


我们的大多数应用程序都必须与数据库,HTTP API,消息代理,SMTP服务器等进行通信,并且使用这些组件来设置真实的测试环境非常复杂。
In some cases, we can simply mock those components or have an in-memory one during test execution. For example, H2 ou HSQLDB are in-memory databases well-known for being used during integration tests. However, they are not the one used in production environment and our tests can seem unrepresentative.
Today, it's possible to use all the power of Docker and set up a connected test environment easily thanks to Testcontainers.
![]()
Testcontainers
Testcontainers allows us to easily manipulate Docker containers during test execution. It uses the Docker client docker-java to communicate with Docker daemon. It works with most operating systems and environments and despite the best-efforts support for Windows, I use it on a daily basis with Docker Toolbox. You can find the matrix compatibility here.
创建容器时,Testcontainers将尝试通过使用以下方式连接到Docker守护程序DOCKER_HOST,DOCKER_TLS_VERIFY和DOCKER_CERT_PATH变量。 例如,可以在JVM中轻松覆盖这些环境变量。
Create a container
Containers are represented with the object GenericContainer. It's possible to create a container from an image, a Dockerfile or from a Dockerfile created on the fly. In addition, it's possible to create containers from a Docker Compose file.
For instance, this is an Elasticsearch server created from the image docker.elastic.co/elasticsearch/elasticsearch:6.1.1.
GenericContainer container = new GenericContainer("docker.elastic.co/elasticsearch/elasticsearch:6.1.1")
   .withEnv("discovery.type", "single-node")
   .withExposedPorts(9200)
   .waitingFor(
      Wait
       .forHttp("/_cat/health?v&pretty")
       .forStatusCode(200)
   );
我们可以看到,使用方法将环境变量提供给容器非常容易withEnv。 在这种情况下,它是变量发现类型有价值单节点。 接下来,我们通过以下方式进行HTTP调用,以确保容器已启动/ _cat /健康 API and having a 200 code response。 There are also other strategies to assert a container is running:
- Wait.forLogMessage waits for a log message,
- Wait.forListeningPort waits for a listening port
- Wait.forHealthcheck enables to use HEALTHCHECK feature from docker.
为了最终确定容器配置,我们的容器公开了内部端口9200,并使用方法明确设置了该端口withExposedPorts。 这意味着Testcontainer会将此容器的端口映射到随机端口。 使用该方法可以检索映射的端口getMappedPort否则我们可以使用方法定义端口绑定setPortBindings。 在这里,我们将端口9200从我们的容器暴露到端口9200:
container.setPortBindings(Arrays.asList("9200:9200"));
而已! 我们的Elasticsearch服务器已准备就绪,可以使用。 要启动它,我们只需要执行start方法:
container.start();
在启动时,Testcontainers将运行一系列检查,例如docker版本或与已注册Docker Registry的连接。 如果您在公司代理后面工作,这可能会阻塞,因此可以通过创建文件来禁用那些检查testcontainers.properties在具有以下内容的测试资源目录中:
check.disable=true
最后,我们可以使用stop方法停止容器。
container.stop();
这将停止容器,并删除附加的卷。 这很棒,因为它可以防止体积悬空。
During Tests
One great strength of Testcontainers is its integration with JUnit framework. In fact, GenericContainer objects are JUnit rules. It means that their lifecycle is directly bound to the test lifecycle. Thereby, by using the @Rule or @ClassRule JUnit annotations, our containers will be initialized before the test start-up and stopped at the end of the tests execution.
@ClassRule
public static GenericContainer redis = new GenericContainer("redis:3.0.2")
               .withExposedPorts(6379);
Nevertheless, it means that Testcontainers will come with a JUnit 4 dependency and it can be annoying if your tests run with JUnit 5. Indeed, JUnit has replaced the Rule concept with Extension. Since the version 1.10.0 released on November 2018, Testcontainers supports now JUnit 5 and it's possible to use extensions with the help of @Testcontainersand @Container annotations from the dedicated library junit-jupiter:
<dependency>
 <groupId>testcontainers</groupId>
 <artifactId>junit-jupiter</artifactId>
 <version>1.10.2</version>
</dependency>
Preconfigured container
像Docker一样,Testcontainers生态系统非常丰富。 您可以找到预配置的容器,例如MySql,PostgreSQL,Oracle数据库,Kafka,Neo4j,Elasticsearch等。
@Rule
public KafkaContainer kafka = new KafkaContainer();
You can browse the list directly from maven repository.
A concrete case
Let's see a concrete example of using Testscontainers with the Spring PetClinic application. It's a demonstrating project based on several Spring components like Spring Boot, Spring MVC and Spring JPA. This application aims at managing a pet clinic with pets, pet owners and vets.
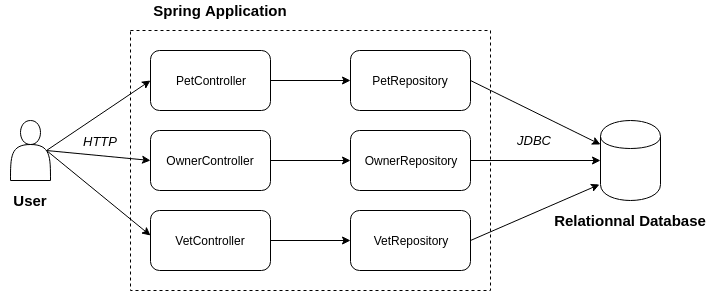
控制器层公开HTTP端点以创建和读取实体。 然后,持久层与关系数据库进行通信。 可以将应用程序配置为与HSQLDB或MySql数据库进行通信。
持久层通过集成测试进行了测试,这些集成测试使用内存中的HSQL数据库,而持久层本身使用MySql数据库。
Requirements
首先,我们必须在要执行测试的机器上安装Docker。 然后,我们需要将Testcontainers依赖项添加到项目中。 在这种情况下,我们只需将以下内容添加到pom.xml文件:
<dependency>
  <groupId>org.testcontainers</groupId>
  <artifactId>testcontainers</artifactId>
  <version>1.10.2</version>
  <scope>test</scope>
</dependency>
Database configuration
默认数据库配置在application.properties文件。
database=hsqldb
spring.datasource.schema=classpath*:db/${database}/schema.sql
spring.datasource.data=classpath*:db/${database}/data.sql
如我们所见,这是一个内存中的HSQLDB数据库,已使用来自schema.sql文件。 然后,在数据库中填充data.sql文件。 这是默认的项目配置。 我们需要创造application-test.properties文件以配置与MySql数据库的连接。
spring.datasource.url=jdbc:mysql://localhost/petclinic
spring.datasource.username=petclinic
spring.datasource.password=petclinic
spring.datasource.driver-class-name=com.mysql.jdbc.Driver
接下来,让我们参加测试课程ClinicServiceTests.java。 此类包含针对持久层的所有集成测试。 首先,我们需要更改Spring测试配置,以确保测试将使用我们的数据库连接。
的@TestPropertySource注解可以加载我们的文件application-test.properties和@AutoConfigureTestDatabase与没有值阻止Spring创建嵌入式数据库。
MySql container
Let's create a MySql database that matches requirements from our tests. In this instance, we use the ability from Testcontainers to create a Docker image from a Dockerfile created on the fly. As a first step, we have pulled a MySql official image from Docker Hub:
现在,我们必须创建数据库和连接的用户。 这是通过使用Docker映像中的环境变量来完成的。
接下来,我们必须创建数据库架构并填充数据库。 从图像文档中,目录/docker-entrypoint-initdb.d在启动时进行扫描,所有带有.sh,.sql等.sql.gz扩展名被执行。 所以,我们只需要把我们的文件schema.sql和data.sql在此目录中。
通过使用withClasspathResourceMapping, 文件schema.sql和data.sql放在容器中的类路径中作为卷。 然后,我们可以将其访问到我们的Dockerfile构建中。 最后一件事,我们必须公开默认的MySql端口:3306。
Unfortunately, we can't directly set port bindings with the method setPortBindings. We have to customize the container on creation with the method withCreateContainerCmdModifier. Finally, we are waiting for the listening port to ensure that our container is up.
Voilà! With few lines of code, we have easily set a MySql database for our tests without having to manage the container lifecycle. The @ClassRule annotation makes our container starting once for all the tests. You might be wondering: have we extend the test execution time? In fact, it only takes 907 ms with a Docker container against 860 ms with a HSQLDB in-memory database. The source code shown in this section is available on github.
一种 big thanks to Sonyth, Sebastien, Laurent, Louis and Nicolas for their time and proofreading.


 1806
1806


 被折叠的 条评论
为什么被折叠?
被折叠的 条评论
为什么被折叠?
 到【灌水乐园】发言


