


The GWT context 💎
GWT是强大的工具,但有时这种力量可能会被视为复杂性。
大号ong unnecessary explanation here, if you just want to start with GWT jump to the guide itself.
我认为这种复杂性可以分为两个原因: 1.大型项目很复杂,而当您尝试解释如何解决复杂的情况时,说明本身就是复杂的。 2. GWT具有庞大的生态系统,每个问题都有不同的解决方案。 这迫使您做出复杂的决定。
但,我们怎么到达那里?
GWT诞生于2006年,此后网络生态系统的发展一直令人赞叹,即使在GWT内部,也发生了许多变化,替代方案,并且第三方创建了惊人的解决方案来管理大型客户端Web APP。
From 2006 to 2012 GWT was actually called "Google Web Toolkit", and it was an all-in-one solution. But since June 2012, Google handed control to the steering committee and rename the project as "GWT". Since then, GWT has been evolving into a more open tool and most of the architectural solutions embedded into GWT itself, have been overcome by third-party alternatives. Nowadays, the number of solutions is enormous, and at this point, GWT is really just the core, and it is not biased in how you should organize your code. So, GWT is no longer a web toolkit, no longer client-side framework, it is just a transpiler with a giant ecosystem around it.
For example, nowadays if you want to choose a client architectural pattern, you must choose between gwt-activities, gwtp, errai, react4j, vue-gwt, nalu, and more! or if you are looking for a transport layer you should choose between gwt-rpc, request-factory, resty-gwt, gwtp-rest-dispatch, autorest, and more!
所有这些复杂性(仅对于拥有经验丰富的Java团队的大型项目才是合理的)以及所有这些替代体系结构解决方案(这实际上是一件好事),这使从GWT开始变得有些混乱。
说了这么多我什么时候应该使用GWT?我认为,只有在满足这两点的情况下,才应在公司项目中使用GWT。
- you have a senior Java team that already know Java and Web development (HTML5, CSS3, ES6). To develop with GWT you must know browsers, you don't need to be a JavaScript expert, but you need to know a lot around the web world (MDN is your friend).
- you must want to share Java logic, libs, and tools that you are already using in Java (servers or Android) with the client-side or even iOS with J2ObjC). This is the whole point with GWT, sharing code between platforms. This is useful and it solves a logic-duplication, e.g. whenever you edit a field, you frequently validate with some rules, but then this is sent to the server and should be validated again. This simple but extremely common use case is beautifully solved with GWT. You write your validator code, and you use it exactly the same validation code on all platforms, giving you the responsiveness in the client side and also the security of the server side (cross-platform example).
如果您已经在GWT方面拥有多年的经验,则可以将其用于很多事情,甚至小型APP。 但是为了证明进入工作的合理性,您应该满足这两点。 但是,!! 在进行公司项目之前,您可以从中学到乐趣,并希望您在这里!
The starting guide ☝️
为了使本指南更容易理解,我将专注于客户端。 另外,我将做出一些我认为很普遍且可以面向未来的个人决定。 但是请记住,GWT远不止我在这里解释! 这是我选择的:
-
create a micro client-only APP, so no transport and no view components. Frequently guides start with a client-server app, it is much more complex and when you start with GWT you tend to confuse/mix the client and server sides as just one unique magic virtual machine. Although everything is java, and you can run the same java code in the client or in the server, both are independent runtime environments and this concept should be clear.
Also, if you create a client only APP the guide gets much smaller, and you can play with it easier. Even more, I strongly encourage to find micro-games or micro-apps written in JS or TypeScript and migrate it to GWT. This is a pretty good exercise to get used to GWT (this is, for example, a snake game I migrated from a JS project rxsnake-gwt).
it is managed with Maven, no IDE or plugin required, just
java+maven. I'll use IntelliJ IDEA. We are not going to use any plugin, IntelliJ Ultimate has GWT support, Eclipse has a super nice plugin, but I personally prefer not to depend on any of that. Also, the problem with those plugins is that the project configuration (classpath mostly) is not easy to keep it exactly the same in the terminal or CI Vs the IDE plugin. So with this solution, Maven solution, you will be able to run, test and package your GWT in the same way in all those environments. IMO Maven is currently the easier strategy to compile GWT.java 8, GWT already support Java 11, but it will be easier to make it work with Java 8 (which is still the most used version), so to keep it simple, please use JDK 8.
1. Maven basic archetype 💩
First, we create a minimal maven project. You might follow this guide or execute this command if you have maven already installed.
› mvn archetype:generate \
    -DarchetypeRepository=https://repo.maven.apache.org/maven2 \
    -DarchetypeGroupId=org.apache.maven.archetypes \
    -DarchetypeArtifactId=maven-archetype-quickstart \
    -DarchetypeVersion=1.4 -DinteractiveMode=false \
    -DgroupId=me -DartifactId=hello-app -Dversion=HEAD-SNAPSHOT
希望您对Maven有所了解。 但是,如果没有,请注意,您可以使用以下命令编译,测试和打包应用程序mvn验证。 立即运行! 😉
You can now open the created project in IntelliJ, just click open and go to the folder. IntelliJ detect maven automatically, and it will use the maven configurations to configure your project. I have reformated and removed comments, and also change the target/source java version to 1.8. Whenever you change something IntelliJ will ask you to "import changes", click it to update the project configuration. This is how it should look like: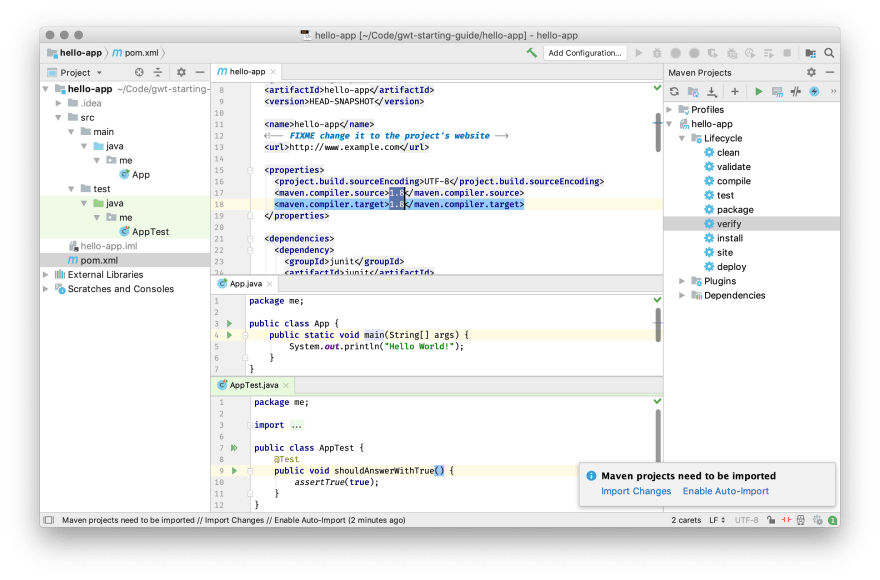
Try again the mvn verify but this time use the IntelliJ maven menu. If you have various JDK installed, IntelliJ might be using the last one. In that case, and if you find any problem, configure JDK 8 for your project.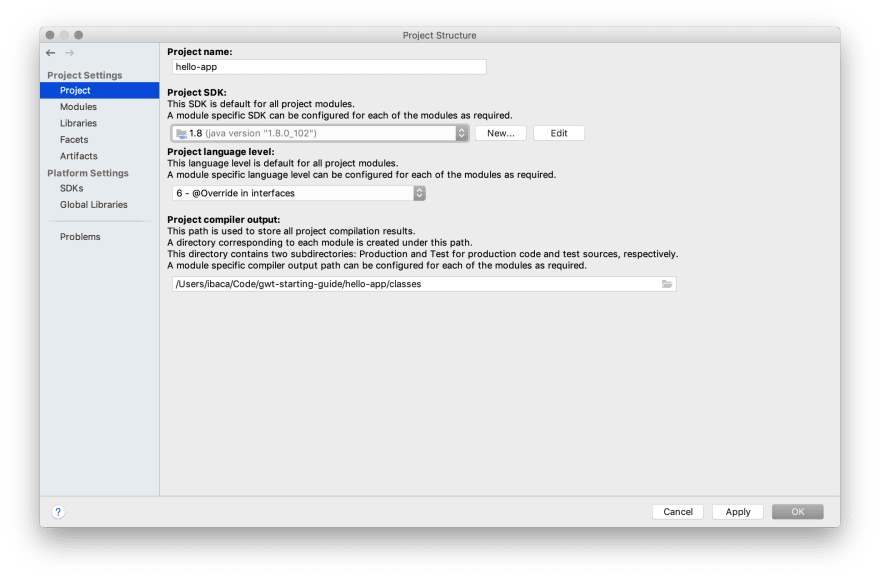
我以这种方式开始,是因为我想指出GWT项目使用了整个Java生态系统,并且使用了类似的模式,但适用于前端开发。
2. GWTify it 🌈
首先,修改pom.xml添加GWT依赖项和GWT Maven插件,这些插件将添加一些有用的目标来编译和运行GWT。 将此添加到依赖项部分:
<dependency>
  <groupId>com.google.gwt</groupId>
  <artifactId>gwt-user</artifactId>
  <version>2.8.2</version>
</dependency>
<dependency>
  <groupId>com.google.gwt</groupId>
  <artifactId>gwt-dev</artifactId>
  <version>2.8.2</version>
</dependency>
这些是最小的GWT依赖性。 的gwt-用户包含客户端Java实用程序,例如入口点在GWT中用作静态void main(args)等价(稍后会详细介绍)。 和gwt-dev包含编译器和其他开发工具的要求。
然后,您需要配置GWT插件并将项目定义为gwt-app。 将此添加到构建部分:
<plugins>
  <plugin>
    <groupId>net.ltgt.gwt.maven</groupId>
    <artifactId>gwt-maven-plugin</artifactId>
    <version>1.0-rc-10</version>
    <extensions>true</extensions>
    <configuration>
      <moduleName>me.App</moduleName>
      <skipModule>true</skipModule>
    </configuration>
  </plugin>
</plugins>
在开始的时候artifactId和版元素:
<packaging>gwt-app</packaging>
这将扩展Maven,将GWT特定的执行添加到Maven生命周期。 因此,例如,添加后如果再次运行mvn包您会注意到有很多新的步骤,最重要的步骤是运行GWT编译器的步骤,包括我们的项目源代码并输出最终的JS。 请注意,由于我们尚未更新Java源代码,因此目前无法正常工作! 有2个配置,moduleName指向主要gwt.xml文件(稍后说明)并skipModule用于避免该插件产生一个不错但有点“神奇”的实用程序,该实用程序会生成gwt.xml文件,现在,我希望在下一步中手动创建它,因此我只是将插件设置为不为我生成此文件。
更新IntelliJ项目,以便下载依赖项并将其添加到项目类路径。
现在,我们将更新当前应用程式在JVM中运行以使其在客户端运行的类。 使应用程式实施com.google.gwt.core.client.EntryPoint, 去除静态主方法和实现onModuleLoad用等效的代码。 简单吧? 差不多,主要对于JVM和onModuleLoad对于GWT。 您的课程内容应为:
package me.client;

import com.google.gwt.core.client.EntryPoint;
import com.google.gwt.dom.client.Document;
import com.google.gwt.dom.client.Text;
import com.google.gwt.user.client.ui.RootPanel;

public class App implements EntryPoint {

    @Override
    public void onModuleLoad() {
        Text textNode = Document.get().createTextNode("Hello World!");
        RootPanel.getBodyElement().appendChild(textNode);
    }
}
我认为代码是不言自明的,但是……是的,getBodyElement返回身体网页的内容,因此我们可以添加你好,世界!并在我们的页面中查看。
关于应用程式上课,将其移入客户 package (probably your IDE has already complained about that if you have copy&pasted the previous code). This makes it a bit easier. Note that GWT apps are all about sharing code,so you probably end up with a 服务器,共享和客户 packages in your project. And although this is a minimal 客户 only example,we will follow this convention,so move it至the 客户软件包(警告:如果您使用的是IntelliJ,则可以更改pom.xml<moduleName>从me.应用程式至me.客户.应用程式移动后应用程式.java至the 客户 package,but it should be me.应用程式 so check it out,sometimes IntelliJ is too smart).
接下来,创建gwt.xml文件名为App.gwt.xml(在我包装,不在客户).Thisna我shouldmatchthepackageandna我thatwehaveconfiguredinthegwt-maven-pluginmoduleNa我configuration.Createthefilewiththiscontent:
<module>
  <inherits name="com.google.gwt.user.User"/>
  <entry-point class="me.client.App"/>
  <!--<source path="client"/>-->
  <!--<public path="public"/>-->
</module>
This file is called a GWŤ module file. It is required so the GWT compiler knows which sources should be compiled, i.e. GWT does NOT compile everything that is in the classpath, it only compiles the sources indicated in the source tag. It is commented because the module adds those 2 lines implicitly. The source path="client" indicates that all java classes inside the package {module-package}.client will be included, and this is why we have moved App inside the client package. The inherits module is a dependency, this module depends on the gwt.user.User module and User source will depend on other modules recursively. The second line entry-point specify an entry point. So when the GWT final compilation is loaded in the web page, those entry points will be called. This is the onModuleLoad that we have created in the App class. This is the equivalent to the Main-Class manifest property for a jar file.
最后,创建一个index.html归档在我包含以下内容的软件包:
<!DOCTYPE html>
<meta http-equiv="Content-Type" content="text/html; charset=UTF-8">
<title>GWT • Hello App</title>
<script type="text/javascript" src="me.App.nocache.js"></script>
The first 2 lines is a "strong" recomendation. Title just optional, and the unique actual interesting line is the script. This will bootstrap the GWT transpiled code, and after some steps, it will end up calling your onModuleLoad entry point! yeah! As you can see, the name of the file is {moduleName}.nocache.js. The nocache is just an easy convention in GWT, the compiler generates various files, and some of them contain .nocache. and others contains .cache.. Files with .nocache. should NEVER be cached and .cache. can be cached FOREVER. This makes trivial to add filters to the server to add cache headers, this is called GWŤ perfect caching™.
注意,这个上市 / index.html是在GWT模块文件中配置的实用程序,但与<source path="client"/>约定,所有模块都包含一个隐式<上市 path="上市"/>线。 而且,GWT编译器将从所有模块复制所有内容上市最终编译器输出的路径。 但是,我的建议是您尽量减少添加上市 folders. GWT has a lot of option to add managed-resources in your project, the 上市 folder is just a drop-in that GWT copy blindly. I don't want to lose you here with explanations, but, believe me, if you add too many things into a 上市文件夹,它可能被认为是代码气味。 到那时,寻求帮助(在本文结尾,我将解释在哪里寻求帮助的最佳位置)。
3. Package, Run and Debug 🔥
GWT将代码转换为JS,并查看结果,您需要在浏览器中将其打开。 但是首先,您需要编译和打包项目。 跑:
mvn package
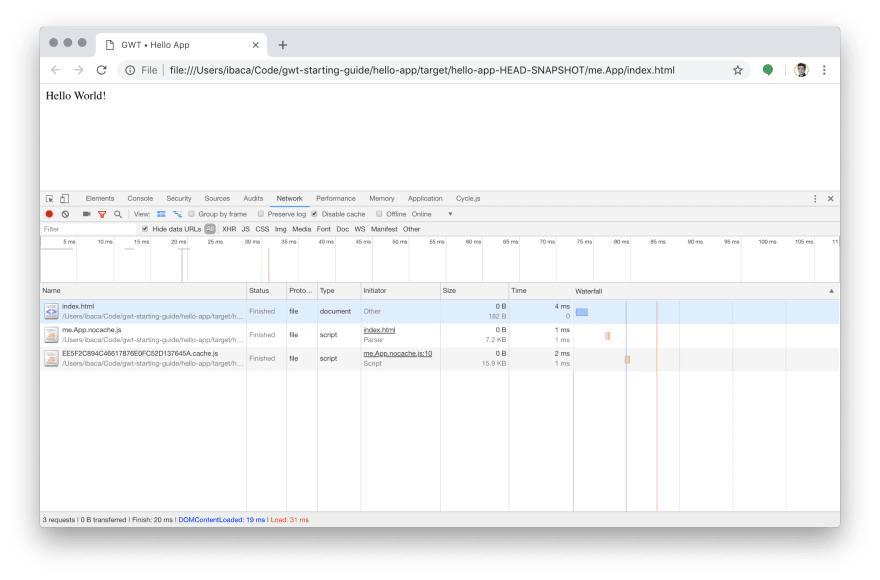
这将生成所需的文件,并将其放在项目目标文件夹中。 然后,成功后,打开结果,在mac中,您可以使用打开目标/ hello-app-HEAD-SNAPSHOT / me.App / index.html在终端。 否则,请在浏览器中打开该文件或将其拖到浏览器窗口中。 你应该看到你好,世界!在您的浏览器中。
这是怎么回事 的index.html在我 folder is the one that we have written previously在the 上市包。 因此,这实际上不是GWT生成的,而是从我们上市资源。 该文件指向我.nocache.js that are placed在the same folder by the GWT compiler. This file is the GWT bootstrapper. It is responsible for choosing the final client permutation. It is called permutation because GWT define a special type of compile property that can be used to choose between different "implementations", and it can use it to generate a specific final compilation results for all possible combination of all those properties, each of this combinations is called 排列(例如铬+ is 排列 for the browser chrome and language Spanish).
如果您能够看到你好,世界!这意味着所有这些步骤均已成功完成。 建议您在浏览器中打开开发工具控制台,然后检查网络面板,可以看到浏览器已加载无缓存文件,然后加载一个奇怪的{hash} .快取.js文件是实际排列。 您可以尝试使用另一个浏览器来查看此排列文件是否不同,因为默认情况下,GWT将为每个浏览器生成特定的排列。 这是可配置的,但在本指南中将省略它。 在版本之间,应检查的唯一文件是无缓存,因为如果发生更改,它将指向新的哈希文件(这就是为什么快取 files can be 快取d forever).
很好,但是如果您需要调试或重新加载少量更改,就不是很好。 在开发过程中,您将使用一种特殊的GWT功能,称为代码服务器。 的代码服务器是一台可以即时编译和提供代码的服务器。 您可以运行代码服务器使用mvn gwt:代码服务器,但在这种情况下,我们将使用目标mvn gwt:开发模式。 好的,抱歉,这有点令人困惑,但这将运行2台服务器,代码服务器和另一个码头只是为了打开index.html. I don't want to explain this, because it is a bit confusing and requires a long explanation. But for now, just keep in mind that what we really want and what we are使用is the 代码服务器,我们使用开发模式只能打开index.html(所有这些将在以后的有关服务器端的教程中变得更加有意义)。 所以,请运行mvn gwt:开发模式。 在IntelliJ中,您只需双击gwt:开发模式Maven面板中的目标,超级方便!
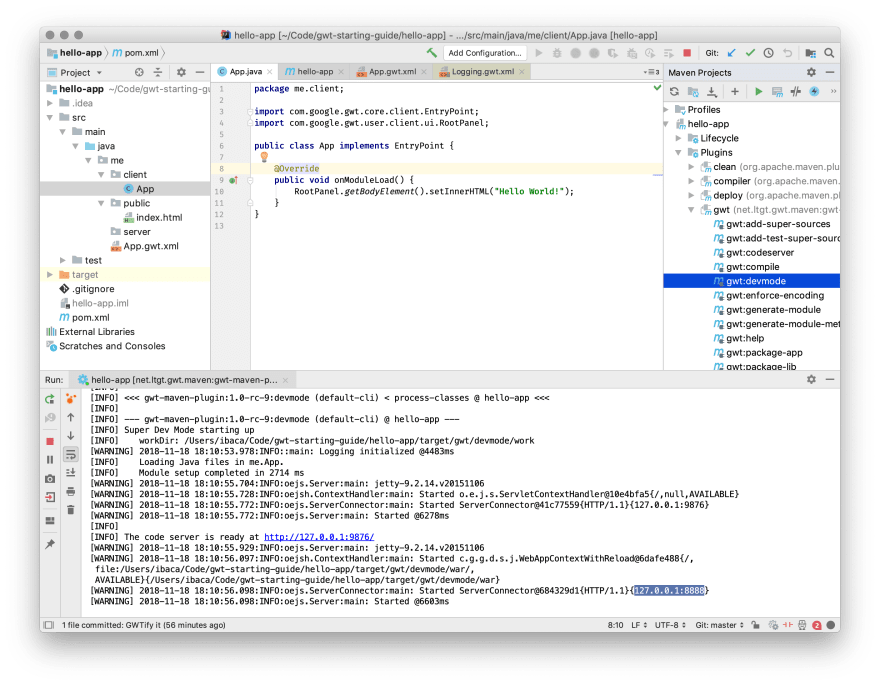
如果您仔细检查日志,则可以看到两个服务器,代码服务器在端口9876和第二个码头服务器在8888。代码服务器。 在浏览器中打开它。 现在,仅检查第二点(那里有模块列表),您会看到我模块。 希望你看到它! 然后,在端口8888上打开另一个服务器(两个都可以像本地主机:9876要么本地主机:8888在任何浏览器中)。 当您打开码头服务器时,您将看到您的模块目录,单击我/打开该文件夹。 最终将打开我们的index.html,那么它将获取我.nocache.js文件,但这一次(这有点开发模式魔术)它将使用特殊的nocache.js文件,它将检测排列并与代码服务器, compile the code on the fly and sent the permutation plus source codes to your browser. During a few seconds, you should notice a "Compiling 我" dialog that will disappear on success. You can change the 你好,世界讯息,例如 去除世界部分,然后重新加载页面。 这将再次触发编译。 这是标准的开发生命周期,进行编辑和重新加载。
现在,我将要求您转到chrome。 您可以在任何浏览器中执行此操作,但是使用一个特定的浏览器更容易解释。 转到开发工具然后打开资料来源标签。 现在找到资源(快捷键ctr + p或cmd + p)并编写应用程式找到我们的切入点类。 您应该在浏览器中看到Java文件,这是因为代码服务器自动生成JS源映射,chrome解析该映射的Java源并将其显示在开发工具。 点击RootPanel.getBodyElement要添加断点的行号,它应该变成蓝色,表示活动的断点。 然后,重新加载页面。 如果正确完成,调试器应在该行停止,您将看到类似以下内容:
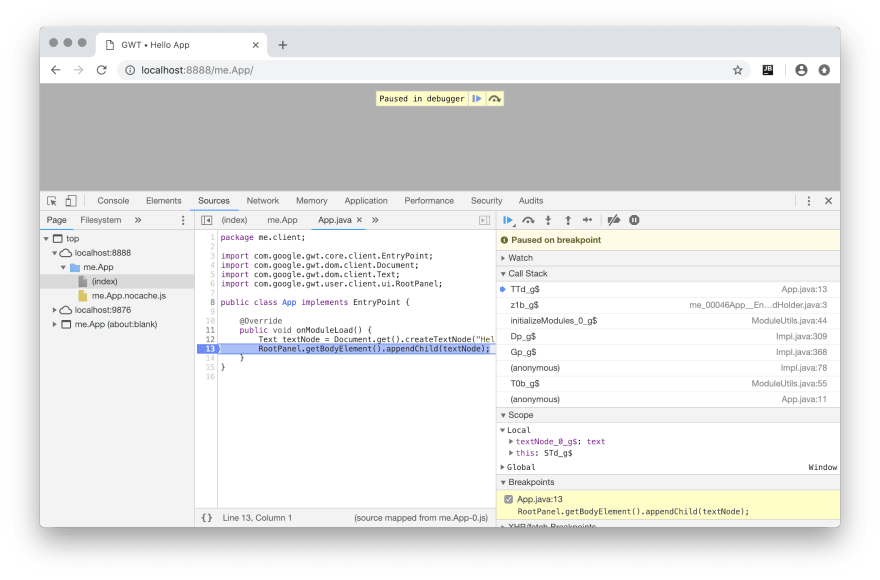
这就是调试GWT代码所需的全部。 但是,请注意,您可以使用纯Java编写很多代码,尤其是在避免UI最终层的情况下,此代码对于在JVM中运行或使用JUnit进行测试来说是微不足道的。 GWT就是关于共享和使用Java工具的全部内容,因此,如果您正在开发诸如空间索引之类的工具,那么使用纯Java对其进行测试,运行和调试将更加容易和快捷。 然后在客户端使用它。
4. Spice it up 🌮
这就是个人风格变得疯狂的地方。 现在,我将说明如何添加2个库,“纯” JS库(Elemental2)和“纯” Java库(RxJava)。 我选择了这两个库作为极端的相反案例。 使用“纯” JS库,您应该了解如何在GWT中访问本机JS代码以及它多么简单轻巧。 使用“纯” Java库,您将看到在GWT中可以在浏览器中使用经典的纯Java库。 但是,我们不会直接依赖于这两个库,而是将使用以下依赖关系图:
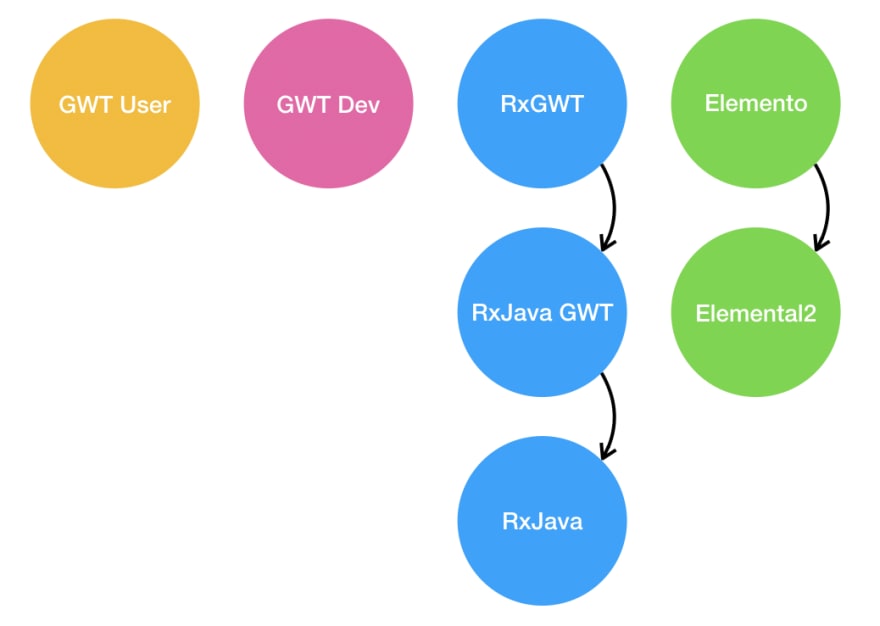
Ëlemental2 is a Google library that exposes the whole Browser API in Java. The unique minor problem with this library is that in some cases the API is not javaish enough, specifically, events and element creation requires casts which is not common in the Java world. So, although we will use this library behind scenes, we are going to depend directly on a super small RedHat library called Ëlemento that add those missing parts. This library is a handcrafted API for elements and events, a beautiful library that gives us the power of JS with the type-safety of Java.
[RxGWT is a set of utilities to use RxJava in GWT, i.e. same as RxAndroid but for GWT. RxGWT depends on [RxJava GWT, a thin GWT adapter library over RxJava. Yep, ok, you cannot depend directly on RxJava, but if you go to the repo you will see that there are just a few minor changes and configurations to make it work in GWT, almost 98% of the actual RxJava source-code is the same.
记住我的建议; 这两个库的想法是您可以找到JS + RxJS项目并迁移到Java + RxJava使用您的Java知识使用GWT! 这是习惯GWT的绝妙方式,并且有很多有趣的微型反应式项目可以改进!
要添加此依赖项,请更新pom.xml与:
<?xml version="1.0" encoding="UTF-8"?>
<project xmlns="http://maven.apache.org/POM/4.0.0" xmlns:xsi="http://www.w3.org/2001/XMLSchema-instance"
         xsi:schemaLocation="http://maven.apache.org/POM/4.0.0 http://maven.apache.org/xsd/maven-4.0.0.xsd">
  <modelVersion>4.0.0</modelVersion>

  <groupId>me</groupId>
  <artifactId>hello-app</artifactId>
  <version>HEAD-SNAPSHOT</version>
  <packaging>gwt-app</packaging>

  <name>hello-app</name>

  <properties>
    <project.build.sourceEncoding>UTF-8</project.build.sourceEncoding>
    <maven.compiler.source>1.8</maven.compiler.source>
    <maven.compiler.target>1.8</maven.compiler.target>
  </properties>

  <dependencyManagement>
    <dependencies>
      <dependency>
        <groupId>com.google.gwt</groupId>
        <artifactId>gwt</artifactId>
        <version>2.8.2-rx1</version>
        <type>pom</type>
        <scope>import</scope>
      </dependency>
    </dependencies>
  </dependencyManagement>

  <dependencies>
    <dependency>
      <groupId>com.google.gwt</groupId>
      <artifactId>gwt-user</artifactId>
    </dependency>
    <dependency>
      <groupId>com.google.gwt</groupId>
      <artifactId>gwt-dev</artifactId>
    </dependency>
    <dependency>
      <groupId>org.jboss.gwt.elemento</groupId>
      <artifactId>elemento-core</artifactId>
      <version>0.9.1-gwt2</version>
    </dependency>
    <dependency>
      <groupId>com.intendia.gwt.rxgwt2</groupId>
      <artifactId>rxgwt</artifactId>
      <version>2.2</version>
    </dependency>
    <dependency>
      <groupId>com.intendia.gwt</groupId>
      <artifactId>rxjava2-gwt</artifactId>
      <version>2.2.10-gwt1</version>
    </dependency>
    <dependency>
      <groupId>junit</groupId>
      <artifactId>junit</artifactId>
      <version>4.11</version>
      <scope>test</scope>
    </dependency>
  </dependencies>

  <build>
    <plugins>
      <plugin>
        <groupId>net.ltgt.gwt.maven</groupId>
        <artifactId>gwt-maven-plugin</artifactId>
        <version>1.0-rc-10</version>
        <extensions>true</extensions>
        <configuration>
          <moduleName>me.App</moduleName>
          <skipModule>true</skipModule>
        </configuration>
      </plugin>
    </plugins>
    <pluginManagement>
      <plugins>
        <plugin>
          <artifactId>maven-compiler-plugin</artifactId>
          <version>3.8.0</version>
        </plugin>
      </plugins>
    </pluginManagement>
  </build>

  <repositories>
    <repository>
      <id>rxjava-gwt-repo</id>
      <url>https://raw.githubusercontent.com/intendia-oss/rxjava-gwt/mvn-repo/</url>
    </repository>
  </repositories>
</project>
我们添加了一个特殊的类型依赖绒球和范围进口叫物料清单。 这是一个实用程序依赖项,它断言在物料清单将是在物料清单本身。 这很有用,因为我们最终可以得到各种gwt-xxx具有各种版本的库,这可能是一个问题,所以这物料清单断言所有GWT核心依赖项都处于同一版本。
我们添加了3个新的显式依赖项,元素核,rxgwt和rxjava-gwt。
最后,我们添加了rxjava-gwt-repo。 如果您回到物料清单您会看到我们正在使用版本2.8.2-RX1。 这是在合理的时间内编译项目所必需的。 与官方的GWT 2.8.2版本相比,此版本是自定义版本,源代码更改为零,但内部Eclipse ECJ编译器已更新。 这修复了一个错误,该错误使RxJava的编译速度极慢,因此在发布下一个GWT之前,如果要使用RxJava,则需要使用该版本。 GWT头快照已经包含修复BTW!
然后,去你的App.gwt.xml模块文件并添加以下2个依赖项:
<inherits name="com.intendia.rxgwt2.RxElemento"/>
<inherits name="org.jboss.gwt.elemento.Core"/>
如果您还有gwt:devmode运行您将需要重新启动。 有新的Maven依赖项,并且由于这些依赖项应添加到类路径中,因此您将不得不重新启动它。 只需几秒钟,所以没有问题。 停止并运行mvn gwt:devmode再次。 打开本地主机:8888去应用程式并检查您是否仍然看到你好,世界!在您的浏览器中。
现在,更新内容App.java与:
package me.client;

import com.google.gwt.core.client.EntryPoint;
import org.jboss.gwt.elemento.core.Elements;

public class App implements EntryPoint {

    @Override
    public void onModuleLoad() {
        Elements.body().add("Hello World!");
    }
}
太酷了,这不那么冗长。元素是一个元素实用程序,它包含所有这些用户友好的类型安全元素API。 大多数类型的元素方法返回的构建器是实际包装器元素2类型。 您可以提取元素2打字得到()。 那时,您几乎可以直接访问浏览器API。 GWT会将Java源代码转换为JS,但是像这样的一行代码DomGlobal.document.body.background =“红色”;将被翻译成document.bod.background ='红色';, 差不多一样。小费:浏览元素2源代码是学习如何在Java GWT中映射本机API的好策略。
现在我们要申请RxJava的,更新内容App.java至:
package me.client;

import com.google.gwt.core.client.EntryPoint;
import com.intendia.rxgwt2.elemento.RxElemento;
import elemental2.dom.HTMLElement;
import org.jboss.gwt.elemento.core.Elements;

import static elemental2.dom.DomGlobal.document;
import static org.jboss.gwt.elemento.core.EventType.mousemove;

public class App implements EntryPoint {

    @Override
    public void onModuleLoad() {
        HTMLElement el = Elements.span().style("font-weight: bold;").get();
        Elements.body().add("mouse position: ").add(el);
        RxElemento.fromEvent(document, mousemove)
                .subscribe(ev -> el.textContent = ev.clientX + ", " + ev.clientY);
    }
}
哦! 的你好,世界消息已被删除😅! 我们添加了一个跨度和一个事件监听器鼠标移动页面中的事件文献。 这是一个非常简单的代码,但是有很多不错的东西!Elements.跨度()是一个元素生成器,看看使用其流畅的API设置样式和获取元素有多么容易。HTMLElement是一个元素2类型,几乎就像直接使用浏览器API一样。RxElemento.fromEvent是一个RxGWT结合了元素类型安全事件RxJava的。 这是实际的类型可观察的<MouseEvent>由...返回fromEvent, i.e. it是一个可观察的具体事件类型。 此可观察对象将在每个订阅上添加一个新的事件侦听器,并在取消订阅时将其删除。 最后一行是实际的订阅,它将更新埃尔 跨度 埃尔ement with the mouse client coordinates.
在这个微型示例中,我们将混合一个纯Java库以使用浏览器本地API来订阅和编写事件。 它是如此简单,不足为奇,但是如果您考虑一下,它就非常强大而且功能强大🤯! 实际上,如果您是一名Android开发人员,并且在UI,MVP,Dagger,RxJava和所有用于管理UI状态的奇特的东西上都有丰富的经验? 然后,这应该是您开始应用所有这些知识来创建基于Web的UI应用程序的起点!
Conclusion 👋
只是开个玩笑,一点也没有结论,只有一些关于您应该从这里出发的提示。 希望你喜欢。 GWT是一款超级强大的编译器。 我们甚至还没有讨论过它如何管理资源(JS,CSS,HTML,翻译,图像等)并将其全部嵌入到一个JS文件中。 它是巨大的,但是即使忽略了所有这些额外的实用程序,就像一个“简单”的编译器一样,它对于想要编写浏览器代码的所有Java专家来说也绰绰有余。
如果您喜欢此介绍,我将尝试制作一些客户端-服务器教程。 我确实认为,仅客户端APP是最好的起点,但是,人们喜欢用相同语言编写客户端和服务器的想法,并且几乎所有使用GWT的人都出于这个目标而使用它。 但是,当然,本教程也将是一个颇有偏见的教程。
There is a project to start with GWT using a spring boot approach. I personally prefer a manual approach as explained in this guide because the spring boot approach adds many dependencies and make you feel a bit like you have loose control. But if you like it, then you will love this project gwt-boot-samples and it is even easier to start with. Anyway, this project has various modern popular solutions, so even if you don't use the dependencies itself, you can get inspired and configure it manually.
最后,我对寻求帮助:
- stackoverflow gwt - pretty obvious, but yep, the best place to standard problems
- gitter gwt - gitter chat, this is pretty active, if you have no idea or have a quick question this is the best place
- groups gwt here there are a lot of old questions, also there are various specific groups for contributors, steering committee, various classic GWT libs, and more
Those 3 places should be enough. But, if you want to find more things, maybe some surprise, then go to awesome gwt where there are an infinite list of useful GWT resources, tutorial, libs, videos, blogs, and more!


 3万+
3万+


 被折叠的 条评论
为什么被折叠?
被折叠的 条评论
为什么被折叠?
 到【灌水乐园】发言


