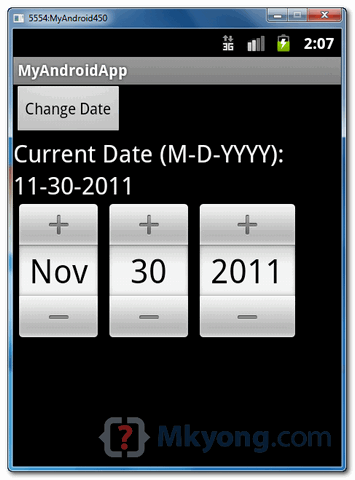
在Android中,您可以使用“ android.widget.DatePicker ”类来呈现日期选择器组件,以在预定义的用户界面中选择日,月和年。
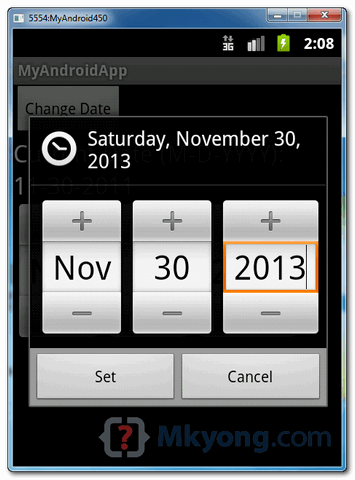
在本教程中,我们向您展示如何通过android.widget.DatePicker在当前页面中以及在通过android.app.DatePickerDialog在对话框中呈现日期选择器组件。 此外,我们还向您展示了如何在日期选择器组件中设置日期。
PS此项目在Eclipse 3.7中开发,并通过Android 2.3.3进行了测试。
1. DatePicker
打开“ res / layout / main.xml ”文件,添加日期选择器,标签和按钮进行演示。
文件:res / layout / main.xml
<?xml version="1.0" encoding="utf-8"?>
<LinearLayout xmlns:android="http://schemas.android.com/apk/res/android"
    android:layout_width="fill_parent"
    android:layout_height="fill_parent"
    android:orientation="vertical" >

    <Button
        android:id="@+id/btnChangeDate"
        android:layout_width="wrap_content"
        android:layout_height="wrap_content"
        android:text="Change Date" />

    <TextView
        android:id="@+id/lblDate"
        android:layout_width="wrap_content"
        android:layout_height="wrap_content"
        android:text="Current Date (M-D-YYYY): "
        android:textAppearance="?android:attr/textAppearanceLarge" />

    <TextView
        android:id="@+id/tvDate"
        android:layout_width="wrap_content"
        android:layout_height="wrap_content"
        android:text=""
        android:textAppearance="?android:attr/textAppearanceLarge" />

    <DatePicker
        android:id="@+id/dpResult"
        android:layout_width="wrap_content"
        android:layout_height="wrap_content" />

</LinearLayout>
PS“ DatePickerDialog ”是用代码而不是XML声明的。
2.代码代码
阅读代码的注释,它应该是不言自明的。
文件:MyAndroidAppActivity.java
package com.mkyong.android;

import java.util.Calendar;
import android.app.Activity;
import android.app.DatePickerDialog;
import android.app.Dialog;
import android.os.Bundle;
import android.view.View;
import android.view.View.OnClickListener;
import android.widget.Button;
import android.widget.DatePicker;
import android.widget.TextView;

public class MyAndroidAppActivity extends Activity {

	private TextView tvDisplayDate;
	private DatePicker dpResult;
	private Button btnChangeDate;

	private int year;
	private int month;
	private int day;

	static final int DATE_DIALOG_ID = 999;

	@Override
	public void onCreate(Bundle savedInstanceState) {
		super.onCreate(savedInstanceState);
		setContentView(R.layout.main);

		setCurrentDateOnView();
		addListenerOnButton();

	}

	// display current date
	public void setCurrentDateOnView() {

		tvDisplayDate = (TextView) findViewById(R.id.tvDate);
		dpResult = (DatePicker) findViewById(R.id.dpResult);

		final Calendar c = Calendar.getInstance();
		year = c.get(Calendar.YEAR);
		month = c.get(Calendar.MONTH);
		day = c.get(Calendar.DAY_OF_MONTH);

		// set current date into textview
		tvDisplayDate.setText(new StringBuilder()
			// Month is 0 based, just add 1
			.append(month + 1).append("-").append(day).append("-")
			.append(year).append(" "));

		// set current date into datepicker
		dpResult.init(year, month, day, null);

	}

	public void addListenerOnButton() {

		btnChangeDate = (Button) findViewById(R.id.btnChangeDate);

		btnChangeDate.setOnClickListener(new OnClickListener() {

			@Override
			public void onClick(View v) {

				showDialog(DATE_DIALOG_ID);

			}

		});

	}

	@Override
	protected Dialog onCreateDialog(int id) {
		switch (id) {
		case DATE_DIALOG_ID:
		   // set date picker as current date
		   return new DatePickerDialog(this, datePickerListener,
                         year, month,day);
		}
		return null;
	}

	private DatePickerDialog.OnDateSetListener datePickerListener
                = new DatePickerDialog.OnDateSetListener() {

		// when dialog box is closed, below method will be called.
		public void onDateSet(DatePicker view, int selectedYear,
				int selectedMonth, int selectedDay) {
			year = selectedYear;
			month = selectedMonth;
			day = selectedDay;

			// set selected date into textview
			tvDisplayDate.setText(new StringBuilder().append(month + 1)
			   .append("-").append(day).append("-").append(year)
			   .append(" "));

			// set selected date into datepicker also
			dpResult.init(year, month, day, null);

		}
	};

}
PS上面的“ DatePickerDialog”示例是从Google Android日期选择器示例中引用的 ,但有一些小的更改。
3.演示
运行应用程序。
1.结果将“日期选择器”和“文本视图”设置为当前日期。

2.单击“更改日期”按钮,它将通过DatePickerDialog在对话框中提示日期选择器组件。

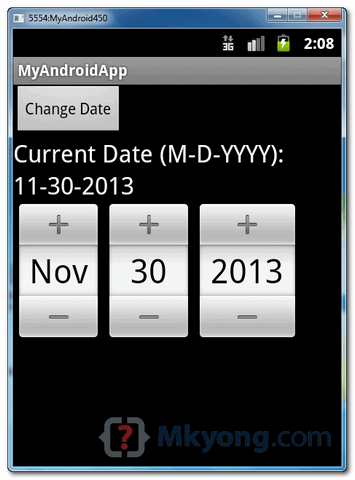
3.“日期选择器”和“文本视图”都用选定的日期更新。

下载源代码
下载它– Android-DatePicker-Example.zip (16 KB)
参考文献
翻译自: https://mkyong.com/android/android-date-picker-example/


 本文档介绍了如何在Android应用中使用DatePicker组件。内容包括在布局文件中添加DatePicker,通过DatePickerDialog在对话框中显示日期选择器,以及设置和获取所选日期的方法。还提供了源代码下载链接供参考。


 379
379

 被折叠的 条评论
为什么被折叠?


