在Android中, RelativeLayout可让您根据附近(相对或同级)组件的位置来放置组件。 这是最灵活的布局,可让您将组件放置在所需的任何位置(如果您知道如何“相对”放置)。
在RelativeLayout ,可以使用“ 上 , 下 , 左 , 右 ”来排列组件位置,例如,在“ button2”下显示“ button1”,或在“ button1”的右边显示“ button3”。
注意
RelativeLayout非常灵活,但是很难掌握。 建议您使用Eclipse IDE拖动组件,然后查看研究Eclipse生成的XML布局代码,以了解如何编写“相对”组件。
在本教程中,我们向您展示如何通过“ RelativeLayout ”来排列/定位button , textview和editbox 。
PS此项目在Eclipse 3.7中开发,并通过Android 2.3.3进行了测试。
1. RelativeLayout
打开“ res / layout / main.xml ”文件,添加组件并通过“ RelativeLayout ” 放置它。 阅读下面的XML代码,它很冗长,可以告诉您组件的显示位置。
文件:res / layout / main.xml
<?xml version="1.0" encoding="utf-8"?>
<RelativeLayout xmlns:android="http://schemas.android.com/apk/res/android"
    android:layout_width="fill_parent"
    android:layout_height="fill_parent" >

    <Button
        android:id="@+id/btnButton1"
        android:layout_width="wrap_content"
        android:layout_height="wrap_content"
        android:text="Button 1"/>

    <Button
        android:id="@+id/btnButton2"
        android:layout_width="wrap_content"
        android:layout_height="wrap_content"
        android:text="Button 2"
        android:layout_toRightOf="@+id/btnButton1"/>

     <Button
        android:id="@+id/btnButton3"
        android:layout_width="wrap_content"
        android:layout_height="wrap_content"
        android:text="Button 3"
        android:layout_below="@+id/btnButton1"/>

     <TextView
         android:id="@+id/textView1"
         android:layout_width="wrap_content"
         android:layout_height="wrap_content"
         android:layout_below="@+id/btnButton3"
         android:layout_marginTop="94dp"
         android:text="User :"
         android:textAppearance="?android:attr/textAppearanceLarge" />

     <EditText
         android:id="@+id/editText1"
         android:layout_width="wrap_content"
         android:layout_height="wrap_content"
         android:layout_alignParentRight="true"
         android:layout_alignTop="@+id/textView1"
         android:layout_toRightOf="@+id/btnButton3" />

     <Button
         android:id="@+id/btnSubmit"
         android:layout_width="wrap_content"
         android:layout_height="wrap_content"
         android:layout_alignParentRight="true"
         android:layout_below="@+id/editText1"
         android:text="Submit" />

</RelativeLayout>
2.演示
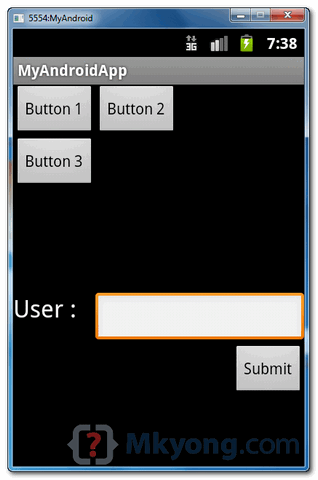
参见结果,以上XML代码将生成以下输出。

下载源代码
下载它– Android-RelativeLayout-Example.zip (15 KB)
参考文献
翻译自: https://mkyong.com/android/android-relativelayout-example/


 68
68

 被折叠的 条评论
为什么被折叠?


