


在本教程中,我们将向您展示如何在Spring Security中执行数据库身份验证(同时使用XML和注释)。
使用的技术:
- 春天3.2.8。发布
- Spring Security 3.2.3发布
- Spring JDBC 3.2.3.RELEASE
- Eclipse 4.2
- JDK 1.6
- Maven 3
- Tomcat 6或7(Servlet 3.x)
- MySQL服务器5.6
先前的登录表单内存中身份验证将被重用,进行增强以支持以下功能:
- 使用Spring-JDBC和MySQL进行数据库身份验证。
- Spring Security,JSP TagLib,
sec:authorize access="hasRole('ROLE_USER') - 自定义403拒绝访问页面。
1.项目演示
2.项目目录
查看最终的项目结构(基于XML):

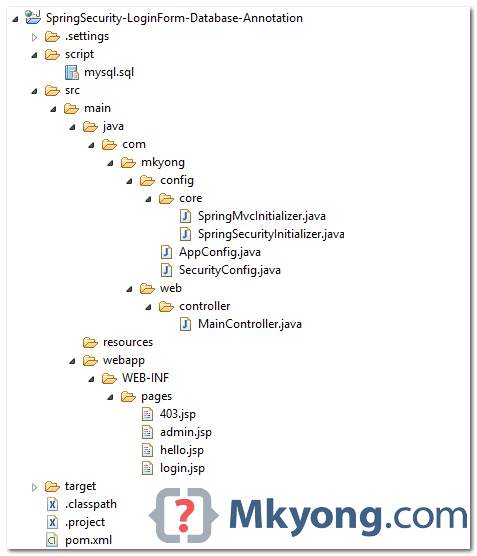
查看最终项目结构(基于注释):

3.项目依赖
获取对Spring,Spring Security,JDBC,Taglib和MySQL的依赖
<properties>
		<jdk.version>1.6</jdk.version>
		<spring.version>3.2.8.RELEASE</spring.version>
		<spring.security.version>3.2.3.RELEASE</spring.security.version>
		<jstl.version>1.2</jstl.version>
		<mysql.connector.version>5.1.30</mysql.connector.version>
	</properties>

	<dependencies>

		<!-- Spring 3 dependencies -->
		<dependency>
			<groupId>org.springframework</groupId>
			<artifactId>spring-core</artifactId>
			<version>${spring.version}</version>
		</dependency>

		<dependency>
			<groupId>org.springframework</groupId>
			<artifactId>spring-web</artifactId>
			<version>${spring.version}</version>
		</dependency>

		<dependency>
			<groupId>org.springframework</groupId>
			<artifactId>spring-webmvc</artifactId>
			<version>${spring.version}</version>
		</dependency>

		<dependency>
			<groupId>org.springframework</groupId>
			<artifactId>spring-jdbc</artifactId>
			<version>${spring.version}</version>
		</dependency>

		<!-- Spring Security -->
		<dependency>
			<groupId>org.springframework.security</groupId>
			<artifactId>spring-security-web</artifactId>
			<version>${spring.security.version}</version>
		</dependency>

		<dependency>
			<groupId>org.springframework.security</groupId>
			<artifactId>spring-security-config</artifactId>
			<version>${spring.security.version}</version>
		</dependency>

		<!-- Spring Security JSP Taglib -->
		<dependency>
			<groupId>org.springframework.security</groupId>
			<artifactId>spring-security-taglibs</artifactId>
			<version>${spring.security.version}</version>
		</dependency>

		<!-- jstl for jsp page -->
		<dependency>
			<groupId>jstl</groupId>
			<artifactId>jstl</artifactId>
			<version>${jstl.version}</version>
		</dependency>

                <!-- connect to mysql -->
		<dependency>
			<groupId>mysql</groupId>
			<artifactId>mysql-connector-java</artifactId>
			<version>${mysql.connector.version}</version>
		</dependency>

	</dependencies>

</project>
4.数据库
要执行数据库身份验证,您必须创建表来存储用户和角色详细信息。 请参考这个Spring Security用户模式参考 。 以下是MySQL的脚本来创建users和user_roles表。
4.1创建一个“用户”表。
CREATE  TABLE users (
  username VARCHAR(45) NOT NULL ,
  password VARCHAR(45) NOT NULL ,
  enabled TINYINT NOT NULL DEFAULT 1 ,
  PRIMARY KEY (username));
4.2创建一个“ user_roles”表。
CREATE TABLE user_roles (
  user_role_id int(11) NOT NULL AUTO_INCREMENT,
  username varchar(45) NOT NULL,
  role varchar(45) NOT NULL,
  PRIMARY KEY (user_role_id),
  UNIQUE KEY uni_username_role (role,username),
  KEY fk_username_idx (username),
  CONSTRAINT fk_username FOREIGN KEY (username) REFERENCES users (username));
4.3插入一些测试记录。
INSERT INTO users(username,password,enabled)
VALUES ('mkyong','123456', true);
INSERT INTO users(username,password,enabled)
VALUES ('alex','123456', true);

INSERT INTO user_roles (username, role)
VALUES ('mkyong', 'ROLE_USER');
INSERT INTO user_roles (username, role)
VALUES ('mkyong', 'ROLE_ADMIN');
INSERT INTO user_roles (username, role)
VALUES ('alex', 'ROLE_USER');
注意
- 用户名“ mkyong”,具有role_user和role_admin。
- 用户名“ alexa”,带有role_user。
5. Spring安全配置
XML和注释中的Spring Security。
5.1创建一个数据源以连接MySQL。
<beans xmlns="http://www.springframework.org/schema/beans"
	xmlns:xsi="http://www.w3.org/2001/XMLSchema-instance"
	xsi:schemaLocation="http://www.springframework.org/schema/beans
	http://www.springframework.org/schema/beans/spring-beans-3.0.xsd">

	<bean id="dataSource"
		class="org.springframework.jdbc.datasource.DriverManagerDataSource">

		<property name="driverClassName" value="com.mysql.jdbc.Driver" />
		<property name="url" value="jdbc:mysql://localhost:3306/test" />
		<property name="username" value="root" />
		<property name="password" value="password" />
	</bean>

</beans>
相当于Spring注释:
package com.mkyong.config;

import org.springframework.context.annotation.Bean;
import org.springframework.context.annotation.ComponentScan;
import org.springframework.context.annotation.Configuration;
import org.springframework.context.annotation.Import;
import org.springframework.jdbc.datasource.DriverManagerDataSource;
import org.springframework.web.servlet.config.annotation.EnableWebMvc;
import org.springframework.web.servlet.view.InternalResourceViewResolver;
import org.springframework.web.servlet.view.JstlView;

@EnableWebMvc
@Configuration
@ComponentScan({ "com.mkyong.web.*" })
@Import({ SecurityConfig.class })
public class AppConfig {

	@Bean(name = "dataSource")
	public DriverManagerDataSource dataSource() {
	    DriverManagerDataSource driverManagerDataSource = new DriverManagerDataSource();
	    driverManagerDataSource.setDriverClassName("com.mysql.jdbc.Driver");
	    driverManagerDataSource.setUrl("jdbc:mysql://localhost:3306/test");
	    driverManagerDataSource.setUsername("root");
	    driverManagerDataSource.setPassword("password");
	    return driverManagerDataSource;
	}

	@Bean
	public InternalResourceViewResolver viewResolver() {
	    InternalResourceViewResolver viewResolver = new InternalResourceViewResolver();
	    viewResolver.setViewClass(JstlView.class);
	    viewResolver.setPrefix("/WEB-INF/pages/");
	    viewResolver.setSuffix(".jsp");
	    return viewResolver;
	}

} 5.2使用jdbc-user-service定义查询以执行数据库身份验证。
<beans:beans xmlns="http://www.springframework.org/schema/security"
	xmlns:beans="http://www.springframework.org/schema/beans"
	xmlns:xsi="http://www.w3.org/2001/XMLSchema-instance"
	xsi:schemaLocation="http://www.springframework.org/schema/beans
	http://www.springframework.org/schema/beans/spring-beans-3.0.xsd
	http://www.springframework.org/schema/security
	http://www.springframework.org/schema/security/spring-security-3.2.xsd">

    <!-- enable use-expressions -->
	<http auto-config="true" use-expressions="true">

		<intercept-url pattern="/admin**" access="hasRole('ROLE_ADMIN')" />

		<!-- access denied page -->
		<access-denied-handler error-page="/403" />

		<form-login
		    login-page="/login"
		    default-target-url="/welcome"
			authentication-failure-url="/login?error"
			username-parameter="username"
			password-parameter="password" />
		<logout logout-success-url="/login?logout"  />
		<!-- enable csrf protection -->
		<csrf/>
	</http>

	<!-- Select users and user_roles from database -->
	<authentication-manager>
	  <authentication-provider>
		<jdbc-user-service data-source-ref="dataSource"
		  users-by-username-query=
		    "select username,password, enabled from users where username=?"
		  authorities-by-username-query=
		    "select username, role from user_roles where username =?  " />
	  </authentication-provider>
	</authentication-manager>

</beans:beans>
相当于Spring Security批注:
package com.mkyong.config;

import javax.sql.DataSource;
import org.springframework.beans.factory.annotation.Autowired;
import org.springframework.context.annotation.Configuration;
import org.springframework.security.config.annotation.authentication.builders.AuthenticationManagerBuilder;
import org.springframework.security.config.annotation.web.builders.HttpSecurity;
import org.springframework.security.config.annotation.web.configuration.EnableWebSecurity;
import org.springframework.security.config.annotation.web.configuration.WebSecurityConfigurerAdapter;

@Configuration
@EnableWebSecurity
public class SecurityConfig extends WebSecurityConfigurerAdapter {

	@Autowired
	DataSource dataSource;

	@Autowired
	public void configAuthentication(AuthenticationManagerBuilder auth) throws Exception {

	  auth.jdbcAuthentication().dataSource(dataSource)
		.usersByUsernameQuery(
			"select username,password, enabled from users where username=?")
		.authoritiesByUsernameQuery(
			"select username, role from user_roles where username=?");
	}

	@Override
	protected void configure(HttpSecurity http) throws Exception {

	  http.authorizeRequests()
		.antMatchers("/admin/**").access("hasRole('ROLE_ADMIN')")
		.and()
		  .formLogin().loginPage("/login").failureUrl("/login?error")
		  .usernameParameter("username").passwordParameter("password")
		.and()
		  .logout().logoutSuccessUrl("/login?logout")
		.and()
		  .exceptionHandling().accessDeniedPage("/403")
		.and()
		  .csrf();
	}
}
6. JSP页面
用于自定义登录页面的JSP页面。
6.1 Default页面,显示使用Spring Security JSP taglib sec:authorize向具有“ ROLE_USER ”权限的用户显示内容。
<%@taglib prefix="sec"
	uri="http://www.springframework.org/security/tags"%>
<%@taglib prefix="c" uri="http://java.sun.com/jsp/jstl/core"%>
<html>
<body>
	<h1>Title : ${title}</h1>
	<h1>Message : ${message}</h1>

	<sec:authorize access="hasRole('ROLE_USER')">
		<!-- For login user -->
		<c:url value="/j_spring_security_logout" var="logoutUrl" />
		<form action="${logoutUrl}" method="post" id="logoutForm">
			<input type="hidden" name="${_csrf.parameterName}"
				value="${_csrf.token}" />
		</form>
		<script>
			function formSubmit() {
				document.getElementById("logoutForm").submit();
			}
		</script>

		<c:if test="${pageContext.request.userPrincipal.name != null}">
			<h2>
				User : ${pageContext.request.userPrincipal.name} | <a
					href="javascript:formSubmit()"> Logout</a>
			</h2>
		</c:if>


	</sec:authorize>
</body>
</html>
6.2页面显示自定义登录表单。
<%@ taglib prefix="c" uri="http://java.sun.com/jsp/jstl/core"%>
<%@page session="true"%>
<html>
<head>
<title>Login Page</title>
<style>
.error {
	padding: 15px;
	margin-bottom: 20px;
	border: 1px solid transparent;
	border-radius: 4px;
	color: #a94442;
	background-color: #f2dede;
	border-color: #ebccd1;
}

.msg {
	padding: 15px;
	margin-bottom: 20px;
	border: 1px solid transparent;
	border-radius: 4px;
	color: #31708f;
	background-color: #d9edf7;
	border-color: #bce8f1;
}

#login-box {
	width: 300px;
	padding: 20px;
	margin: 100px auto;
	background: #fff;
	-webkit-border-radius: 2px;
	-moz-border-radius: 2px;
	border: 1px solid #000;
}
</style>
</head>
<body onload='document.loginForm.username.focus();'>

	<h1>Spring Security Login Form (Database Authentication)</h1>

	<div id="login-box">

		<h2>Login with Username and Password</h2>

		<c:if test="${not empty error}">
			<div class="error">${error}</div>
		</c:if>
		<c:if test="${not empty msg}">
			<div class="msg">${msg}</div>
		</c:if>

		<form name='loginForm'
		  action="<c:url value='/j_spring_security_check' />" method='POST'>

		<table>
			<tr>
				<td>User:</td>
				<td><input type='text' name='username'></td>
			</tr>
			<tr>
				<td>Password:</td>
				<td><input type='password' name='password' /></td>
			</tr>
			<tr>
				<td colspan='2'><input name="submit" type="submit"
				  value="submit" /></td>
			</tr>
		  </table>

		  <input type="hidden" name="${_csrf.parameterName}"
			value="${_csrf.token}" />

		</form>
	</div>

</body>
</html>
6.3该页面受密码保护,仅允许经过身份验证的用户“ ROLE_ADMIN ”访问。
<%@taglib prefix="c" uri="http://java.sun.com/jsp/jstl/core"%>
<%@page session="true"%>
<html>
<body>
	<h1>Title : ${title}</h1>
	<h1>Message : ${message}</h1>

	<c:url value="/j_spring_security_logout" var="logoutUrl" />
	<form action="${logoutUrl}" method="post" id="logoutForm">
		<input type="hidden" name="${_csrf.parameterName}"
			value="${_csrf.token}" />
	</form>
	<script>
		function formSubmit() {
			document.getElementById("logoutForm").submit();
		}
	</script>

	<c:if test="${pageContext.request.userPrincipal.name != null}">
		<h2>
			Welcome : ${pageContext.request.userPrincipal.name} | <a
				href="javascript:formSubmit()"> Logout</a>
		</h2>
	</c:if>

</body>
</html>
6.4自定义403访问被拒绝页面。
<%@taglib prefix="c" uri="http://java.sun.com/jsp/jstl/core"%>
<html>
<body>
	<h1>HTTP Status 403 - Access is denied</h1>

	<c:choose>
		<c:when test="${empty username}">
		  <h2>You do not have permission to access this page!</h2>
		</c:when>
		<c:otherwise>
		  <h2>Username : ${username} <br/>
                    You do not have permission to access this page!</h2>
		</c:otherwise>
	</c:choose>

</body>
</html>
7. Spring MVC控制器
一个简单的控制器。
package com.mkyong.web.controller;

import org.springframework.security.authentication.AnonymousAuthenticationToken;
import org.springframework.security.core.Authentication;
import org.springframework.security.core.context.SecurityContextHolder;
import org.springframework.security.core.userdetails.UserDetails;
import org.springframework.stereotype.Controller;
import org.springframework.web.bind.annotation.RequestMapping;
import org.springframework.web.bind.annotation.RequestMethod;
import org.springframework.web.bind.annotation.RequestParam;
import org.springframework.web.servlet.ModelAndView;

@Controller
public class MainController {

	@RequestMapping(value = { "/", "/welcome**" }, method = RequestMethod.GET)
	public ModelAndView defaultPage() {

	  ModelAndView model = new ModelAndView();
	  model.addObject("title", "Spring Security Login Form - Database Authentication");
	  model.addObject("message", "This is default page!");
	  model.setViewName("hello");
	  return model;

	}

	@RequestMapping(value = "/admin**", method = RequestMethod.GET)
	public ModelAndView adminPage() {

	  ModelAndView model = new ModelAndView();
	  model.addObject("title", "Spring Security Login Form - Database Authentication");
	  model.addObject("message", "This page is for ROLE_ADMIN only!");
	  model.setViewName("admin");
	  return model;

	}

	@RequestMapping(value = "/login", method = RequestMethod.GET)
	public ModelAndView login(@RequestParam(value = "error", required = false) String error,
		@RequestParam(value = "logout", required = false) String logout) {

	  ModelAndView model = new ModelAndView();
	  if (error != null) {
		model.addObject("error", "Invalid username and password!");
	  }

	  if (logout != null) {
		model.addObject("msg", "You've been logged out successfully.");
	  }
	  model.setViewName("login");

	  return model;

	}

	//for 403 access denied page
	@RequestMapping(value = "/403", method = RequestMethod.GET)
	public ModelAndView accesssDenied() {

	  ModelAndView model = new ModelAndView();

	  //check if user is login
	  Authentication auth = SecurityContextHolder.getContext().getAuthentication();
	  if (!(auth instanceof AnonymousAuthenticationToken)) {
		UserDetails userDetail = (UserDetails) auth.getPrincipal();
		model.addObject("username", userDetail.getUsername());
	  }

	  model.setViewName("403");
	  return model;

	}

}
8.演示
8.1。 默认页面
XML – http:// localhost:8080 / spring-security-loginform-database /
注释-http:// localhost:8080 / spring-security-loginform-database-annotation /

8.2尝试访问/admin页面,仅允许“ mkyong” ROLE_ADMIN访问。

8.3。 如果尝试使用“ alex”访问/admin ,则会显示“ 403访问被拒绝”页面。

在默认页面中的8.3“ alex”中,显示sec:authorize的使用

8.4。 如果尝试使用“ mkyong”访问/admin ,则显示admin页面。

下载源代码
下载XML版本– spring-security-login-form-database-xml.zip (16 KB)
下载注释版本– spring-security-login-form-database-annotation.zip (22 KB)
参考文献
- Spring安全性参考– jdbc-ser-service
- Spring安全性参考– juser-schema
- Spring安全性参考– taglibs
- Spring Security Hello World注释示例
- 创建自定义登录表单
- Spring Security –如何定制403访问被拒绝页面
翻译自: https://mkyong.com/spring-security/spring-security-form-login-using-database/


 2万+
2万+

 被折叠的 条评论
为什么被折叠?
被折叠的 条评论
为什么被折叠?
 到【灌水乐园】发言


