


在这篇文章中,我想描述如何创建一个提供当前天气信息的天气应用程序。 该应用程序将使用JSON,HTTP连接和AsyncTask来获取此信息。作为天气提供者,我将使用OpenWeatherMap一个免费的天气服务,该服务提供了一些非常易于使用的有趣的API。我将指导您完成建立工作所需的步骤。应用程式。 有关API的更多信息,您可以访问OpenWeatherMap网站。 我将向您展示最终结果,以便您可以了解我们在本文中的工作。
当前天气信息– HTTP请求和JSON响应
OpenWeatherMap提供了一些API来获取天气信息。 我们想使用一种能提供当前天气信息的工具。 要获取此信息的电话为:
http://api.openweathermap.org/data/2.5/weather?q=city,country假设我们想知道罗马IT的天气。 使用我们的浏览器,我们可以:

如我们所见,我们具有JSON响应。 格式化我们拥有的回应
{
  "coord":{"lon":12.4958,"lat":41.903},
  "sys":{"country":"Italy","sunrise":1369107818,"sunset":1369160979},
  "weather":[{
        "id":802,"main":"Clouds","description":"scattered clouds",
         "icon":"03d"}],
   "base":"global stations",
   "main":{
           "temp":290.38,
           "humidity":68,
           "pressure":1015,
           "temp_min":287.04,
           "temp_max":293.71},
    "wind":{
           "speed":1.75,
           "deg":290.002},
    "clouds":{"all":32},
    "dt":1369122932,
    "id":3169070,
    "name":"Rome",
    "cod":200
}
因此,我们要做的第一件事是创建数据模型,以便我们可以解析响应并将其转换为Java类。 分析响应,我们可以使用不同的“ main”标签作为Java类:
- 坐标(对象)
- sys(对象)
- 天气(数组)
- 主要(对象)
- 风(物体)
- 名称:(字符串)
响应非常简单,我们可以手动对其进行转换。 该模型的UML类图如下所示:

JSON天气解析器
创建模型后,我们必须对其进行解析。 我们可以创建一个处理该任务的特定类。 首先,我们必须创建“ root”对象,该对象接收包含所有JSON响应的整个字符串作为输入:
// We create out JSONObject from the data
JSONObject jObj = new JSONObject(data);
然后,我们开始解析每个响应:
// We start extracting the info
Location loc = new Location();

JSONObject coordObj = getObject("coord", jObj);
loc.setLatitude(getFloat("lat", coordObj));
loc.setLongitude(getFloat("lon", coordObj));

JSONObject sysObj = getObject("sys", jObj);
loc.setCountry(getString("country", sysObj));
loc.setSunrise(getInt("sunrise", sysObj));
loc.setSunset(getInt("sunset", sysObj));
loc.setCity(getString("name", jObj));
weather.location = loc;
在第4,8行中,我们创建了两个“子”对象( coordObj和sysObj ),该对象具有从JSON响应中清除的jObj作为父对象。 如我们所见,我们使用一些辅助方法来获取String,int和float值:
private static JSONObject getObject(String tagName, JSONObject jObj)  throws JSONException {
    JSONObject subObj = jObj.getJSONObject(tagName);
    return subObj;
}

private static String getString(String tagName, JSONObject jObj) throws JSONException {
    return jObj.getString(tagName);
}

private static float  getFloat(String tagName, JSONObject jObj) throws JSONException {
    return (float) jObj.getDouble(tagName);
}

private static int  getInt(String tagName, JSONObject jObj) throws JSONException {
    return jObj.getInt(tagName);
}
然后我们最后解析天气信息。 我们必须记住,天气标签是一个数组,因此我们必须以不同的方式处理它
// We get weather info (This is an array)
JSONArray jArr = jObj.getJSONArray("weather");

// We use only the first value
JSONObject JSONWeather = jArr.getJSONObject(0);
weather.currentCondition.setWeatherId(getInt("id", JSONWeather));
weather.currentCondition.setDescr(getString("description", JSONWeather));
weather.currentCondition.setCondition(getString("main", JSONWeather));
weather.currentCondition.setIcon(getString("icon", JSONWeather));

JSONObject mainObj = getObject("main", jObj);
weather.currentCondition.setHumidity(getInt("humidity", mainObj));
weather.currentCondition.setPressure(getInt("pressure", mainObj));
weather.temperature.setMaxTemp(getFloat("temp_max", mainObj));
weather.temperature.setMinTemp(getFloat("temp_min", mainObj));
weather.temperature.setTemp(getFloat("temp", mainObj));

// Wind
JSONObject wObj = getObject("wind", jObj);
weather.wind.setSpeed(getFloat("speed", wObj));
weather.wind.setDeg(getFloat("deg", wObj));

// Clouds
JSONObject cObj = getObject("clouds", jObj);
weather.clouds.setPerc(getInt("all", cObj));
最后,我们在Weather类中填充了检索到的数据。
HTTP请求和响应
现在,我们必须使用HTTP协议与远程服务器交换信息。 我们必须发送信息,然后阅读响应。 我们在上一篇文章( Android HTTP客户端:GET,POST,下载,上传,多部分请求 )中介绍了该主题,因此我们不再赘述,仅显示代码:
public class WeatherHttpClient {

    private static String BASE_URL = "http://api.openweathermap.org/data/2.5/weather?q=";
    private static String IMG_URL = "http://openweathermap.org/img/w/";

    public String getWeatherData(String location) {
        HttpURLConnection con = null ;
        InputStream is = null;

        try {
            con = (HttpURLConnection) ( new URL(BASE_URL + location)).openConnection();
            con.setRequestMethod("GET");
            con.setDoInput(true);
            con.setDoOutput(true);
            con.connect();

            // Let's read the response
            StringBuffer buffer = new StringBuffer();
            is = con.getInputStream();
            BufferedReader br = new BufferedReader(new InputStreamReader(is));
            String line = null;
            while (  (line = br.readLine()) != null )
                buffer.append(line + "\r\n");

            is.close();
            con.disconnect();
            return buffer.toString();
        }
        catch(Throwable t) {
            t.printStackTrace();
        }
        finally {
            try { is.close(); } catch(Throwable t) {}
            try { con.disconnect(); } catch(Throwable t) {}
        }

        return null;

    }

    public byte[] getImage(String code) {
        HttpURLConnection con = null ;
        InputStream is = null;
        try {
            con = (HttpURLConnection) ( new URL(IMG_URL + code)).openConnection();
            con.setRequestMethod("GET");
            con.setDoInput(true);
            con.setDoOutput(true);
            con.connect();

            // Let's read the response
            is = con.getInputStream();
            byte[] buffer = new byte[1024];
            ByteArrayOutputStream baos = new ByteArrayOutputStream();

            while ( is.read(buffer) != -1)
                baos.write(buffer);

            return baos.toByteArray();
        }
        catch(Throwable t) {
            t.printStackTrace();
        }
        finally {
            try { is.close(); } catch(Throwable t) {}
            try { con.disconnect(); } catch(Throwable t) {}
        }

        return null;

    }
}
天气应用
最后,是时候进行我们的活动了。 布局非常简单,当然,如果您要使用生产应用程序,则只是需要改进的骨架。
<RelativeLayout xmlns:android="http://schemas.android.com/apk/res/android"
    xmlns:tools="http://schemas.android.com/tools"
    android:layout_width="match_parent"
    android:layout_height="match_parent"
    android:paddingBottom="@dimen/activity_vertical_margin"
    android:paddingLeft="@dimen/activity_horizontal_margin"
    android:paddingRight="@dimen/activity_horizontal_margin"
    android:paddingTop="@dimen/activity_vertical_margin"
    tools:context=".MainActivity" >

    <TextView
        android:id="@+id/cityText"
        style="?android:attr/textAppearanceMedium"
        android:layout_width="wrap_content"
        android:layout_height="wrap_content"
        android:layout_centerHorizontal="true" />

    <ImageView
        android:id="@+id/condIcon"
        android:layout_width="wrap_content"
        android:layout_height="wrap_content"
        android:layout_alignParentLeft="true"
        android:layout_below="@id/cityText" />

    <TextView
        android:id="@+id/condDescr"
        android:layout_width="wrap_content"
        android:layout_height="wrap_content"
        android:layout_below="@id/condIcon"
        android:layout_alignLeft="@id/condIcon"
       />

    <TextView
        android:id="@+id/temp"
        style="@style/tempStyle"
        android:layout_width="wrap_content"
        android:layout_height="wrap_content"
        android:layout_marginLeft="12dp"
        android:layout_alignBaseline="@id/condDescr"
        android:layout_toRightOf="@id/condDescr"/>

    <TextView
        android:id="@+id/pressLab"
        android:layout_width="wrap_content"
        android:layout_height="wrap_content"
        android:layout_alignParentLeft="true"
        android:layout_below="@id/condDescr"
        android:text="Pressure"
        android:layout_marginTop="15dp" />

    <TextView
        android:id="@+id/press"
        android:layout_width="wrap_content"
        android:layout_height="wrap_content"
        android:layout_alignBaseline="@id/pressLab"
        android:layout_toRightOf="@id/pressLab"
        style="@style/valData"/>

    <TextView
        android:id="@+id/humLab"
        android:layout_width="wrap_content"
        android:layout_height="wrap_content"
        android:layout_alignParentLeft="true"
        android:layout_below="@id/pressLab"
        android:text="Humidity" />

    <TextView
        android:id="@+id/hum"
        android:layout_width="wrap_content"
        android:layout_height="wrap_content"
        android:layout_alignBaseline="@id/humLab"
        android:layout_toRightOf="@id/humLab"
        android:layout_marginLeft="4dp"
        style="@style/valData"/>

    <TextView
        android:id="@+id/windLab"
        android:layout_width="wrap_content"
        android:layout_height="wrap_content"
        android:layout_alignParentLeft="true"
        android:layout_below="@id/humLab"
        android:text="Wind" />

    <TextView
        android:id="@+id/windSpeed"
        android:layout_width="wrap_content"
        android:layout_height="wrap_content"
        android:layout_alignBaseline="@id/windLab"
        android:layout_toRightOf="@id/windLab"
        android:layout_marginLeft="4dp"
        style="@style/valData" />

    <TextView
        android:id="@+id/windDeg"
        android:layout_width="wrap_content"
        android:layout_height="wrap_content"
        android:layout_alignBaseline="@id/windLab"
        android:layout_toRightOf="@id/windSpeed"
        android:layout_marginLeft="4dp"
        style="@style/valData"/>

</RelativeLayout>在onCreate方法中,我们仅获取对布局内View的引用,以便我们可以在请求完成后稍后填充它们。
@Override
protected void onCreate(Bundle savedInstanceState) {
    super.onCreate(savedInstanceState);
    setContentView(R.layout.activity_main);
    String city = "Rome,IT";

    cityText = (TextView) findViewById(R.id.cityText);
    condDescr = (TextView) findViewById(R.id.condDescr);
    temp = (TextView) findViewById(R.id.temp);
    hum = (TextView) findViewById(R.id.hum);
    press = (TextView) findViewById(R.id.press);
    windSpeed = (TextView) findViewById(R.id.windSpeed);
    windDeg = (TextView) findViewById(R.id.windDeg);
    imgView = (ImageView) findViewById(R.id.condIcon);

    JSONWeatherTask task = new JSONWeatherTask();
    task.execute(new String[]{city});
}
然后启动AsyncTask,因为我们已经知道网络操作非常耗时,因此我们可以在主线程中运行它们,否则我们可能会遇到ANR问题。 JSONWeatherTask非常简单
protected Weather doInBackground(String... params) {
    Weather weather = new Weather();
    String data = ( (new WeatherHttpClient()).getWeatherData(params[0]));

    try {
        weather = JSONWeatherParser.getWeather(data);

        // Let's retrieve the icon
        weather.iconData = ( (new WeatherHttpClient()).getImage(weather.currentCondition.getIcon()));

    } catch (JSONException e) {
        e.printStackTrace();
    }
    return weather;

    }
在第3行,我们发出HTTP请求,然后在第6行,对其进行解析。在第9行,我们检索显示天气状况的图标。
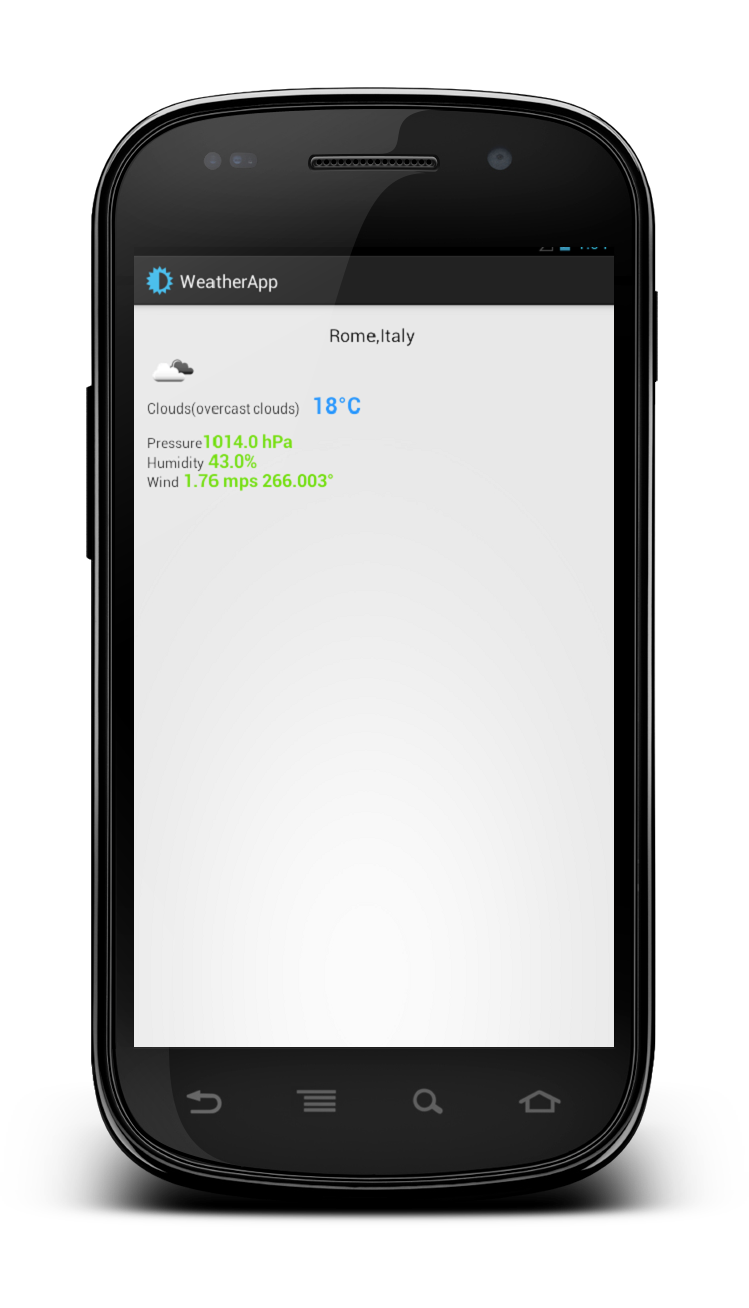
运行我们拥有的代码:

源代码可用@github 。


 1855
1855

 被折叠的 条评论
为什么被折叠?
被折叠的 条评论
为什么被折叠?
 到【灌水乐园】发言


