


除XML之外, JSON是API响应中使用的非常常见的格式。 它的简单性已经为相当冗长的XML赢得了广泛的采用。 此外,JSON可以轻松地与REST结合使用,从而生成清晰易用的API。 Android可以在JSON包摘要中找到有人在其SDK中支持JSON。 但是,使用这些类,开发人员必须处理低级JSON解析,我认为这是乏味且乏味的。 因此,在本教程中,我将向您展示如何执行自动JSON解析。为此,我们将使用Google Gson库。 从官方网站:
Gson是一个Java库,可用于将Java对象转换为其JSON表示形式。 它还可以用于将JSON字符串转换为等效的Java对象。 Gson可以处理任意Java对象,包括您没有源代码的现有对象。
有一些开源项目可以将Java对象转换为JSON。 但是,大多数方法都要求您将Java批注放在类中,这是如果您无法访问源代码则无法执行的操作。 大多数还不完全支持Java泛型的使用。 Gson认为这两个都是非常重要的设计目标。
很好,正是我们需要的。 在研究代码之前,您可能需要阅读《 Gson用户指南》并为Gson API Javadocs添加书签。 让我们开始下载Gson ,当前版本为1.6。 我们需要发行版中的gson-1.6.jar。
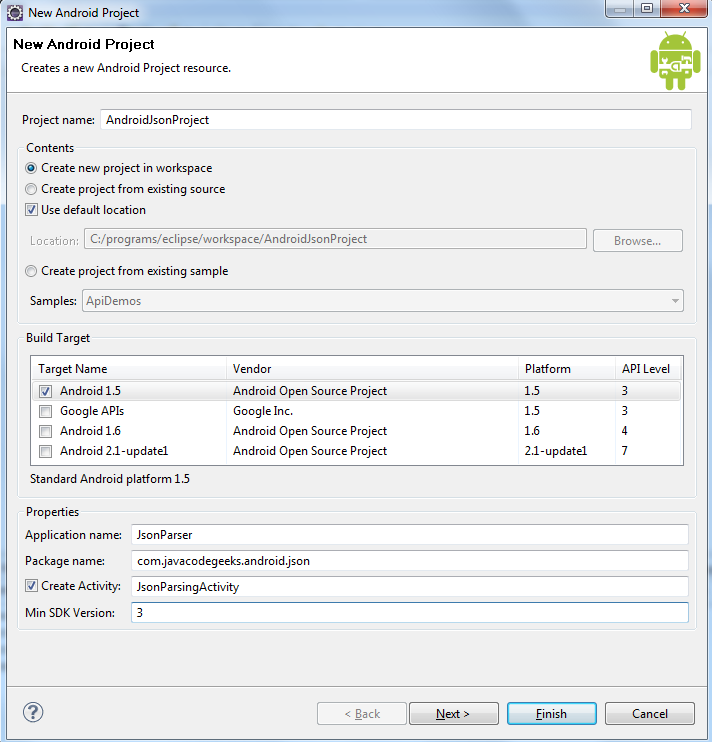
让我们继续创建一个名为“ AndroidJsonProject”的Eclipse项目,如下所示:
将Gson JAR添加到项目的类路径中。
为了说明如何使用Gson进行JSON解析,我们将分析来自Twitter API的JSON响应。 查看Twitter API文档以获取更多信息。 我们将使用Search API方法执行临时搜索。
例如,要搜索有关JavaCodeGeeks的 Twitter并以JSON格式检索结果,以下是相应的URL:
http://search.twitter.com/search.json?q=javacodegeeks
这将给出包含所有相关信息的一行JSON响应。 这个衬里很难阅读,因此JSON编辑器非常方便。 我使用Eclipse Json Editor插件 ,效果很好。 这是在我的Eclipse IDE中格式化响应的样子:

如您所见,我们有很多结果,之后还有其他一些字段,例如“ max_id”,“ since_id”,“ query”等。
因此,名为“ SearchResponse”的主模型对象将如下所示:
package com.javacodegeeks.android.json.model;

import java.util.List;

import com.google.gson.annotations.SerializedName;

public class SearchResponse {

    public List<Result> results;

    @SerializedName("max_id")
    public long maxId;

    @SerializedName("since_id")
    public int sinceId;

    @SerializedName("refresh_url")
    public String refreshUrl;

    @SerializedName("next_page")
    public String nextPage;

    @SerializedName("results_per_page")
    public int resultsPerPage;

    public int page;

    @SerializedName("completed_in")
    public double completedIn;

    @SerializedName("since_id_str")
    public String sinceIdStr;

    @SerializedName("max_id_str")
    public String maxIdStr;

    public String query;

}
我们提供了各种公共字段(也可以使用具有私有字段的getter / setter),并且在字段名称与JSON响应不匹配的情况下,我们使用SerializedName注释进行注释。
请注意,我们还有一个结果列表,相应的模型类为:
package com.javacodegeeks.android.json.model;

import com.google.gson.annotations.SerializedName;

public class Result {

    @SerializedName("from_user_id_str")
    public String fromUserIdStr;

    @SerializedName("profile_image_url")
    public String profileImageUrl;

    @SerializedName("created_at")
    public String createdAt;

    @SerializedName("from_user")
    public String fromUser;

    @SerializedName("id_str")
    public String idStr;

    public Metadata metadata;

    @SerializedName("to_user_id")
    public String toUserId;

    public String text;

    public long id;

    @SerializedName("from_user_id")
    public String from_user_id;

    @SerializedName("iso_language_code")
    public String isoLanguageCode;

    @SerializedName("to_user_id_str")
    public String toUserIdStr;

    public String source;

}
最后,我们还有一个名为“元数据”的类:
package com.javacodegeeks.android.json.model;

import com.google.gson.annotations.SerializedName;

public class Metadata {

    @SerializedName("result_type")
    public String resultType;

}
现在让我们看看如何使用Gson连接所有这些。 这是我们的活动:
package com.javacodegeeks.android.json;

import java.io.IOException;
import java.io.InputStream;
import java.io.InputStreamReader;
import java.io.Reader;
import java.util.List;

import org.apache.http.HttpEntity;
import org.apache.http.HttpResponse;
import org.apache.http.HttpStatus;
import org.apache.http.client.methods.HttpGet;
import org.apache.http.impl.client.DefaultHttpClient;

import android.app.Activity;
import android.os.Bundle;
import android.util.Log;
import android.widget.Toast;

import com.google.gson.Gson;
import com.javacodegeeks.android.json.model.Result;
import com.javacodegeeks.android.json.model.SearchResponse;

public class JsonParsingActivity extends Activity {

    String url = "http://search.twitter.com/search.json?q=javacodegeeks";

    @Override
    public void onCreate(Bundle savedInstanceState) {

        super.onCreate(savedInstanceState);
        setContentView(R.layout.main);

        InputStream source = retrieveStream(url);

        Gson gson = new Gson();

        Reader reader = new InputStreamReader(source);

        SearchResponse response = gson.fromJson(reader, SearchResponse.class);

        Toast.makeText(this, response.query, Toast.LENGTH_SHORT).show();

        List<Result> results = response.results;

        for (Result result : results) {
            Toast.makeText(this, result.fromUser, Toast.LENGTH_SHORT).show();
        }

    }

    private InputStream retrieveStream(String url) {

        DefaultHttpClient client = new DefaultHttpClient();

        HttpGet getRequest = new HttpGet(url);

        try {

           HttpResponse getResponse = client.execute(getRequest);
           final int statusCode = getResponse.getStatusLine().getStatusCode();

           if (statusCode != HttpStatus.SC_OK) {
              Log.w(getClass().getSimpleName(),
                  "Error " + statusCode + " for URL " + url);
              return null;
           }

           HttpEntity getResponseEntity = getResponse.getEntity();
           return getResponseEntity.getContent();

        }
        catch (IOException e) {
           getRequest.abort();
           Log.w(getClass().getSimpleName(), "Error for URL " + url, e);
        }

        return null;

     }

}
首先,我们执行HTTP GET请求并以流的形式检索资源(如果您需要更多信息,请查看我之前的教程Android Full App,第2部分:使用HTTP API )。 我们创建一个Gson实例,并使用它执行JSON解析,并检索我们的模型对象及其所有字段。
编辑您的Android清单XML文件并授予Internet访问权限,然后启动Eclipse配置。 您将看到有关Twitter的最新Twitter用户有关JavaCodeGeeks的通知。
伙计们,使用Gson在Android中进行快速JSON解析。 与往常一样,您可以下载为本教程创建的Eclipse项目 。
手机编码愉快! 别忘了分享!
相关文章:
翻译自: https://www.javacodegeeks.com/2011/01/android-json-parsing-gson-tutorial.html


 3006
3006


 被折叠的 条评论
为什么被折叠?
被折叠的 条评论
为什么被折叠?
 到【灌水乐园】发言


