


weather icon
该应用程序可在Google Play上使用 。 下载它,玩得开心。 如果您喜欢我的工作,则可以使用该应用程序向我捐款。
在这篇文章中,您将找到完整的教程,其中介绍了如何构建Android应用。 这篇文章的目的是创建一个将使用Yahoo!的Weather App。 天气作为数据提供者。 这篇文章涵盖了最重要的方面,我们在构建应用程序时应该考虑。 它将说明如何使用Yahoo! Weather API检索XML天气数据以及如何解析它以提取信息。
在上一篇文章中,我们发现了如何从城市名称中检索woeid。 此信息非常重要,因为我们可以使用它来获取天气数据。 在这篇文章的结尾,您将创建一个完整的工作应用程序,如下所示: ![android_weather_app [3]](http://www.javacodegeeks.com/wp-content/uploads/2014/03/android_weather_app31.png)
![android_weather_app_settings_1 [3]](http://www.javacodegeeks.com/wp-content/uploads/2014/03/android_weather_app_settings_131.png)
![android_weather_app_settings [3]](http://www.javacodegeeks.com/wp-content/uploads/2014/03/android_weather_app_settings31.png)
应用程式结构
我们要创建一个包含两个不同区域的应用程序:
- 天气信息
- 应用程式设定
应用程序的第一个区域显示使用Yahoo!检索到的当前天气信息。 Weather API (第二个区域,称为“ 应用程序设置” )是我们可以配置应用程序,查找城市woeid和系统度量单位的地方。 下图显示了设置区域应如何:
![android_weather_app_settings_1 [7]](http://www.javacodegeeks.com/wp-content/uploads/2014/03/android_weather_app_settings_17.png)
第一步,我们将创建一个偏好活动,用户可以在其中配置天气应用。 在这种情况下,我们可以创建一个名为WeatherPreferenceActivity的类,该类扩展了PreferenceActivity ,并设置了首选项布局:
public class WeatherPreferenceActivity extends PreferenceActivity  {
   @Override
    public void onCreate(Bundle Bundle) {
        super.onCreate(Bundle);
        getActionBar().setDisplayHomeAsUpEnabled(true);
        String action = getIntent().getAction();

        addPreferencesFromResource(R.xml.weather_prefs);
...
} 要创建首选项布局,我们可以使用/res/xml下的XML文件,并将其命名为weather_prefs.xml。 看起来像下面显示的XML:
<PreferenceScreen  xmlns:android="http://schemas.android.com/apk/res/android">
  <PreferenceCategory android:title="@string/loc_title">
      <Preference android:title="@string/pref_location_title"
                  android:key="swa_loc">
          <intent android:targetPackage="com.survivingwithandroid.weather"
                android:targetClass="com.survivingwithandroid.weather.settings.CityFinderActivity"
                  />
      </Preference>
  </PreferenceCategory>

    <PreferenceCategory android:title="@string/pref_unit_title">
        <ListPreference android:key="swa_temp_unit"
            android:title="@string/temp_title"
            android:entryValues="@array/unit_values"
            android:entries="@array/unit_names"
            android:defaultValue="c" />

    </PreferenceCategory>

</PreferenceScreen> 您会注意到我们将设置屏幕分为两个不同的部分(有两个PreferenceScreen标签)。 在第2至7行,当用户选择此选项时,我们将启动另一个“活动”,因为我们必须给用户提供选择城市名称的机会,并在稍后使用的woeid中对其进行解析。 要在PreferenceCategory中启动另一个活动,我们使用一个Intent,传递包名和类名。 第二部分用于选择度量单位系统,如果用户使用°C,则该系统将为公制 。 最好向用户显示当前值,以便在WeatherPreferenceActivity的onCreate方法中添加以下代码行:
SharedPreferences prefs = PreferenceManager.getDefaultSharedPreferences(this);
        // We set the current values in the description
        Preference prefLocation = getPreferenceScreen().findPreference("swa_loc");
        Preference prefTemp = getPreferenceScreen().findPreference("swa_temp_unit");

        prefLocation.setSummary(getResources().getText(R.string.summary_loc) + " " + prefs.getString("cityName", null) + "," + prefs.getString("country", null));

        String unit =  prefs.getString("swa_temp_unit", null) != null ? "°" + prefs.getString("swa_temp_unit", null).toUpperCase() : "";
prefTemp.setSummary(getResources().getText(R.string.summary_temp) + " " + unit);我们在第1行使用了SharedPreference类来保存应用程序设置。
天气客户
现在,我们已经构建了使用户能够配置应用程序的活动,我们可以集中精力于如何构建使用Yahoo!检索天气信息的客户端。 天气客户端。 我们创建一个名为YahooClient的新类,在其中将实现连接远程服务器并检索数据的逻辑。
第一步是创建类结构,该结构将保存我们从远程服务器接收的XML中检索到的信息。 这个类结构以某种方式映射了从服务器接收到的XML,因此我们可以假设我们具有如下所示的图片:
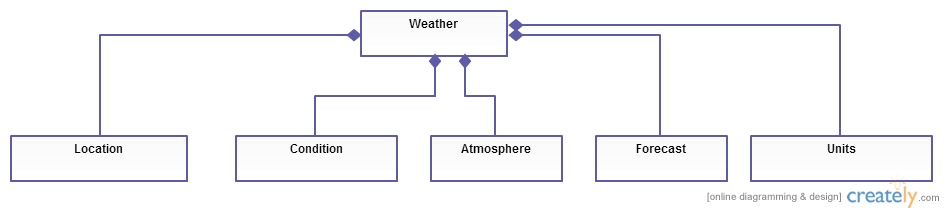
Weather类是将返回并传递回活动以显示信息的类。 我们可以创建一个名为getWeather的静态方法,该方法使用Volley lib连接到远程服务器。 我们必须创建将被调用的URL:
http://weather.yahooapis.com/forecastrss?w=woeid&u=unit现在我们有了可以实现客户端的URL:
public static void getWeather(String woeid, String unit, RequestQueue rq, final WeatherClientListener listener) {
        String url2Call = makeWeatherURL(woeid, unit);
        Log.d("SwA", "Weather URL ["+url2Call+"]");
        final Weather result = new Weather();
        StringRequest req = new StringRequest(Request.Method.GET, url2Call, new Response.Listener<String>() {
            @Override
            public void onResponse(String s) {
                parseResponse(s, result);
                listener.onWeatherResponse(result);
            }
        }, new Response.ErrorListener() {
            @Override
            public void onErrorResponse(VolleyError volleyError) {

            }
        });

        rq.add(req);
    }
在第5行,我们使用GET方法创建HTTP请求,然后等待响应。 如您所知(如果不看这篇介绍如何使用Volley的文章 ),我们有两个侦听器来实现一个处理传入响应的侦听器,另一个实现处理可能发生的错误的侦听器。 目前,我们只想处理响应(请参见第8,9行),首先我们解析XML,然后将结果通知调用方(第9行)。 我们定义我们的监听器:
public static interface WeatherClientListener {
        public void onWeatherResponse(Weather weather);
    }
最后,在第18行,我们将请求添加到队列中。
解析XML非常简单,我们输入了一个保存XML的String,然后寻找我们感兴趣的标签,并创建了pojo( Weather )。 解析器如下所示:
private static Weather parseResponse (String resp, Weather result) {
    Log.d("SwA", "Response ["+resp+"]");
    try {
        XmlPullParser parser = XmlPullParserFactory.newInstance().newPullParser();
        parser.setInput(new StringReader(resp));

        String tagName = null;
        String currentTag = null;

        int event = parser.getEventType();
        boolean isFirstDayForecast = true;
        while (event != XmlPullParser.END_DOCUMENT) {
            tagName = parser.getName();

            if (event == XmlPullParser.START_TAG) {
                if (tagName.equals("yweather:wind")) {
                    ...
                }
                else if (tagName.equals("yweather:atmosphere")) {
                    ...
                }
                else if (tagName.equals("yweather:forecast")) {
                    ...
                }
                else if (tagName.equals("yweather:condition")) {
                    ...
               }
                else if (tagName.equals("yweather:units")) {
                   ...
                }
                else if (tagName.equals("yweather:location")) {
                    ...
                }
                else if (tagName.equals("image"))
                    currentTag = "image";
                else if (tagName.equals("url")) {
                    if (currentTag == null) {
                        result.imageUrl = parser.getAttributeValue(null, "src");
                    }
                }
                else if (tagName.equals("lastBuildDate")) {
                   currentTag="update";
                }
                else if (tagName.equals("yweather:astronomy")) {
                ...
             }

            }
            else if (event == XmlPullParser.END_TAG) {
                if ("image".equals(currentTag)) {
                   currentTag = null;
                }
            }
            else if (event == XmlPullParser.TEXT) {
                if ("update".equals(currentTag))
                    result.lastUpdate = parser.getText();
            }
            event = parser.next();
        }

    }
    catch(Throwable t) {
        t.printStackTrace();
    }

    return result;
}
应用程序导航和ActionBar
下一步是构建应用程序导航结构。 我们已经知道我们有两项活动:一项显示当前的天气状况,另一项用于应用程序设置。 我们可以使用众所周知的操作栏模式来处理这些活动之间的导航。 我们可以在/ res / menu下创建(如果不存在)名为main.xml的文件。 该文件将包含我们要显示给用户的所有菜单项:
<menu xmlns:android="http://schemas.android.com/apk/res/android"
    xmlns:app="http://schemas.android.com/apk/res-auto"
    xmlns:tools="http://schemas.android.com/tools"
    tools:context="com.survivingwithandroid.weather.MainActivity" >

    <item android:id="@+id/action_donate"
        android:title="@string/action_donate"
        android:orderInCategory="100"
        app:showAsAction="never"
        android:icon="@android:drawable/ic_menu_manage"/>

    <item android:id="@+id/action_settings"
        android:title="@string/action_settings"
        android:orderInCategory="100"
        app:showAsAction="never"
        android:icon="@android:drawable/ic_menu_manage"/>

    <item android:id="@+id/action_refresh"
        android:title="@string/action_refresh"
        android:orderInCategory="50"
        android:icon="@drawable/ic_menu_refresh"
        android:showAsAction="ifRoom"/>

    <item android:id="@+id/action_share"
        android:title="@string/action_share"
        android:orderInCategory="50"
        android:icon="@android:drawable/ic_menu_share"
        android:showAsAction="ifRoom"/>


</menu>
结果,我们有:
![android_actionbar_menu_item [5]](http://www.javacodegeeks.com/wp-content/uploads/2014/03/android_actionbar_menu_item5.png)
在MainActivity.java中,我们有:
@Override
public boolean onCreateOptionsMenu(Menu menu) {
    // Inflate the menu; this adds items to the action bar if it is present.
    getMenuInflater().inflate(R.menu.main, menu);
    return true;
}

@Override
public boolean onOptionsItemSelected(MenuItem item) {

    int id = item.getItemId();
    if (id == R.id.action_settings) {
        Intent i = new Intent();
        i.setClass(this, WeatherPreferenceActivity.class);
        startActivity(i);
    }
    else if (id == R.id.action_refresh) {
        refreshItem = item;
        refreshData();
    }
    else if (id == R.id.action_share) {
        String playStoreLink = "https://play.google.com/store/apps/details?id=" +
                getPackageName();

        String msg = getResources().getString(R.string.share_msg) + playStoreLink;
        Intent sendIntent = new Intent();
        sendIntent.setAction(Intent.ACTION_SEND);
        sendIntent.putExtra(Intent.EXTRA_TEXT, msg);
        sendIntent.setType("text/plain");
        startActivity(sendIntent);
    }
    else if (id == R.id.action_donate) {
        SwABillingUtil.showDonateDialog(this, mHelper, this);
    }
    return super.onOptionsItemSelected(item);
}为了提供Up Navigation ,我们将以下代码行添加到WeatherPreferenceActivity的onCreate方法中:
getActionBar().setDisplayHomeAsUpEnabled(true);同时,我们希望当用户在CityFinderActivity中选择城市时,我们返回到偏好屏幕,因此我们添加:
NavUtils.navigateUpFromSameTask(CityFinderActivity.this);MainActivity和App布局
最后一步是设置MainActivity的布局,以显示我们从远程服务器检索到的所有信息。 在这种情况下,我们可以定义一个简单的布局,如下所示:
<RelativeLayout xmlns:android="http://schemas.android.com/apk/res/android"
    xmlns:tools="http://schemas.android.com/tools"
    android:layout_width="match_parent"
    android:layout_height="match_parent"
    android:paddingLeft="@dimen/activity_horizontal_margin"
    android:paddingRight="@dimen/activity_horizontal_margin"
    android:paddingTop="@dimen/activity_vertical_margin"
    android:paddingBottom="@dimen/activity_vertical_margin"
   tools:context="com.survivingwithandroid.weather.MainActivity$PlaceholderFragment">

    <TextView
        android:layout_width="wrap_content"
        android:layout_height="wrap_content"
        android:id="@+id/location"/>

    <RelativeLayout
        android:layout_width="wrap_content"
        android:layout_height="wrap_content"
        android:id="@+id/tempLyt"
        android:layout_below="@id/location"
        android:layout_centerHorizontal="true">

        <TextView
            android:layout_width="wrap_content"
            android:layout_height="wrap_content"
            style="@style/textBig"
            android:id="@+id/temp"
            />
        <TextView
            android:layout_width="wrap_content"
            android:layout_height="3dp"
            android:layout_alignLeft="@id/temp"
            android:layout_alignRight="@id/temp"
            android:id="@+id/lineTxt"
            android:layout_below="@id/temp"
            android:layout_marginTop="0dp" />

        <ImageView
            android:layout_width="48dp"
            android:layout_height="48dp"
            android:layout_marginLeft="10dp"
            android:id="@+id/imgWeather"
            android:layout_toRightOf="@id/temp"
            android:layout_alignTop="@id/temp"
            />

        <TextView
            android:layout_width="wrap_content"
            android:layout_height="wrap_content"
            android:id="@+id/tempUnit"
            android:layout_alignBaseline="@id/temp"
            android:layout_toRightOf="@id/temp"
            android:layout_alignStart="@id/imgWeather"
            style="@style/textSmall"/>

        <TextView
            android:layout_width="wrap_content"
            android:layout_height="wrap_content"
            android:id="@+id/descrWeather"
            android:layout_below="@id/imgWeather"
            android:layout_toRightOf="@id/temp"
            android:layout_alignStart="@id/tempUnit"
            style="@style/textSmall"/>


    </RelativeLayout>


    <!-- Here the current weather data -->

    <!-- Temperature data -->
    <ImageView
        android:layout_width="32dp"
        android:layout_height="32dp"
        android:id="@+id/tempIcon"
        android:src="@drawable/temperature"
        android:layout_below="@id/tempLyt"
        android:layout_marginTop="10dp"/>
    <TextView
        android:layout_width="wrap_content"
        android:layout_height="wrap_content"
        android:id="@+id/tempMin"
        android:layout_toRightOf="@id/tempIcon"
        android:layout_alignTop="@id/tempIcon"
        android:layout_marginTop="12dp"
        android:layout_marginLeft="10dp"/>
    <TextView
        android:layout_width="wrap_content"
        android:layout_height="wrap_content"
        android:id="@+id/tempMax"
        android:layout_toRightOf="@id/tempMin"
        android:layout_alignBaseline="@id/tempMin"
        android:layout_marginLeft="10dp"/>
    <!-- End temp Data -->

    <!-- Wind data -->
    <ImageView
        android:layout_width="32dp"
        android:layout_height="32dp"
        android:id="@+id/windIcon"
        android:src="@drawable/wind"
        android:layout_below="@id/tempIcon"
        android:layout_marginTop="10dp"/>
    <TextView
        android:layout_width="wrap_content"
        android:layout_height="wrap_content"
        android:id="@+id/windSpeed"
        android:layout_toRightOf="@id/windIcon"
        android:layout_alignTop="@id/windIcon"
        android:layout_marginTop="12dp"
        android:layout_alignStart="@id/tempMin"
        android:layout_marginLeft="10dp"/>
    <TextView
        android:layout_width="wrap_content"
        android:layout_height="wrap_content"
        android:id="@+id/windDeg"
        android:layout_toRightOf="@id/windSpeed"
        android:layout_alignBaseline="@id/windSpeed"
        android:layout_marginLeft="10dp"/>
    <!-- End wind Data -->

   <!-- Humidity -->
    <ImageView
        android:layout_width="32dp"
        android:layout_height="32dp"
        android:id="@+id/humidityIcon"
        android:src="@drawable/humidity"
        android:layout_below="@id/windIcon"
        android:layout_marginTop="10dp"/>
    <TextView
        android:layout_width="wrap_content"
        android:layout_height="wrap_content"
        android:id="@+id/humidity"
        android:layout_toRightOf="@id/humidityIcon"
        android:layout_alignTop="@id/humidityIcon"
        android:layout_marginTop="12dp"
        android:layout_alignStart="@id/tempMin"
        android:layout_marginLeft="10dp"/>
    <!-- End Humidity Data -->

    <!-- Pressure data -->
    <ImageView
        android:layout_width="32dp"
        android:layout_height="32dp"
        android:id="@+id/pressureIcon"
        android:src="@drawable/pressure"
        android:layout_below="@id/humidityIcon"
        android:layout_marginTop="10dp"/>
    <TextView
        android:layout_width="wrap_content"
        android:layout_height="wrap_content"
        android:id="@+id/pressure"
        android:layout_toRightOf="@id/pressureIcon"
        android:layout_alignTop="@id/pressureIcon"
        android:layout_marginTop="12dp"
        android:layout_alignStart="@id/tempMin"
        android:layout_marginLeft="10dp"/>
    <TextView
        android:layout_width="wrap_content"
        android:layout_height="wrap_content"
        android:id="@+id/pressureStat"
        android:layout_toRightOf="@id/pressure"
        android:layout_alignBaseline="@id/pressure"
        android:layout_marginLeft="10dp"/>
    <!-- End Pressure data -->

    <!-- Visibility -->
    <ImageView
        android:layout_width="32dp"
        android:layout_height="32dp"
        android:id="@+id/visibilityIcon"
        android:src="@drawable/eye"
        android:layout_below="@id/pressureIcon"
        android:layout_marginTop="10dp"/>
    <TextView
        android:layout_width="wrap_content"
        android:layout_height="wrap_content"
        android:id="@+id/visibility"
        android:layout_toRightOf="@id/visibilityIcon"
        android:layout_alignTop="@id/visibilityIcon"
        android:layout_marginTop="12dp"
        android:layout_alignStart="@id/tempMin"
        android:layout_marginLeft="10dp"/>
    <!-- End visibility -->

    <!-- Astronomy -->
    <ImageView
        android:layout_width="32dp"
        android:layout_height="32dp"
        android:id="@+id/sunIcon"
        android:src="@drawable/sun"
        android:layout_below="@id/visibilityIcon"
        android:layout_marginTop="10dp"/>
    <TextView
        android:layout_width="wrap_content"
        android:layout_height="wrap_content"
        android:id="@+id/sunrise"
        android:layout_toRightOf="@id/sunIcon"
        android:layout_alignTop="@id/sunIcon"
        android:layout_marginTop="12dp"
        android:layout_alignStart="@id/tempMin"
        android:layout_marginLeft="10dp"/>
    <ImageView
        android:layout_width="32dp"
        android:layout_height="32dp"
        android:id="@+id/moonIcon"
        android:src="@drawable/moon"
        android:layout_below="@id/sunIcon"
        android:layout_marginTop="10dp"/>
    <TextView
        android:layout_width="wrap_content"
        android:layout_height="wrap_content"
        android:id="@+id/sunset"
        android:layout_toRightOf="@id/moonIcon"
        android:layout_alignTop="@id/moonIcon"
        android:layout_marginTop="12dp"
        android:layout_alignStart="@id/tempMin"
        android:layout_marginLeft="10dp"/>

    <!-- End astronomy -->
    <TextView
        android:layout_width="wrap_content"
        android:layout_height="wrap_content"
        android:layout_alignParentBottom="true"
        android:layout_alignParentRight="true"
        android:text="@string/provider"
        style="@style/textVerySmall"
        />
</RelativeLayout>
布局结构如下所示:
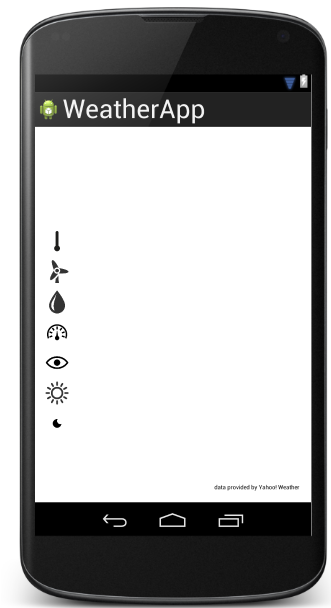
在运行时,将从XML提取的数据填充此布局。
现在在MainActivity中,我们只需调用YahooClient即可检索数据并协调活动:
protected void onCreate(Bundle savedInstanceState) {
 ...
 refreshData();
}

private void refreshData() {

    if (prefs == null)
        return ;

    String woeid = prefs.getString("woeid", null);

    if (woeid != null) {
        String loc = prefs.getString("cityName", null) + "," + prefs.getString("country", null);
        String unit = prefs.getString("swa_temp_unit", null);
        handleProgressBar(true);

        YahooClient.getWeather(woeid, unit, requestQueue, new YahooClient.WeatherClientListener() {
            @Override
            public void onWeatherResponse(Weather weather) {
                // We update the view
                ..
                // We retrieve the image
                IWeatherImageProvider provider = new WeatherImageProvider();
                provider.getImage(code, requestQueue, new IWeatherImageProvider.WeatherImageListener() {
                    @Override
                    public void onImageReady(Bitmap image) {
                        weatherImage.setImageBitmap(image);
                    }
                });
                handleProgressBar(false);
            }
        });


    }
}
在refreshData方法中,我们仅检索存储在SharedPreferences中的应用程序设置(请参见第11,14,15行),在第18行,我们调用YahooClient方法getWeather来检索数据。 我们必须记住,我们在后台线程中调用HTTP URL以避免ANR问题,因此我们使用侦听器等待响应(请参见第20行)。 收到响应后,我们将更新视图。 最后,在第25行,我们检索与天气状况有关的图像。
- 源代码可用@ github
翻译自: https://www.javacodegeeks.com/2014/03/android-weather-app-tutorial-step-by-step-guide-part-2.html
weather icon


 1307
1307

 被折叠的 条评论
为什么被折叠?
被折叠的 条评论
为什么被折叠?
 到【灌水乐园】发言


