


 本文介绍了如何使用esp8266替代Raspberry Pi作为I2C传感器的网络主机,利用其WiFi功能通过MQTT发送传感器数据。内容包括esp8266的优势、硬件选择、Arduino IDE的集成、必要的库和软件设置,以及如何将esp8266进入Flash模式进行固件上传。
传感器 esp8266
对于我的室外传感器,我使用了一个RaspberryPi,它具有通过I 2 C连接的BMP180 + TSL2561,将传感器数据作为MQTT消息传输。
在法兰克福以代码为中心的办公室举行的物联网聚会会议上,我们讨论了esp8266的用法,我很高兴得到它并使用它。
很快就发现esp8266是非常好的硬件,我计划更换充当网络传感器主机的Raspberry Pi。 借助esp8266的wifi功能,我仍然可以使用MQTT方法运行I 2 C传感器。
例如 当前安装在户外的Raspberry Pi将值发送给这些主题
- sweethome /传感器/室外/温度
- sweethome /传感器/室外/压力
- sweethome /传感器/室外/ lux
如果让esp8266发布到这些主题,我的网络其余部分也不会意识到有变化...
计划:保留I
 |  | |
|---|---|---|
| 树莓派 | HUZAAH ESP8266突破 | |
| SD卡: | 40€ | 10€ |
| 无线局域网 | 8€ | – |
| 总: | 52€ | 10€ |
| 能量消耗: | 3W | 1瓦 |
硬件
集成开发环境
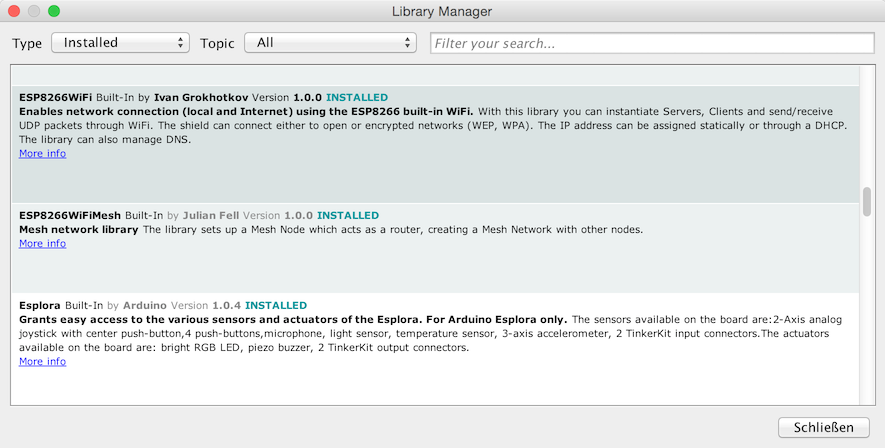
图书馆
几乎所有库都可以通过Arduino IDE库管理器轻松安装。 除esp8266支持外,还必须设置其他董事会管理器URL: http ://arduino.esp8266.com/stable/package_esp8266com_index.json

- ESP8266WiFi
- Adafruit BMP085统一
- Adafruit TSL2561统一
- Adafruit MQTT库
软件
esp8266分支具有对LUA的内置支持,但我决定将其刷新以准备与Arduino IDE和C ++一起使用(主要是因为Adafruit很好地支持了驱动程序)。
#include <ESP8266WiFi.h>
#include "Adafruit_MQTT.h"
#include "Adafruit_MQTT_Client.h"
#include <Wire.h>
#include <Adafruit_Sensor.h>
#include <Adafruit_BMP085_U.h>
#include <Adafruit_TSL2561_U.h>

/************************* WiFi Access Point *********************************/

#define WLAN_SSID       "Lummerland"
#define WLAN_PASS       "****************"

/************************* MQTT Broker Setup *********************************/

const int MQTT_PORT = 1883;
const char MQTT_SERVER[] PROGMEM    = "192.168.0.61";
const char MQTT_CLIENTID[] PROGMEM  = "ESP-PUBLISHER-SERVICE";
const char MQTT_USERNAME[] PROGMEM  = "********";
const char MQTT_PASSWORD[] PROGMEM  = "********";

// Create an ESP8266 WiFiClient class to connect to the MQTT server.
WiFiClient client;

Adafruit_MQTT_Client mqtt(&client, MQTT_SERVER, MQTT_PORT, MQTT_CLIENTID, MQTT_USERNAME, MQTT_PASSWORD);

/****************************** Feeds ***************************************/
const char TEMPERATURE_FEED[] PROGMEM = "sweethome/sensors/outdoor/temperature";
Adafruit_MQTT_Publish temperature_topic = Adafruit_MQTT_Publish(&mqtt, TEMPERATURE_FEED);

const char PRESSURE_FEED[] PROGMEM = "sweethome/sensors/outdoor/pressure";
Adafruit_MQTT_Publish pressure_topic = Adafruit_MQTT_Publish(&mqtt, PRESSURE_FEED);

const char LUMINOSITY_FEED[] PROGMEM = "sweethome/sensors/outdoor/lux";
Adafruit_MQTT_Publish luminosity_topic = Adafruit_MQTT_Publish(&mqtt, LUMINOSITY_FEED);

Adafruit_BMP085_Unified bmp = Adafruit_BMP085_Unified(10085);
Adafruit_TSL2561_Unified tsl = Adafruit_TSL2561_Unified(TSL2561_ADDR_FLOAT, 12345);

/*************************** Sketch Code ************************************/

void setup() {
  Serial.begin(115200);
  delay(10);

  Serial.println("Sensor Test");
  if (!bmp.begin())
  {
    Serial.print("Ooops, no BMP180 detected ... Check your wiring or I2C ADDR!");
    while (1);
  }
  else {
    Serial.println("BMP180 ready.");
  }
  if (!tsl.begin())
  {
    Serial.print("Ooops, no TSL2561 detected ... Check your wiring or I2C ADDR!");
    while (1);
  }
  else {
    Serial.println("TSL2561 ready.");
  }

  configureTSL2561();

  // Connect to WiFi access point.
  Serial.println();
  Serial.print("Connecting to ");
  Serial.println(WLAN_SSID);

  WiFi.begin(WLAN_SSID, WLAN_PASS);
  while (WiFi.status() != WL_CONNECTED) {
    delay(500);
    Serial.print(".");
  }
  Serial.println();

  Serial.println("WiFi connected");
  Serial.println("IP address: "); Serial.println(WiFi.localIP());
}

void loop() {
  MQTT_connect();

  /* Get a new sensor event */
  sensors_event_t bmpEvent;
  bmp.getEvent(&bmpEvent);

  if (bmpEvent.pressure)
  {
    float temperature;
    bmp.getTemperature(&temperature);
    Serial.print("Temperature: ");
    Serial.print(temperature);
    Serial.println(" C");
    Serial.print("Publish Temperature: ");
    if (! temperature_topic.publish(temperature)) {
      Serial.println("Failed");
    } else {
      Serial.println("OK!");
    }

    float pressure = bmpEvent.pressure;
    Serial.print("Pressure:    ");
    Serial.print(pressure);
    Serial.println(" hPa");
    Serial.print("Publish Pressure: ");
    if (! pressure_topic.publish(pressure)) {
      Serial.println("Failed");
    } else {
      Serial.println("OK!");
    }
  }
  else
  {
    Serial.println("Sensor error");
  }

  sensors_event_t tslEvent;
  tsl.getEvent(&tslEvent);
  unsigned int luminosity = 0;
  if (tslEvent.light)
  {
    luminosity = tslEvent.light;
  }

  Serial.print("Luminosity:   ");
  Serial.print(luminosity);
  Serial.println(" lux");
  Serial.print("Publish Luminosity: ");
  if (! luminosity_topic.publish(luminosity)) {
    Serial.println("Failed");
  } else {
    Serial.println("OK!");
  }

  delay(5000);
}

void configureTSL2561()
{
  /* You can also manually set the gain or enable auto-gain support */
  // tsl.setGain(TSL2561_GAIN_1X);      /* No gain ... use in bright light to avoid sensor saturation */
  // tsl.setGain(TSL2561_GAIN_16X);     /* 16x gain ... use in low light to boost sensitivity */
  tsl.enableAutoRange(true);            /* Auto-gain ... switches automatically between 1x and 16x */

  /* Changing the integration time gives you better sensor resolution (402ms = 16-bit data) */
  tsl.setIntegrationTime(TSL2561_INTEGRATIONTIME_13MS);      /* fast but low resolution */
  // tsl.setIntegrationTime(TSL2561_INTEGRATIONTIME_101MS);  /* medium resolution and speed   */
  // tsl.setIntegrationTime(TSL2561_INTEGRATIONTIME_402MS);  /* 16-bit data but slowest conversions */
}

void MQTT_connect() {
  int8_t ret;

  // Stop if already connected.
  if (mqtt.connected()) {
    return;
  }

  Serial.print("Connecting to MQTT... ");

  while ((ret = mqtt.connect()) != 0) { // connect will return 0 for connected
    switch (ret) {
      case 1: Serial.println("Wrong protocol"); break;
      case 2: Serial.println("ID rejected"); break;
      case 3: Serial.println("Server unavailable"); break;
      case 4: Serial.println("Bad user/password"); break;
      case 5: Serial.println("Not authenticated"); break;
      case 6: Serial.println("Failed to subscribe"); break;
      default: Serial.print("Couldn't connect to server, code: ");
        Serial.println(ret);
        break;
    }
    Serial.println("Retrying MQTT connection in 5 seconds...");
    mqtt.disconnect();
    delay(5000);  // wait 5 seconds
  }
  Serial.println("MQTT Connected!");
}
要使程序在esp板上运行,您必须
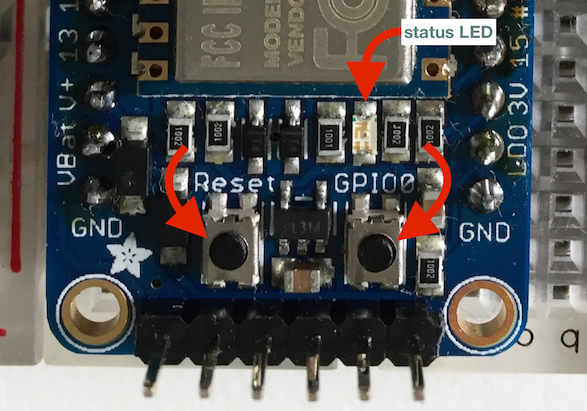
使esp8266进入Flash模式
按住+按住“重置”按钮,然后按+按住“ GPIO0”按钮,然后释放“重置”按钮,然后释放“ GPIO0”按钮 ->红色LED点亮(亮度较低)
准备上传
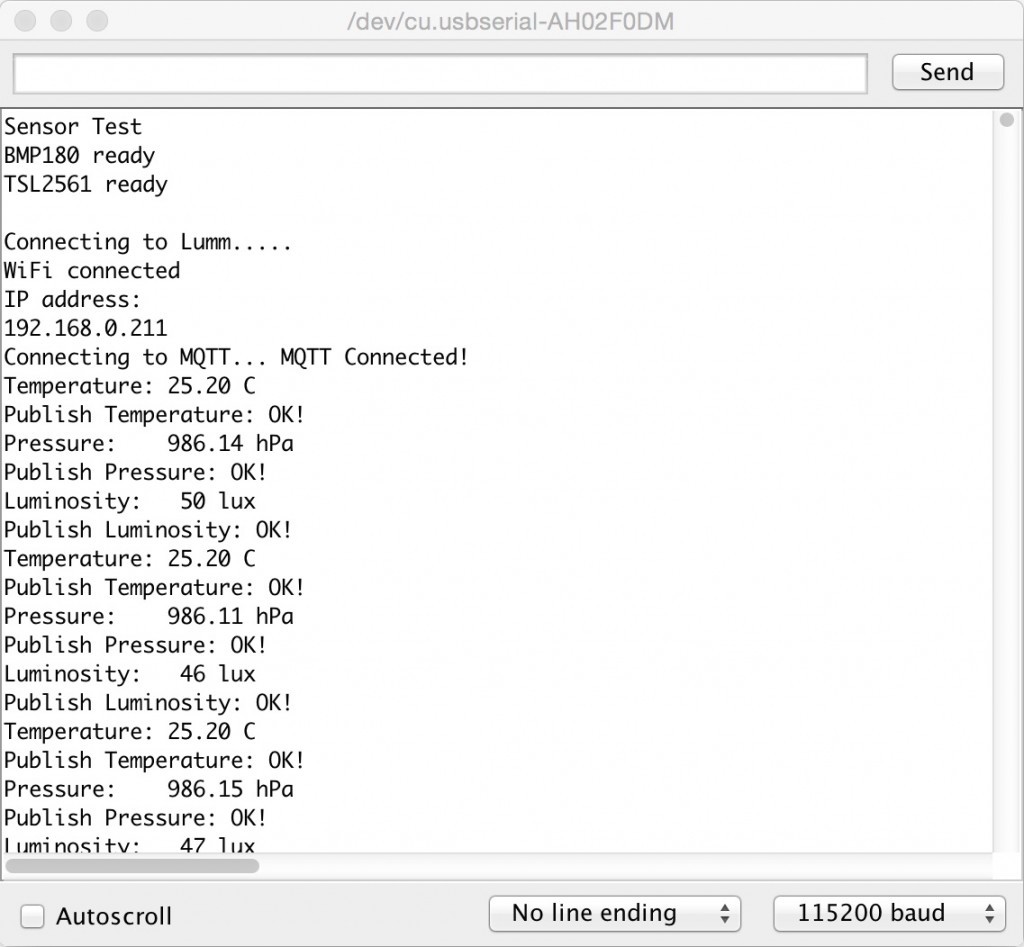
打开串行监视器以查看发生了什么:
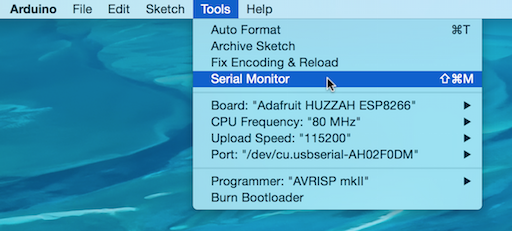
注意“ Board”,“ CPU Frequency”,“ Upload Speed”和“ Port”设置!
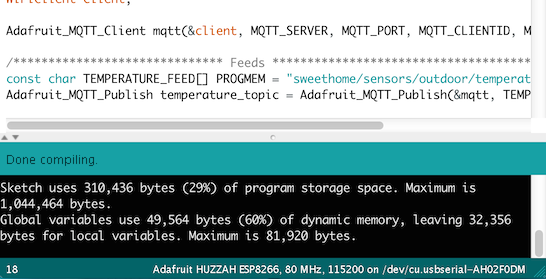
上传之前,您可以通过单击“验证”来构建程序:

然后开始上传:
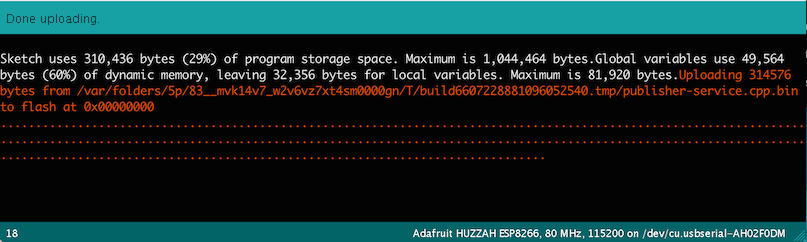
该程序立即启动,并且串行监视器显示发生了什么情况:
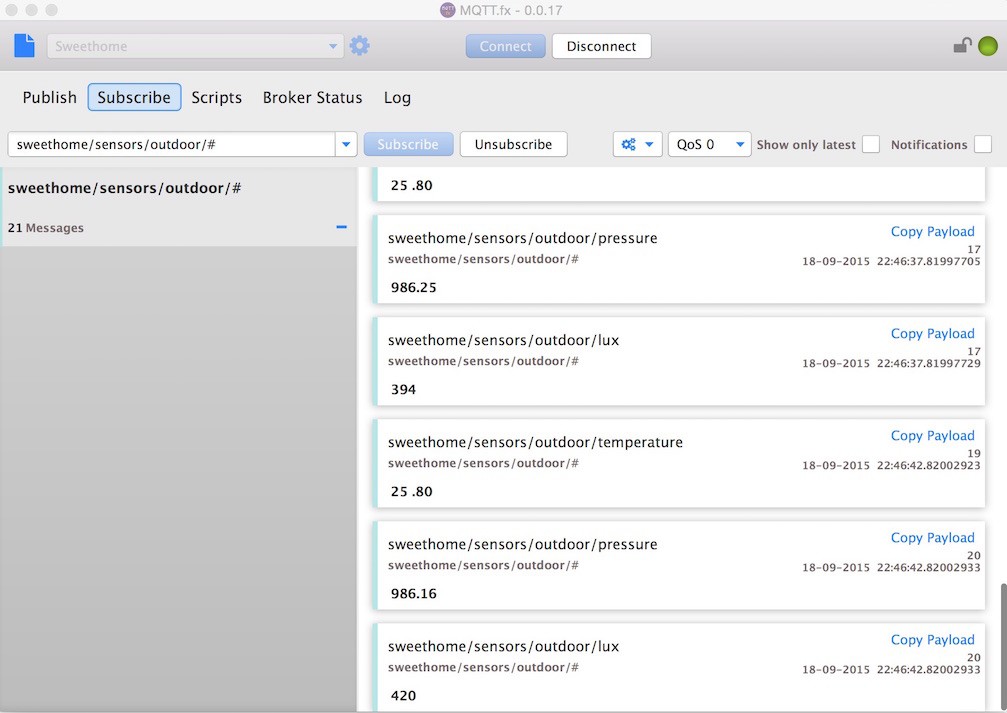
要调试/监视MQTT消息,我正在使用MQTT.fx (当然;-)):
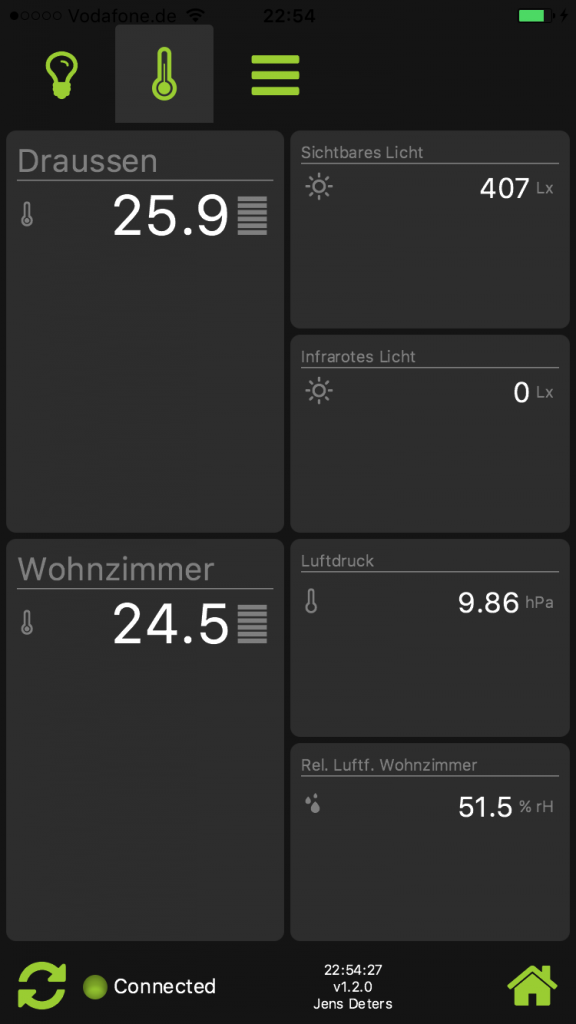
无需更改我的网络的其他组件。 替换对(移动)客户端也是透明的:
翻译自: https://www.javacodegeeks.com/2015/09/using-the-esp8266-as-host-for-i2c-sensors.html
传感器 esp8266


 500
500

 被折叠的 条评论
为什么被折叠?
被折叠的 条评论
为什么被折叠?
 到【灌水乐园】发言


