Linux0.11内核源代码(3)

	movl $0x10,%eax/*设置数据寄存器,注意CS段寄存器设置为8,而数据寄存器设置为16.仅一位有差距*/
	mov %ax,%ds
	mov %ax,%es
	mov %ax,%fs
	mov %ax,%gs
	lss _stack_start,%esp
	call setup_idt
	call setup_gdt
	movl $0x10,%eax		# reload all the segment registers
	mov %ax,%ds		# after changing gdt. CS was already
	mov %ax,%es		# reloaded in 'setup_gdt'
	mov %ax,%fs
	mov %ax,%gs
	lss _stack_start,%esp
	xorl %eax,%eax
1:	incl %eax		# check that A20 really IS enabled
	movl %eax,0x000000	# loop forever if it isn't
	cmpl %eax,0x100000
	je 1b
	movl %cr0,%eax		# check math chip
	andl $0x80000011,%eax	# Save PG,PE,ET
	orl $2,%eax		# set MP
	movl %eax,%cr0
	call check_x87
	jmp after_page_tables
check_x87:
和之前一样,代码起始位置设置段寄存器,由于已经定义了GDTR;所以这里只需要设置相应的索引就可以了。注意这里设置的索引刚好是GDTR中的第二项。由于第二项的基地址是0x0,因此以后要读取相应的数据就需要加上偏移,(数据都存放在0x8000以上)。然后开始设置堆栈段和堆栈指针。lss就可以实现。其中stack_start的定义如下:
struct {
	long * a;
	short b;
	} stack_start = { & user_stack [PAGE_SIZE>>2] , 0x10 };
其中,堆栈段寄存器同样被设置为0x10,而堆栈指针则是一个在编译时推导出来的值。现在只要知道这个位置设置很安全就可以了,相关的数据会在下一步分析。设置堆栈之后就可以重新设置IDTR和GDTR了,由于在之前的IDTR中并没有实质性的数据。由于GDT变化了,所以相应的需要重新设置段寄存器和堆栈指针。然后验证内存是否回卷,如果回卷,则写到0x000000处的数据将会出现在0x100000处。到了这一步,因为原来有设置CR0寄存器,所以需要将原来的数值保存起来。
check_x87:
	fninit
	fstsw %ax
	cmpb $0,%al
	je 1f			/* no coprocessor: have to set bits */
	movl %cr0,%eax
	xorl $6,%eax		/* reset MP, set EM */
	movl %eax,%cr0
	ret
.align 2
1:	.byte 0xDB,0xE4		/* fsetpm for 287, ignored by 387 */
	ret
然后测试是否存在浮点数处理器,如果没有浮点数处理器则需要设置CR0中的相应的位。
setup_idt:
	lea ignore_int,%edx
	movl $0x00080000,%eax
	movw %dx,%ax		/* selector = 0x0008 = cs */
	movw $0x8E00,%dx	/* interrupt gate - dpl=0, present */
	lea _idt,%edi
	mov $256,%ecx
rp_sidt:
	movl %eax,(%edi)
	movl %edx,4(%edi)
	addl $8,%edi
	dec %ecx
	jne rp_sidt
	lidt idt_descr
	ret
setup_gdt:
	lgdt gdt_descr
	ret
.org 0x1000

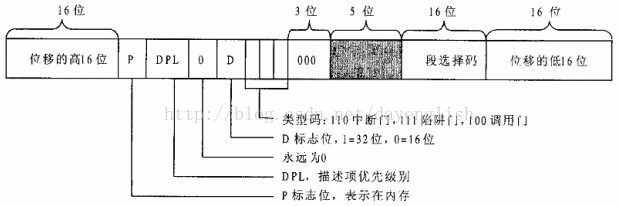
对IDTR的初始化,也是一个比较复杂的位处理,不过和GDTR表项的设置一样,整个表项比较重要的是段选择器(段基址),然后相对段的偏移以及DPL。整个IDT表项如同上面一样,其中低32位存放在EAX中,而高32位则存放在EDX中。然后,利用循环开始填充IDT表项,最后将IDT表项给存放到IDTR中。注意IDTR中的基址和上限的设置。同样对GDTR的设置也很简单。

.org 0x1000
pg0:
.org 0x2000
pg1:
.org 0x3000
pg2:
.org 0x4000
pg3:
.org 0x5000
_tmp_floppy_area:
	.fill 1024,1,0
after_page_tables:
	pushl $0		# These are the parameters to main :-)
	pushl $0
	pushl $0
	pushl $L6		# return address for main, if it decides to.
	pushl $_main
	jmp setup_paging
L6:
	jmp L6
int_msg:
	.asciz "Unknown interrupt\n\r"
.align 2
ignore_int:
	pushl %eax
	pushl %ecx
	pushl %edx
	push %ds
	push %es
	push %fs
	movl $0x10,%eax
	mov %ax,%ds
	mov %ax,%es
	mov %ax,%fs
	pushl $int_msg
	call _printk
	popl %eax
	pop %fs
	pop %es
	pop %ds
	popl %edx
	popl %ecx
	popl %eax
	iret
after_page_tables中开始,首先进行压栈操作,然后将主函数的地址也存放到堆栈中,因此调用主函数只需要一个ret返回就可以了。

下面的ignore_int函数,首先保存寄存器。然后重新设置段寄存器,这里的设置使得整个代码在内核中进行处理,注意此时代码段已经设置好了。设置之后调用内核的printk函数进行打印输出。

.align 2
setup_paging:
	movl $1024*5,%ecx		/* 5 pages - pg_dir+4 page tables */
	xorl %eax,%eax
	xorl %edi,%edi			/* pg_dir is at 0x000 */
	cld;rep;stosl
	movl $pg0+7,_pg_dir		/* set present bit/user r/w */
	movl $pg1+7,_pg_dir+4		/*  --------- " " --------- */
	movl $pg2+7,_pg_dir+8		/*  --------- " " --------- */
	movl $pg3+7,_pg_dir+12		/*  --------- " " --------- */
	movl $pg3+4092,%edi
	movl $0xfff007,%eax		/*  16Mb - 4096 + 7 (r/w user,p) */
	std
1:	stosl			/* fill pages backwards - more efficient :-) */
	subl $0x1000,%eax
	jge 1b
	xorl %eax,%eax		/* pg_dir is at 0x0000 */
	movl %eax,%cr3		/* cr3 - page directory start */
	movl %cr0,%eax
	orl $0x80000000,%eax
	movl %eax,%cr0		/* set paging (PG) bit */
	ret			/* this also flushes prefetch-queue */
.align 2
.word 0
idt_descr:
	.word 256*8-1		# idt contains 256 entries
	.long _idt
.align 2
.word 0
gdt_descr:
	.word 256*8-1		# so does gdt (not that that's any
	.long _gdt		# magic number, but it works for me :^)
	.align 3
_idt:	.fill 256,8,0		# idt is uninitialized
_gdt:	.quad 0x0000000000000000	/* NULL descriptor */
	.quad 0x00c09a0000000fff	/* 16Mb */
	.quad 0x00c0920000000fff	/* 16Mb */
	.quad 0x0000000000000000	/* TEMPORARY - don't use */
	.fill 252,8,0			/* space for LDT's and TSS's etc */
Linux对页面的处理分为两个部分,第一个是页目录表,第二项才是页表,最后才是偏移。16MB内存下,有4K个页,则需要4K*4个页表项建立地址映射关系,这四个页表存在于页目录表中,在这里存储在内存地址为0的页中,因此需要清除5个页表为0,然后进行设置。在设置页目录后就对页表进行设置,页表中每四个字节存储一个物理地址,这个物理地址和虚拟地址进行映射找到物理地址。不过这里的映射关系都是直接对应的映射关系。也就是高位内存存放在物理的高位内存中。因此在接下来的访问中和没有设置页表是一样的。

目录树 下面再给个样例 ├─Makefile │ ├─boot │ bootsect.s │ head.s │ setup.s │ ├─fs │ bitmap.c │ block_dev.c │ buffer.c │ char_dev.c │ exec.c │ fcntl.c │ file_dev.c │ file_table.c │ inode.c │ ioctl.c │ Makefile │ namei.c │ open.c │ pipe.c │ read_write.c │ stat.c │ super.c │ truncate.c │ ├─include │ │ a.out.h │ │ const.h │ │ ctype.h │ │ errno.h │ │ fcntl.h │ │ signal.h │ │ stdarg.h │ │ stddef.h │ │ string.h │ │ termios.h │ │ time.h │ │ unistd.h │ │ utime.h │ │ │ ├─asm │ │ io.h │ │ memory.h │ │ segment.h │ │ system.h │ │ │ ├─linux │ │ config.h │ │ fs.h │ │ hdreg.h │ │ head.h │ │ kernel.h │ │ mm.h │ │ sched.h │ │ sys.h │ │ tty.h │ │ │ └─sys │ stat.h │ times.h │ types.h │ utsname.h │ wait.h │ ├─init │ main.c │ ├─kernel │ │ asm.s │ │ exit.c │ │ fork.c │ │ mktime.c │ │ panic.c │ │ printk.c │ │ sched.c │ │ signal.c │ │ sys.c │ │ system_call.s │ │ vsprintf.c │ │ │ ├─blk_drv │ │ blk.h │ │ floppy.c │ │ hd.c │ │ ll_rw_blk.c │ │ Makefile │ │ ramdisk.c │ │ │ ├─chr_drv │ │ console.c │ │ keyboard.S │ │ Makefile │ │ rs_io.s │ │ serial.c │ │ tty_io.c │ │ tty_ioctl.c │ │ │ └─math │ Makefile │ math_emulate. │ ├─lib │ close.c │ ctype.c │ dup.c │ errno.c │ execve.c │ Makefile │ malloc.c │ open.c │ setsid.c │ string.c │ wait.c │ write.c │ _exit.c │ ├─mm │ Makefile │ memory.c │ page.s │ └─tools build.c 样例 main。c 用sourceinsight软件阅读 很方便 /* * linux/init/main.c * * (C) 1991 Linus Torvalds */ #define __LIBRARY__ // 定义该变量是为了包括定义在unistd.h 中的内嵌汇编代码等信息。 #include // *.h 头文件所在的默认目录是include/,则在代码中就不用明确指明位置。 // 如果不是UNIX 的标准头文件,则需要指明所在的目录,并用双引号括住。 // 标准符号常数与类型文件。定义了各种符号常数和类型,并申明了各种函数。 // 如果定义了__LIBRARY__,则还包括系统调用号和内嵌汇编代码_syscall0()等。 #include // 时间类型头文件。其中最主要定义了tm 结构和一些有关时间的函数原形。 /* * we need this inline - forking from kernel space will result * in NO COPY ON WRITE (!!!), until an execve is executed. This * is no problem, but for the stack. This is handled by not letting * main() use the stack at all after fork(). Thus, no function * calls - which means inline code for fork too, as otherwise we * would use the stack upon exit from 'fork()'. * * Actually only pause and fork are needed inline, so that there * won't be any messing with the stack from main(), but we define * some others too. */ /* * 我们需要下面这些内嵌语句 - 从内核空间创建进程(forking)将导致没有写时复制(COPY ON WRITE)!!! * 直到一个执行execve 调用。这对堆栈可能带来问题。处理的方法是在fork()调用之后不让main()使用 * 任何堆栈。因此就不能有函数调用 - 这意味着fork 也要使用内嵌的代码,否则我们在从fork()退出 * 时就要使用堆栈了。 * 实际上只有pause 和fork 需要使用内嵌方式,以保证从main()中不会弄乱堆栈,但是我们同时还 * 定义了其它一些函数。 */ static inline _syscall0 (int, fork) // 是unistd.h 中的内嵌宏代码。以嵌入汇编的形式调用 // Linux 的系统调用中断0x80。该中断是所有系统调用的 // 入口。该条语句实际上是int fork()创建进程系统调用。 // syscall0 名称中最后的0 表示无参数,1 表示1 个参数。 static inline _syscall0 (int, pause) // int pause()系统调用:暂停进程的执行,直到 // 收到一个信号。 static inline _syscall1 (int, setup, void *, BIOS) // int setup(void * BIOS)系统调用,仅用于 // linux 初始化(仅在这个程序中被调用)。 static inline _syscall0 (int, sync) // int sync()系统调用:更新文件系统。 #include // tty 头文件,定义了有关tty_io,串行通信方面的参数、常数。 #include // 调度程序头文件,定义了任务结构task_struct、第1 个初始任务 // 的数据。还有一些以宏的形式定义的有关描述符参数设置和获取的 // 嵌入式汇编函数程序。 #include // head 头文件,定义了段描述符的简单结构,和几个选择符常量。 #include // 系统头文件。以宏的形式定义了许多有关设置或修改 // 描述符/中断门等的嵌入式汇编子程序。 #include // io 头文件。以宏的嵌入汇编程序形式定义对io 端口操作的函数。 #include // 标准定义头文件。定义了NULL, offsetof(TYPE, MEMBER)。 #include // 标准参数头文件。以宏的形式定义变量参数列表。主要说明了-个 // 类型(va_list)和三个宏(va_start, va_arg 和va_end),vsprintf、 // vprintf、vfprintf。 #include #include // 文件控制头文件。用于文件及其描述符的操作控制常数符号的定义。 #include // 类型头文件。定义了基本的系统数据类型。 #include // 文件系统头文件。定义文件表结构(file,buffer_head,m_inode 等)。 static char printbuf[1024]; // 静态字符串数组。 extern int vsprintf (); // 送格式化输出到一字符串中(在kernel/vsprintf.c,92 行)。 extern void init (void); // 函数原形,初始化(在168 行)。 extern void blk_dev_init (void); // 块设备初始化子程序(kernel/blk_drv/ll_rw_blk.c,157 行) extern void chr_dev_init (void); // 字符设备初始化(kernel/chr_drv/tty_io.c, 347 行) extern void hd_init (void); // 硬盘初始化程序(kernel/blk_drv/hd.c, 343 行) extern void floppy_init (void); // 软驱初始化程序(kernel/blk_drv/floppy.c, 457 行) extern void mem_init (long start, long end); // 内存管理初始化(mm/memory.c, 399 行) extern long rd_init (long mem_start, int length); //虚拟盘初始化(kernel/blk_drv/ramdisk.c,52) extern long kernel_mktime (struct tm *tm); // 建立内核时间(秒)。 extern long startup_time; // 内核启动时间(开机时间)(秒)。 /* * This is set up by the setup-routine at boot-time */ /* * 以下这些数据是由setup.s 程序在引导时间设置的(参见第2 章2.3.1 节中的表2.1)。 */ #define EXT_MEM_K (*(unsigned short *)0x90002) // 1M 以后的扩展内存大小(KB)。 #define DRIVE_INFO (*(struct drive_info *)0x90080) // 硬盘参数表基址。 #define ORIG_ROOT_DEV (*(unsigned short *)0x901FC) // 根文件系统所在设备号。 /* * Yeah, yeah, it's ugly, but I cannot find how to do this correctly * and this seems to work. I anybody has more info on the real-time * clock I'd be interested. Most of this was trial and error, and some * bios-listing reading. Urghh. */ /* * 是啊,是啊,下面这段程序很差劲,但我不知道如何正确地实现,而且好象它还能运行。如果有 * 关于实时时钟更多的资料,那我很感兴趣。这些都是试探出来的,以及看了一些bios 程序,呵! */ #define CMOS_READ(addr) ({ \ // 这段宏读取CMOS 实时时钟信息。 outb_p (0x80 | addr, 0x70); \ // 0x70 是写端口号,0x80|addr 是要读取的CMOS 内存地址。 inb_p (0x71); \ // 0x71 是读端口号。 } ) #define BCD_TO_BIN(val) ((val)=((val)&15) + ((val)>>4)*10) // 将BCD 码转换成数字。 static void time_init (void) // 该子程序取CMOS 时钟,并设置开机时间??startup_time(秒)。 { struct tm time; do { time.tm_sec = CMOS_READ (0); // 参见后面CMOS 内存列表。 time.tm_min = CMOS_READ (2); time.tm_hour = CMOS_READ (4); time.tm_mday = CMOS_READ (7); time.tm_mon = CMOS_READ (8); time.tm_year = CMOS_READ (9); } while (time.tm_sec != CMOS_READ (0)); BCD_TO_BIN (time.tm_sec); BCD_TO_BIN (time.tm_min); BCD_TO_BIN (time.tm_hour); BCD_TO_BIN (time.tm_mday); BCD_TO_BIN (time.tm_mon); BCD_TO_BIN (time.tm_year); time.tm_mon--; startup_time = kernel_mktime (&time); } static long memory_end = 0; // 机器具有的内存(字节数)。 static long buffer_memory_end = 0; // 高速缓冲区末端地址。 static long main_memory_start = 0; // 主内存(将用于分页)开始的位置。 struct drive_info { char dummy[32]; } drive_info; // 用于存放硬盘参数表信息。 void main (void) /* This really IS void, no error here. */ { /* The startup routine assumes (well, ...) this */ /* 这里确实是void,并没错。在startup 程序(head.s)中就是这样假设的。 */ // 参见head.s 程序第136 行开始的几行代码。 /* * Interrupts are still disabled. Do necessary setups, then * enable them */ /* * 此时中断仍被禁止着,做完必要的设置后就将其开启。 */ // 下面这段代码用于保存: // 根设备号 ??ROOT_DEV; 高速缓存末端地址??buffer_memory_end; // 机器内存数??memory_end;主内存开始地址 ??main_memory_start; ROOT_DEV = ORIG_ROOT_DEV; drive_info = DRIVE_INFO; memory_end = (1 << 20) + (EXT_MEM_K < 16 * 1024 * 1024) // 如果内存超过16Mb,则按16Mb 计。 memory_end = 16 * 1024 * 1024; if (memory_end > 12 * 1024 * 1024) // 如果内存>12Mb,则设置缓冲区末端=4Mb buffer_memory_end = 4 * 1024 * 1024; else if (memory_end > 6 * 1024 * 1024) // 否则如果内存>6Mb,则设置缓冲区末端=2Mb buffer_memory_end = 2 * 1024 * 1024; else buffer_memory_end = 1 * 1024 * 1024; // 否则则设置缓冲区末端=1Mb main_memory_start = buffer_memory_end; // 主内存起始位置=缓冲区末端; #ifdef RAMDISK // 如果定义了虚拟盘,则主内存将减少。 main_memory_start += rd_init (main_memory_start, RAMDISK * 1024); #endif // 以下是内核进行所有方面的初始化工作。阅读时最好跟着调用的程序深入进去看,实在看 // 不下去了,就先放一放,看下一个初始化调用 -- 这是经验之谈?。 mem_init (main_memory_start, memory_end); trap_init (); // 陷阱门(硬件中断向量)初始化。(kernel/traps.c,181 行) blk_dev_init (); // 块设备初始化。 (kernel/blk_dev/ll_rw_blk.c,157 行) chr_dev_init (); // 字符设备初始化。 (kernel/chr_dev/tty_io.c,347 行) tty_init (); // tty 初始化。 (kernel/chr_dev/tty_io.c,105 行) time_init (); // 设置开机启动时间??startup_time(见76 行)。 sched_init (); // 调度程序初始化(加载了任务0 的tr, ldtr) (kernel/sched.c,385) buffer_init (buffer_memory_end); // 缓冲管理初始化,建内存链表等。(fs/buffer.c,348) hd_init (); // 硬盘初始化。 (kernel/blk_dev/hd.c,343 行) floppy_init (); // 软驱初始化。 (kernel/blk_dev/floppy.c,457 行) sti (); // 所有初始化工作都做完了,开启中断。 // 下面过程通过在堆栈中设置的参数,利用中断返回指令切换到任务0。 move_to_user_mode (); // 移到用户模式。 (include/asm/system.h,第1 行) if (!fork ()) { /* we count on this going ok */ init (); } /* * NOTE!! For any other task 'pause()' would mean we have to get a * signal to awaken, but task0 is the sole exception (see 'schedule()') * as task 0 gets activated at every idle moment (when no other tasks * can run). For task0 'pause()' just means we go check if some other * task can run, and if not we return here. */ /* 注意!! 对于任何其它的任务,'pause()'将意味着我们必须等待收到一个信号才会返 * 回就绪运行态,但任务0(task0)是唯一的意外情况(参见'schedule()'),因为任务0 在 * 任何空闲时间里都会被激活(当没有其它任务在运行时),因此对于任务0'pause()'仅意味着 * 我们返回来查看是否有其它任务可以运行,如果没有的话我们就回到这里,一直循环执行'pause()'。 */ for (;;) pause (); } static int printf (const char *fmt, ...) // 产生格式化信息并输出到标准输出设备stdout(1),这里是指屏幕上显示。参数'*fmt'指定输出将 // 采用的格式,参见各种标准C 语言书籍。该子程序正好是vsprintf 如何使用的一个例子。 // 该程序使用vsprintf()将格式化的字符串放入printbuf 缓冲区,然后用write()将缓冲区的内容 // 输出到标准设备(1--stdout)。 { va_list args; int i; va_start (args, fmt); write (1, printbuf, i = vsprintf (printbuf, fmt, args)); va_end (args); return i; } static char *argv_rc[] = { "/bin/sh", NULL}; // 调用执行程序时参数的字符串数组。 static char *envp_rc[] = { "HOME=/", NULL}; // 调用执行程序时的环境字符串数组。 static char *argv[] = { "-/bin/sh", NULL}; // 同上。 static char *envp[] = { "HOME=/usr/root", NULL}; void init (void) { int pid, i; // 读取硬盘参数包括分区表信息并建立虚拟盘和安装根文件系统设备。 // 该函数是在25 行上的宏定义的,对应函数是sys_setup(),在kernel/blk_drv/hd.c,71 行。 setup ((void *) &drive_info); (void) open ("/dev/tty0", O_RDWR, 0); // 用读写访问方式打开设备“/dev/tty0”, // 这里对应终端控制台。 // 返回的句柄号0 -- stdin 标准输入设备。 (void) dup (0); // 复制句柄,产生句柄1 号 -- stdout 标准输出设备。 (void) dup (0); // 复制句柄,产生句柄2 号 -- stderr 标准出错输出设备。 printf ("%d buffers = %d bytes buffer space\n\r", NR_BUFFERS, NR_BUFFERS * BLOCK_SIZE); // 打印缓冲区块数和总字节数,每块1024 字节。 printf ("Free mem: %d bytes\n\r", memory_end - main_memory_start); //空闲内存字节数。 // 下面fork()用于创建一个子进程(子任务)。对于被创建的子进程,fork()将返回0 值, // 对于原(父进程)将返回子进程的进程号。所以180-184 句是子进程执行的内容。该子进程 // 关闭了句柄0(stdin),以只读方式打开/etc/rc 文件,并执行/bin/sh 程序,所带参数和 // 环境变量分别由argv_rc 和envp_rc 数组给出。参见后面的描述。 if (!(pid = fork ())) { close (0); if (open ("/etc/rc", O_RDONLY, 0)) _exit (1); // 如果打开文件失败,则退出(/lib/_exit.c,10)。 execve ("/bin/sh", argv_rc, envp_rc); // 装入/bin/sh 程序并执行。 _exit (2); // 若execve()执行失败则退出(出错码2,“文件或目录不存在”)。 } // 下面是父进程执行的语句。wait()是等待子进程停止或终止,其返回值应是子进程的进程号(pid)。 // 这三句的作用是父进程等待子进程的结束。&i 是存放返回状态信息的位置。如果wait()返回值不 // 等于子进程号,则继续等待。 if (pid > 0) while (pid != wait (&i)) /* nothing */ ; // 如果执行到这里,说明刚创建的子进程的执行已停止或终止了。下面循环中首先再创建一个子进程, // 如果出错,则显示“初始化程序创建子进程失败”的信息并继续执行。对于所创建的子进程关闭所有 // 以前还遗留的句柄(stdin, stdout, stderr),新创建一个会话并设置进程组号,然后重新打开 // /dev/tty0 作为stdin,并复制成stdout 和stderr。再次执行系统解释程序/bin/sh。但这次执行所 // 选用的参数和环境数组另选了一套(见上面165-167 行)。然后父进程再次运行wait()等待。如果 // 子进程又停止了执行,则在标准输出上显示出错信息“子进程pid 停止了运行,返回码是i”,然后 // 继续重试下去…,形成“大”死循环。 while (1) { if ((pid = fork ()) < 0) { printf ("Fork failed in init\r\n"); continue; } if (!pid) { close (0); close (1); close (2); setsid (); (void) open ("/dev/tty0", O_RDWR, 0); (void) dup (0); (void) dup (0); _exit (execve ("/bin/sh", argv, envp)); } while (1) if (pid == wait (&i)) break; printf ("\n\rchild %d died with code %04x\n\r", pid, i); sync (); } _exit (0); /* NOTE! _exit, not exit() */ }
评论
添加红包

请填写红包祝福语或标题

红包个数最小为10个

红包金额最低5元

当前余额3.43前往充值 >
需支付:10.00
成就一亿技术人!
领取后你会自动成为博主和红包主的粉丝 规则
hope_wisdom
发出的红包
实付
使用余额支付
点击重新获取
扫码支付
钱包余额 0

抵扣说明:

1.余额是钱包充值的虚拟货币,按照1:1的比例进行支付金额的抵扣。
2.余额无法直接购买下载,可以购买VIP、付费专栏及课程。

余额充值