


WPF项目中涉及到了输入验证,就查阅了一些资料,写了小demo测试,总结如下
新建一个Person类,把四个属性绑定在textbox上
public class Person : INotifyPropertyChanged
    {
        private string name;
        private int age;
        private string gender;
        private string nickname;

        public event PropertyChangedEventHandler PropertyChanged;
        public string Name
        {
            get { return name; }
            set
            {
                name = value;
                if(this.PropertyChanged != null)
                {
                    PropertyChanged.Invoke(this,new PropertyChangedEventArgs("Name"));
                }
            }
        }

        public int Age
        {
            get { return age; }
            set
            {
                age = value;
                if (this.PropertyChanged != null)
                {
                    PropertyChanged.Invoke(this, new PropertyChangedEventArgs("Age"));
                }
            }
        }

        public string Gender
        {
            get { return gender; }
            set
            {
                gender = value;

                if (this.PropertyChanged != null)
                {
                    PropertyChanged.Invoke(this, new PropertyChangedEventArgs("Gender"));
                }

            }
        }

        public string Nickname
        {
            get { return nickname; }
            set
            {
                nickname = value;
                if(this.PropertyChanged != null)
                {
                    PropertyChanged.Invoke(this, new PropertyChangedEventArgs("Nickname"));
                }
            }
        }


    }
前台XAML
<Grid Name="MainGrid">
        <StackPanel>
            <DockPanel Width="220" LastChildFill="False"  Margin="30">
                <TextBlock Name="NameLabel" Text="姓名"  TextAlignment="Center" HorizontalAlignment="Center" VerticalAlignment="Center"/>
                <TextBox Name="NameText" Width="180" DockPanel.Dock="Right">
                    <TextBox.Text>
                        <Binding Path="Name" Mode="TwoWay" UpdateSourceTrigger="PropertyChanged"/>
                    </TextBox.Text>
                </TextBox>
            </DockPanel>
            <DockPanel Width="220" LastChildFill="False" Margin="30,0,30,0">
                <TextBlock Name="AgeLabel" Text="年龄"  TextAlignment="Center" HorizontalAlignment="Center" VerticalAlignment="Center"/>
                <TextBox Name="AgeText" Width="180" DockPanel.Dock="Right" >
                    <TextBox.Text>
                        <Binding Path="Age" Mode="TwoWay" UpdateSourceTrigger="PropertyChanged"/>
                    </TextBox.Text>
                </TextBox>
            </DockPanel>
            <DockPanel Width="220" LastChildFill="False"  Margin="30">
                <TextBlock Name="GenderLabel" Text="性别"  TextAlignment="Center" HorizontalAlignment="Center" VerticalAlignment="Center"/>
                <TextBox Name="GenderText" Width="180" DockPanel.Dock="Right">
                    <TextBox.Text>
                        <Binding Path="Gender" Mode="TwoWay" UpdateSourceTrigger="PropertyChanged"/>
                    </TextBox.Text>
                </TextBox>
            </DockPanel>
            <DockPanel Width="220" LastChildFill="False"  Margin="30,0,30,0">
                <TextBlock Name="NicknameLabel" Text="昵称"  TextAlignment="Center" HorizontalAlignment="Center" VerticalAlignment="Center"/>
                <TextBox Name="NicknameText" Width="180" DockPanel.Dock="Right">
                    <TextBox.Text>
                        <Binding Path="Nickname" Mode="TwoWay" UpdateSourceTrigger="PropertyChanged"/>
                    </TextBox.Text>
                </TextBox>
            </DockPanel>
        </StackPanel>
    </Grid>
一.验证的几种方式
(1).ValidationRule
ValidationRule类是个抽象类,需要创建它的派生类并实现它的Validate方法,然后把自定义的ValidationRule添加到Binding的ValidationRules里
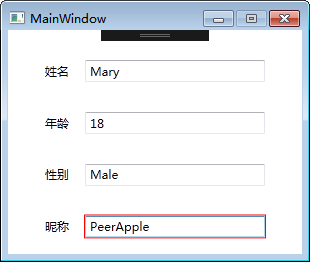
拿Name属性来举例,新建NameRule
public class NameRule : ValidationRule
{
        public override ValidationResult Validate(object value, CultureInfo cultureInfo)
        {
            if(string.IsNullOrWhiteSpace(value.ToString()))
            {
                return new ValidationResult(false, "姓名不能为空");
            }

            return new ValidationResult(true, null);
        }
}
在前台添加NameRule(在后台通过Binding对象的ValidationRules.Add())
<TextBox Name="NameText" Width="180" DockPanel.Dock="Right">
     <TextBox.Text>
        <Binding Path="Name" Mode="TwoWay" UpdateSourceTrigger="PropertyChanged">
            <Binding.ValidationRules>
                <local:NameRule></local:NameRule>
            </Binding.ValidationRules>
        </Binding>
     </TextBox.Text>
</TextBox>
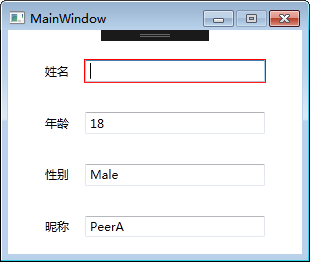
运行效果如下,如果姓名输入为空,边框会显示红色
在刘铁猛大神的《深入浅出WPF》中特别提到,Binding进行校验时的默认行为是认为来自Source的数据总是正确的,只在Target被外部方法更新时校验数据,而来自Binding的Source数据更新Target时是不会进行校验的。如果想改变这种行为,或者当来自Source的数据也有可能出问题时,需要将校验条件的ValidatesOnTargetUpdated属性设为True。
另外如果使用ExceptionValidationRule,会根据绑定的属性类型进行验证,显示默认的错误信息。
<TextBox Name="AgeText" Width="180" DockPanel.Dock="Right">
      <TextBox.Text>
          <Binding Path="Age" Mode="TwoWay" UpdateSourceTrigger="PropertyChanged">
              <Binding.ValidationRules>
                 <ExceptionValidationRule></ExceptionValidationRule>
              </Binding.ValidationRules>
          </Binding>
      </TextBox.Text>
</TextBox>
(2).异常
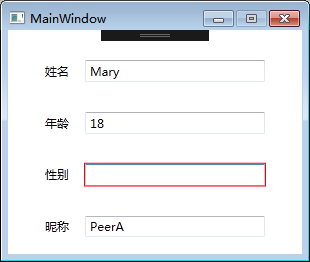
设置Binding的ValidatesOnExceptions属性,当绑定的数据源对象属性改变时引发异常,以Gender为例
public string Gender
{
    get { return gender; }
    set
    {
       if (string.IsNullOrWhiteSpace(value))
       {
          throw new Exception("性别不能为空");
       }
       gender = value;

       if (this.PropertyChanged != null)
       {
          PropertyChanged.Invoke(this, new PropertyChangedEventArgs("Gender"));
       }
     }
}
XAML设置ValidatesOnExceptions为True
<Binding Path="Gender" Mode="TwoWay" UpdateSourceTrigger="PropertyChanged" ValidatesOnExceptions="True"/>
显示效果
(3).IDataErrorInfo
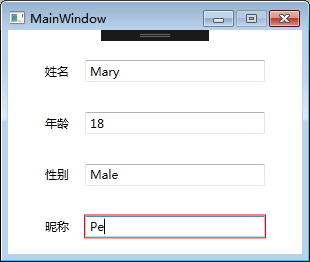
实体对象继承IDataErrorInfo,Binding设置ValidatesOnDataErrors
public string Error => null;

public string this[string columnName]
{
      get
      {
          string result = null;

          switch (columnName)
          {
              case "Nickname":
              // 设置Nickname属性的验证规则
              int len = Nickname.Length;
              if (len < 3 || len > 8)
              {
                   result = "昵称长度为3~8位";
               }
               break;
             }
             return result;
       }
}
XAML
<Binding Path="Nickname" Mode="TwoWay" UpdateSourceTrigger="PropertyChanged" ValidatesOnDataErrors="True" />
二.显示验证错误信息
看了其他前辈的博文,总结了一下显示错误提示信息的方法,还有一些理解
(1)需要设置NotifyOnValidationError属性设为True
来自铁猛大神《深入浅出WPF》的解释:
“当数据校验失败的时候Binding会像报警器一样发出一个信号,这个信号会以Binding对象的Target为起点在UI元素树上传播。信号每到达一个结点,如果这个结点上设置有对这种信号的侦听器(事件处理器),那么这个侦听器就会被触发用以处理这个信号。”
Binding Path="Name" Mode="TwoWay" UpdateSourceTrigger="PropertyChanged" NotifyOnValidationError="True"
事件处理器部分有两种不同的写法
//写法一
Validation.AddErrorHandler(this.NameText, delegate (object sender, ValidationErrorEventArgs e)
{
    NameText.ToolTip = e.Error.ErrorContent.ToString();
});
//写法二
NameText.AddHandler(Validation.ErrorEvent, new RoutedEventHandler(this.ValidationError));

private void ValidationError(object sender, RoutedEventArgs e)
{
     if(Validation.GetErrors(this.NameText).Count > 0)
     {
         this.NameText.ToolTip = Validation.GetErrors(this.NameText)[0].ErrorContent.ToString();
     }
}
除了在处理器里通过控件的ToolTip来显示错误信息,还可以通过MessageBox,或者在别的控件中显示
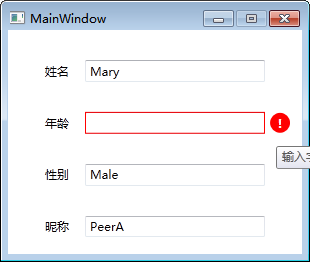
(2)为Validation.HasError设定触发器,指定Validation.ErrorTemplate来动态显示错误信息,可以修改ErrorTemplate的样式,举例
<DockPanel.Resources>
    <ControlTemplate x:Key="ErrorTemplate">
        <DockPanel LastChildFill="true">
            <Border Background="Red" DockPanel.Dock="right" Margin="5,0,0,0" Width="20" Height="20" CornerRadius="10"
              ToolTip="{Binding ElementName=customAdorner, Path=AdornedElement.(Validation.Errors)[0].ErrorContent}">
                  <TextBlock Text="!" VerticalAlignment="center" HorizontalAlignment="center" FontWeight="Bold" Foreground="White"/>
            </Border>
            <AdornedElementPlaceholder Name="customAdorner" VerticalAlignment="Center">
                 <Border BorderBrush="red" BorderThickness="1" />
            </AdornedElementPlaceholder>
        </DockPanel>
    </ControlTemplate>
    <Style TargetType="TextBox">
        <Setter Property="Validation.ErrorTemplate" Value="{StaticResource ErrorTemplate}"/>
        <Style.Triggers>
            <Trigger Property="Validation.HasError" Value="True">
                <Setter Property="ToolTip" Value="{Binding RelativeSource={RelativeSource Self}, Path=(Validation.Errors)[0].ErrorContent}"/>
            </Trigger>
        </Style.Triggers>
     </Style>
</DockPanel.Resources>
(3)直接在UI元素上绑定错误信息
<TextBlock x:Name="ErrorInfo" Text="{Binding ElementName=AgeText, Path=(Validation.Errors)[0].ErrorContent}"/>
三.相关博文链接,感谢前辈们的总结和分享
WPF快速指导5:验证 https://www.cnblogs.com/luminji/archive/2011/01/25/1944930.html
关于WPF的验证 https://www.cnblogs.com/fuchongjundream/p/3844051.html
SilverLight.3-Validation:一、银光验证。ValidatesOnExpression和NotifyOnValidationError https://www.cnblogs.com/ylbtech/p/3441135.html
MVVM模式下的输入校验(IDataErrorInfo + DataAnnotations) https://blog.csdn.net/liuruxin/article/details/38497391


 9372
9372


 被折叠的 条评论
为什么被折叠?
被折叠的 条评论
为什么被折叠?
 到【灌水乐园】发言


