


CentOS 7 DHCP服务配置
1. 配置静态ip地址
查看本机网卡#fconfig
配置静态ip地址vi /etc/sysconfig/network-scripts/ifcfg-ens33 ifcfg-自己的网卡
[root@localhost ~]# cat /etc/sysconfig/network-scripts/ifcfg-ens33
TYPE="Ethernet"
PROXY_METHOD="none"
BROWSER_ONLY="no"
BOOTPROTO="static" #dhcp改static
DEFROUTE="yes"
IPV4_FAILURE_FATAL="no"
IPV6INIT="yes"
IPV6_AUTOCONF="yes"
IPV6_DEFROUTE="yes"
IPV6_FAILURE_FATAL="no"
IPV6_ADDR_GEN_MODE="stable-privacy"
NAME="ens33"
UUID="c5fe79f2-77d7-4431-9814-79f6646b6083"
DEVICE="ens33"
ONBOOT="yes"	#no改为yes,表示开机自启
IPADDR="192.168.26.128"
NETMASK="255.255.255.0"
GATEWAY="192.168.26.2"	#网关可在虚拟网络设置->NAT设置中查找
DNS1="192.168.26.2"  #这里将网关地址设置为DNS地址
重启网络服务并测试 # systemctl restart network.service
[root@localhost ~]# systemctl restart network.service
[root@localhost ~]# ping www.baidu.com
PING www.baidu.com (14.215.177.39) 56(84) bytes of data.
64 bytes from www.baidu.com (14.215.177.39): icmp_seq=1 ttl=128 time=324 ms
64 bytes from www.baidu.com (14.215.177.39): icmp_seq=2 ttl=128 time=23.7 ms
64 bytes from www.baidu.com (14.215.177.39): icmp_seq=3 ttl=128 time=17.0 ms
64 bytes from www.baidu.com (14.215.177.39): icmp_seq=4 ttl=128 time=16.4 ms
^C
--- www.baidu.com ping statistics ---
4 packets transmitted, 4 received, 0% packet loss, time 3004ms
rtt min/avg/max/mdev = 16.473/95.325/324.068/132.095 ms
没有数据包丢失,静态ip地址配置成功
2.安装dhcp服务
关键字查询dhcp配置软件是否有预装
[root@localhost ~]# rpm -qa|grep dhcp
dhcp-libs-4.2.5-79.el7.centos.x86_64
dhcp-4.2.5-79.el7.centos.x86_64
dhcp-common-4.2.5-79.el7.centos.x86_64
我这里已经预装好4.2.5版本的,没有的话可与从网上获取安装#yum -y install dhcp
3.配置dhcp文件
查看并编辑配置文件dhcp.confcat /etc/dhcp/ vi dhcpd.conf
#
# DHCP Server Configuration file.
#   see /usr/share/doc/dhcp*/dhcpd.conf.example
#   see dhcpd.conf(5) man page
#
#声明网段和子网掩码
subnet 192.168.26.1 netmask 255.255.255.0 {
  range 192.168.26.100 192.168.26.200;	#动态分配的ip范围
  option domain-name-servers 192.168.26.2;	#DNS服务ip地址
  option domain-name "internal.example.org";
  option routers 192.168.26.2;
  option broadcast-address 10.5.5.31;
  default-lease-time 6000;
  max-lease-time 72000;
  		#host用于声明主机属性,一般用来分配固定的ip地址
        host VMClient {		#host后面 + 主机名字
        hardware ethernet 00:0c:29:cd:f2:d6;	#客户机MAC地址
        fixed-address 192.168.26.5;				#保留的ip地址
	}
}
这里只配置了一些最基础的参数,更多的案例可以通过dhcp.conf文件中的/usr/share/doc/dhcp*/dhcpd.conf.example给出的样例去参考。
编辑完成后保存并退出,重启dhcp服务
# systemctl restart dhcpd.service
[root@localhost dhcp]# systemctl restart dhcpd.service
Job for dhcpd.service failed because the control process exited with error code. See "systemctl status dhcpd.service" and "journalctl -xe" for details.
出错了。。。
这时候千万不要慌,稳住心态打开系统日记文件
cat /var/log/messages 查找到最近的一次启动日志中
Jul  1 13:00:55 localhost systemd: Stopping DHCPv4 Server Daemon...
Jul  1 13:00:55 localhost systemd: Starting DHCPv4 Server Daemon...
Jul  1 13:00:56 localhost dhcpd: Internet Systems Consortium DHCP Server 4.2.5
Jul  1 13:00:56 localhost dhcpd: Copyright 2004-2013 Internet Systems Consortium.
Jul  1 13:00:56 localhost dhcpd: All rights reserved.
Jul  1 13:00:56 localhost dhcpd: For info, please visit https://www.isc.org/software/dhcp/
Jul  1 13:00:56 localhost dhcpd: /etc/dhcp/dhcpd.conf line 7: subnet 192.168.26.1 netmask 255.255.255.0: bad subnet number/mask combination.
Jul  1 13:00:56 localhost dhcpd: subnet 192.168.26.1 netmask 255.255.255.0
Jul  1 13:00:56 localhost dhcpd:                                        ^ #我们可以看到这里提示第七行出错了,可能是子码掩网的问题
Jul  1 13:00:56 localhost dhcpd: Configuration file errors encountered -- exiting
Jul  1 13:00:56 localhost dhcpd:
Jul  1 13:00:56 localhost dhcpd: This version of ISC DHCP is based on the release available
Jul  1 13:00:56 localhost dhcpd: on ftp.isc.org.  Features have been added and other changes
Jul  1 13:00:56 localhost dhcpd: have been made to the base software release in order to make
Jul  1 13:00:56 localhost dhcpd: it work better with this distribution.
Jul  1 13:00:56 localhost dhcpd:
Jul  1 13:00:56 localhost dhcpd: Please report for this software via the CentOS Bugs Database:
Jul  1 13:00:56 localhost dhcpd:    http://bugs.centos.org/
Jul  1 13:00:56 localhost dhcpd:
Jul  1 13:00:56 localhost dhcpd: exiting.
这时候我们可以返回到dhcpd.conf文件中查找问题
原来是我的子网网段写错了
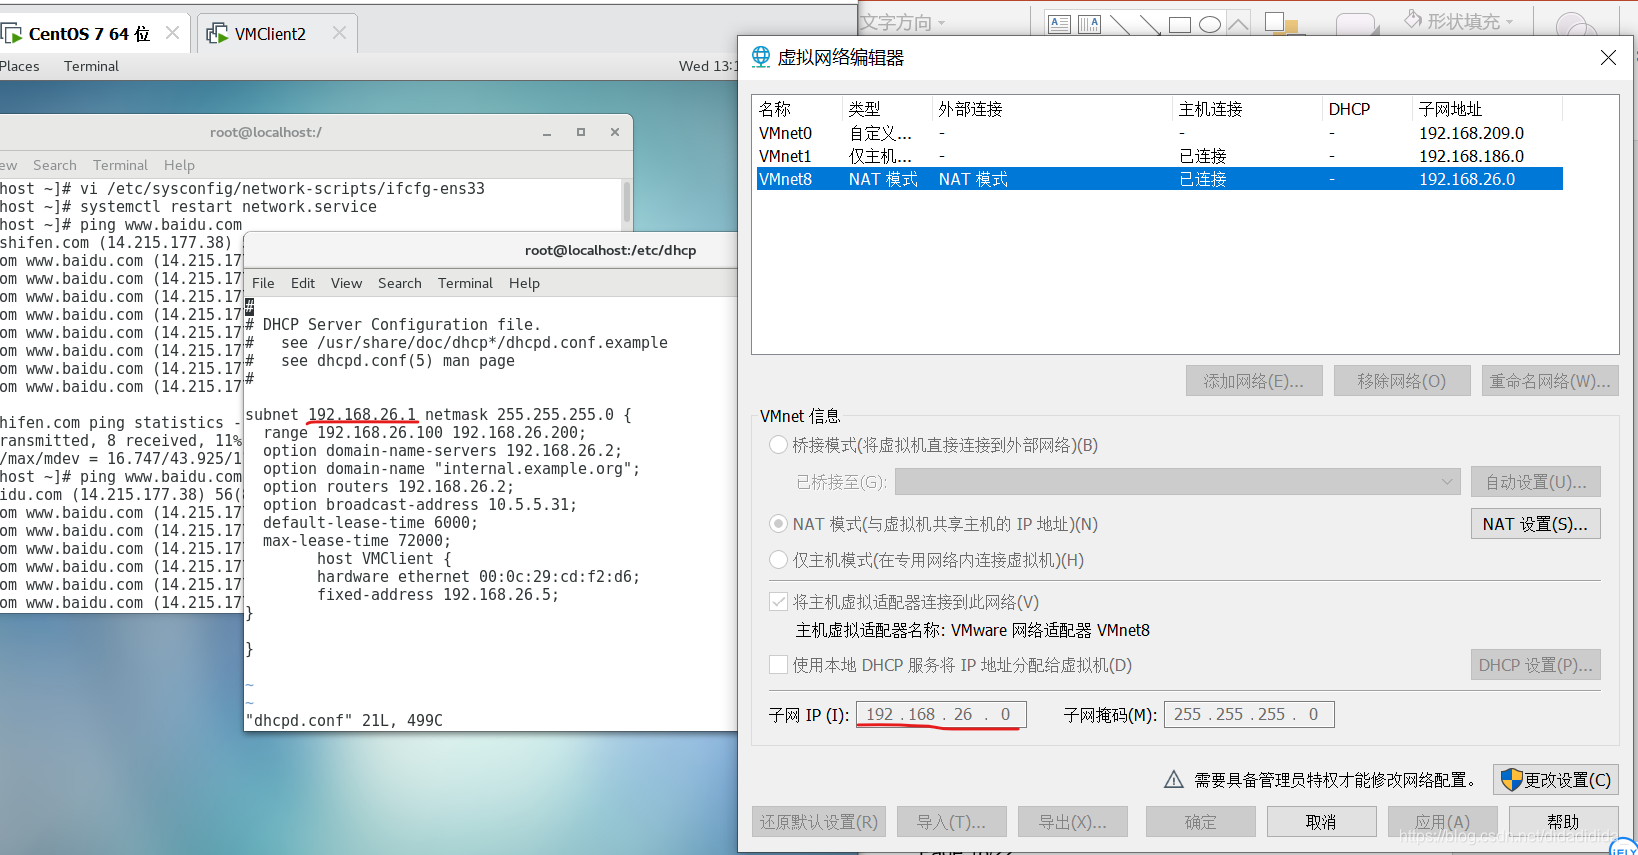
192168.26.1改成192.168.26.0,改成VMnet8中的子网ip
重启dhcp服务
[root@localhost dhcp]# systemctl restart dhcpd.service

这边并没有报错,说明重启成功
4.测试dhcp服务
这里选择win2003的客户机进行测试
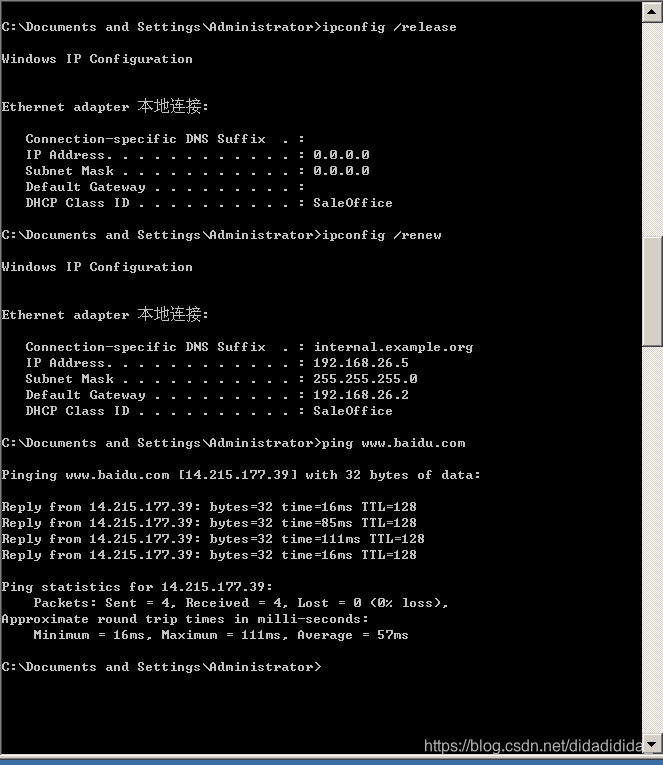
这里获取的ip地址和我们之前保留给它的地址一样
测试成功


 650
650


 被折叠的 条评论
为什么被折叠?
被折叠的 条评论
为什么被折叠?
 到【灌水乐园】发言


