


安全概述-授权机制-加密算法-MD5-数字证书
防范手段整体分两部分:技术方面和法规方法(如规章制度和社会工程学方面)。在技术层 面,可以根据从以下框架着手:
1.1 Linux资深知识整体思维框架如下
/安全、稳定
/可用性-网络(协议)
/ \易用、易维护
/ \系统调优 (高性能、低成本)
应用/服务
\
\ /要想性能提升:硬件升级
\扩展性 -集群
\存储
\云/虚拟化
2.服务安全
/OS漏洞
/1.系统安全-密码验证 数据库服务器
| \权限
| /程序的配置文件(如ftp的黑白名单 samba的...)
安全意识< 2.服务安全-防火墙iptables/firewalld
| \TCP wrapper.
| \程序漏洞. [用隔代,用稳定,用次新] 例:nginx 0day 漏洞
|
| /攻击、防范方法
\3.网络安全-用户验证
\伪装截获
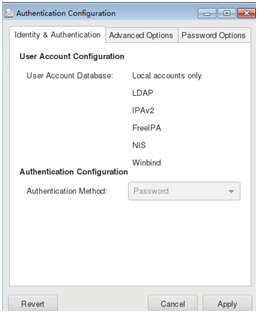
1.2 Linux 系统登录认证方法
[root@k7 ~]# yum provides */system-config-gtk
[root@k7 ~]# yum provides */system-config-authentication
[root@k7 ~]# system-config-authentication
2、存放用户信息和密码信息
/etc/passwd /etc/shadow /etc/group 备份文件后面带-
注:CENTOS5 使用 MD5 对/etc/shadow 中密码加密,CENTOS6 使用 sha512 对/etc/shadow 中密码加密
查看一个系统是使用什么方式加密用户密码
[root@k7 ~]# grep shadow /root/anaconda-ks.cfg
auth --useshadow --passalgo=sha512
1.3授权 su/sudo 权限
1、使用su切换用户,加- 代表把环境变量加载
2、sudo 方式不需要知道 root 密码,仅拥有授权的用户权限。 sudo 是在不切换用户的情况下,以其他用户的身份执行一个命令。它能够限制指定用户在指定的主 机上运行某些指定的命令。
3、通过 sudo 给普通用户授权: /etc/sudoers #是 sudo 命令的配置文件
4、/etc/sudoers 文档格式:
[root@k7 ~]# vim /etc/sudoers
命令格式 : 用户名或组名 ALL=(以谁的身份运行命令) Commd_Alias 运行的命令 注: 如果组:前面加% 。 如: %kill Commd_Alias 运行的命令:注:1 命令;2 目录(必须以/结尾)最好使用绝对路径;
5、配置 sudo 方法 方法 1:visudo visudo 命令概述:visudo 命令可以修改文件/etc/sudoers。而且使用 visudo 命令修改 sudoers 配置时会帮你校验文件配置是否正确,如果不正确,在保存退出时就会提示你哪段配置出错的。
方法 2:vim 直接编辑/etc/sudoers
6、实例-测试 sudo 命令
[root@k7 ~]# vim /etc/sudoers
[root@k7 ~]# groupadd student
[root@k7 ~]# useradd -g student kk
[root@k7 ~]# useradd -g student kk2
[root@k7 ~]# echo "123"|passwd --stdin kk
Changing password for user kk.
passwd: all authentication tokens updated successfully.
[root@k7 ~]# echo "123"|passwd --stdin kk2
Changing password for user kk2.
passwd: all authentication tokens updated successfully.
7、添加权限
[root@k7 ~]# vim /etc/sudoers
root ALL=(ALL) ALL
kk ALL=(root) /sbin/fdisk
[kk@k7 ~]$ sudo fdisk -l
Disk /dev/sda: 42.9 GB, 42949672960 bytes, 83886080 sectors
Units = sectors of 1 * 512 = 512 bytes
Sector size (logical/physical): 512 bytes / 512 bytes
I/O size (minimum/optimal): 512 bytes / 512 bytes
Disk label type: dos
Disk identifier: 0x000b1b92
Device Boot Start End Blocks Id System
/dev/sda1 * 2048 1026047 512000 83 Linux
/dev/sda2 1026048 5122047 2048000 82 Linux swap / Solaris
/dev/sda3 5122048 83886079 39382016 83 Linux
kk ALL = (root) /usr/bin/systemctl 用户的设置、NOPASSWD不输入密码
%student ALL = (root) /usr/bin/systemctl 组的设置,%,还可以添加脚本.sh
二、对称加密-非对称加密方法
2.1加密算法
1)对称加密(一把密钥配),容易泄露,效率高
2)非对称加密(一对密钥配(公钥用来加密,私钥用来解密)) 更安全,效率低
对称加密算法如:AES 高级加密算法 ;DES 标准加密算法 ;3DES三重数据加密算法,它相当于是对每个数据块应用三次DES加密算法。
非对称加密算法如:DSA 和RSA
对称加密:3des算法为例
安装
[root@k7 ~]# yum install openssl
[root@k7 ~]# openssl --help #查看使用方法。
[root@k7 ~]#openssl enc --help #查看加密算法。
加密
[root@k7 ~]# openssl enc -e -des3 -a -in /etc/passwd -out /passwd.des3
参数:
选项: options are
-in <file> input file
-out <file> output file
-e encrypt 加密 ; 后面可以加很多加密算法,如: -des3 加密码算法
-d decrypt 解码
-a/-base64 base64 encode/decode, depending on encryption flag。# base64编码/解码,这取决于加密标志。
注:Base64是网络上最常见的用于传输8Bit字节代码的编码方式之一。
解密:
[root@k7~]# openssl enc -d -des3 -a -in /passwd.des3 -out /root/passwd
-d decrypt 解码
查看解密完的文件和原文件是否一致
[root@k7~]# diff /etc/passwd /root/passwd #没有任何输出说明,两个文件内容一样
2.2 使用RSA算法进行非对称加密演示过程
安装加密工具
[root@k7 ~]# yum install gnupg2 -y
gpg (GnuPG) 2.0.22; Copyright (C) 2013 Free Software Foundation, Inc.
This is free software: you are free to change and redistribute it.
There is NO WARRANTY, to the extent permitted by law.
gpg: directory `/root/.gnupg' created
gpg: new configuration file `/root/.gnupg/gpg.conf' created
gpg: WARNING: options in `/root/.gnupg/gpg.conf' are not yet active during this run
gpg: keyring `/root/.gnupg/secring.gpg' created
gpg: keyring `/root/.gnupg/pubring.gpg' created
Please select what kind of key you want:
(1) RSA and RSA (default)
(2) DSA and Elgamal
(3) DSA (sign only)
(4) RSA (sign only)
Your selection?
RSA keys may be between 1024 and 4096 bits long.
What keysize do you want? (2048) 1024
Requested keysize is 1024 bits
Please specify how long the key should be valid.
0 = key does not expire
<n> = key expires in n days
<n>w = key expires in n weeks
<n>m = key expires in n months
<n>y = key expires in n years
Key is valid for? (0)
Key does not expire at all
Is this correct? (y/N) y
GnuPG needs to construct a user ID to identify your key.
Real name: kezi
Name must be at least 5 characters long
Real name: kezibk
Email address: kezibk@163.com
Comment: kezirsa
You selected this USER-ID:
"kezibk (kezirsa) <kezibk@163.com>"
Change (N)ame, (C)omment, (E)mail or (O)kay/(Q)uit? o
You need a Passphrase to protect your secret key.
We need to generate a lot of random bytes. It is a good idea to perform
some other action (type on the keyboard, move the mouse, utilize the
disks) during the prime generation; this gives the random number
generator a better chance to gain enough entropy.
We need to generate a lot of random bytes. It is a good idea to perform
some other action (type on the keyboard, move the mouse, utilize the
disks) during the prime generation; this gives the random number
generator a better chance to gain enough entropy.
gpg: /root/.gnupg/trustdb.gpg: trustdb created
gpg: key 695CC960 marked as ultimately trusted
public and secret key created and signed.
gpg: checking the trustdb
gpg: 3 marginal(s) needed, 1 complete(s) needed, PGP trust model
gpg: depth: 0 valid: 1 signed: 0 trust: 0-, 0q, 0n, 0m, 0f, 1u
pub 1024R/695CC960 2019-09-11
Key fingerprint = 30E6 8F7B 3ECE 3267 5D53 E969 5242 783D 695C C960
uid kezibk (kezirsa) <kezibk@163.com>
sub 1024R/014B9210 2019-09-11
[root@k7 ~]# ll /root/.gnupg/
total 28
-rw------- 1 root root 7680 Sep 11 22:56 gpg.conf
drwx------ 2 root root 6 Sep 11 22:57 private-keys-v1.d
-rw------- 1 root root 679 Sep 11 23:03 pubring.gpg #公钥
-rw------- 1 root root 679 Sep 11 23:03 pubring.gpg~
-rw------- 1 root root 600 Sep 11 23:03 random_seed
-rw------- 1 root root 1419 Sep 11 23:03 secring.gpg #私钥
srwxr-xr-x 1 root root 0 Sep 11 22:58 S.gpg-agent
-rw------- 1 root root 1280 Sep 11 23:03 trustdb.gpg
2.3 实战:实现k7和k8之间使用非对称加密方法传输数据
复制公钥到另一台机器k8上
[root@k9 ~]# scp /root/.gnupg/pubring.gpg 192.168.1.38:/root/
[root@k8 ~]# which gpg
/usr/bin/gpg
[root@k8 ~]# rpm -qf /usr/bin/gph
error: file /usr/bin/gph: No such file or directory
[root@k8 ~]# rpm -qf /usr/bin/gpg
gnupg2-2.0.22-4.el7.x86_64
查看公钥:
[root@k8 ~]# gpg --list-keys
gpg: directory `/root/.gnupg' created
gpg: new configuration file `/root/.gnupg/gpg.conf' created
gpg: WARNING: options in `/root/.gnupg/gpg.conf' are not yet active during this run
gpg: keyring `/root/.gnupg/pubring.gpg' created
gpg: /root/.gnupg/trustdb.gpg: trustdb created
导入公钥到k8
[root@k8 ~]# gpg --import /root/pubring.gpg
gpg: keyring `/root/.gnupg/secring.gpg' created
gpg: key 7BBDB28D: public key "kezibky (kezirsa) <kezibky@163.com>" imported
gpg: Total number processed: 1
gpg: imported: 1 (RSA: 1)
[root@k8 ~]# gpg --list-keys
/root/.gnupg/pubring.gpg
------------------------
pub 1024R/7BBDB28D 2019-09-11
uid kezibky (kezirsa) <kezibky@163.com>
sub 1024R/F9B63FAB 2019-09-11
2.4 使用公钥加密
[root@k8 ~]# cp /etc/passwd /root
[root@k8 ~]# gpg -ear kezibky /root/passwd
gpg: F9B63FAB: There is no assurance this key belongs to the named user
pub 1024R/F9B63FAB 2019-09-11 kezibky (kezirsa) <kezibky@163.com>
Primary key fingerprint: 1400 4540 A297 E2E0 6841 4A6A 4834 2659 7BBD B28D
Subkey fingerprint: BE50 8050 7407 3221 5ADC A5B9 0F91 37BD F9B6 3FAB
It is NOT certain that the key belongs to the person named
in the user ID. If you *really* know what you are doing,
you may answer the next question with yes.
Use this key anyway? (y/N) y
参数:
-a, --armor 装甲 ['ɑ:mə] create ascii armored output 以ASCII的方式输出
-r, --recipient接受者[rɪˈsɪpiənt] USER-ID encrypt for USER-ID指定加密使用的公钥的名字。
-e, --encrypt [ɪnˈkrɪpt] encrypt data
-d, --decrypt [di:ˈkrɪpt] decrypt data (default)
[root@k8 ~]# ll passwd*
-rw-r--r-- 1 root root 1580 Sep 11 23:15 passwd
-rw-r--r-- 1 root root 1279 Sep 11 23:16 passwd.asc #生成加密文件
解密:k7
[root@k8 ~]# scp passwd.asc 192.168.1.37:/root/
[root@k7 ~]# gpg --list-key
[root@k7 ~]# gpg -dar kezibky -o passwd passwd.asc
[root@k7~]# ll passwd*
-rw-r--r-- 1 root root 1580 Sep 11 23:41 passwd
-rw-r--r-- 1 root root 1279 Sep 11 23:32 passwd.asc
参数:
-d 解密
-a, --armor (盔甲) create ascii armored output #以ascII编码输出
-r, --recipient USER-ID encrypt for USER-ID 指定加密使用的公司UID
-o 指定解密后的内容输出到文件中。
2.5 利用SSH 公钥私钥实例,实现k9登录k8时,不输入密码
[root@k9 ~]# ssh-keygen
Generating public/private rsa key pair.
Enter file in which to save the key (/root/.ssh/id_rsa):
Enter passphrase (empty for no passphrase):
Enter same passphrase again:
Your identification has been saved in /root/.ssh/id_rsa.
Your public key has been saved in /root/.ssh/id_rsa.pub.
The key fingerprint is:
SHA256:CxcCNHXysXge6oq3OUd+ubKYeXTEpo86uWoigiNygMQ root@k9
The key's randomart image is:
+---[RSA 2048]----+
| .+.o o |
| o = o |
|. o.* |
| E =+o |
|o o+S |
|o .+o.. |
|.. =.+.. |
|O o.=** + |
|==ooXO.+.. |
+----[SHA256]-----+
复制公钥到k8上:
[root@k9 ~]# ssh-copy-id -i /root/.ssh/id_rsa.pub 192.168.1.38
输入k8 密码
测试:
[root@k9 ~]# ssh 192.168.1.38
Last login: Wed Sep 11 23:07:06 2019 from 192.168.1.9
[root@k8 ~]#
表示成功
三、md5-sha1-哈希算法使用方法-数字证书
4.1 哈希算法概述
常见的哈希算法有:MD5 和 SHA1 。MD5的全称是Message-Digest Algorithm 5(信息-摘要算法)。MD5 算法的哈希值大小为 128 位。是一种不可逆的算法。SHA1的全称是Secure Hash Algorithm(安全哈希算法)。SHA1 算法的哈希值大小为 160 位。是一种不可逆的算法。
两者区别是:SHA1抗暴力破解能力比MD5强。缺点:产生SHA-1 报文摘要的运行速度比MD5 慢。
哈希算法具有以下特点:
1、压缩性:任意长度的数据,算出的哈希值长度都是固定的。
2、容易计算:从原数据计算出哈希值很容易。
3、抗修改性:对原数据进行任何改动,哪怕只修改1个字节,所得到的哈希值都有很大区别。
4、弱抗碰撞:已知原数据和其哈希值,想找到一个具有相同哈希值的数据(即伪造数据)是非常困难的。
1:产成固定长度MD5消息摘要
8cc5ca7f264ccec23a5f9ab80455bed0 /etc/passwd
[root@k8 ~]# sha1sum /etc/passwd
77b6fe86c7b37cdd53f9c3885495f27f0194b7d2 /etc/passwd
2:使用MD5加密密码:
[root@k8 ~]# echo 123 |md5sum
ba1f2511fc30423bdbb183fe33f3dd0f -
[root@k8 ~]# echo 1234 |md5sum
e7df7cd2ca07f4f1ab415d457a6e1c13 -
[root@k8 ~]# date +%F%|md5sum|head -8
be2e59974ac11db041bb6a2d4b3af4f0 -
3:演示MD5保障数据的完整性:
使用MD5检查先前使用rsa私钥解密后的文件和原文件是否一致
[root@k9 ~]# scp /root/passwd 192.168.1.38:/opt/#把解密的文件复制到
[root@k8 ~]# md5sum /etc/passwd /opt/passwd
在k8上进行对比,如果哈希值一样,说明正确。
8cc5ca7f264ccec23a5f9ab80455bed0 /etc/passwd
8cc5ca7f264ccec23a5f9ab80455bed0 /opt/passwd
4: 演示暴力破解MD5
[root@k8 ~]# echo aaa | md5sum
5c9597f3c8245907ea71a89d9d39d08e -
登录网站:http://www.cmd5.com/ (此网站功能需要收费),输入md5值,进行查询。
口语表达: 两个不同的文件内容,产生相同的MD5值,非常困难。
但是可以使用windows下的工具fastcoll_v1.0.0.5.exe伪装MD5。
四、 数字证书概述
数字证书概述:数字证书就是互联网通讯中标志通讯各方身份信息的一串数字,提供了一种在Internet上验证通信实体身份的方式,数字证书不是数字身份证,而是身份认证机构盖在数字身份证上的一个章或印(或者说加在数字身份证上的一个签名)。
例:http://www.12306.cn/mormhweb/


 156
156


 被折叠的 条评论
为什么被折叠?
被折叠的 条评论
为什么被折叠?
 到【灌水乐园】发言


