JDBC连接池
概念:其实就是一个容器(集合),存放数据库连接的容器。
当系统初始化好后,容器被创建,容器中会申请一些连接对象,当用户来访问数据库时,从容器中获取连接对象,用户访问完之后,会将连接对象归还给容器。好处:
- 节约资源
- 用户访问高效
实现:
标准接口:DataSource javax.sql包下的
方法:
获取连接:getConnection()
归还连接:Connection.close()。
如果连接对象Connection是从连接池中获取的,那么调用Connection.close()方法,则不会再关闭连接了。而是归还连接
一般我们不去实现它,由数据库厂商来实现
- C3P0:数据库连接池技术
- Druid:数据库连接池实现技术,由阿里巴巴提供的
C3P0
数据库连接池技术
- 步骤:
- 导入jar包 (两个) c3p0-0.9.5.2.jar mchange-commons-java-0.2.12.jar
- 不要忘记导入数据库驱动jar包
- 定义配置文件:
- 名称: c3p0.properties 或者 c3p0-config.xml
- 路径:直接将文件放在src目录下即可。
- 创建核心对象 数据库连接池对象 ComboPooledDataSource
- 获取连接: getConnection
代码实现
配置文件
<c3p0-config>
<!-- 使用默认的配置读取连接池对象 -->
<default-config>
  <!--  连接参数 -->
 <property name="driverClass">com.mysql.jdbc.Driver</property>
 <property name="jdbcUrl">jdbc:mysql://localhost:3306/ada</property>
 <property name="user">root</property>
 <property name="password">admin</property>

 <!-- 连接池参数 -->
 <!--初始化申请的连接数量-->
 <property name="initialPoolSize">5</property>
 <!--最大的连接数量-->
 <property name="maxPoolSize">10</property>
 <!--超时时间-->
 <property name="checkoutTimeout">3000</property>
</default-config>
<!--自定义配置-->
<named-config name="otherc3p0">
 <!--  连接参数 -->
 <property name="driverClass">com.mysql.jdbc.Driver</property>
 <property name="jdbcUrl">jdbc:mysql://localhost:3306/ada</property>
 <property name="user">root</property>
 <property name="password">admin</property>

 <!-- 连接池参数 -->
 <property name="initialPoolSize">5</property>
 <property name="maxPoolSize">8</property>
 <property name="checkoutTimeout">1000</property>
</named-config>
</c3p0-config>
测试代码
public class Demo1 {
 public static void main(String[] args) throws SQLException {
     //获得连接池对象 不传值使用默认配置
     DataSource dataSources = new ComboPooledDataSource();
     /*传值使用自定义配置
     *DataSource dataSources = new ComboPooledDataSource("otherc3p0");
     */
     //获得链接对象
     Connection connection = dataSources.getConnection();
     //打印
     System.out.println(connection);
     //归还连接
     connection.close();
 }
}
Druid
数据库连接池实现技术,由阿里巴巴提供的
   * 步骤:
      1. 导入jar包 druid-1.0.9.jar
      2. 定义配置文件:
         - 是properties形式的
         - 可以叫任意名称,可以放在任意目录下
      3. 加载配置文件。Properties
      4. 获取数据库连接池对象:通过工厂来来获取  DruidDataSourceFactory
      5. 获取连接:getConnection
- 代码实现
配置文件
driverClassName=com.mysql.jdbc.Driver
url=jdbc:mysql://localhost:3306/ada
username=root
password=admin
# 初始化连接数量
initialSize=5
# 最大连接数
maxActive=10
# 最大等待时间
maxWait=3000
测试
public class TestDemo2 {
public static void main(String[] args) throws Exception {
   Properties properties = new Properties();
   //加载配置文件
   TestDemo2 testDemo2 = new TestDemo2();
   InputStream resourceAsStream = testDemo2.getClass().getClassLoader().getResourceAsStream("druid.properties");
   properties.load(resourceAsStream);
   DataSource dataSource = DruidDataSourceFactory.createDataSource(properties);
   Connection connection = dataSource.getConnection();
   System.out.println(connection);
}
}
- 定义工具类
- 定义一个类 JDBCUtils
- 提供静态代码块加载配置文件,初始化连接池对象
- 提供方法
- 获取连接方法:通过数据库连接池获取连接
- 释放资源
- 获取连接池的方法
代码:
public class JDBCUtils {
private static DataSource dataSource;

static {
   try {
       //加载配置文件
       Properties properties = new Properties();
       properties.load(JDBCUtils.class.getClassLoader().getResourceAsStream("druid.properties"));
       //获取DateSource
       dataSource = DruidDataSourceFactory.createDataSource(properties);

   } catch (IOException e) {
       e.printStackTrace();
   } catch (Exception e) {
       e.printStackTrace();
   }

}

/**
    * 获取链接
*/
public static Connection getConnection() throws SQLException {
   return dataSource.getConnection();
}

/**
    * 归还连接
    * @param resultSet
    * @param statement
    * @param connection
*/
public static void close(ResultSet resultSet, Statement statement, Connection connection) {
   if (resultSet != null) {
       try {
           resultSet.close();
       } catch (SQLException e) {
           e.printStackTrace();
       }
   }
   if (statement != null) {
       try {
           statement.close();
       } catch (SQLException e) {
           e.printStackTrace();
       }
   }
   if (connection != null) {
       try {
           connection.close();//归还链接
       } catch (SQLException e) {
           e.printStackTrace();
       }
   }
}
/**
    * @param statement
    * @param connection
*/
public static void close(Statement statement, Connection connection) {
   close(null, statement, connection);
}

/**
*
    * @return 连接池
*/
public static  DataSource getDataSource(){
   return dataSource;
}
}
- 测试工具类
public class Demo3 {
  public static void main(String[] args) {
      Connection connection = null;
      PreparedStatement pstm = null;
      try {
       //获得连接
       connection = JDBCUtils.getConnection();
       //定义sql
       String sql = "insert into student values('5',?,?)";
       pstm = connection.prepareStatement(sql);
       pstm.setInt(1, 23);
       pstm.setInt(2, 34);
       int i = pstm.executeUpdate();
       if (i > 0) {
           System.out.println("成功");
       } else {
           System.out.println("失败");
       }
       }catch (SQLException e)
       {
       e.printStackTrace();
       } finally {
           //释放走远
           JDBCUtils.close(pstm, connection);
      }
  }
}
Spring JDBC
Spring框架对JDBC的简单封装。提供了一个JDBCTemplate对象简化JDBC的开发
步骤:
导入jar包
创建JdbcTemplate对象。依赖于数据源DataSource
JdbcTemplate template = new JdbcTemplate(ds);
调用JdbcTemplate的方法来完成CRUD的操作
- update():执行DML语句。增、删、改语句
- queryForMap():查询结果将结果集封装为map集合,将列名作为key,将值作为value 将这条记录封装为一个map集合
- 注意:这个方法查询的结果集长度只能是1
- queryForList():查询结果将结果集封装为list集合
- 注意:将每一条记录封装为一个Map集合,再将Map集合装载到List集合中
- query():查询结果,将结果封装为JavaBean对象
- query的参数:RowMapper
- 一般我们使用BeanPropertyRowMapper实现类。可以完成数据到JavaBean的自动封装
- new BeanPropertyRowMapper(类型.class)
- queryForObject:查询结果,将结果封装为对象
- 一般用于聚合函数的查询
测试
public class JT {
public static void main(String[] args) {

   JdbcTemplate template = new JdbcTemplate(JDBCUtils.getDataSource());
   String sql = "update student set name='小明' where name=?";
   int count = template.update(sql, "3");
   System.out.println(count);
}
}
练习:
- 需求:
- 修改1号数据的 age为 21
- 添加一条记录
- 删除刚才添加的记录
- 查询id为1的记录,将其封装为Map集合
- 查询所有记录,将其封装为List
- 查询所有记录,将其封装为Emp对象的List集合
- 查询总记录数
代码:
创建持久化类
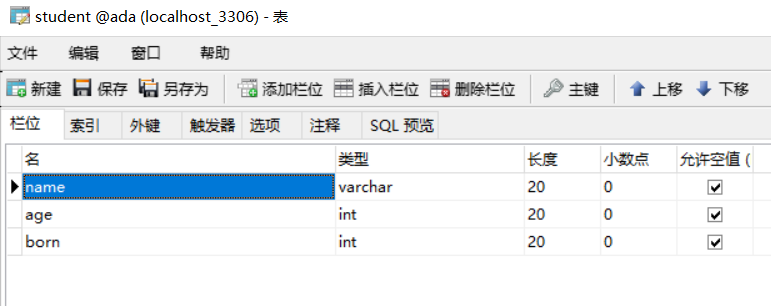
public class Emp {
private  String name;
private Integer age;
private  Integer born;

public String getName() {
   return name;
}

public void setName(String name) {
   this.name = name;
}

public Integer getAge() {
   return age;
}

public void setAge(Integer age) {
   this.age = age;
}

public Integer getBorn() {
   return born;
}

public void setBorn(Integer born) {
   this.born = born;
}

@Override
public String toString() {
   return "Emp{" +
           "name='" + name + '\'' +
           ", age=" + age +
           ", born=" + born +
           '}';
}
}
测试代码:
public class JTTest {
JdbcTemplate jdbcTemplate;

@Before
public void before() {
   jdbcTemplate = new JdbcTemplate(JDBCUtils.getDataSource());
}

/**
    * 更新
*/
@Test
public void test1() {
   int update = jdbcTemplate.update("update student set age=21 where name ='1'");
   System.out.println(update);
}

/**
    * 添加记录
*/
@Test
public void test2() {
   String sql = "insert into student values(?,?,?)";
   int update = jdbcTemplate.update(sql, "6", 6, 6);
   System.out.println(update);
}

/**
    * 删除
*/
@Test
public void test3() {
   String sql = "delete  from student where name= ? ";
   int update = jdbcTemplate.update(sql, "6");
   System.out.println(update);
}

/**
    * 查询
    * 注意:queryForMap查询的结果集只能为1
*/
@Test
public void test4() {
   String sql = "select * from student where age=?";
   Map<String, Object> map = jdbcTemplate.queryForMap(sql, 23);
   Set<Map.Entry<String, Object>> entrySet = map.entrySet();
   Iterator<Map.Entry<String, Object>> iterator = entrySet.iterator();
   while (iterator.hasNext()) {
       Map.Entry<String, Object> next = iterator.next();
       System.out.println(next.getKey() + " " + next.getValue());

   }
}

/**
    * queryForList查询
*/
@Test
public void test5() {
   String sql = "select * from student where age=?";
   List<Map<String, Object>> maps = jdbcTemplate.queryForList(sql, 100);
   System.out.println(maps);

}

@Test
public void test6_1() {
   String sql = "select * from student";
   List<Emp> list = jdbcTemplate.query(sql, new RowMapper<Emp>() {
       @Override
       public Emp mapRow(ResultSet resultSet, int i) throws SQLException {
           Emp emp = new Emp();
           emp.setName(resultSet.getString("name"));
           emp.setAge(resultSet.getInt(2));
           emp.setBorn(resultSet.getInt(3));
           return emp;
       }
   });
   System.out.println(list);

}

@Test
public void test6_2() {
   String sql = "select * from student";
   List<Emp> query = jdbcTemplate.query(sql, new BeanPropertyRowMapper<Emp>(Emp.class));
   for (Emp emp : query
   ) {
       System.out.println(emp);
   }
}

/**
    * 查询总计录数
*/
@Test
public void test7() {
   String sql = "SELECT COUNT(*) FROM STUDENT ";
   Long aLong = jdbcTemplate.queryForObject(sql, Long.class);
   System.out.println(aLong);

}
}


 201
201


 被折叠的 条评论
为什么被折叠?


