


1. oauth简述
oauth本身不是技术,而是一项资源授权协议,重点是协议!Apache基金会提供了针对Java的oauth封装。我们做Java web项目想要实现oauth协议进行资源授权访问,直接使用该封装就可以。
2. 概述
2.1 官方文档简介
1.需要第三方应用存储资源所有者的凭据,以供将来使用,通常是明文密码。
2.需要服务器支持密码身份认证,尽管密码认证天生就有安全缺陷。
3.第三方应用获得的资源所有者的受保护资源的访问权限过于宽泛,从而导致资源所
  有者失去对资源使用时限或使用范围的控制。
4.资源所有者不能仅撤销某个第三方的访问权限而不影响其它,并且,资源所有者只有
  通过改变第三方的密码,才能单独撤销这第三方的访问权限。
5.与任何第三方应用的让步导致对终端用户的密码及该密码所保护的所有数据的让步
2.2 概括
用于第三方在用户授权下调取平台对外开放接口获取用户相关信息
2.3 理解
1. 第三方应用请求访问受保护资源时,资源服务器在获准资源用户授权后,会向第三方
    应用颁发一个访问令牌(AccessToken)
2. 该访问令牌包含资源用户的授权访问范围、授权有效期等关键属性
3. 第三方应用在后续资源访问过程中需要一直持有该令牌,直到用户主动结束该次授权或者令牌自动过期
3. OAuth角色
3.1 资源拥有者(resource owner)
资源拥有者(resource owner)能授权访问受保护资源的一个实体,即终端用户;如新浪微博用户zhangsan
3.2 资源服务器(resource server)
存储受保护资源,客户端通过access token请求资源,资源服务器响应受保护资源给客户端;存储着用户zhangsan的微博等信息
3.3 授权服务器(authorization server)
成功验证资源拥有者并获取授权后,授权服务器颁发授权令牌(Access Token)给客户端
3.4 客户端
1. 如新浪微博客户端weico、微格等第三方应用,也可以是它自己的官方应用;
2. 其本身不存储资源,而是资源拥有者授权通过后,使用它的授权(授权令牌)访问受保护资源,然后客户端把相应的数据展示出来/提交到服务器。
3. 访问过程,下图及其描述
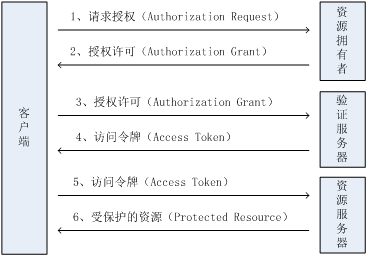
1.请求授权: 客户端请求授权==》授权请求可以直接发给资源拥有者,或间接的通过授权服务器这种中介,后者更可取
在客户端web项目中构造一个oauth的客户端请求对象(OAuthClientRequest),
在此对象中携带客户端信息(clientId、accessTokenUrl、response_type、redirectUrl),
将此信息放入http请求中,重定向到服务端
2. 获得授权许可: 客户端收到一个授权许可,代表资源服务器提供的授权
在服务端web项目中接受第一步传过来的request,从中获取客户端信息,可以自行验证信息的可靠性。
同时构造一个oauth的code授权许可对象(OAuthAuthorizationResponseBuilder),
并在其中设置授权码code,将此对象传回客户端
3.授权许可验证: 客户端使用它自己的私有证书及授权许可到授权服务器验证
a. 在客户端web项目中接受第二步的请求request,从中获得code。
b. 同时构造一个oauth的客户端请求对象(OAuthClientRequest),
   此对象携带客户端信息(clientId、accessTokenUrl、clientSecret、GrantType、redirectUrl),
   还要携带接受到的code。
c. 再构造一个客户端请求工具对象(oAuthClient),这个工具封装了httpclient,
   用此对象将这些信息以post(一定要设置成post)的方式请求到服务端,
   目的是为了让服务端返回资源访问令牌
4.返回访问令牌: 如果验证成功,则下发一个访问令牌
a. 服务端接受第三步传过来的request,从中获取客户端信息和code,并进行验证。
b. 再按照需求生成访问令牌(accessToken),
   同时构造一个oauth响应对象(OAuthASResponse),
   携带生成的访问指令(accesstoken),
   返回给第三步中客户端的oAuthClient。oAuthClient接受响应之后获取accessToken
5. 请求资源:客户端使用访问令牌向资源服务器请求受保护资源
a. 此时客户端中已经拥有从服务端返回过来的accessToken,
b. 客户端构造一个服务端资源请求对象(OAuthBearerClientRequest),
c. 在此对象中设置服务端资源请求URI,并携带上accessToken。
d. 再构造一个客户端请求工具对象(oAuthClient),用此对象去服务端靠accesstoken换取资源
6. 验证并返回资源:资源服务器会验证访问令牌的有效性,如果成功则下发受保护资源
 服务端接受第五步传过来的request,从中获取accesstoken并进行验证。
 验证通过之后就可以将客户端请求的资源返回给客户端了
4.OAuth2.0授权模式
授权码模式(Authorization Code)==》(正统方式)(支持refresh token)
授权码简化模式(Implicit)========》(为web浏览器设计)(不支持refresh token)
Pwd模式(Resource Owner Password Credentials)==》(基本不用)(支持refresh token)
Client模式(Client Credentials)==》 (为后台api调用设计)(不支持refresh token)
扩展模式(Extension)=========》(自定义模式)
4.1 授权码模式(Authorization Code)
(1) 简单概括,就是用于第三方在用户授权下调取平台对外开放接口获取用户相关信息。
有三个关键字:第三方,用户,平台,关系如下图。

(2) 授权的部分,要比上图展示的复杂一丢丢,下面来讲解一下授权的部分
首先,有个问题,就拿微博平台来说吧,不能说随便一个第三方过来要求申请用户资源,微博平台就去用户那问一句是否授予权限吧,微博大哥能这么随便?所以第三方需要去想要请求的接口所在平台去报备一下,也就是告诉平台:我的xxx地址想要申请使用你的接口,可以吗?等平台审核通过之后,会下发一组appid+appkey,第三方持凭此就有资格去请求该平台的接口了。
第三方的准备工作做好了,下面就是具体运作流程了。(各大平台大多使用授权码模式——Authorization Code,因为它相比其它几种模式更为严谨,这里我仅分析一下该模式的原理)
这里我们假设一个场景,就是想用‘云打印’来打印自己‘微博的关注列表’。 简图如下:
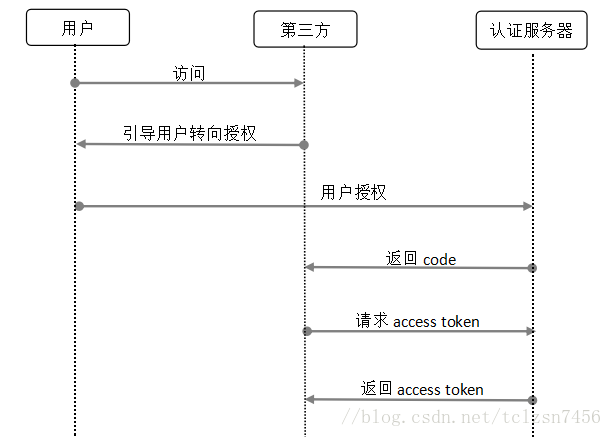

在第②,④,⑥,⑧步中,分别用到了云打印在微博平台上获得的appid+appkey。关于每一步请求所需要的一系列参数这里就不一一列举了,官方文档非常详细,这里仅说明一下请求code和请求access token时重要的参数。
第④步参数:
response_type:指授权类型,必选,这里填固定值‘code’
client_id:指客户端id,必选,这里填在平台报备时获取的appid
redirect_uri:指重定向URI,可选
scope:指申请的权限范围,可选
state:指客户端当前状态,可选,若填了,则认证服务器会原样返回该值
第⑥步参数:
grant_type:指使用哪种授权模式,必选,这里填固定值‘authorization_code’
code:指从第⑤步获取的code,必选
redirect_uri:指重定向URI,必选,这个值需要和第④步中的redirect_uri保持一致
client_id:指客户端id,必选,这里填在平台报备时获取的appid
client_secret:指客户端密钥,必选,这里填在平台报备时获取的appkey
第⑧步参数:
access_token:指访问令牌,必选,这里填第⑦步获取的access_token
token_type:指令牌类型,必选,大小写不敏感,bearer类型 / mac类型
expires_in:指过期时间,单位秒,当其他地方已设置过期时间,此处可省略该参数
refresh_token:指更新令牌,可选,用即将过期token换取新token
scope:指权限范围,可选,第④步中若已申请过某权限,此处可省略该参数
到这里,OAuth2.0 授权码模式的认证过程就完成了,原理还算比较简单,就是较为繁琐,但是不算难。
注意:1.code时效较短,多为10s-10min,每次获得的code仅可使用一次,且code与client_id和redirect_uri有 一一对应关系。
2.access token 有过期时间,多为10-15天。(过期处理有2种,请求用户重新授权/refreshToken,一般多用重新授权。)
3.在请求时,参数中包含重定向地址的,需要和第三方在授权方平台报备时留的地址前部一致
4.关于token_type的两种类型有什么区别,有个博客写的很详细,推荐阅读:www.cnblogs.com/XiongMaoMengNan/p/6785155.html
此处奉上找了好久才找到的OAuth2 RFC6749中文翻译:http://colobu.com/2017/04/28/oauth2-rfc6749/
此文借鉴张胜楠的原文:https://blog.csdn.net/tclzsn7456/article/details/79550249
4.2 授权码简化模式(Implicit)
授权访问:
http://localhost:8080 /oauth2/oauth/authorize?response_type=token&client_id=testid&redirect_uri=http://localhost/OAuth&scope=read
之后接受访问,该页面将被重定向到重定向URI并带有令牌:
http://localhost/OAuth/#access_token=KCIS89HFUE7SGE62&token_type=bearer&expires_in=3600
4.3 Pwd模式(Resource Owner Password Credentials)
请求格式:
POST -D "&grant_type=password&username=babala&password=kkk1234&scope=read,write"
http://localhost/oauth/token
服务器返回来的访问令牌:
{
"access_token":"9cd23bef-ae56-46b0-82f5-b9a8f78da569",
"token_type" : "bearer" ,
"expires_in" : 43199 ,
"scope" : "read"
}
4.4 Client模式(Client Credentials)
请求格式:
POST -D "&client_id=appid&grant_type=client_credentials&client_secret=appkey"
http://localhost/OAuth/token
服务器返回来的访问令牌:
{
"access_token":"4e56e9ec-2f8e-46b4-88b1-5d06847909ad",
"token_type": "bearer” ,
"refresh_token":"7e14c979-7039-49d0-9c5d-854efe7f5b38",
"expires_in": 36133 ,
"scope": "read,write"
}
5. 代码
客户端:
一、pom依赖:
<dependency>
    <groupId>org.apache.oltu.oauth2</groupId>
    <artifactId>org.apache.oltu.oauth2.client</artifactId>
<version>0.31</version>
二、controller方法:
2.1 向服务端请求授权码code的controller方法:
@RequestMapping("/server")
@Controller
public class ServerController{

   String clientId = null;
   String clientSecret = null;
   String accessTokenUrl = null;
   String userInfoUrl = null;
   String redirectUrl = null;
   String response_type = null;
   String code= null;

   //提交申请code的请求
   @RequestMapping("/requestServerCode")
   public String requestServerFirst(HttpServletRequestrequest, HttpServletResponseresponse, RedirectAttributesattr) throws OAuthProblemException{

      clientId = "clientId";
      clientSecret = "clientSecret";
      accessTokenUrl = "responseCode";
      redirectUrl = "http://localhost:8081/oauthclient01/server/callbackCode";
      response_type = "code";

      OAuthClient oAuthClient =new OAuthClient(new URLConnectionClient());

      String requestUrl = null;
      try {
// 构建oauthd的请求。
// 设置请求服务地址(accessTokenUrl)、clientId、response_type、redirectUrl
      OAuthClientRequest accessTokenRequest = OAuthClientRequest
                .authorizationLocation(accessTokenUrl)
                .setResponseType(response_type)
                .setClientId(clientId)
                .setRedirectURI(redirectUrl)
                .buildQueryMessage();

        requestUrl = accessTokenRequest.getLocationUri();
        System.out.println(requestUrl);
      } catch (OAuthSystemExceptione) {
        e.printStackTrace();
      }
      return "redirect:http://localhost:8082/oauthserver/"+requestUrl ;
   }
此段代码对应开发步骤1.其中accessTokenUrl是服务端返回code的controller方法映射地址。redirectUrl是告诉服务端,code要传回客户端的一个controller方法,该方法的映射地址就是redirectUrl。
2.2 向服务端请求资源访问令牌access token的controller方法:
//接受客户端返回的code,提交申请access token的请求
@RequestMapping("/callbackCode")
public Object toLogin(HttpServletRequestrequest)throws OAuthProblemException{
   System.out.println("-----------客户端/callbackCode--------------------------------------------------------------------------------");
   clientId = "clientId";
   clientSecret = "clientSecret";
   accessTokenUrl="http://localhost:8082/oauthserver/responseAccessToken";
    userInfoUrl = "userInfoUrl";
    redirectUrl = "http://localhost:8081/oauthclient01/server/accessToken";
    HttpServletRequest httpRequest = (HttpServletRequest)request;
    code = httpRequest.getParameter("code");
    System.out.println(code);
    OAuthClient oAuthClient =new OAuthClient(new URLConnectionClient());

    try {
     OAuthClientRequest accessTokenRequest = OAuthClientRequest
           .tokenLocation(accessTokenUrl)
             .setGrantType(GrantType.AUTHORIZATION_CODE)
             .setClientId(clientId)
             .setClientSecret(clientSecret)
             .setCode(code)
             .setRedirectURI(redirectUrl)
             .buildQueryMessage();

     //去服务端请求access token,并返回响应
     OAuthAccessTokenResponse oAuthResponse =oAuthClient.accessToken(accessTokenRequest, OAuth.HttpMethod.POST);
     //获取服务端返回过来的access token
     String accessToken = oAuthResponse.getAccessToken();

     //查看access token是否过期
     Long expiresIn =oAuthResponse.getExpiresIn();
     System.out.println("客户端/callbackCode方法的token:::"+accessToken);
     System.out.println("-----------客户端/callbackCode-----------");
     return"redirect:http://localhost:8081/oauthclient01/server/accessToken?accessToken="+accessToken;
   } catch (OAuthSystemExceptione) {
     e.printStackTrace();
   }
    return null;
}
此方法对应开发步骤3的全部和步骤4的一半,也就是还包括接受服务端返回的access token。最后的redirect地址不是服务端的地址,只是将此token传进客户端的另一个方法,该方法就是最后的资源请求方法。
2.3 利用服务端给的token去请求服务端的资源的controller方法。这里的资源就是服务端数据库中的数据。
//接受服务端传回来的access token,由此token去请求服务端的资源(用户信息等)
@RequestMapping("/accessToken")
public ModelAndView accessToken(StringaccessToken) {
   System.out.println("---------客户端/accessToken--------------------------");
   userInfoUrl = "http://localhost:8082/oauthserver/userInfo";
   System.out.println("accessToken");

   OAuthClient oAuthClient =new OAuthClient(new URLConnectionClient());
   try {
        OAuthClientRequest userInfoRequest =new OAuthBearerClientRequest(userInfoUrl)
        .setAccessToken(accessToken).buildQueryMessage();
        OAuthResourceResponse resourceResponse =oAuthClient.resource(userInfoRequest, OAuth.HttpMethod.GET, OAuthResourceResponse.class);
        String username = resourceResponse.getBody();
        System.out.println(username);
        ModelAndView modelAndView =new ModelAndView("usernamePage");
        modelAndView.addObject("username",username);
        System.out.println("---------客户端/accessToken--------------------------");
        returnmodelAndView;
   } catch (OAuthSystemExceptione) {
     e.printStackTrace();
   } catch (OAuthProblemExceptione) {
     e.printStackTrace();
   }
   System.out.println("---------客户端/accessToken------------------");
   return null;
}
此方法对应开发步骤5的全部和步骤6的一半,也就是还包括接受服务端返回的资源信息。获取了资源信息之后,其余的开发就和平时的springmvc一毛一样了。
以上三个方法我全部封装在同一个ServerController类中。
服务端
pom依赖
<dependency>
    <groupId>org.apache.oltu.oauth2</groupId>
    <artifactId>org.apache.oltu.oauth2.authzserver</artifactId>
    <version>0.31</version>
</dependency>
<dependency>
    <groupId>org.apache.oltu.oauth2</groupId>
    <artifactId>org.apache.oltu.oauth2.resourceserver</artifactId>
    <version>0.31</version>
</dependency>
controller方法
向客户端返回授权码code的controller方法
@Controller
public class AuthorizeController{
   @Autowired
   private UserServiceuserService;

   //向客户端返回授权许可码 code
   @RequestMapping("/responseCode")
   public Object toShowUser(Modelmodel,  HttpServletRequestrequest){
      System.out.println("----------服务端/responseCode---------------------------");

         try {
         //构建OAuth授权请求
             OAuthAuthzRequest oauthRequest =new OAuthAuthzRequest(request);
             /*oauthRequest.getClientId();
             oauthRequest.getResponseType();
             oauthRequest.getRedirectURI();
             System.out.println(oauthRequest.getClientId());
             System.out.println(oauthRequest.getResponseType());
             System.out.println(oauthRequest.getRedirectURI());*/

         if(oauthRequest.getClientId()!=null&&oauthRequest.getClientId()!=""){
           //设置授权码
                String authorizationCode ="authorizationCode";
              //利用oauth授权请求设置responseType,目前仅支持CODE,另外还有TOKEN
                String responseType =oauthRequest.getParam(OAuth.OAUTH_RESPONSE_TYPE);
              //进行OAuth响应构建
                OAuthASResponse.OAuthAuthorizationResponseBuilderbuilder =

                          OAuthASResponse.authorizationResponse(request, HttpServletResponse.SC_FOUND);
              //设置授权码
                builder.setCode(authorizationCode);
              //得到到客户端重定向地址
                String redirectURI =oauthRequest.getParam(OAuth.OAUTH_REDIRECT_URI);
              //构建响应
                final OAuthResponseresponse =builder.location(redirectURI).buildQueryMessage();
                System.out.println("服务端/responseCode内,返回的回调路径:"+response.getLocationUri());
                System.out.println("----------服务端/responseCode--------------------------");
               String responceUri =response.getLocationUri();

              //根据OAuthResponse返回ResponseEntity响应
                  HttpHeaders headers =new HttpHeaders();
                  try {
                 headers.setLocation(new URI(response.getLocationUri()));
              } catch (URISyntaxExceptione) {
                 // TODO Auto-generated catch block
                 e.printStackTrace();
              }
                  return"redirect:"+responceUri;
           }
      } catch (OAuthSystemExceptione) {
        e.printStackTrace();
      } catch (OAuthProblemExceptione) {
        e.printStackTrace();
      }
         System.out.println("----------服务端/responseCode------------------------");
      return null;

   }
   }
此段代码对应开发步骤2
向客户端返回资源访问令牌accesstoken的controller方法
@Controller
public class AccessTokenController {
   //获取客户端的code码,向客户端返回access token
   @RequestMapping(value="/responseAccessToken",method = RequestMethod.POST)
   public HttpEntity token(HttpServletRequest request){
      System.out.println("--------服务端/responseAccessToken--------------------");
      OAuthIssuer oauthIssuerImpl=null;
       OAuthResponse response=null;

      //构建OAuth请求
         try {
        OAuthTokenRequest oauthRequest =new OAuthTokenRequest(request);
        String authCode =oauthRequest.getParam(OAuth.OAUTH_CODE);
        String clientSecret = oauthRequest.getClientSecret();
        if(clientSecret!=null||clientSecret!=""){
           //生成Access Token
               oauthIssuerImpl =new OAuthIssuerImpl(new MD5Generator());
               final StringaccessToken =oauthIssuerImpl.accessToken();
               System.out.println(accessToken);
               System.out.println("--oooo---");
             //生成OAuth响应
               response = OAuthASResponse
                       .tokenResponse(HttpServletResponse.SC_OK)
                       .setAccessToken(accessToken)
                       .buildJSONMessage();
        }
        System.out.println("--------服务端/responseAccessToken------------------");

          //根据OAuthResponse生成ResponseEntity
            return new ResponseEntity(response.getBody(), HttpStatus.valueOf(response.getResponseStatus()));
      } catch (OAuthSystemExceptione) {
        // TODO Auto-generated catch block
        e.printStackTrace();
      } catch (OAuthProblemExceptione) {
        // TODO Auto-generated catch block
        e.printStackTrace();
      }
        System.out.println("--------服务端/responseAccessToken--------------------");
      return null;
   }
}
此段代码对应开发步骤4的前面一半,即服务端验证code、生成token并给客户端
4.3 向客户端返回请求资源(username)的controller方法
@Controller
public class UserInfoController {
   @Autowired
   private UserServiceuserService;

   @RequestMapping("/userInfo")
   public HttpEntity userInfo(HttpServletRequest request)throws OAuthSystemException{

      System.out.println("-----------服务端/userInfo---------------------------------------");
      try {
         //获取客户端传来的OAuth资源请求
        OAuthAccessResourceRequest oauthRequest =new OAuthAccessResourceRequest(request, ParameterStyle.QUERY);
        //获取Access Token
            String accessToken =oauthRequest.getAccessToken();
            System.out.println("accessToken");
            //验证Access Token
            /*if (accessToken==null||accessToken=="") {
              // 如果不存在/过期了,返回未验证错误,需重新验证
            OAuthResponse oauthResponse = OAuthRSResponse
                    .errorResponse(HttpServletResponse.SC_UNAUTHORIZED)
                    .setError(OAuthError.ResourceResponse.INVALID_TOKEN)
                    .buildHeaderMessage();

              HttpHeaders headers = new HttpHeaders();
              headers.add(OAuth.HeaderType.WWW_AUTHENTICATE,
                oauthResponse.getHeader(OAuth.HeaderType.WWW_AUTHENTICATE));
            return new ResponseEntity(headers, HttpStatus.UNAUTHORIZED);

            }  */

            //返回用户名
            User user=userService.selectByPrimaryKey(1);
            String username = accessToken+"---"+Math.random()+"----"+user.getUname();
            System.out.println(username);
            System.out.println("服务端/userInfo::::::ppp");
            System.out.println("-----------服务端/userInfo-----------------------------------");
            return new ResponseEntity(username, HttpStatus.OK);
      } catch (OAuthProblemExceptione) {
        // TODO Auto-generated catch block
        e.printStackTrace();

        //检查是否设置了错误码
            String errorCode =e.getError();
            if (OAuthUtils.isEmpty(errorCode)) {
              OAuthResponse oauthResponse = OAuthRSResponse
                     .errorResponse(HttpServletResponse.SC_UNAUTHORIZED)
                     .buildHeaderMessage();

              HttpHeaders headers =new HttpHeaders();
              headers.add(OAuth.HeaderType.WWW_AUTHENTICATE,
                oauthResponse.getHeader(OAuth.HeaderType.WWW_AUTHENTICATE));
              return new ResponseEntity(headers, HttpStatus.UNAUTHORIZED);

            }
            OAuthResponse oauthResponse = OAuthRSResponse
                     .errorResponse(HttpServletResponse.SC_UNAUTHORIZED)
                     .setError(e.getError())
                     .setErrorDescription(e.getDescription())
                     .setErrorUri(e.getUri())
                     .buildHeaderMessage();

            HttpHeaders headers =new HttpHeaders();
            headers.add(OAuth.HeaderType.WWW_AUTHENTICATE,
              oauthResponse.getHeader(OAuth.HeaderType.WWW_AUTHENTICATE));
            System.out.println("-----------服务端/userInfo-----------------------------");
            return new ResponseEntity(HttpStatus.BAD_REQUEST);
      }
   }
}
此代码对应开发步骤6的前一半。即服务端验证access token、并将资源信息给客户端
另外:需要验证的客户端信息,如clientId、clientSecret都是自行指定,与自己的项目相关,同时客户端信息的验证方法也是依情况而定,没有什么具体标准,我的demo里为了方便,基本上省略了客户端信息验证,都是默认合法。但是accessTokenUrl、userInfoUrl、redirectUrl一定要与自己的项目路径相符合。response_type、GrantType有标准模板,见代码。服务端生成的access token也是有标准的,见代码,too。
至此,整个Java集成oauth就完成了。
项目地址http://download.csdn.net/download/jing12062011/10005141
代码参考jing12062011的作品:地址:https://blog.csdn.net/jing12062011/article/details/78147306
本人能力有限,错误之处,敬请指正


 3648
3648


 被折叠的 条评论
为什么被折叠?
被折叠的 条评论
为什么被折叠?
 到【灌水乐园】发言


