


介绍:
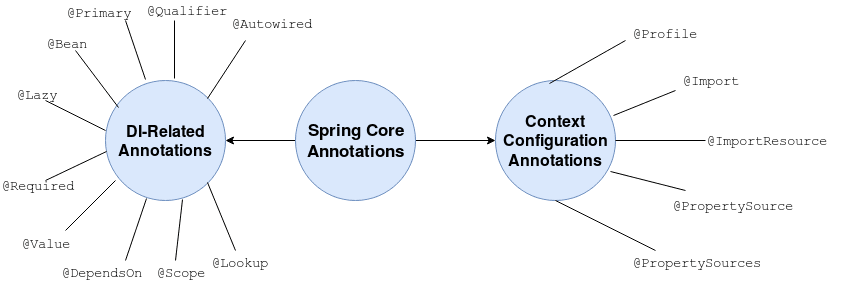
org.springframework.beans.factory.annotation和org.springframework.context.annotation包中存在的Spring注释通常称为Spring Core注释。 我们可以将它们分为两大类:DI相关的注释和上下文配置注释:
在本教程中,我们将探索所有这些Spring Core批注。
与DI相关的注释:
1.
我们使用@Autowired标记将由Spring容器注入的依赖项。 它可以与构造函数,setter或基于字段的注入一起使用。
构造函数注入:
public class Employee {
    private Department dept;

    @Autowired
    public Employee(Department dept) {
        this.dept = dept;
    }
}
对于基于构造函数的注入,所有构造函数参数都是必需的。 从Spring 4.3开始,除非有两个或多个,否则我们可以跳过使用@Autowired批注显式批注的构造函数。
场注入:
public class Employee {
    @Autowired
    private Department dept;
}
二传手注射:
public class Employee {
    private Department dept;

    @Autowired
    public void setDept(Department dept) {
        this.dept = dept;
    }
}@Autowired批注还接受一个名为required的可选布尔参数。 默认情况下,其值设置为true。 我们可以将其显式设置为false ,当自动装配失败时,Spring不会抛出异常。
2.
当我们有多个相同类型的bean时,我们将@Qualifier和@Autowired注释一起使用以避免歧义。
假设我们有两个类:
@Component
public class Employee implements Person {}

@Component
public class Student implements Person {}由于它们都实现了Person接口,因此Spring无法使用@Autowired知道要注入哪个Person bean。 要解决此问题,我们可以使用@Qualifier批注:
public class Main {

    @Autowired
    @Qualifier("employee")
    private Person person;
}就像@Autowired一样,我们可以将其与setter,构造函数或基于字段的注入一起使用。
3.
现在我们知道,当我们有多个相同类型的bean时,可以将@Qualifier和@Autowired一起使用。 但是,大多数时候,我们特别需要这些bean的实例之一,很少需要其他实例。 我们可以 使用@Primary批注 标记 最常用的bean。 有了它,所有不合格的注入都将解析为我们的主bean。
@Primary
@Component
public class Employee implements Person {}

@Component
public class Student implements Person {}

@Component
public class EmployeeHandler {

    @Autowired
    private Person employee;
}

@Component
public class StudentHandler {

    @Autowired
    @Qualifier("student")
    private Person student;
}由于我们已经在StudentHandler中指定了限定词,因此将注入Student bean。 对于EmployeeHandler ,我们跳过了限定符,因此将注入Employee 。 就像Employee是我们类型Person的主要bean一样。
4.
@Bean是@Configuration类中使用的方法级注释。 它标记了用于实例化Spring bean的工厂方法:
@Configuration
public class AppConfig {
    ...
    @Bean
    public Employee employee() {
        return new Employee();
    }
}
当需要返回类型的新实例时,Spring将调用这些方法。 实例化的bean与工厂方法具有相同的名称。 如果我们想给它一个不同的名字,我们可以使用这个注释的name参数来做到。
@Bean("myEmp")
public Employee employee() {
    return new Employee();
}
5.
默认情况下,Spring在应用程序启动时实例化所有单例bean。 如果要防止这种急切的初始化,可以使用@Lazy批注。 当我们使用@Lazy批注时,将首先根据用户请求实例化bean。
我们可以将此注释放在:
- @Bean带注释的方法可延迟特定的bean实例化
- 一个用@Configuration注释的类,以延迟创建该类中定义的所有bean
- 一个标记为@Component的类 ,然后将延迟加载
- 以及在构造函数,字段或setter上的@Autowired注释。 同样,在这里,容器将不会加载注入的依赖项,直到我们收到第一个用户请求
@Configuration
public class AppConfig {

    @Bean
    @Lazy
    public Employee employee() {
        return new Employee();
    }

    @Bean
    public Student student() {
        return new Student();
    }
}它还接受一个可选的布尔参数值 ,默认值设置为true 。 如果将其设置为false ,它将热切实例化该bean。 当我们有一个配置来延迟加载除少数几个以外的所有bean时,这可以派上用场。
6.
@Required是在bean的setter方法上使用的方法级注释。 它只是标记我们要使用XML填充的依赖项:
@Required
void setName(String name) {
    this.name = name;
}
<bean class="com.programmergirl.spring.Employee">
<property name="name" value="Joey" />
</bean>如果不这样做,它将抛出BeanInitializationException 。
7.
我们可以使用@Value将外部源中定义的属性值注入到我们的bean中。 例如,我们可以在application.yaml或application.properties文件中定义一些属性:
james.employee.id = 2563然后将该值注入到我们的bean中:
@Value("${james.employee.id}")
private String jamesEmpId;我们也可以在SpEL中使用@Value。
8.
@DependsOn注释可以强制Spring容器在使用@DependsOn注释进行注释的bean之前初始化一个或多个bean。
通常,此行为是自动的。 仅当我们具有隐式依赖项时(例如,加载JDBC驱动程序),才需要它。
我们可以在任何直接或间接使用@Component注释的类上或在使用@Bean注释的工厂方法上使用@DependsOn注释。
@Configuration
public class AppConfig {

    @Bean
    @DependsOn(value = {"employee"})
    public Dependent dependent() {
        return new Dependent();
    }

}
9.
我们使用@Scope批注定义@Component类或@Bean定义的范围。 它可以是单例,原型,请求,会话,globalSession或某些自定义范围。
@Component
@Scope("prototype")
public class Employee {}
10.
一个带有@Lookup注释的方法告诉Spring在调用它时返回该方法的返回类型的实例。 它对以下有用:
- 将原型bean注入单例实例
- 程序注入依赖
要了解如何将原型bean注入到singleton bean中,请随时参考本文。
上下文配置注释:
我们可以使用以下注释配置应用程序上下文:
1. @个人资料
如果我们希望Spring仅在特定配置文件处于活动状态时使用@Component类或@Bean方法,则可以使用@Profile批注对其进行标记。 我们可以使用此批注的value参数提及配置文件的名称:
@Component
@Profile("dev")
public class Employee {}
2.
使用此批注,我们可以指定一个或多个要导入的@Configuration类。
@Configuration
public class EmployeeConfig {

    @Bean
    public Employee employee() {
        return new Employee();
    }
}

@Configuration
@Import(EmployeeConfig.class)
public class AppConfig {

    @Bean
    public Student student() {
        return new Student();
    }
}这样,我们就可以在初始化应用程序上下文时显式指定AppConfig类。 它将自动导入在EmployeeConfig中定义的bean 。
3.
我们可以使用此批注将bean从applicationContext.xml文件加载到ApplicationContext中 :
@Configuration
@ImportResource({"classpath*:applicationContext.xml"})
public class AppConfig {
}
4.
此批注提供了一种方便的方法来定义用于应用程序设置的属性文件:
@Configuration
@PropertySource("classpath:appConfig.properties")
public class DatabaseConfig implements InitializingBean {

    @Autowired
    Environment env;

    ...

    void setDbConfig() {
        DataSourceConfig config = new DataSourceConfig();
        config.setDriver(env.getProperty("jdbc.driver"));
        config.setUrl(env.getProperty("jdbc.url"));
        config.setUsername(env.getProperty("jdbc.username"));
        config.setPassword(env.getProperty("jdbc.password"));
    }

}
5.
我们可以使用此批注指定多个@PropertySource配置:
@Configuration
@PropertySources({
    @PropertySource("classpath:/student.properties"),
    @PropertySource("classpath:/employee.properties"),
    @PropertySource("classpath:/database.properties")
})
class AppConfig {}
从Java 8开始,我们只需使用重复注释功能即可实现相同功能,即直接指定多个@PropertySource注释。
结论:
在本文中,我们介绍了最常见的Spring核心注释。 我们可以将它们用于Bean接线或配置应用程序上下文。
翻译自: https://www.javacodegeeks.com/2019/05/spring-core-annotations.html


 554
554

 被折叠的 条评论
为什么被折叠?
被折叠的 条评论
为什么被折叠?
 到【灌水乐园】发言


