Java提供了不同的接口,使您可以修改TestNG行为。 这些接口在Selenium WebDriver中进一步称为TestNG侦听器。 TestNG Listeners还允许您根据项目要求自定义测试日志或报告。
Selenium WebDriver中的TestNG侦听器是侦听某些事件并跟踪测试执行情况的模块,同时在测试执行的每个阶段执行某些操作。
这是一个TestNG教程,在这里我将通过示例帮助您实现不同的TestNG侦听器,以便下次计划使用TestNG和Selenium时可以熟练使用它们。
Selenium WebDriver中的TestNG侦听器可以在两个级别上实现:
- 类级别:在此,您可以为每个特定的类实现侦听器,无论它包含多少测试用例。
- 套件级别:在此,您将为特定套件实现侦听器,该套件包括多个类作为测试用例。
如果您不了解TestNG,建议您查看我们的TestNG教程以使用TestNG和Selenium运行您的第一个自动化脚本。
Selenium WebDriver中的TestNG侦听器类型
Selenium WebDriver中有许多TestNG侦听器,其中一些经常被测试社区使用,而有些则几乎被遗忘。 在本TestNG教程中,我将通过示例演示最受欢迎的TestNG侦听器,但在此之前,让我在Selenium WebDriver中注册各种TestNG侦听器。
- ITestListener
- IAnnotationTransformer
- IInvokedMethodListener
- ISuiteListener
- iReporter
- 可配置
- IExecutionListener
- 挂钩
- IMethodInterceptor
- IConfigurationListener
常用的TestNG侦听器及示例
现在,在这个TestNG教程中,让我们首先查看带有示例的最受欢迎和使用最广泛的TestNG侦听器。
1. ITestListener
ITestListener是Selenium WebDriver中使用最广泛的TestNG侦听器。 通过普通的Java类为您提供易于实现的接口,该类将覆盖ITestListener内部声明的每个方法。 通过在Selenium WebDriver中使用此TestNG侦听器,可以通过向方法添加不同的事件来更改测试的默认行为。 它还定义了一种新的日志记录或报告方式。
以下是此接口提供的一些方法:
onStart:在执行任何测试方法之前,将调用此方法。 这可以用来获取运行测试的目录。
onFinish:执行所有测试方法后,将调用此方法。 这可用于存储所有已运行测试的信息。
onTestStart:在调用任何测试方法之前,将先调用此方法。 这可以用来指示特定的测试方法已经开始。
onTestSkipped:跳过每个测试方法时,将调用此方法。 这可以用来指示特定的测试方法已被跳过。
onTestSuccess:成功执行任何测试方法时,将调用此方法。 这可以用来指示特定的测试方法已成功完成其执行。
onTestFailure:当任何测试方法失败时,将调用此方法。 这可以用来指示特定的测试方法已失败。 您可以创建一个截屏事件,以显示测试失败的地方。
onTestFailedButWithinSuccessPercentage:每次测试方法失败但在提及的成功百分比之内,都会调用此方法。 为了实现此方法,我们在TestNG中使用两个属性作为测试注释的参数,即successPercentage和invocationCount。 成功百分比取成功百分比的值,调用计数表示特定测试方法将执行的次数。
例如:@Test(successPercentage = 60,invocationCount = 5),在此注释中,成功百分比为60%,调用计数为5,这意味着如果至少3次((⅗)* 100 = 60),则表示5次以上测试方法通过,则视为通过。
如果您不了解TestNG和Selenium,建议您检查我们的TestNG教程以运行第一个自动化脚本。
对于每个ITestListener方法,我们通常传递以下参数:
- “ ITestResult”接口及其实例“ result”(描述测试结果)。
注意:如果要通过ITestResult跟踪异常,则需要避免try / catch处理。
- “ ITestContext”接口及其实例“上下文”描述了包含给定测试运行的所有信息的测试上下文。
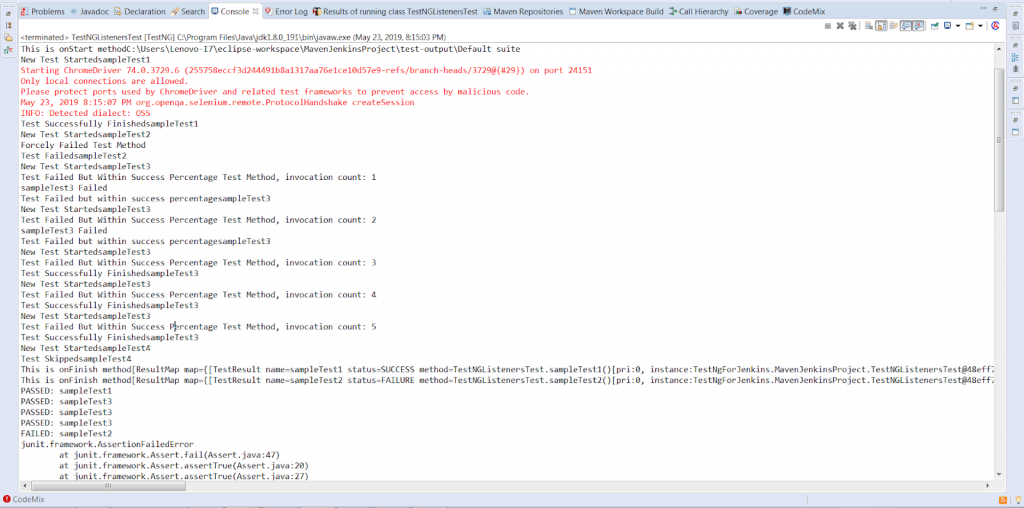
现在,在此TestNG侦听器教程中,我们将获取一个基本的示例代码,用于在类级别运行测试。 日志将在控制台上生成,它将帮助您了解哪些测试通过,失败和跳过。
第一个类(ListentersBlog.java)将包含ITestListener接口实现的所有方法:
package TestNgListeners;

import org.testng.ITestContext;
import org.testng.ITestListener;
import org.testng.ITestResult;

public class ListenersBlog implements ITestListener {


	public void onTestStart(ITestResult result) {

		System.out.println("New Test Started" +result.getName());

	}

	public void onTestSuccess(ITestResult result) {

		System.out.println("Test Successfully Finished" +result.getName());

	}

	public void onTestFailure(ITestResult result) {

		System.out.println("Test Failed" +result.getName());

	}

	public void onTestSkipped(ITestResult result) {

		System.out.println("Test Skipped" +result.getName());

	}

	public void onTestFailedButWithinSuccessPercentage(ITestResult result) {

		System.out.println("Test Failed but within success percentage" +result.getName());

	}

	public void onStart(ITestContext context) {


		System.out.println("This is onStart method" +context.getOutputDirectory());

	}

	public void onFinish(ITestContext context) {

		System.out.println("This is onFinish method" +context.getPassedTests());
		System.out.println("This is onFinish method" +context.getFailedTests());
	}
}
以下是包含测试方法(TestNGListenersTest.java)的代码。 确保在类名上方添加一个Listeners注释,以实现上述添加的方法。
语法: @Listeners(PackageName.ClassName.class)
package TestNgListeners;

import org.openqa.selenium.By;
import org.openqa.selenium.WebDriver;
import org.openqa.selenium.chrome.ChromeDriver;
import org.testng.SkipException;
import org.testng.annotations.Listeners;
import org.testng.annotations.Test;

import junit.framework.Assert;

@Listeners(TestNgListeners.ListenersBlog.class)
public class TestNGListenersTest {


	@Test  //Passing Test
	public void sampleTest1() throws InterruptedException
	{
		System.setProperty("webdriver.chrome.driver", "C:\\Users\\Lenovo-I7\\Desktop\\Selenium\\chromedriver.exe");

		WebDriver driver = new ChromeDriver();

		driver.get("https://www.apple.com/");
        driver.manage().window().maximize();

        driver.findElement(By.xpath("//*[@id=\'ac-globalnav\']/div/ul[2]/li[3]")).click();
        Thread.sleep(2000);

        driver.findElement(By.cssSelector("#chapternav > div > ul > li.chapternav-item.chapternav-item-ipad-air > a")).click();
   	    Thread.sleep(2000);

   	    driver.findElement(By.linkText("Why iPad")).click();
   	    Thread.sleep(2000);

   	    driver.quit();

	}

	@Test  //Failing Test
	public void sampleTest2() throws InterruptedException
	{
		System.out.println("Forcely Failed Test Method");
		Assert.assertTrue(false);
	}

	private int i = 0;

	@Test(successPercentage = 60, invocationCount = 5)  //Test Failing But Within Success Percentage
	public void sampleTest3() {
		i++;
		System.out.println("Test Failed But Within Success Percentage Test Method, invocation count: " + i);
		if (i == 1 || i == 2) {
			System.out.println("sampleTest3 Failed");
			Assert.assertEquals(i, 6);
		}
	}

	@Test  //Skipping Test
	public void sampleTest4()
	{
		 throw new SkipException("Forcely skipping the sampleTest4");
	}

}
控制台输出屏幕:

现在,假设您的项目中有多个类,那么将Selenium WebDriver中的TestNG侦听器添加到每个类中可能会很麻烦。 在这种情况下,您可以创建一个测试套件并将Listeners标记添加到套件(xml文件)中,而不是将Listeners添加到每个类中。
这是用于在套件级别运行测试的示例代码(testng.xml):
<suite name="TestNG Listeners Suite" parallel="false">

    	 	 	 	 	<listeners>
        	 	 	 	 	<listener class-name="TestNgListeners.ListenersBlog">
   </listener></listeners>

   <test name="Test">
       <classes>
           <class name="TestNgListeners.TestNGListenersTest">
       </class></classes>
   </test>

</suite>
2. IAnnotationTransformer
IAnnotationTransformer是一个提供“转换”方法的接口,TestNG会调用该方法来修改测试类中Test注释方法的行为。
转换方法提供各种参数:
- 注解:从测试类中读取的注解。
- testClass:如果在类上找到注释,则此参数将表示同一类。
- testConstructor:如果在构造函数上找到注释,则此参数表示相同的构造函数。
- testMethod:如果在方法上找到注释,则此参数表示相同的方法。
注意:至少一个参数为非null。
以下是将在套件级别执行的示例代码。 在此代码中,我们在Test批注中使用了一个参数“ alwaysRun = true” ,该参数指示即使该方法所依赖的参数失败,该测试方法也将始终运行。 但是,我们将通过IAnnotationTransformer Listener转换测试方法的这种行为,这将不允许执行特定的测试方法。
侦听器类文件:
package TestNgListeners;

import java.lang.reflect.Constructor;
import java.lang.reflect.Method;

import org.testng.IAnnotationTransformer;
import org.testng.annotations.ITestAnnotation;

public class AnnotationTransformers implements IAnnotationTransformer {

	public boolean isTestRunning(ITestAnnotation ins)
	{
		if(ins.getAlwaysRun())
		{
			return true;
		}
		return false;
	}


		public void transform(ITestAnnotation annotation, Class testClass, Constructor testConstructor, Method testMethod) {

		if(isTestRunning(annotation))
		{
			annotation.setEnabled(false);

		}

	}

}
测试类文件:
package TestNgListeners;

import org.testng.annotations.Listeners;
import org.testng.annotations.Test;


public class AnnotationTransformerTests {

	@Test(alwaysRun=true)
	public void test1()
	{
	   System.out.println("This is my first test whose behaviour would get changed while executing");
	}

	@Test
	public void test2()
	{
	   System.out.println("This is my second test executing");
	}

}
控制台输出屏幕:

3. IInvokedMethodListener
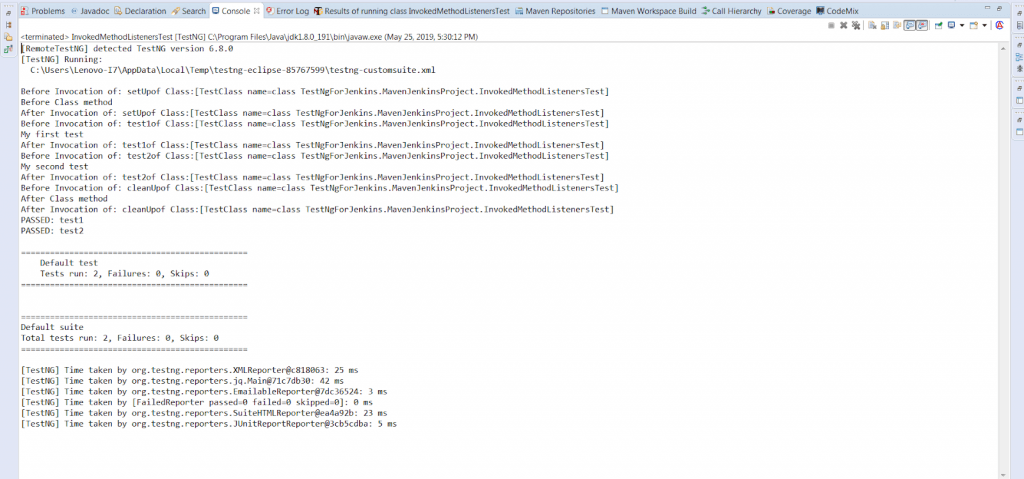
该界面允许您在执行方法之前和之后执行一些操作。 调用此侦听器以进行配置和测试方法。 Selenium WebDriver中的此TestNG侦听器与ITestListerner和ISuiteListerner相同。 但是,您应该记下&的区别,即在IInvokedMethodListener中,它在每个方法之前和之后进行调用。
有两种方法可以实现:
beforeInvocation(): This method is invoked prior every method.
afterInvocation(): This method is invoked post every method.
这是此侦听器的示例代码,在类级别实现。
InvokedMethodListeners.java(includes listeners implemented methods)

package TestNgListeners;

import org.testng.IInvokedMethod;
import org.testng.IInvokedMethodListener;
import org.testng.ITestResult;

public class InvokedMethodListeners implements IInvokedMethodListener {

	public void beforeInvocation(IInvokedMethod method, ITestResult testResult) {

		 System.out.println("Before Invocation of: " + method.getTestMethod().getMethodName() + "of Class:" + testResult.getTestClass());
	}

	public void afterInvocation(IInvokedMethod method, ITestResult testResult) {

		 System.out.println("After Invocation of: " + method.getTestMethod().getMethodName() + "of Class:" + testResult.getTestClass());

	}
}
文件名: InvokedMethodListenersTest.java(包括配置和测试方法)
package TestNgListeners;

import org.testng.annotations.AfterClass;
import org.testng.annotations.BeforeClass;
import org.testng.annotations.Listeners;
import org.testng.annotations.Test;

@Listeners(value=InvokedMethodListeners.class)
public class InvokedMethodListenersTest {
	@Test
	public void test1()
	{
		System.out.println("My first test");
	}

	@Test
	public void test2()
	{
		System.out.println("My second test");
	}

	 @BeforeClass
	    public void setUp() {
	        System.out.println("Before Class method");
	    }
	    @AfterClass
	    public void cleanUp() {
	        System.out.println("After Class method");
	    }
}
控制台输出屏幕:

4. ISuiteListener
Selenium WebDriver中的此TestNG侦听器以称为ISuiteListener的套件级别实现。 它有2种方法:
onStart:在测试套件执行之前调用此方法。
onFinish:在测试套件执行后调用此方法。
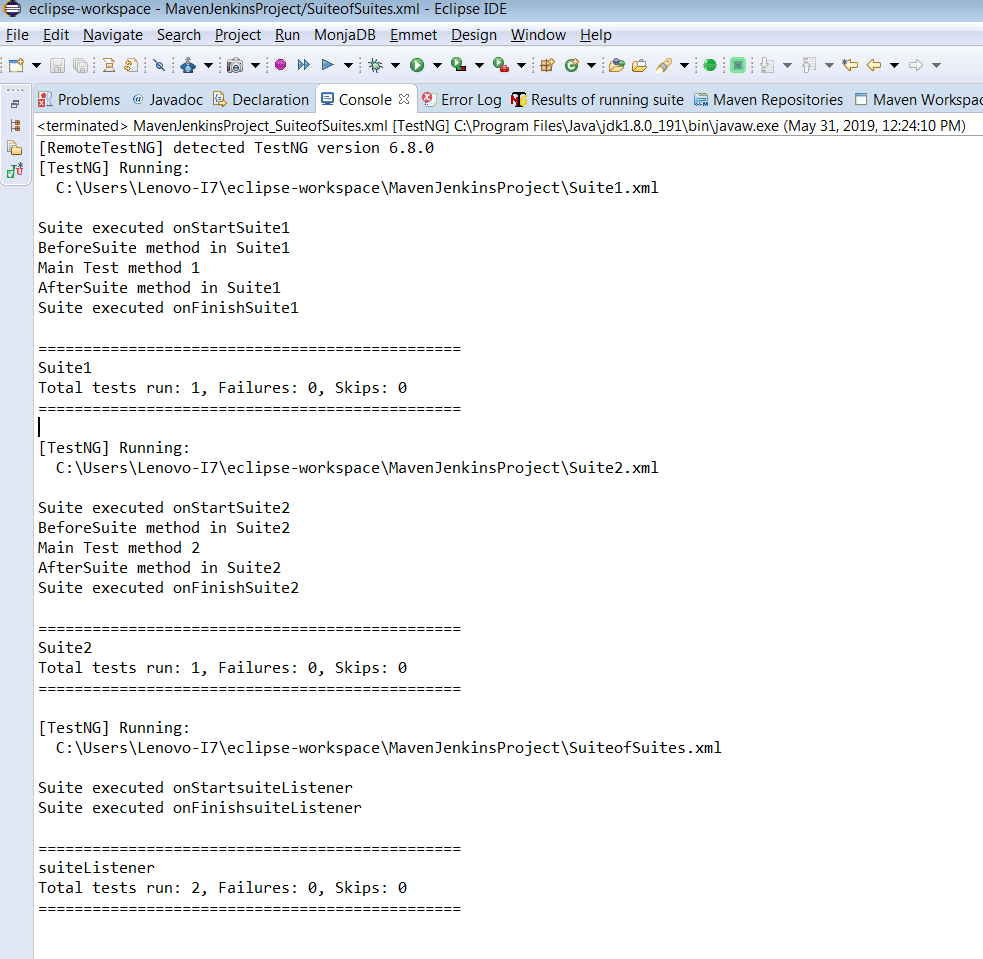
此侦听器基本上侦听套件执行之前和之后发生的事件。如果父套件还包含子套件,则在运行父套件之前执行子套件。
步骤1:使用普通的Java类实现ISuiteListener并添加未实现的方法。
类:SuiteListeners
package TestNgListeners;

import org.testng.ISuite;
import org.testng.ISuiteListener;

public class SuiteListeners implements ISuiteListener {
	public void onStart(ISuite suite) {
		System.out.println("Suite executed onStart"  + suite.getName());
	}
	public void onFinish(ISuite suite) {
		System.out.println("Suite executed onFinish"  + suite.getName());
	}
}步骤2:创建要添加到两个不同子套件中的两个测试类。
第1类:SuiteListenersTests1
package TestNgListeners;

import org.testng.annotations.AfterSuite;
import org.testng.annotations.BeforeSuite;
import org.testng.annotations.Test;

public class SuiteListenersTests1 {

	@BeforeSuite
	public void test1()
	{
	   System.out.println("BeforeSuite method in Suite1");
	}


	@Test
	public void test2()
	{
		System.out.println("Main Test method 1");
	}

	@AfterSuite
	public void test3()
	{
	   System.out.println("AfterSuite method in Suite1");
	}

}
第2类:SuiteListenersTests2
package TestNgListeners;

import org.testng.annotations.AfterSuite;
import org.testng.annotations.BeforeSuite;
import org.testng.annotations.Test;

public class SuiteListenersTests2 {

	@BeforeSuite
	public void test1()
	{
	   System.out.println("BeforeSuite method in Suite2");
	}


	@Test
	public void test2()
	{
		System.out.println("Main Test method 2");
	}

	@AfterSuite
	public void test3()
	{
	   System.out.println("AfterSuite method in Suite2");
	}

}
步骤3:将测试类添加到子套件中。
套件1:测试套件One.xml
<!--?xml version="1.0" encoding="UTF-8"?-->套件2:测试套件Two.xml
<!--?xml version="1.0" encoding="UTF-8"?-->步骤4:创建一个父套件xml文件,该文件将结合其他2个定义的套件以及listeners类。
<!--?xml version="1.0" encoding="UTF-8"?-->控制台输出屏幕:

5. IReporter
Selenium WebDriver中的此TestNG侦听器提供了一个界面,可帮助您自定义TestNG生成的测试报告。 它提供了generateReport方法,该方法将在所有套件执行后被调用。 该方法还包含三个参数:
- xmlSuite:它为您提供了正在执行的testng xml文件中提供的多个套件的列表。
- 套件:此对象表示有关类,包,测试执行结果以及所有测试方法的大量信息。 基本上,它表示最终执行后有关套件的详细信息。
- outputDirectory:包含生成报告的输出文件夹路径。
以下是套件级别的IReporterer侦听器示例。
文件名:ReporterListener.java
package TestNgListener;

import java.util.List;
import java.util.Map;

import org.testng.IReporter;
import org.testng.ISuite;
import org.testng.ISuiteResult;
import org.testng.ITestContext;
import org.testng.xml.XmlSuite;

public class ReporterListener implements IReporter {

	public void generateReport(List xmlSuites, List suites, String outputDirectory) {

		for(ISuite isuite : suites)
		{
			Map<string, isuiteresult=""> suiteResults = isuite.getResults();
			String sn = isuite.getName();

			for(ISuiteResult obj : suiteResults.values())
			{
				ITestContext tc = obj.getTestContext();

				System.out.println("Passed Tests of"  + sn + "=" +  tc.getPassedTests().getAllResults().size());

				System.out.println("Failed Tests of"  + sn + "=" +  tc.getFailedTests().getAllResults().size());

				System.out.println("Skipped Tests of"  + sn + "=" +  tc.getSkippedTests().getAllResults().size());
			}

		}


	}

}
</string,>
文件名:ReporterTest.java
package TestNgListener;

import org.testng.SkipException;
import org.testng.annotations.Listeners;
import org.testng.annotations.Test;

import junit.framework.Assert;


public class ReporterTest {

	@Test
	public void FirstTest()
	{
		System.out.println("The First Test Method");
		Assert.assertTrue(true);
	}

	@Test
	public void SecondTest()
	{
		System.out.println("The Second Test Method");
		Assert.fail("Failing this test case");
	}

	@Test
	public void ThirdTest()
	{
		System.out.println("The Third Test Method");
		throw new SkipException("Test Skipped");
	}

}
控制台输出屏幕:

Selenium WebDriver中不太常用的TestNG侦听器
在本节中,我将重点介绍那些TestNG侦听器,这些侦听器没有上一节中讨论的那样知名。 我已经避免了这些TestNG侦听器及其示例的实际演示,因为它们很少使用。 但是,我将帮助您了解其目的。
6. IConfigurationListener
Selenium WebDriver中的此TestNG侦听器仅在通过,失败或跳过配置方法时才用于创建事件。
下面是此侦听器提供的未实现的方法:
- onConfigurationSuccess:配置方法成功时将调用它。
- onConfigurationFailure:配置方法失败时,将调用它。
- onConfigurationSkip:顾名思义,当您的配置方法被跳过时,它将调用onConfigurationSkip方法。
7. IExecutionListener
此侦听器用于跟踪测试或套件运行开始和结束的时间。 它提供了两种方法:
onExecutionStart:在套件或测试开始运行之前被调用。
onExecutionFinish:在套件或测试执行后调用。
注意:此侦听器不可能阻止执行,而只能以某种方式创建事件。 此外,在配置TestNG时,您可以提供多个“ IExecution”侦听器。
8. IHookable
此接口跳过测试方法的调用,并提供一个被调用的run方法,而不是找到的每个@Test方法。 然后,一旦调用IHookCallBack参数的callBack()方法,就会调用测试方法。
当您希望对需要JAAS身份验证的类执行测试时,可以使用IHookable侦听器。 这可以用来设置权限,即测试对象应该针对谁运行以及何时跳过测试方法。
9. IMethodInterceptor
→要返回IMethodInstance的列表,请执行TestNG。
→对测试方法列表进行排序。
TestNG将按照返回值中定义的相同顺序执行测试方法。
IMethodInterceptor接口仅包含一种实现“拦截”的方法,该方法返回修改后的测试方法列表。
示例:一种测试方法SampleTestOne是测试日志,因此我们将其分组在“ LogCheck”中。
现在,假设我们只想运行LogCheck分组测试,而不是其他测试,因此,我们必须提供一个IMethodInterceptor侦听器,该侦听器可以消除其他测试并仅返回LogCheck分组测试。
10. IConfigurable
ICongurable侦听器与IHookable侦听器有些相似。 此接口跳过测试方法的调用,并提供一个run方法,而不是找到的每个配置方法都将被调用。 一旦调用IConfigureCallBack参数的callBack()方法,便会调用配置方法。
您在Selenium WebDriver中使用最多的哪些TestNG侦听器?
我希望这个TestNG教程能够帮助您了解哪种TestNG侦听器最适合您的项目要求。 关于很少使用的TestNG侦听器,如果您发现Selenium中有任何特定的TestNG侦听器非常有用,请随时在下面的评论部分中共享它们。 另外,如果您对本文有任何疑问,请告诉我。 我期待您的答复。 测试愉快!
翻译自: https://www.javacodegeeks.com/2019/06/testng-listeners-in-selenium-webdriver-examples.html


 被折叠的 条评论
为什么被折叠?


