


这篇文章提供了一个使用Spring Boot开发松耦合REST服务的完整示例。 使用spring boot,我们可以开发可独立运行的生产就绪Java应用程序,它是独立的应用程序,具有最小的依赖性,并且与其他应用程序的耦合较少。 大多数时候,Spring Boot应用程序将提供一个内聚的服务,并且服务的边界是明确定义的。 让我们深入研究我们的示例。
在本教程中,我将使用Spring Boot 2.0.3.RELEASE,它需要Java 8或9和Maven 3.2+(Eclipse)作为IDE。
创建Maven jar模块
由于我们将应用程序打包为.jar文件,因此在将maven与Eclipse IDE集成之后,我们可以使用eclipse IDE支持来生成maven jar模块。 Eclipse的最新版本带有集成的maven插件。 因此,您无需将Maven插件显式添加到Eclipse中。 我不会在这篇文章中解释如何使用Eclipse创建Maven jar模块。 如果您想知道它,可以在这里阅读我的另一篇文章,其中清楚地说明了如何使用Eclipse创建Maven模块。
如果使用quickstart工件创建maven项目,则将获得类似于以下内容的项目结构。

我创建了一个名为“ customer”的maven模块,其中“ com.semika”为groupId,“ customer”为工件ID。 您可以选择所需的包装结构。 您的内部包装结构将因此而改变。
App.java和AppTest.java文件将很快删除。 看一下pom.xml文件,其中包含有关项目的信息以及Maven用于构建项目的配置详细信息。 由于本教程不涉及单元测试功能,因此您现在可以删除Junit依赖项。
我想在这里强调一个重要因素。
<packaging> jar </ packaging>
在这里,我们告诉maven将应用程序捆绑为.jar文件进行部署。
添加Spring Boot功能
现在,我们有了典型的maven jar模块。 我们如何将其转换为Spring Boot应用程序?
所有Spring Boot依赖项都在Maven存储库中的org.springframework.boot组ID下定义。 spring-boot-starter-parent是一个项目,具有一些默认设置和基本必需的配置,我们可以使用它们来快速开始使用spring boot。
我们可以通过将以下元素添加到我们的pom.xml文件中来继承这些默认设置。
<!-- Inherit defaults from Spring Boot -->
<parent>
    <groupId>org.springframework.boot</groupId>
    <artifactId>spring-boot-starter-parent</artifactId>
    <version>2.0.3.RELEASE</version>
</parent>
连接到数据库
现在,让我们看看如何将Spring Boot应用程序与数据库连接,或者如何将数据源集成到Spring Boot应用程序中。 Spring框架为通过直接JDBC访问Hibernate等ORM技术访问数据库提供了强大的支持。
javax.sql.DataSource接口提供标准方法,以便通过使用连接池创建数据源来与数据库一起使用。 有几种实现,例如BoneCP,Apache通用DBCP2和spring的默认HikariCP。如果我们使用spring-boot-starter-jdbc或spring-boot-starter-data-jpa “启动器”,我们将自动获得对HikariCP的依赖。 在本教程的后面,我们将使用spring-boot-starter-data-jpa进行数据访问。
现在,该将application.properties文件添加到我们的项目了。 在Spring Boot应用程序中,此文件包含所有配置属性,并且该文件应在classpath上可用。 我将删除App.java和AppTest.java文件,并在与main文件夹平行的main文件夹中创建一个新文件夹作为resources 。 使用maven构建模块时,“资源”文件夹中的文件可用于classpath。 我们不需要提取任何东西。
让我们在资源文件夹中创建一个文件作为application.properties 。 我将把我的spring boot应用程序连接到MySql数据库。
为Spring Boot应用程序创建数据存储所需的最小属性如下。
spring.datasource.url=jdbc:mysql://localhost/springboot?useSSL=false
spring.datasource.username=root
spring.datasource.password=abc123
spring.datasource.driver-class-name=com.mysql.jdbc.Driver

spring.jpa.database-platform=org.hibernate.dialect.MySQLDialect
spring.jpa.show-sql=false
在这里,属性名称约定不是随机选择的。 Spring的数据源配置属性应以spring.datasource.*为前缀。 如果要设置特定的数据源实现,则应使用相应的前缀指定属性名称,例如spring.datasource.hikari.* , spring.datasource.tomcat.* , spring.datasource.dbcp2.* 。
由于我们将要连接到MySql数据库,因此应如下所示将mysql-java connector maven依赖项添加到我们的pom.xml文件中。
<dependency>
     <groupId>mysql</groupId>
     <artifactId>mysql-connector-java</artifactId>
</dependency>
添加主应用程序类
每个spring boot应用程序都应该有一个定义了main()方法的主类。 通常,此类被命名为Application.java并且应位于其他类上方的根包中。 此类通常带有少量注释。
- @EnableAutoConfiguration –此批注为我们的Spring Boot应用程序启用自动配置,该应用程序尝试根据添加的jar依赖项自动配置我们的Spring应用程序。
- @ComponentScan –这通过使用@Autowired注释启用Spring bean依赖项注入功能。 我们所有的应用程序组件这是使用了@Component注解,@Service,@Repository或@Controller被自动注册为Spring Bean。 可以使用@Autowired批注来注入这些bean。
- @Configuration –这将为Spring Boot应用程序启用基于Java的配置。 通常,定义main方法的类是使用此注释进行注释的很好的候选者。
我将在com.semika包内创建一个新类Application.java ,这是我的Spring Boot应用程序的根。
package com.semika;

import org.springframework.boot.SpringApplication;
import org.springframework.boot.autoconfigure.EnableAutoConfiguration;
import org.springframework.boot.autoconfigure.SpringBootApplication;
import org.springframework.context.annotation.ComponentScan;
import org.springframework.context.annotation.Configuration;

@EnableAutoConfiguration
@ComponentScan
@Configuration

public class Application {

    public static void main(String[] args) {
         SpringApplication app = new SpringApplication(Application.class);
         app.run(args);
    }
}代替使用所有三个注释,我们只能使用@SpringBootApplication注释,这等效于使用@ Configuration , @ EnableAutoConfiguration和@ComponentScan及其默认属性,如以下示例所示。
package com.semika;

import org.springframework.boot.SpringApplication;
import org.springframework.boot.autoconfigure.EnableAutoConfiguration;
import org.springframework.boot.autoconfigure.SpringBootApplication;
import org.springframework.context.annotation.ComponentScan;
import org.springframework.context.annotation.Configuration;

@SpringBootApplication
public class Application {
     public static void main(String[] args) {
        SpringApplication app = new SpringApplication(Application.class);
        app.run(args);
     }
}
使用spring-data-JPA添加数据访问功能
现在,让我们看看如何将数据访问功能集成到我们的Spring Boot应用程序中。 数据访问类在Spring Boot应用程序中称为Repositories 。 JPA ( Java持久性API )是一种标准技术,可让我们将对象“映射”到关系数据库。
spring-boot-starter-data-jpa入门项目提供了一种快速启动Spring Boot应用程序数据访问的方法。 它提供以下关键依赖性:
- 使用Hibernate映射对象与数据库表。
- Spring Data JPA,可用于编写基于JPA的存储库。
- Spring框架对ORM的核心支持。
为了向我们的Spring Boot应用程序添加数据访问功能,我们应该在pom.xml文件中添加以下maven依赖项。
添加波纹管依赖性之后,我们可以使用常规的JPA批注来映射具有关系数据库表的对象。
<dependency>
      <groupId>org.springframework.boot</groupId>
      <artifactId>spring-boot-starter-data-jpa</artifactId>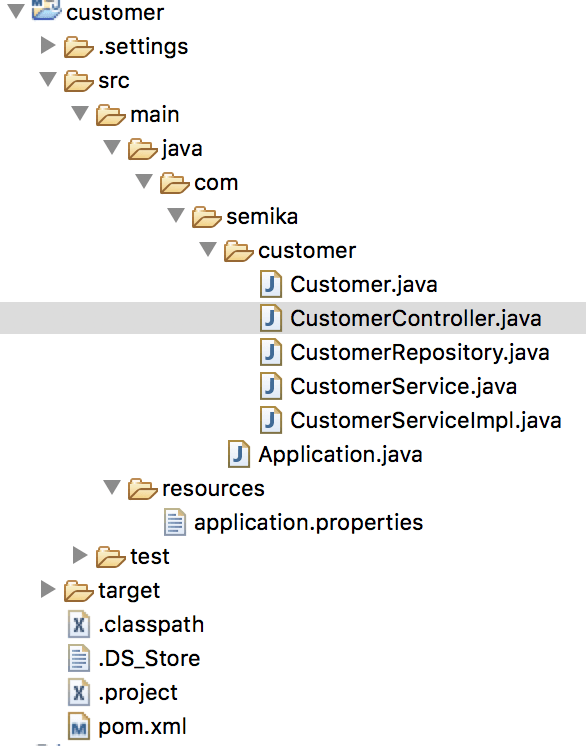
</dependency> 让我们在com.semika根文件夹中创建一个新的customer包,该根文件夹是Application.java类现在所处的位置。 在客户文件夹中,新的实体类创建为Customer.java 。
现在,我的客户数据库表具有以下三个属性。

package com.semika.customer;

import javax.persistence.Column;
import javax.persistence.Entity;
import javax.persistence.GeneratedValue;
import javax.persistence.GenerationType;
import javax.persistence.Id;
import javax.persistence.Table;

@Entity
@Table(name="customer")
public class Customer {

    @Id
    @GeneratedValue(strategy = GenerationType.AUTO)
    private Long id;

    @Column(name="first_name")
    private String firstName;

    @Column(name="last_name")
    private String lastName;

    @Column(name="address")
    private String address;

    public Customer() {
       super();
    }

    // getters and setters
}
Spring数据JPA存储库是可以定义为访问数据的接口。 JPA查询是根据方法名称自动创建的。 例如, CustomerRepository.java类中的findAll()方法获取所有客户。 findByFirstName (String firstName)方法将获取给定名字的所有客户。
Spring Data存储库抽象中的中央接口是Repository接口。 它使用要管理的域类以及域类的ID类型作为类型参数CrudRepository接口为要管理的实体类提供复杂的CRUD功能。 我们的存储库接口应从CrudRepository接口扩展。
我们的CustomerRepository.java接口将如下所示:
package com.semika.customer;

import org.springframework.data.repository.CrudRepository;

public interface CustomerRepository extends CrudRepository<Customer Long> {

}
您可能会找到实现类? Spring数据JPA为大多数数据访问方案提供了实现。 我们不需要显式实现那些方法。 如果您想了解有关Spring数据JPA的更多信息,可以在此处阅读参考文档。
此外,我将添加CustomerService.java接口及其实现CustomerServiceImpl.java类,以将业务逻辑保持在单独的层中。
package com.semika.customer;

public interface CustomerService {
    public Iterable<Customer> findAll();
}
package com.semika.customer;
package com.semika.customer;
import org.springframework.beans.factory.annotation.Autowired;
import org.springframework.stereotype.Service;
@Service
public class CustomerServiceImpl implements CustomerService {
@Autowired
private CustomerRepository customerRepository;
public Iterable<Customer> findAll() {
return customerRepository.findAll();
}
} 您可以看到,CustomerRepository使用@Autowired批注注入到CustomerServiceImpl类。 我们确实通过在本教程的开头通过@SpringBootApplication将@ComponentScan批注添加到我们的Application.java类中来实现此目的。
添加网络功能
现在,是时候构建和测试我们的应用程序了。 假设客户端发出HTTP请求以获取所有客户数据。 因此,我们的spring boot应用程序应该响应HTTP请求。 Spring MVC提供了接受HTTP请求和响应的Controllers 。 在这里,我们将向我们的Spring Boot应用程序添加一些spring MVC功能。 通过使用spring-boot-starter-web项目,我们可以将一些基本的MVC功能集成到我们的spring boot应用程序中,以便我们可以编写简单的Controller类来响应客户端的HTTP请求。
我们应该将以下Maven依赖项添加到我们的项目中。
<dependency>
     <groupId>org.springframework.boot</groupId>
     <artifactId>spring-boot-starter-web</artifactId>
</dependency>
package com.semika.customer;
import org.springframework.beans.factory.annotation.Autowired;
import org.springframework.web.bind.annotation.RequestMapping;
import org.springframework.web.bind.annotation.ResponseBody;
import org.springframework.web.bind.annotation.RestController;
@RestController
public class CustomerController {
@Autowired
private CustomerService customerService;
@RequestMapping("/customers")
@ResponseBody
public Iterable<Customer> findAll() {
Iterable<Customer> customers = customerService.findAll();
return customers;
}
} @RestController是Spring MVC中的构造型注释,它为人们阅读代码提供了提示,并为Spring提供了类扮演特定角色的提示。 也就是说,它包含进入应用程序的门。 在这种情况下,我们的类是一个Web @Controller ,因此Spring在处理传入的Web请求时会考虑使用它。
@RestController注释告诉Spring将结果字符串直接呈现回调用方。
@RequestMapping批注提供“路由”信息。 它告诉Spring,任何带有/customers路径的HTTP请求都应映射到findAll()方法。
这两个注释是Spring MVC注释。 它们不特定于Spring Boot。 我们在今年Spring增加了MVC Web功能,以便通过发出一些Web请求来测试我们的应用程序。 通过将spring-boot-starter-web到spring boot应用程序中,在运行它时,spring boot应用程序将启动它自己的Web容器并在其中运行。
所以现在,我们的项目结构应该如下。
建筑应用
Spring Boot jar文件被称为一个独立的可执行jar文件,我们可以在生产环境中直接运行它。 可执行的jar是包含您的已编译类以及代码需要运行的所有jar依赖项的归档文件。 在我们的示例中,由于我们使用了pring-boot-starter-web ,因此在运行jar文件时,它将启动内部Web容器以运行应用程序。
要创建可执行jar,我们需要将spring-boot-maven-plugin到我们的pom.xml 。 为此,请在“插件”部分下方插入以下几行。
<plugins>
     <plugin>
          <groupId>org.springframework.boot</groupId>
          <artifactId>spring-boot-maven-plugin</artifactId>
     </plugin>
</plugins>
您可能会注意到此处缺少上述插件的某些配置。 由于我们使用的是spring-boot-starter-parent ,因此我们不必担心这些,因为这些已包含在父项目中。 例如,父项目POM包含<executions>配置以绑定重新打包目标。
现在让我们看一下最终的pom.xml文件:
<project xmlns="http://maven.apache.org/POM/4.0.0" xmlns:xsi="http://www.w3.org/2001/XMLSchema-instance"
  xsi:schemaLocation="http://maven.apache.org/POM/4.0.0 http://maven.apache.org/xsd/maven-4.0.0.xsd">
  <modelVersion>4.0.0</modelVersion>

  <groupId>com.semika.user</groupId>
  <artifactId>customer</artifactId>
  <version>0.0.1-SNAPSHOT</version>
  <packaging>jar</packaging>

  <!-- Inherit defaults from Spring Boot -->
  <parent>
      <groupId>org.springframework.boot</groupId>
      <artifactId>spring-boot-starter-parent</artifactId>
      <version>2.0.3.RELEASE</version>
  </parent>

  <name>customer</name>
  <url>http://maven.apache.org</url>

  <properties>
    <project.build.sourceEncoding>UTF-8</project.build.sourceEncoding>
  </properties>

  <!-- Building an executable jar file -->

  <build>
      <plugins>
         <plugin>
             <groupId>org.springframework.boot</groupId>
             <artifactId>spring-boot-maven-plugin</artifactId>
         </plugin>
      </plugins>
  </build>

  <dependencies>
        <!-- Adding spring data jpa features -->
        <dependency>
            <groupId>org.springframework.boot</groupId>
            <artifactId>spring-boot-starter-data-jpa</artifactId>
        </dependency>

        <!-- Java MySQL connector -->
        <dependency>
             <groupId>mysql</groupId>
             <artifactId>mysql-connector-java</artifactId>
        </dependency>

        <!-- Integrating spring MVC features -->
        <dependency>
             <groupId>org.springframework.boot</groupId>
             <artifactId>spring-boot-starter-web</artifactId>
        </dependency>
  </dependencies>
</project>
让我们来构建应用程序。 转到pom.xml文件所在的项目根文件夹,然后运行以下命令。
mvn package 在目标文件夹中,您可以看到我们的可执行jar文件创建为customer-0.0.1-SNAPSHOT.jar 。
运行应用程序
在同一文件夹中,运行以下命令以运行jar文件。
java -jar target/customer-0.0.1-SNAPSHOT.jar如果在启动应用程序时分析日志,则会发现许多重要的事情。
服务器启动时的控制台输出如下:
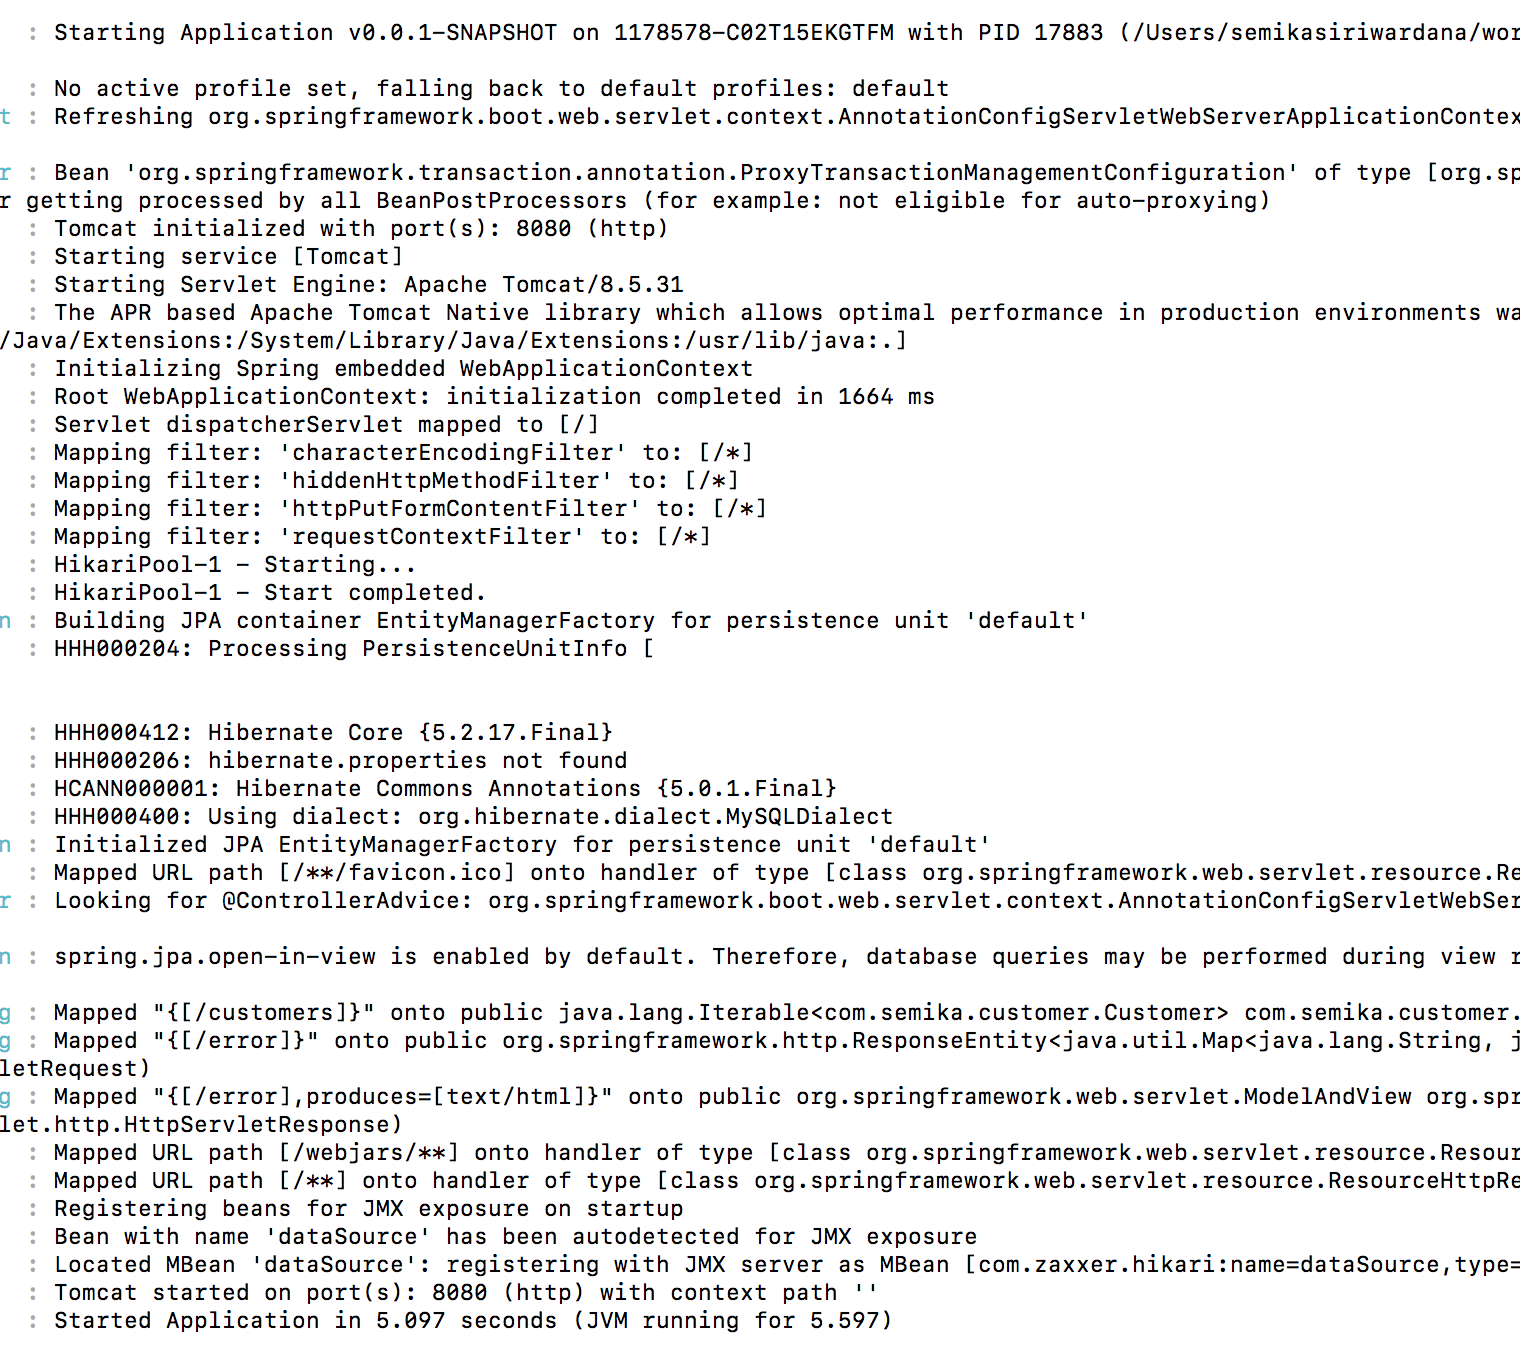
如果在底部附近看到日志,它将在端口8080上启动Tomcat服务器。如果从浏览器访问http://localhost:8080/customers URL,则将获得客户的JSON响应作为响应。
如果要在默认端口之外的其他端口上启动应用程序,则可以通过使用--server.port选项指定端口,如下所示。
java --server.port=9000 -jar target/customer-0.0.1-SNAPSHOT.jar如果要在启用调试的情况下启动应用程序,则可以使用以下命令:
java -Xdebug -Xrunjdwp:server=y,transport=dt_socket,address=8000,suspend=n -jar target/customer-0.0.1-SNAPSHOT.jar要在启用调试日志的情况下启动应用程序,可以使用以下命令:
java -jar target/customer-0.0.1-SNAPSHOT.jar --debug如果要在“ application.properties ”文件中指定服务器正在运行的端口,则可以在文件中包括以下属性。
server.port=${port:9000} 使用application.properties文件中的上述条目,而不是使用--server.port选项,只需使用java -jar命令使用--port选项即可指定端口。
大多数时候,您的配置属性因环境而异。 对于开发,生产和测试等环境,您可能需要保留不同的配置属性集。 您可以通过为每个环境保留不同的配置配置文件来做到这一点。
为了实现此目的,您应该以以下格式创建配置属性文件。
application-${profile}.properties 假设您需要分别为“开发”和“生产”环境保留两个配置文件。 在这种情况下,您应该创建两个属性文件,分别为application-development.properties和application-production.properties 。
使用java -jar命令启动应用程序时,应使用-D参数指定概要文件,如下所示:
java -jar -Dspring.profiles.active=production customer-0.0.1-SNAPSHOT.jar我希望这篇文章对尝试学习Spring Boot应用程序和Micro服务的初学者特别有用。
参考: Spring Boot参考指南
翻译自: https://www.javacodegeeks.com/2018/07/spring-boot-complete-example.html


 6999
6999

 被折叠的 条评论
为什么被折叠?
被折叠的 条评论
为什么被折叠?
 到【灌水乐园】发言


