


总览
为什么将XML转换为JSON以在MongoDB中原始使用?
由于MongoDB使用JSON文档存储记录,就像表和行将记录存储在关系数据库中一样,我们自然需要将XML转换为JSON。
某些应用程序可能需要存储原始(未修改的)JSON,因为在如何构造数据方面存在不确定性。
有数百种基于XML的标准 。 如果应用程序要处理不遵循相同标准的XML文件,则数据的结构将存在不确定性。
为什么要使用Spring Batch?
Spring Batch提供了可重用的功能,这些功能在处理大量记录时是必不可少的,而其他功能则可以实现高容量和高性能的批处理作业。 Spring网站已很好地记录了Spring Batch 。
有关Spring Batch的另一个教程,请参阅我以前的文章“ 使用Spring Batch处理CSV” 。
0 –将XML转换为JSON以在MongoDB中与Spring Batch示例应用程序一起使用
该示例应用程序转换XML文档,该XML文档是用于配置音乐播放列表的“策略”。 该策略旨在类似于真实的网络安全配置文档。 它是一个简短的文档,但说明了如何搜索复杂的XML文档。
我们将采用本教程的方法是处理各种样式的XML文件。 我们希望能够处理意外情况。 这就是为什么我们保持数据“原始”的原因。
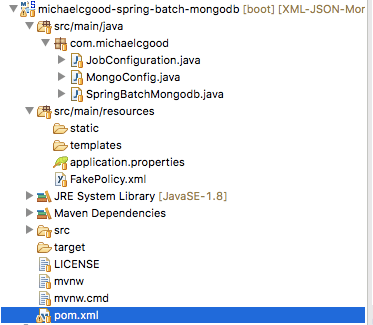
1 –项目结构
它是典型的Maven结构。 我们为该示例应用程序提供了一个软件包。 XML文件位于src / main / resources中 。
2 –项目依赖性
除了典型的Spring Boot依赖关系之外,我们还包含嵌入式MongoDB数据库和JSON处理的依赖关系。
<?xml version="1.0" encoding="UTF-8"?>
<project xmlns="http://maven.apache.org/POM/4.0.0" xmlns:xsi="http://www.w3.org/2001/XMLSchema-instance"
	xsi:schemaLocation="http://maven.apache.org/POM/4.0.0 http://maven.apache.org/xsd/maven-4.0.0.xsd">
	<modelVersion>4.0.0</modelVersion>

	<groupId>com.michaelcgood</groupId>
	<artifactId>michaelcgood-spring-batch-mongodb</artifactId>
	<version>0.0.1</version>
	<packaging>jar</packaging>

	<name>michaelcgood-spring-batch-mongodb</name>
	<description>Michael C  Good - XML to JSON + MongoDB + Spring Batch Example</description>

	<parent>
		<groupId>org.springframework.boot</groupId>
		<artifactId>spring-boot-starter-parent</artifactId>
		<version>1.5.7.RELEASE</version>
		<relativePath /> <!-- lookup parent from repository -->
	</parent>

	<properties>
		<project.build.sourceEncoding>UTF-8</project.build.sourceEncoding>
		<project.reporting.outputEncoding>UTF-8</project.reporting.outputEncoding>
		<java.version>1.8</java.version>
	</properties>

	<dependencies>
		<dependency>
			<groupId>org.springframework.boot</groupId>
			<artifactId>spring-boot-starter-batch</artifactId>
		</dependency>
		<dependency>
			<groupId>org.springframework.boot</groupId>
			<artifactId>spring-boot-starter-web</artifactId>
		</dependency>
		<dependency>
			<groupId>de.flapdoodle.embed</groupId>
			<artifactId>de.flapdoodle.embed.mongo</artifactId>
			<version>1.50.5</version>
		</dependency>
		<dependency>
			<groupId>cz.jirutka.spring</groupId>
			<artifactId>embedmongo-spring</artifactId>
			<version>RELEASE</version>
		</dependency>
		<dependency>
				<groupId>org.json</groupId>
				<artifactId>json</artifactId>
				<version>20170516</version>
			</dependency>

			<dependency>
				<groupId>org.springframework.boot</groupId>
				<artifactId>spring-boot-starter-data-mongodb</artifactId>
			</dependency>
	</dependencies>

	<build>
		<plugins>
			<plugin>
				<groupId>org.springframework.boot</groupId>
				<artifactId>spring-boot-maven-plugin</artifactId>
			</plugin>
		</plugins>
	</build>


</project>
3 – XML文档
这是为本教程创建的示例策略文档。 它的结构基于真实的网络安全策略文档。
- 请注意,文档的父项是Policy标记。
- 重要信息位于“组”标签内。
- 查看标记内的值,例如Policy中的ID或status中的日期。
在这个小文档中有很多信息需要考虑。 例如,还有XML名称空间(xmlns)。 在本教程的其余部分中,我们不会涉及到这一点,但是根据您的目标,可能需要为其添加逻辑。
<?xml version="1.0"?>
<Policy  xmlns:xsi="http://www.w3.org/2001/XMLSchema-instance" style="STY_1.1" id="NRD-1">
  <status date="2017-10-18">draft</status>
  <title xmlns:xhtml="http://www.w3.org/1999/xhtml">Guide to the Configuration of Music Playlist</title>
   <description xmlns:xhtml="http://www.w3.org/1999/xhtml" >This guide presents a catalog of relevant
    configuration settings for a playlist that I listen to while I work on software development.
    <html:br xmlns:html="http://www.w3.org/1999/xhtml"/>
    <html:br xmlns:html="http://www.w3.org/1999/xhtml"/>
    Providing myself with such guidance reminds me how to efficiently
    configure my playlist.  Lorem ipsum <html:i xmlns:html="http://www.w3.org/1999/xhtml">Lorem ipsum,</html:i>
    and Lorem ipsum.  Some example
    <html:i xmlns:html="http://www.w3.org/1999/xhtml">Lorem ipsum</html:i>, which are Lorem ipsum.
  </description>
  <Group id="remediation_functions">
    <title xmlns:xhtml="http://www.w3.org/1999/xhtml" >Remediation functions used by the SCAP Security Guide Project</title>
    <description xmlns:xhtml="http://www.w3.org/1999/xhtml" >XCCDF form of the various remediation functions as used by
      remediation scripts from the SCAP Security Guide Project</description>
    <Value id="is_the_music_good" prohibitChanges="true" >
      <title xmlns:xhtml="http://www.w3.org/1999/xhtml" >Remediation function to fix bad playlist</title>
      <description xmlns:xhtml="http://www.w3.org/1999/xhtml" >Function to fix bad playlist.


       Lorem ipsum Lorem ipsum Lorem ipsum Lorem ipsum

       Lorem ipsum
       Lorem ipsum
       Lorem ipsum
       Lorem ipsum
      </description>
      <value>
        function fix_bad_playlist {

        # Load function arguments into local variables
       Lorem ipsum
       Lorem ipsum
       Lorem ipsum

        # Check sanity of the input
        if [ $# Lorem ipsum ]
        then
        echo "Usage: Lorem ipsum"
        echo "Aborting."
        exit 1
        fi

        }
      </value>
    </Value>
    </Group>
    </Policy>
4 – MongoDB配置
在下面,我们指定我们使用的是嵌入式MongoDB数据库,使它可被捆绑在便捷注释@SpringBootApplication中的组件扫描发现,并指定mongoTemplate将是bean。
package com.michaelcgood;

import java.io.IOException;
import cz.jirutka.spring.embedmongo.EmbeddedMongoFactoryBean;
import org.springframework.context.annotation.Bean;
import org.springframework.context.annotation.Configuration;
import org.springframework.data.mongodb.core.*;
import com.mongodb.MongoClient;


@Configuration
public class MongoConfig {

    private static final String MONGO_DB_URL = "localhost";
    private static final String MONGO_DB_NAME = "embeded_db";
    @Bean
    public MongoTemplate mongoTemplate() throws IOException {
        EmbeddedMongoFactoryBean mongo = new EmbeddedMongoFactoryBean();
        mongo.setBindIp(MONGO_DB_URL);
        MongoClient mongoClient = mongo.getObject();
        MongoTemplate mongoTemplate = new MongoTemplate(mongoClient, MONGO_DB_NAME);
        return mongoTemplate;
    }
}
5 –处理XML到JSON
我们的Spring Batch Job的step1()包含调用三个方法来帮助将XML转换为JSON。 我们将分别进行审查。
@Bean
    public Step step1() {
        return stepBuilderFactory.get("step1")
                .tasklet(new Tasklet() {
                    @Override
                    public RepeatStatus execute(StepContribution stepContribution, ChunkContext chunkContext) throws Exception {

                        // get path of file in src/main/resources
                        Path xmlDocPath =  Paths.get(getFilePath());

                        // process the file to json
                         String json = processXML2JSON(xmlDocPath);

                         // insert json into mongodb
                         insertToMongo(json);
                        return RepeatStatus.FINISHED;
                    }
                }).build();
    }
5.1 – getFilePath()
此方法只是获取作为参数传递给方法processXML2JSON的文件路径。
注意:
- ClassLoader正在帮助我们在资源文件夹中找到XML文件。
// no parameter method for creating the path to our xml file
    private String getFilePath(){

        String fileName = "FakePolicy.xml";
        ClassLoader classLoader = getClass().getClassLoader();
        File file = new File(classLoader.getResource(fileName).getFile());
        String xmlFilePath = file.getAbsolutePath();

        return xmlFilePath;
    }
5.2 – processXML2JSON(xmlDocPath)
getFilePath返回的字符串作为参数传递到此方法中。 从XML文件的字符串创建一个JSONOBject。
// takes a parameter of xml path and returns json as a string
    private String processXML2JSON(Path xmlDocPath) throws JSONException {


        String XML_STRING = null;
        try {
            XML_STRING = Files.lines(xmlDocPath).collect(Collectors.joining("\n"));
        } catch (IOException e) {
            e.printStackTrace();
        }

        JSONObject xmlJSONObj = XML.toJSONObject(XML_STRING);
        String jsonPrettyPrintString = xmlJSONObj.toString(PRETTY_PRINT_INDENT_FACTOR);
        System.out.println("PRINTING STRING :::::::::::::::::::::" + jsonPrettyPrintString);

        return jsonPrettyPrintString;
    }
5.3 – insertToMongo(json)
我们将已解析的JSON插入MongoDB文档中。 然后,我们在@Autowired mongoTemplate的帮助下将此文档插入名为“ foo”的集合中。
// inserts to our mongodb
    private void insertToMongo(String jsonString){
        Document doc = Document.parse(jsonString);
        mongoTemplate.insert(doc, "foo");
    }
6 –查询MongoDB
我们的Spring Batch Job的step2()包含我们的MongoDB查询。
- mongoTemplate.collectionExists基于集合的存在返回一个布尔值。
- mongoTemplate.getCollection(“ foo”)。find()返回集合中的所有文档。
- alldocs.toArray()返回一个DBObjects数组。
- 然后,我们将调用以下三种方法,我们将在下面分别进行回顾。
public Step step2(){
        return stepBuilderFactory.get("step2")
            .tasklet(new Tasklet(){
            @Override
            public RepeatStatus execute(StepContribution stepContribution, ChunkContext chunkContext) throws Exception{
                // all printing out to console removed for post's brevity
                // checks if our collection exists
                Boolean doesexist = mongoTemplate.collectionExists("foo");

                // show all DBObjects in foo collection
                DBCursor alldocs = mongoTemplate.getCollection("foo").find();
                List<DBObject> dbarray = alldocs.toArray();

                // execute the three methods we defined for querying the foo collection
                String result = doCollect();
                String resultTwo = doCollectTwo();
                String resultThree = doCollectThree();

                return RepeatStatus.FINISHED;
            }
        }).build();
    }
6.1 –第一个查询
该查询的目标是找到一个样式为“ STY_1.1”的文档。 为此,我们需要记住样式在文档中的位置。 它是政策的产物; 因此,我们将其作为Policy.style来处理 。
该查询的另一个目标是仅返回策略的id字段。 它也是政策的产物。
通过调用以下方法返回结果: mongoTemplate.findOne(query,String.class,“ foo”); 。 输出为String,因此第二个参数为String.class 。 第三个参数是我们的集合名称。
public String doCollect(){
        Query query = new Query();
        query.addCriteria(Criteria.where("Policy.style").is("STY_1.1")).fields().include("Policy.id");
        String result = mongoTemplate.findOne(query, String.class, "foo");
        return result;
    }
6.2 –第二个查询
第二个查询和第一个查询之间的区别是返回的字段。 在第二个查询中,我们返回Value,它是Policy和Group的子级。
public String doCollectTwo(){
        Query query = new Query();
        query.addCriteria(Criteria.where("Policy.style").is("STY_1.1")).fields().include("Policy.Group.Value");
        String result = mongoTemplate.findOne(query, String.class, "foo");

        return result;
    }
6.3 –第三次查询
第三个查询的条件不同。 我们只想返回ID为“ NRD-1”且状态日期为“ 2017-10-18”的文档 。 我们只想返回两个字段:title和description,它们都是Value的子级。
请参阅下面的演示中的XML文档或打印的JSON,以进一步澄清查询。
public String doCollectThree(){
        Query query = new Query();
        query.addCriteria(Criteria.where("Policy.id").is("NRD-1").and("Policy.status.date").is("2017-10-18")).fields().include("Policy.Group.Value.title").include("Policy.Group.Value.description");
        String result = mongoTemplate.findOne(query, String.class, "foo");

        return result;
    }
7 –Spring批处理作业
作业从步骤1开始,然后调用步骤2。
@Bean
    public Job xmlToJsonToMongo() {
        return jobBuilderFactory.get("XML_Processor")
                .start(step1())
                .next(step2())
                .build();
    }
8 – @SpringBootApplication
这是一个带有静态void main和@SpringBootApplication的标准类。
package com.michaelcgood;

import org.springframework.boot.SpringApplication;
import org.springframework.boot.autoconfigure.EnableAutoConfiguration;
import org.springframework.boot.autoconfigure.SpringBootApplication;
import org.springframework.boot.autoconfigure.jdbc.DataSourceAutoConfiguration;

@SpringBootApplication
@EnableAutoConfiguration(exclude={DataSourceAutoConfiguration.class})
public class SpringBatchMongodb {

	public static void main(String[] args) {
		SpringApplication.run(SpringBatchMongodb.class, args);
	}
}
9 –演示
9.1 –步骤1
JSON打印为字符串。 由于输出很长,因此我在下面的描述中省略了输出。
Executing step: [step1]
PRINTING STRING :::::::::::::::::::::{"Policy": {
    "Group": {
        "Value": {
            "prohibitChanges": true,
            "description": {
9.2 –步骤2
我剪切了结果以格式化博客文章的输出。
Executing step: [step2]检查集合是否存在
Status of collection returns :::::::::::::::::::::true显示所有对象
list of db objects returns:::::::::::::::::::::[{ "_id" : { "$oid" : "59e7c0324ad9510acf5773c0"} , [..]只需返回Policy的ID
RESULT:::::::::::::::::::::{ "_id" : { "$oid" : "59e7c0324ad9510acf5773c0"} , "Policy" : { "id" : "NRD-1"}}要查看打印到控制台的其他结果,请从Github分叉/下载代码并运行该应用程序。
10 –结论
我们已经审查了如何将XML转换为JSON,如何将JSON存储到MongoDB,以及如何在数据库中查询特定结果。
进一步阅读:
源代码在 Github上
翻译自: https://www.javacodegeeks.com/2017/10/converting-xml-json-raw-use-mongodb-spring-batch.html


 8445
8445

 被折叠的 条评论
为什么被折叠?
被折叠的 条评论
为什么被折叠?
 到【灌水乐园】发言


