


众所周知, Spring Boot是一个工具包,可以快速轻松地开发功能强大的Web服务。 它非常模块化,可以与其他框架和工具很好地配合使用。 在本教程中,我将向您展示通过使用Speedment作为ORM对现有SQL数据库设置RESTful API多么容易。
背景
Speedment是一个开放源代码工具包 ,它连接到数据库,分析元数据,并使用它生成实体和管理器类,以面向对象的方式对数据库进行建模。 它还包含一个运行时库,该库将Java 8 Streams转换为优化的SQL查询,使您可以使用非常类型安全和现代的方式编写代码。 事实证明,这对于Spring应用程序来说是完美的。
本教程的目标
本教程的目标是使用Spring开发REST API,该API会根据用户的角色授予对不同端点的访问权限。 如果您想向前看,可以在这里的指南中找到所有资源 。
| POST /帐户 | 任何人都可以访问 |
| GET /帐户/ {id} | 可供管理员以及相关用户访问 |
| GET /帐户 | 列出所有帐户,并且只有管理员可以访问 |
将使用我们将使用标准Java 8 Streams查询的MySQL数据库进行身份验证。 最后,我们将准备好一个完全面向对象的解决方案,可以使用自定义业务逻辑进行扩展!
如果您想跟随完成的项目,可以在GitHub上克隆它。
步骤1:数据库
为了简单起见,我使用的是使用以下语句创建的自定义MySQL数据库。 但是,您的想法是可以使用碰巧有权访问的任何现有数据库。
create database `securerest`;
use `securerest`;

create table `account` (
    `id` bigint not null auto_increment primary key,
    `username` varchar(30) not null unique,
    `password` char(60) not null,
    `role` enum('USER', 'ADMIN') not null
);
步骤2:创建Maven项目
为了快速启动一个新的Spring项目,我推荐一个很棒的Spring Initializr网站。 在这里,您可以轻松输入项目所需的依赖项。
我们需要以下Spring依赖项:
- spring-boot-starter-security
- 弹簧启动启动器网站
- MySQL的连接器的Java
其次,我们还需要添加Speedment依赖项以及Speedment插件来生成我们的代码。
<dependency>
    <groupId>com.speedment</groupId>
    <artifactId>runtime</artifactId>
    <version>${speedment.version}</version>
    <type>pom</type>
</dependency>
...
<plugin>
    <groupId>com.speedment</groupId>
    <artifactId>speedment-maven-plugin</artifactId>
    <version>${speedment.version}</version>

    <dependencies>
        <dependency>
            <groupId>mysql</groupId>
            <artifactId>mysql-connector-java</artifactId>
            <version>${mysql.version}</version>
            <scope>runtime</scope>
        </dependency>
    </dependencies>
</plugin>
步骤3:生成域模型
添加插件后,我们可以运行以下Maven目标来启动Speedment UI。
mvn speedment:tool 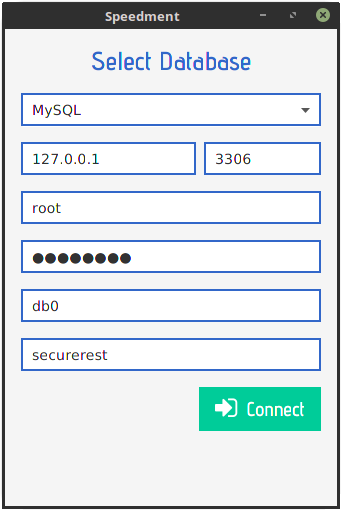
这将打开“加速工具”。 它将要求您提供数据库的用户名,密码,架构名称等。 输入字段的值,然后按“连接”。
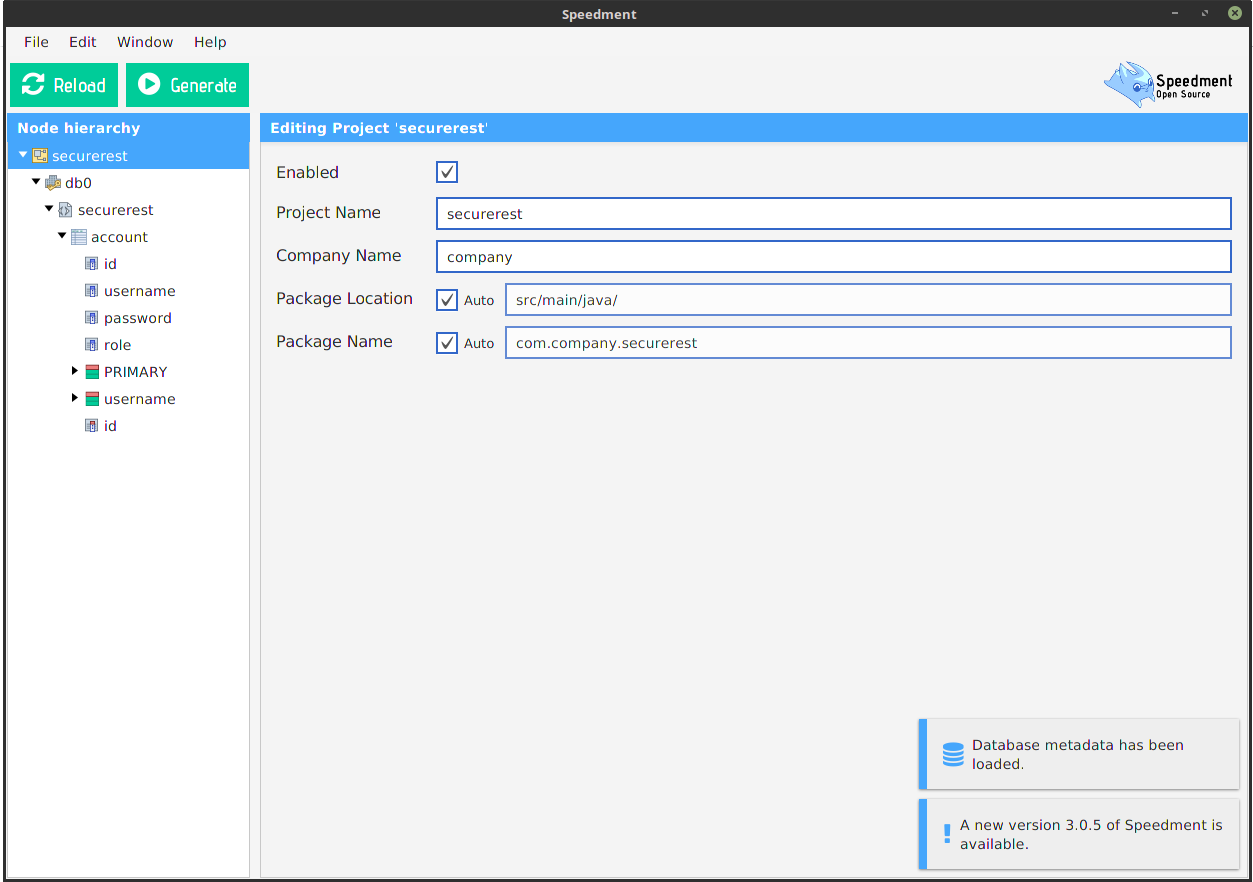
在用户界面内,您可以执行许多配置。 您可以指定所生成代码的确切位置,禁用与应用程序无关的表或列,并在希望字段或表在代码中以其他形式出现时创建别名。
对于本教程,按“生成”就足够了。 现在,您应该看到如何在您的项目中生成许多新的Java类和包!
步骤4:配置Spring Security
为了允许Spring作为Spring Bean启动Speedment,我们需要指定实例的创建方式。 为此,我们创建一个名为SpeedmentConfiguration的类。
SpeedmentConfiguration.java
@Configuration
public class SpeedmentConfiguration {

    private @Value("${dbms.host}") String host;
    private @Value("${dbms.port}") int port;
    private @Value("${dbms.schema}") String schema;
    private @Value("${dbms.username}") String username;
    private @Value("${dbms.password}") String password;

    @Bean
    public SpeedmentApplication getSpeedmentApplication() {
        return new SpeedmentApplicationBuilder()
            .withIpAddress(host)
            .withPort(port)
            .withUsername(username)
            .withPassword(password)
            .withSchema(schema)
            .build();
    }

    @Bean
    public AccountManager getAccountManager(SpeedmentApplication app) {
        return app.getOrThrow(AccountManager.class);
    }
}
默认情况下,顶部的@Value字段是从名为application.properties的文件加载的。 因此,我们应该在此处指定值:
application.properties
# Speedment Settings
dbms.host=localhost
dbms.port=3306
dbms.schema=securerest
dbms.username=root
dbms.password=password

# Server Settings
server.port=9777
接下来,我们需要创建用于用户身份验证的配置类。 我们称此类为AuthenticationConfiguration。
AuthenticationConfiguration.java
@Configuration
public class AuthenticationConfiguration
extends GlobalAuthenticationConfigurerAdapter {

    private @Autowired AccountManager accounts;

    @Bean
    public DaoAuthenticationProvider authProvider() {
        final DaoAuthenticationProvider authProvider =
            new DaoAuthenticationProvider();

        authProvider.setUserDetailsService(getUserDetailsService());
        authProvider.setPasswordEncoder(getPasswordEncoder());
        return authProvider;
    }

    @Bean
    public UserDetailsService getUserDetailsService() {
        return username -> accounts.stream()
            .filter(Account.USERNAME.equal(username))
            .findAny()
            .orElseThrow(() -> new UsernameNotFoundException(
                "Could not find the user '" + username + "'"
            ));
    }

    @Bean
    public PasswordEncoder getPasswordEncoder() {
        return new BCryptPasswordEncoder();
    }

    @Override
    public void init(
            AuthenticationManagerBuilder auth) throws Exception {
        auth.userDetailsService(getUserDetailsService())
            .passwordEncoder(getPasswordEncoder());
    }
}
注意我们如何在生成的AccountManager上使用@Autowired,因为它在SpeedmentConfiguration类中被指定为Spring Bean。
在方法getUserDetailsService()中,我们将Stream API与自定义谓词一起使用,从而允许将流转换为优化的SQL查询。 但是,要使此方法起作用,我们需要做一件事。 我们需要确保生成的Account接口扩展了UserDetails,以便可以与Spring API无缝使用。 这很容易做到,因为Speedment不会覆盖不是以“ Generated”开头的文件。
Account.java
public interface Account extends GeneratedAccount, UserDetails {

}
我们还需要在实现类中添加一些方法来支持该接口。
AccountImpl.java
@JsonIgnoreProperties("password")
public final class AccountImpl extends GeneratedAccountImpl
implements Account {

    private static final long serialVersionUID = -7552975849070084309L;

    @Override @JsonIgnore
    public Collection<? extends GrantedAuthority> getAuthorities() {
        return createAuthorityList(getRole());
    }

    @Override @JsonIgnore
    public boolean isAccountNonExpired() {
        return true;
    }

    @Override @JsonIgnore
    public boolean isAccountNonLocked() {
        return true;
    }

    @Override @JsonIgnore
    public boolean isCredentialsNonExpired() {
        return true;
    }

    @Override @JsonIgnore
    public boolean isEnabled() {
        return true;
    }
}
然后,我们创建第三个配置文件,以定义访问各种REST端点所需的权限。
SecurityConfiguration.java
@Configuration
@EnableWebSecurity
public class SecurityConfiguration
extends WebSecurityConfigurerAdapter {

    @Override
    protected void configure(HttpSecurity http) throws Exception {
        http.authorizeRequests()
                .antMatchers(POST, "/account").permitAll()
                .antMatchers(GET, "/account").hasAuthority("ROLE_ADMIN")
                .anyRequest().fullyAuthenticated()
            .and().httpBasic()
            .and().csrf().disable();
    }
}
步骤5:创建控制器
最后一步是在我们的业务逻辑所在的位置创建Controller类。 该类带有@RestController批注,以允许Spring自动拾取它。 它定义了三个映射,每个REST端点一个。
AccountController.java
@RestController
public class AccountController {

    private @Autowired AccountManager accounts;
    private @Autowired PasswordEncoder passwordEncoder;

    ...

}
第一个端点是注册命令。 它将位于“ POST /帐户”上。 我们使用两个参数,用户名和密码,对密码进行哈希处理,然后将其持久保存到数据库中。 如果用户名已经存在,则该操作将失败,因为用户名在数据库中被定义为UNIQUE。
@PostMapping("/account")
    long onPostAccount(
            @RequestParam("username") String username,
            @RequestParam("password") String password) {

        final Account created = accounts.persist(new AccountImpl()
            .setUsername(username)
            .setPassword(passwordEncoder.encode(password))
            .setRole("USER")
        );

        return created.getId();
    }
接下来是“ GET / account”端点。 这很简单。 我们将使用生成的管理器类启动流。 然后,通过Speedment将流优化为SQL查询。
@GetMapping("/account")
    List<Account> onGetAllAccounts() {
        return accounts.stream().collect(toList());
    }
最后一个端点要复杂一些。 我们将Spring配置为仅允许登录的用户访问“ GET / account {id}”,但是我们要确保用户只能访问自己的信息,除非他们具有“ ADMIN”角色。
@GetMapping("/account/{id}")
    Account onGetAccount(
            @PathVariable("id") long accountId,
            Authentication auth) {

        final Account account = (Account) auth.getPrincipal();

        if (account.getId() == accountId) {
            return account;
        } else if ("ADMIN".equals(account.getRole())) {
            return accounts.stream()
                .filter(Account.ID.equal(accountId))
                .findAny().orElseThrow(NotFoundException::new);
        } else {
            throw new ForbiddenException();
        }
    }
做完了! 现在,我们有了一个REST API,它使用数据库来存储用户并使用基本身份验证来确保用户只能调用他们有权访问的命令!
尝试一下
要尝试我们刚刚创建的REST API,只需启动一个终端并使用cURL命令即可!
要注册帐户:
curl -X POST "http://localhost:9777/account
    ?username=my_user
    &password=my_pass"
要查看我们自己的信息(在这种情况下,我们是ID为1的用户):
curl -X GET -u my_user:my_pass "http://localhost:9777/account/1"列出所有用户(需要ADMIN角色):
curl -X GET -u my_user:my_pass "http://localhost:9777/account"摘要
在本教程中,我们创建了一个新的Spring Boot项目,以使用简单的注册系统快速映射RESTful API,并使用Speedment为该API生成面向对象的数据库访问层。 我们还配置了Spring Security来要求用户进行身份验证以访问特定的端点。
有关如何使用Speedment的更多指南和教程, 请查看GitHub页面 ! 您还可以在其中找到一些示例项目,这些示例项目说明了如何使用Speedment中提供的更多出色的代码生成功能!
可以在这里找到本教程的完整资源!
直到下一次!
翻译自: https://www.javacodegeeks.com/2017/03/set-secure-rest-api-spring.html


 1万+
1万+

 被折叠的 条评论
为什么被折叠?
被折叠的 条评论
为什么被折叠?
 到【灌水乐园】发言


