


关于连续交付 ,最重要的实践之一是只构建一次二进制文件,并在不同的环境(开发,测试,验收等)中使用该二进制文件 。 这意味着最有可能需要外部化应用程序的配置 。 对于Spring Boot应用程序,将其属性值保留在application jar之外的application.properties中 。 这样,您可以将同一jar用于不同环境的部署(一种替代方法是,将所有可能环境的属性值打包到jar中,但在大多数情况下,我不认为这是一种好习惯)。
尤其是在构建和部署Spring Boot应用程序时,您应该查看一下Spring Cloud Config项目。 在这篇文章中,我将按照此处描述的步骤进行操作,您将仅需几个步骤就可以了解如何设置自己的配置服务。 在展示如何进行设置之前,先对体系结构进行概述: 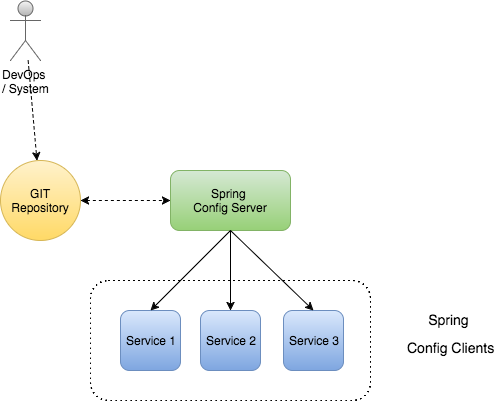
- Git存储库用于存储配置值。 为此,Git是绝佳的选择,因为它具有跟踪和存储更改的功能。
- DevOps(或想要更改配置的任何系统)可以通过将其更改推送到Git存储库中来简单地更改配置值。
- 配置服务与Git存储库保持同步,并根据要求发布配置值。
- 这些服务充当配置客户端,可以从配置服务请求配置值。
要使其在本地计算机上运行,请执行以下步骤:
最简单的方法是创建一个目录“ spring-config-example”,其中将包含此演示所需的所有代码。 这将被视为该帖子的根目录。
设置Git仓库
在这一步中,我创建一个属性文件,并将其放入(本地)Git存储库中。 然后,该属性文件将用作我们的演示客户端应用程序的属性值的源。 首先创建一个新目录“ configstore”,然后在该目录中创建一个名为“ a-bootiful-client.properties”的新文件。 将以下内容添加到文件中:
server.port=8000
message = Hello World

management.security.enabled=false
接下来使用命令创建一个git repo
' git init '并将文件添加并提交到本地仓库
' git commit -a -m 'initial commit' ' 这就是步骤。
设置配置服务
如前所述,该服务只是另一个Spring Boot项目。 要设置项目,我创建了一个新的子目录,并使用以下布局将“默认” Spring Boot项目放入其中:
├── pom.xml
└── src
    └── main
        ├── java
        │   └── net
        │       └── pascalalma
        │           └── cloud
        │               └── ConfigServiceApplication.java
        └── resources
            └── application.properties
“ pom.xml”具有以下内容:
<?xml version="1.0" encoding="UTF-8"?>
<project xmlns="http://maven.apache.org/POM/4.0.0" xmlns:xsi="http://www.w3.org/2001/XMLSchema-instance"
	xsi:schemaLocation="http://maven.apache.org/POM/4.0.0 http://maven.apache.org/xsd/maven-4.0.0.xsd">
  <modelVersion>4.0.0</modelVersion>

  <groupId>net.pascalalma.cloud</groupId>
  <artifactId>configuration-service</artifactId>
  <version>1.0.0-SNAPSHOT</version>
  <packaging>jar</packaging>

  <parent>
    <groupId>org.springframework.boot</groupId>
    <artifactId>spring-boot-starter-parent</artifactId>
    <version>1.5.2.RELEASE</version>
    <relativePath/> <!-- lookup parent from repository -->
  </parent>
  <properties>
    <project.build.sourceEncoding>UTF-8</project.build.sourceEncoding>
    <java.version>1.8</java.version>
  </properties>
  <dependencies>
    <dependency>
      <groupId>org.springframework.cloud</groupId>
      <artifactId>spring-cloud-config-server</artifactId>
    </dependency>
  </dependencies>
  <dependencyManagement>
    <dependencies>
      <dependency>
        <groupId>org.springframework.cloud</groupId>
        <artifactId>spring-cloud-dependencies</artifactId>
        <version>Camden.SR5</version>
        <type>pom</type>
        <scope>import</scope>
      </dependency>
    </dependencies>
  </dependencyManagement>
  <build>
    <plugins>
      <plugin>
        <groupId>org.springframework.boot</groupId>
        <artifactId>spring-boot-maven-plugin</artifactId>
      </plugin>
    </plugins>
  </build>
</project>
对于Spring Boot项目而言,这是相当简单的pom。 唯一增加的依赖性是“ spring-cloud-config-server”的依赖性。
Application类如下所示:
package net.pascalalma.cloud;

import org.springframework.boot.SpringApplication;
import org.springframework.boot.autoconfigure.SpringBootApplication;
import org.springframework.cloud.config.server.EnableConfigServer;

@EnableConfigServer
@SpringBootApplication
public class ConfigServiceApplication {

    public static void main(String[] args) {
        SpringApplication.run(ConfigServiceApplication.class, args);
    }
}
唯一不同的是注释“ EnableConfigServer”,该注释使此Spring Boot应用程序充当配置服务器。
最后是application.properties,其中包含以下内容:
server.port=8888
spring.cloud.config.server.git.uri=/Users/pascalalma/projects/sandbox/spring-config-example/configstore
除了定义端口外,我还将uri添加到Git仓库中,该仓库保存着要使用的属性。 如前所述,我在这里使用本地存储库,但这当然也可以是远程Git存储库。
这就是服务器的全部内容。 接下来让我们设置客户端应用程序。
设置客户服务
为了设置客户端项目,我创建了一个新的子目录,并使用以下布局将另一个“默认” Spring Boot项目放入其中:
├── pom.xml
└── src
    └── main
        ├── java
        │   └── hello
        │       └── ConfigClientApplication.java
        └── resources
            └── bootstrap.properties
如您所见,该项目与另一个项目一样简单。 它包含一个pom,一个Java文件和一个属性文件。 让我们通过每个。
“ pom.xml”包含以下内容:
<?xml version="1.0" encoding="UTF-8"?>
<project xmlns="http://maven.apache.org/POM/4.0.0" xmlns:xsi="http://www.w3.org/2001/XMLSchema-instance"
	xsi:schemaLocation="http://maven.apache.org/POM/4.0.0 http://maven.apache.org/xsd/maven-4.0.0.xsd">
  <modelVersion>4.0.0</modelVersion>
  <groupId>net.pascalalma.cloud</groupId>
  <artifactId>configuration-client</artifactId>
  <version>1.0.0-SNAPSHOT</version>
  <packaging>jar</packaging>
  <parent>
    <groupId>org.springframework.boot</groupId>
    <artifactId>spring-boot-starter-parent</artifactId>
    <version>1.5.2.RELEASE</version>
    <relativePath/> <!-- lookup parent from repository -->
  </parent>
  <properties>
    <project.build.sourceEncoding>UTF-8</project.build.sourceEncoding>
    <java.version>1.8</java.version>
  </properties>
  <dependencies>
    <dependency>
      <groupId>org.springframework.cloud</groupId>
      <artifactId>spring-cloud-starter-config</artifactId>
    </dependency>
    <dependency>
      <groupId>org.springframework.boot</groupId>
      <artifactId>spring-boot-starter-actuator</artifactId>
    </dependency>
    <dependency>
      <groupId>org.springframework.boot</groupId>
      <artifactId>spring-boot-starter-web</artifactId>
    </dependency>
  </dependencies>
  <dependencyManagement>
    <dependencies>
      <dependency>
        <groupId>org.springframework.cloud</groupId>
        <artifactId>spring-cloud-dependencies</artifactId>
        <version>Camden.SR5</version>
        <type>pom</type>
        <scope>import</scope>
      </dependency>
    </dependencies>
  </dependencyManagement>
  <build>
    <plugins>
      <plugin>
        <groupId>org.springframework.boot</groupId>
        <artifactId>spring-boot-maven-plugin</artifactId>
      </plugin>
    </plugins>
  </build>
</project>
接下来是Java文件。 它实际上包含两个类:启动Spring Boot的应用程序和处理传入HTTP请求的Controller。 该文件如下所示:
package net.pascalalma.cloud.client;

import org.springframework.beans.factory.annotation.Value;
import org.springframework.boot.SpringApplication;
import org.springframework.boot.autoconfigure.SpringBootApplication;
import org.springframework.cloud.context.config.annotation.RefreshScope;
import org.springframework.web.bind.annotation.RequestMapping;
import org.springframework.web.bind.annotation.RestController;

@SpringBootApplication
public class ConfigClientApplication {

    public static void main(String[] args) {
        SpringApplication.run(ConfigClientApplication.class, args);
    }
}

@RefreshScope
@RestController
class MessageRestController {

    @Value("${message:Hello default}")
    private String message;

    @RequestMapping("/message")
    String getMessage() {
        return this.message;
    }
}
添加RefreshScope是为了能够稍后在测试中修改属性时重新加载它们。
最后一个文件是“ bootstrap.properties”。 当启动该应用程序以在启动该应用程序之前加载远程“ application.properties”时,该文件将由Spring Boot CLient应用程序使用。 该文件包含以下内容:
spring.application.name=a-bootiful-client
spring.cloud.config.uri=http://localhost:8888
我认为也不是很复杂。 它包含客户端应用程序的名称。 此名称用于从配置服务中选择正确的属性文件。 第二行包含云配置服务器的位置。 您可以在此处了解更多信息。
测试设置
现在有了所有代码,我可以检查它是否有效。 我打开三个终端会话。 我第一个导航到“ configuration-server”目录,并执行“ mvn spring-boot:run ”以启动配置服务器。 第二个我导航到“ configuration-client”目录并执行“ mvn spring-boot:run ”以启动配置客户端。 我用来打电话给客户端以测试配置服务器的第三个。 当我执行命令' curl localhost:8000/message '时,我希望得到返回的消息,该消息是我在第一步中放入configstore的:
$ curl localhost:8000/message
Hello World!
现在,当我对配置存储进行更改时,它不会自动反映在客户端中。 我编辑文件“ a-bootiful-client.properties”,并将消息更新为:
message = Hello World from Spring Boot!\n\n 。 当然,使用' git commit -a -m 'updated message' '将文件提交到存储库中 当我在客户端应用程序上执行相同的curl命令时,不会有任何更改。 如果我直接在配置服务器上卷曲消息,则可以看到更改:
$ curl localhost:8888/a-bootiful-client/default
{"name":"a-bootiful-client"
,"profiles":"default"]
,"label":"master"
,"version":"98c6f8d8dd9a9b2cb36496ca4ac54ffb35806dbc"
,"state":null
,"propertySources":[
  {"name":"/Users/pascalalma/projects/sandbox/spring-config-example/configstore/a-bootiful-client.properties"
  ,"source":{"server.port":"8000"
    ,"management.security.enabled":"false"
    ,"message":"Hello World from Spring Boot!\n\n"}
  }
  ]
}
要将更改后的值从配置服务器获取到客户端,我需要使用以下命令刷新客户端:
'curl -X POST http://localhost:8000/refresh ' 。 如果现在我卷曲客户端,则会看到预期的更新消息:
$ curl localhost:8000/message
Hello World from Spring Boot!
您可能已经注意到,此演示的'application.properties'中的'management.security.enabled'属性设置为false。 这是为了使其易于测试(默认情况下,自Spring Boot 1.5起,Actuator端点默认是安全的)
这篇文章中显示的功能实际上只是冰山一角。 与其他工具(如Spring Cloud Consul和Spring Cloud Bus)结合使用 ,还可以实现更多功能,还可以与标准的Spring功能(如security和Profiles)结合使用 。 这篇文章应该足够让您开始自己检查一下。
翻译自: https://www.javacodegeeks.com/2017/04/use-spring-cloud-config-externalized-configuration.html


 1772
1772

 被折叠的 条评论
为什么被折叠?
被折叠的 条评论
为什么被折叠?
 到【灌水乐园】发言


