


在本系列的第一部分中 ,我展示了事务如何在普通JDBC中工作 。 然后,我展示了Spring如何管理基于JDBC的事务。 在本系列的第二部分中,我将首先展示事务如何在普通的JPA中工作。 然后展示Spring如何管理基于JPA的事务。
资金转移
为了帮助说明交易,我将使用同一案例研究,将资金从一个银行帐户转移到另一个银行帐户。 在这里,我们显示了借方,贷方和转账方法的代码片段。
... class BankAccountService {
  public void transfer(MonetaryAmount amount, ...) {
    debit(amount, ...);
    credit(amount, ...);
    ...
  }
  public void credit(MonetaryAmount amount, AccountId accountId) {
    ...
  }
  public void debit(MonetaryAmount amount, AccountId accountId) {
    ...
  }
  ...
}
JPA交易
在普通的JPA中,通过在EntityManager上调用getTransaction().begin()来启动事务。 下面的代码段对此进行了说明。
import javax.persistence.*;
...
EntityManagerFactory emf = ...;
EntityManager em = emf.createEntityManager();
try {
  em.getTransaction().begin();
  // make changes through entities
  em.getTransaction().commit();
  ...
} catch(Exception e) {
  em.getTransaction().rollback();
  throw e;
} finally {
  em.close();
}
从技术上讲, EntityManager从创建时就处于事务中。 因此,调用begin()有点多余。 在调用begin()不能调用某些操作,例如persist , merge , remove 。 查询仍然可以执行(例如find() )。
从查询返回的对象可以更改。 尽管JPA规范尚不清楚在没有事务开始时这些更改将发生什么。
现在,让我们将JPA应用于资金转移案例研究。
我们定义了一个BankAccount实体来处理debit()和credit()行为。
import javax.persistence.*;

@Entity
... class BankAccount {
  @Id ...;
  ...
  public void debit(MonetaryAmount amount) {...}
  public void credit(MonetaryAmount amount) {...}
  ...
} 我们将EntityManagerFactory添加到BankAccountService以在需要时启用EntityManager的创建。
import javax.persistence.*;

... class BankAccountService {
  private EntityManagerFactory emf; // injected via constructor
  ...
  public void transfer(MonetaryAmount amount, ...) ... {
    EntityManager em = emf.createEntityManager();
    try {
      em.getTransaction().begin();
      BankAccount fromAccount = em.find(BankAccount.class, ...);
      BankAccount toAccount = em.find(BankAccount.class, ...);
      fromAccount.debit(amount);
      toAccount.credit(amount);
      em.getTransaction().commit();
      ...
    } catch(Exception e) {
      em.getTransaction().rollback();
      // handle exception (possibly rethrowing it)
    } finally {
      em.close();
    }
  }
  public void credit(MonetaryAmount amount, AccountId ...) ... {
    EntityManager em = emf.createEntityManager();
    try {
      em.getTransaction().begin();
      BankAccount theAccount = em.find(BankAccount.class, ...);
      theAccount.credit(amount);
      em.getTransaction().commit();
      ...
    } catch(Exception e) {
      em.getTransaction().rollback();
      // handle exception (possibly rethrowing it)
    } finally {
      em.close();
    }
  }
  public void debit(MonetaryAmount amount, AccountId ...) ... {
    EntityManager em = emf.createEntityManager();
    try {
      em.getTransaction().begin();
      BankAccount theAccount = em.find(BankAccount.class, ...);
      theAccount.debit(amount);
      em.getTransaction().commit();
      ...
    } catch(Exception e) {
      em.getTransaction().rollback();
      // handle exception (possibly rethrowing it)
    } finally {
      em.close();
    }
  }
}
Spring管理的JPA交易
transfer , credit和debit方法肯定可以使用模板类(类似于JdbcTemplate )来删除所有样板代码。 Spring以前提供了JpaTemplate类,但是从Spring 3.1开始不推荐使用,而推荐使用本机EntityManager用法(通常通过@PersistenceContext获得)。
因此,让我们做到这一点-使用通过@PersistenceContext获得的EntityManager 。
import javax.persistence.*;

... class BankAccountService {
  @PersistenceContext
  private EntityManager em;
  ...
  public void transfer(MonetaryAmount amount, ...) ... {
    try {
      em.getTransaction().begin();
      BankAccount fromAccount = em.find(BankAccount.class, ...);
      BankAccount toAccount = em.find(BankAccount.class, ...);
      fromAccount.debit(amount);
      toAccount.credit(amount);
      em.getTransaction().commit();
      ...
    } catch(Exception e) {
      em.getTransaction().rollback();
      // handle exception (possibly rethrowing it)
    }
  }
  public void credit(MonetaryAmount amount, AccountId ...) ... {
    try {
      em.getTransaction().begin();
      BankAccount theAccount = em.find(BankAccount.class, ...);
      theAccount.credit(amount);
      em.getTransaction().commit();
      ...
    } catch(Exception e) {
      em.getTransaction().rollback();
      // handle exception (possibly rethrowing it)
    }
  }
  public void debit(MonetaryAmount amount, AccountId ...) ... {
    try {
      em.getTransaction().begin();
      BankAccount theAccount = em.find(BankAccount.class, ...);
      theAccount.debit(amount);
      em.getTransaction().commit();
      ...
    } catch(Exception e) {
      em.getTransaction().rollback();
      // handle exception (possibly rethrowing it)
    }
  }
}
我们的代码要简单一些。 由于我们没有创建EntityManager ,所以不必关闭它。 但是我们仍在调用getTransaction().begin() 。 有没有更好的办法? 首先如何将EntityManager注入对象?
从本系列的前一篇文章中 ,精明的读者可能已经在考虑让Spring为我们完成这项工作。 当然是这样!
EntityManager和@PersistenceContext
我们告诉Spring通过添加PersistenceAnnotationBeanPostProcessor (通过XML <bean>或通过通过AnnotationConfigApplicationContext加载的@Configuration类使用基于Java的配置)从EntityManagerFactory注入EntityManager 。
- 使用基于XML的配置时,
PersistenceAnnotationBeanPostProcessor由<context:annotation-config />元素透明地激活。 并且<context:component-scan />也透明地激活了此元素。 - 使用基于Java的
@Configuration,将使用AnnotationConfigApplicationContext。 并使用它始终注册注释配置处理器(其中之一是上述PersistenceAnnotationBeanPostProcessor)。
通过添加单个bean定义,Spring容器将充当JPA容器,并从EntityManagerFactory注入EnitityManager 。
JPA和
现在我们有了EntityManager ,如何告诉Spring为我们开始交易?
我们告诉Spring通过将方法标记为@Transactional (或将类标记为@Transactional ,使所有公共方法都具有事务性)来开始事务。 这与Spring通过JDBC启用事务的方式一致。
import javax.persistence.*;
import org.springframework.transaction.annotation.Transactional;

@Transactional
... class BankAccountService {
  @PersistenceContext
  private EntityManager em;
  ...
  public void transfer(MonetaryAmount amount, ...) ... {
      BankAccount fromAccount = em.find(BankAccount.class, ...);
      BankAccount toAccount = em.find(BankAccount.class, ...);
      fromAccount.debit(amount);
      toAccount.credit(amount);
  }
  public void credit(MonetaryAmount amount, AccountId ...) ... {
      BankAccount theAccount = em.find(BankAccount.class, ...);
      theAccount.credit(amount);
  }
  public void debit(MonetaryAmount amount, AccountId ...) ... {
      BankAccount theAccount = em.find(BankAccount.class, ...);
      theAccount.debit(amount);
  }
}
哇,真好! 我们的代码短了很多。
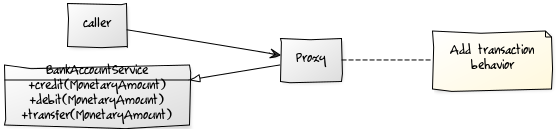
就像本系列第一部分中所解释的那样,当Spring遇到此注释时,它将代理该对象(通常称为Spring管理的Bean)。 代理为标记为@Transactional方法启动事务(如果没有正在进行的事务),并在方法成功返回时结束事务。
调用debit()将使用事务。 单独调用credit()将使用交易。 但是,当调用transfer()时会发生什么?
由于transfer()方法被标记为@Transactional ,Spring将启动一个事务。 相同的事务将用于对debit()和credit()调用。 换句话说, debit(amount)和credit(amount)不会启动新交易。 它将使用正在进行的事务(因为有一个事务)。
可是等等! Spring如何知道何时注入适当的实体管理器? 它仅在调用事务方法时才注入吗?
共享的
在我的一个培训课程中 ,我尝试了以下内容,以更好地理解Spring如何通过@PersistenceContext注入EntityManager 。 而且我相信它也会帮助其他人。 因此,这是我尝试的方法:
import javax.persistence.*;
import org.springframework.transaction.annotation.Transactional;
import org.springframework.beans.factory.InitializingBean;

@Transactional
... class BankAccountService implements InitializingBean {
  @PersistenceContext
  private EntityManager em;
  ...
  @Override
  public void afterPropertiesSet() {
    System.out.println(em.toString());
  }
  ...
}
应用程序上下文启动后,控制台上将显示类似这样的输出。
Shared EntityManager proxy for target factory [...]那么,这个共享实体管理器是什么?
当应用程序上下文启动时,Spring注入一个共享实体管理器。 共享EntityManager行为就像从JPA规范定义的从应用程序服务器的JNDI环境中获取的EntityManager一样。 它将所有调用委派给当前的事务性EntityManager (如果有); 否则,它将按操作退回到新创建的EntityManager 。
回到我们的问题。 Spring没有在正确的时间注入正确的实体管理器。 它总是注入一个共享的实体管理器。 但是,该共享实体管理器是事务感知的。 如果存在正在进行的事务,它将委派给当前的事务性EntityManager 。
结论
 本系列分为两部分。 我希望通过从纯文本版本的JDBC和JPA(没有DAO和存储库)开始,我可以使自己更清楚地了解Spring如何在后台管理事务。 而且,通过对Spring的幕后工作有一个更清晰的了解,您可以更好地进行故障排除,了解为什么会得到一个
TransactionRequiredException说“没有可用的事务性EntityManager”,并为应用程序添加更好的修复程序。
现在,该冷了。
翻译自: https://www.javacodegeeks.com/2016/02/spring-managed-transactions-explained-part-2-jpa.html


 136
136

 被折叠的 条评论
为什么被折叠?
被折叠的 条评论
为什么被折叠?
 到【灌水乐园】发言


