


本文是我们名为“ Spring Integration for EAI ”的学院课程的一部分。
在本课程中,向您介绍了企业应用程序集成模式以及Spring Integration如何解决它们。 接下来,您将深入研究Spring Integration的基础知识,例如通道,转换器和适配器。 在这里查看 !
目录
1.简介
在尝试了Spring Integration提供的主要组件并了解了它如何与JMS队列或Web服务之类的其他系统很好地集成之后,本章通过展示不同的监视或收集有关消息传递中发生的情况的机制来完成本课程。系统。
其中一些机制包括通过MBean管理或监视应用程序,MBean是JMX规范的一部分。 我们还将学习如何监视消息以查看消息传递流程中涉及的组件,以及如何为具有缓冲消息能力的组件保留消息。
本章讨论的另一种机制是我们将如何使用元数据存储实现EIP幂等接收器模式。
最后,最后描述的机制是控制总线。 这将使我们发送消息,这些消息将调用应用程序上下文中的组件上的操作。
2.发布和接收JMX通知
JMX规范定义了一种机制,该机制允许MBean发布将发送到其他MBean或管理应用程序的通知。 Oracle 文档解释了如何实现此机制。
Spring Integration通过提供能够发布和接收JMX通知的通道适配器来支持此功能。 我们将看到一个使用两个通道适配器的示例:
- 通知监听通道适配器
- 通知发布通道适配器
发布JMX通知
在示例的第一部分中,消息传递系统通过其入口网关接收String消息(具有有效载荷类型为String的消息)。 然后,它使用服务激活器(通知处理程序)来构建javax.management.Notification并将其发送到通知发布通道适配器,该适配器将发布JMX通知。
第一部分的流程如下所示:

图1
xml配置等同于上图:
<context:component-scan base-package="xpadro.spring.integration.jmx.notification"/>

<context:mbean-export/>
<context:mbean-server/>

<!-- Sending Notifications -->
<int:gateway service-interface="xpadro.spring.integration.jmx.notification.JmxNotificationGateway" default-request-channel="entryChannel"/>

<int:channel id="entryChannel"/>

<int:service-activator input-channel="entryChannel" output-channel="sendNotificationChannel"
    ref="notificationHandler" method="buildNotification"/>

<int:channel id="sendNotificationChannel"/>

<int-jmx:notification-publishing-channel-adapter channel="sendNotificationChannel"
    object-name="xpadro.spring.integration.jmx.adapter:type=integrationMBean,name=integrationMbean"/>
网关与前面的示例一样简单。 请记住,如果只有一种方法,则@Gateway注释不是必需的:
public interface JmxNotificationGateway {

    public void send(String type);
} Message将到达服务激活器,该服务激活器将使用JMX通知构建消息:
@Component("notificationHandler")
public class NotificationHandler {
    private Logger logger = LoggerFactory.getLogger(this.getClass());
    private static final String NOTIFICATION_TYPE_HEADER = "jmx_notificationType";

    public void receive(Message<Notification> msg) {
        logger.info("Notification received: {}", msg.getPayload().getType());
    }

    public Message<Notification> buildNotification(Message<String> msg) {
        Notification notification = new Notification(msg.getPayload(), this, 0);

        return MessageBuilder.withPayload(notification)
                .copyHeadersIfAbsent(msg.getHeaders()).setHeader(NOTIFICATION_TYPE_HEADER, "myJmxNotification").build();
    }
}
注意,我们已经设置了一个新的标题。 这对于提供通知类型是必需的,否则JMX适配器将抛出IllegalArgumentException并显示消息“没有可用的通知类型头,并且没有提供默认值”。
最后,我们只需要返回消息即可发送到发布适配器。 其余的由Spring Integration处理。
接收JMX通知
该流程的第二部分包含一个通知侦听通道适配器,它将接收我们先前发布的通知。
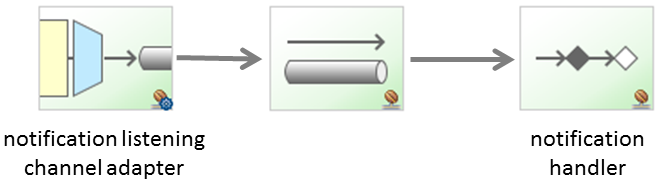
图2
xml配置:
<!-- Receiving Notifications -->
<int-jmx:notification-listening-channel-adapter channel="receiveNotificationChannel"
    object-name="xpadro.spring.integration.jmx.adapter:type=integrationMBean,name=integrationMbean"/>

<int:channel id="receiveNotificationChannel"/>

<int:service-activator input-channel="receiveNotificationChannel"
    ref="notificationHandler" method="receive"/>
我们将只收到通知并记录它:
public void receive(Message<Notification> msg) {
    logger.info("Notification received: {}", msg.getPayload().getType());
}
运行示例的应用程序:
public class NotificationApp {
    public static void main(String[] args) throws InterruptedException {
        AbstractApplicationContext context = new ClassPathXmlApplicationContext("classpath:xpadro/spring/integration/jmx/config/int-notification-config.xml");

        JmxNotificationGateway gateway = context.getBean(JmxNotificationGateway.class);
        gateway.send("gatewayNotification");
        Thread.sleep(1000);
        context.close();
    }
}
3.从MBean轮询托管属性
假设我们有一个正在监视某些功能的MBean 。 使用属性轮询通道适配器,您的应用程序将能够轮询MBean并接收更新的数据。
我实现了一个MBean ,每次询问都会生成一个随机数。 这不是最重要的功能,但可以为我们提供示例:
@Component("pollingMbean")
@ManagedResource
public class JmxPollingMBean {

    @ManagedAttribute
    public int getNumber() {
        Random rnd = new Random();
        int randomNum = rnd.nextInt(100);
        return randomNum;
    }
}
流程再简单不过了; 我们需要一个属性轮询通道适配器,用于指定MBean的类型和名称。 适配器将轮询MBean并将结果放入结果通道。 轮询的每个结果将通过流标准输出通道适配器显示在控制台上:
<context:component-scan base-package="xpadro.spring.integration.jmx.polling"/>

<context:mbean-export/>
<context:mbean-server/>

<!-- Polling -->
<int-jmx:attribute-polling-channel-adapter channel="resultChannel"
        object-name="xpadro.spring.integration.jmx.polling:type=JmxPollingMBean,name=pollingMbean"
        attribute-name="Number">
    <int:poller max-messages-per-poll="1" fixed-delay="1000"/>
</int-jmx:attribute-polling-channel-adapter>

<int:channel id="resultChannel"/>

<int-stream:stdout-channel-adapter channel="resultChannel" append-newline="true"/>
运行示例的应用程序:
public class PollingApp {
    public static void main(String[] args) throws InterruptedException {
        AbstractApplicationContext context = new ClassPathXmlApplicationContext("classpath:xpadro/spring/integration/jmx/config/int-polling-config.xml");
        context.registerShutdownHook();
        Thread.sleep(5000);
        context.close();
    }
}
和控制台输出:
2014-04-16 16:23:43,867|AbstractEndpoint|started org.springframework.integration.config.ConsumerEndpointFactoryBean#0
82
72
20
47
21
2014-04-16 16:23:48,878|AbstractApplicationContext|Closing org.springframework.context.support.ClassPathXmlApplicationContext@7283922
4.调用MBean操作
下一个机制允许我们调用MBean的操作。 我们将实现另一个包含单个操作的bean,我们的老朋友hello world:
@Component("operationMbean")
@ManagedResource
public class JmxOperationMBean {

    @ManagedOperation
    public String hello(String name) {
        return "Hello " + name;
    }
}
现在,如果操作未返回结果,则可以使用通道适配器,或者如果网关不返回结果,则可以使用网关。 通过以下xml配置,我们导出MBean并使用网关来调用操作并等待结果:
<context:component-scan base-package="xpadro.spring.integration.jmx.operation"/>

<context:mbean-export/>
<context:mbean-server/>

<int:gateway service-interface="xpadro.spring.integration.jmx.operation.JmxOperationGateway" default-request-channel="entryChannel"/>

<int-jmx:operation-invoking-outbound-gateway request-channel="entryChannel" reply-channel="replyChannel"
    object-name="xpadro.spring.integration.jmx.operation:type=JmxOperationMBean,name=operationMbean"
    operation-name="hello"/>

<int:channel id="replyChannel"/>

<int-stream:stdout-channel-adapter channel="replyChannel" append-newline="true"/> 为了工作,我们必须指定MBean的类型和名称以及我们要调用的操作。 结果将被发送到流通道适配器,以便在控制台上显示。
运行示例的应用程序:
public class OperationApp {
    public static void main(String[] args) throws InterruptedException {
        AbstractApplicationContext context = new ClassPathXmlApplicationContext("classpath:xpadro/spring/integration/jmx/config/int-operation-config.xml");

        JmxOperationGateway gateway = context.getBean(JmxOperationGateway.class);
        gateway.hello("World");
        Thread.sleep(1000);
        context.close();
    }
}
5.将组件导出为MBean
此组件用于将消息通道,消息处理程序和消息端点导出为MBean,以便您可以对其进行监视。
您需要将以下配置放入您的应用程序:
<int-jmx:mbean-export id="integrationMBeanExporter"
    default-domain="xpadro.integration.exporter" server="mbeanServer"/>

<bean id="mbeanServer" class="org.springframework.jmx.support.MBeanServerFactoryBean">
    <property name="locateExistingServerIfPossible" value="true"/>
</bean>
并按照Spring 文档中的说明设置以下VM参数:
-Dcom.sun.management.jmxremote
-Dcom.sun.management.jmxremote.port=6969
-Dcom.sun.management.jmxremote.ssl=false
-Dcom.sun.management.jmxremote.authenticate=false
运行该示例的应用程序将发送三则消息:
public class ExporterApp {
    public static void main(String[] args) throws InterruptedException {
        AbstractApplicationContext context = new ClassPathXmlApplicationContext("classpath:xpadro/spring/integration/jmx/config/int-exporter-config.xml");
        context.registerShutdownHook();

        JmxExporterGateway gateway = context.getBean(JmxExporterGateway.class);
        gateway.sendMessage("message 1");
        Thread.sleep(500);
        gateway.sendMessage("message 2");
        Thread.sleep(500);
        gateway.sendMessage("message 3");
    }
}
应用程序运行后,您可以查看有关组件的信息。 以下屏幕快照是在JConsole上制作的:
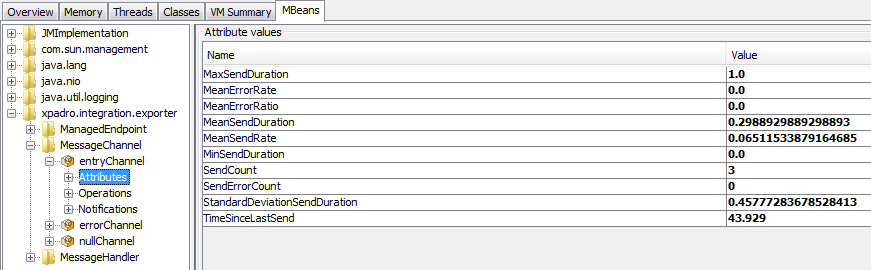
图3
您会注意到,输入通道的sendCount属性值为3,因为在本示例中,我们已发送了3条消息。
6.跟踪消息路径
在消息传递系统中,组件是松散耦合的。 这意味着发送组件不需要知道谁将接收消息。 反之,接收者只对接收到的消息感兴趣,而不是谁发送消息。 当我们需要调试应用程序时,这种好处可能不是很好。
以下应用程序将通过多个组件发送消息来测试此功能:

图4
该配置的关键元素在上图中不可见: message-history元素:
<context:component-scan base-package="xpadro.spring.integration.msg.history"/>

<int:message-history/>

<int:gateway id="historyGateway" service-interface="xpadro.spring.integration.msg.history.HistoryGateway"
    default-request-channel="entryChannel"/>

<int:channel id="entryChannel"/>

<int:transformer id="msgTransformer" input-channel="entryChannel"
    expression="payload + 'transformed'" output-channel="transformedChannel"/>

<int:channel id="transformedChannel"/>

<int:service-activator input-channel="transformedChannel" ref="historyActivator"/>
使用此配置集,消息传递流末尾的服务激活器将能够通过查看消息的标头来检索已访问组件的列表:
@Component("historyActivator")
public class HistoryActivator {
    private Logger logger = LoggerFactory.getLogger(this.getClass());

    public void handle(Message<String> msg) {
        MessageHistory msgHistory = msg.getHeaders().get(MessageHistory.HEADER_NAME, MessageHistory.class);
        if (msgHistory != null) {
            logger.info("Components visited: {}", msgHistory.toString());
        }
    }
}
运行此示例的应用程序:
public class MsgHistoryApp {
    public static void main(String[] args) throws InterruptedException {
        AbstractApplicationContext context = new ClassPathXmlApplicationContext("classpath:xpadro/spring/integration/msg/history/config/int-msg-history-config.xml");

        HistoryGateway gateway = context.getBean(HistoryGateway.class);
        gateway.send("myTest");
        Thread.sleep(1000);
        context.close();
    }
}
结果将显示在控制台上:
2014-04-16 17:34:52,551|HistoryActivator|Components visited: historyGateway,entryChannel,msgTransformer,transformedChannel7.保留缓冲的消息
Spring Integration中的某些组件可以缓冲消息。 例如,队列通道将缓冲消息,直到使用者从中检索消息为止。 另一个示例是聚合器端点; 如第二个教程中所见,此终结点将根据组的发布策略收集消息,直到组完成为止。
这些集成模式意味着,如果发生故障,则缓冲的消息可能会丢失。 为了防止这种情况,我们可以保留这些消息,例如将它们存储到数据库中。 默认情况下,Spring Integration将这些消息存储在内存中。 我们将使用消息存储来更改此设置。
对于我们的示例,我们将这些消息存储到MongoDB数据库中。 为此,我们只需要以下配置:
<bean id="mongoDbFactory" class="org.springframework.data.mongodb.core.SimpleMongoDbFactory">
    <constructor-arg>
        <bean class="com.mongodb.Mongo"/>
    </constructor-arg>
    <constructor-arg value="jcgdb"/>
</bean>

<bean id="mongoDbMessageStore" class="org.springframework.integration.mongodb.store.ConfigurableMongoDbMessageStore">
    <constructor-arg ref="mongoDbFactory"/>
</bean>
现在,我们将创建一个应用程序来测试此功能。 我实现了一个通过网关接收带有String有效负载的消息的流。 网关将该消息发送到队列通道,该队列通道将缓冲消息,直到服务激活程序msgStoreActivator从队列中检索到该消息为止。 服务激活器将每五秒钟轮询一次消息:
<context:component-scan base-package="xpadro.spring.integration.msg.store"/>

<import resource="mongodb-config.xml"/>

<int:gateway id="storeGateway" service-interface="xpadro.spring.integration.msg.store.MsgStoreGateway"
    default-request-channel="entryChannel"/>

<int:channel id="entryChannel">
    <int:queue message-store="myMessageStore"/>
</int:channel>

<int:service-activator input-channel="entryChannel" ref="msgStoreActivator">
    <int:poller fixed-rate="5000"/>
</int:service-activator> 也许您已经注意到myMessageStore bean。 为了查看持久消息机制的工作原理,我扩展了ConfigurableMongoDBMessageStore类以将日志放入其中并调试结果。 如果要尝试此操作,可以删除mongodb-config.xml的MongoDB messageStore bean,因为我们不再使用它。
我已经覆盖了两种方法:
@Component("myMessageStore")
public class MyMessageStore extends ConfigurableMongoDbMessageStore {
    private Logger logger = LoggerFactory.getLogger(this.getClass());
    private static final String STORE_COLLECTION_NAME = "messageStoreCollection";

    @Autowired
    public MyMessageStore(MongoDbFactory mongoDbFactory) {
        super(mongoDbFactory, STORE_COLLECTION_NAME);
        logger.info("Creating message store '{}'", STORE_COLLECTION_NAME);
    }

    @Override
    public MessageGroup addMessageToGroup(Object groupId, Message<?> message) {
        logger.info("Adding message '{}' to group '{}'", message.getPayload(), groupId);
        return super.addMessageToGroup(groupId, message);
    }

    @Override
    public Message<?> pollMessageFromGroup(Object groupId) {
        Message<?> msg = super.pollMessageFromGroup(groupId);
        if (msg != null) {
            logger.info("polling message '{}' from group '{}'", msg.getPayload(), groupId);
        }
        else {
            logger.info("Polling null message from group {}", groupId);
        }

        return msg;
    }
}
该机制的工作原理如下:
- 当一条消息到达配置了我们的消息存储的队列通道时,它将调用“ addMessageToGroup”方法。 此方法会将具有有效负载的文档插入构造函数中指定的MongoDB集合。 这是通过使用
MongoTemplate完成的。 - 当使用者轮询消息时,将调用
pollMessageFromGroup,从集合中检索文档。
让我们通过调试代码来看看它是如何工作的。 我们将在轮询消息以查看其在数据库中的存储方式之前停止:
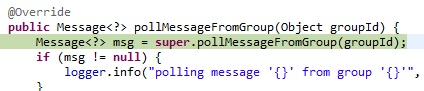
图5
现在,我们可以看一下数据库:
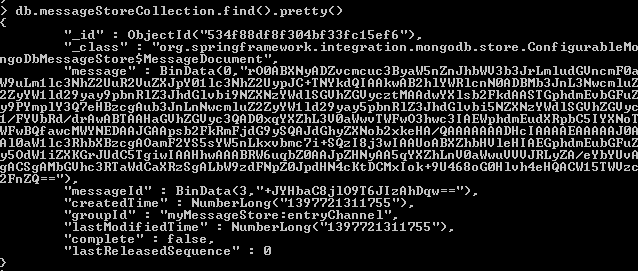
图6
恢复后,将从集合中轮询消息:
图7
运行示例的应用程序:
public class MsgStoreApp {
    public static void main(String[] args) throws InterruptedException {
        AbstractApplicationContext context = new ClassPathXmlApplicationContext("classpath:xpadro/spring/integration/msg/store/config/int-msg-store-config.xml");

        MsgStoreGateway gateway = context.getBean(MsgStoreGateway.class);

        gateway.send("myMessage");
        Thread.sleep(30000);
        context.close();
    }
}
8.实现幂等组件
如果我们的应用程序需要避免重复消息,Spring Integration通过实现幂等接收器模式来提供此机制。 负责检测重复消息的是元数据存储组件。 该组件包括存储键值对。 该框架提供了接口MetadataStore两种实现:
- SimpleMetadataStore :默认实现。 它使用内存映射来存储信息。
- PropertiesPersistingMetadataStore :如果您需要保留数据,则很有用。 它使用属性文件。 我们将在示例中使用此实现。
好的,让我们从配置文件开始:
<context:component-scan base-package="xpadro.spring.integration.msg.metadata"/>

<bean id="metadataStore"
class="org.springframework.integration.metadata.PropertiesPersistingMetadataStore"/>

<int:gateway id="metadataGateway" service-interface="xpadro.spring.integration.msg.metadata.MetadataGateway"
    default-request-channel="entryChannel"/>

<int:channel id="entryChannel"/>

<int:filter input-channel="entryChannel" output-channel="processChannel"
    discard-channel="discardChannel" expression="@metadataStore.get(headers.messageId) == null"/>


<!-- Process message -->
<int:publish-subscribe-channel id="processChannel"/>

<int:outbound-channel-adapter channel="processChannel" expression="@metadataStore.put(headers.messageId, '')"/>

<int:service-activator input-channel="processChannel" ref="metadataActivator" method="process"/>


<!-- Duplicated message - discard it -->
<int:channel id="discardChannel"/>

<int:service-activator input-channel="discardChannel" ref="metadataActivator" method="discard"/>
我们定义了一个“ metadataStore”,以便使用我们的属性元数据存储来代替默认的内存实现。
流程说明如下:
- 一条消息发送到网关。
- 由于它是第一次发送,因此过滤器会将消息发送到过程通道。
- 处理通道有两个订阅者:处理消息的服务激活器和出站通道适配器。 通道适配器会将消息头
messagId的值发送到元数据存储。 - 元数据存储将值存储在属性文件中。
- 下次发送相同的消息; 过滤器将找到该值并丢弃该消息。
元数据存储在文件系统中创建属性文件。 如果您使用的是Windows,则会在“ C:\ Users \用户名\ AppData \ Local \ Temp \ spring-integration”文件夹中看到一个meta-store.properties文件
该示例使用服务激活器来记录是否已处理消息:
@Component("metadataActivator")
public class MetadataActivator {
    private Logger logger = LoggerFactory.getLogger(this.getClass());

    public void process(Message<String> msg) {
        logger.info("Message processed: {}", msg.getPayload());
    }

    public void discard(Message<String> msg) {
        logger.info("Message discarded: {}", msg.getPayload());
    }
}
该应用程序将运行示例:
public class MetadataApp {
    private static final String MESSAGE_STORE_HEADER = "messageId";

    public static void main(String[] args) throws InterruptedException {
        AbstractApplicationContext context = new ClassPathXmlApplicationContext("classpath:xpadro/spring/integration/msg/metadata/config/int-msg-metadata-config.xml");

        MetadataGateway gateway = context.getBean(MetadataGateway.class);

        Map<String,String> headers = new HashMap<>();
        headers.put(MESSAGE_STORE_HEADER, "msg1");
        Message<String> msg1 = MessageBuilder.withPayload("msg1").copyHeaders(headers).build();

        headers = new HashMap<>();
        headers.put(MESSAGE_STORE_HEADER, "msg2");
        Message<String> msg2 = MessageBuilder.withPayload("msg2").copyHeaders(headers).build();

        gateway.sendMessage(msg1);
        Thread.sleep(500);
        gateway.sendMessage(msg1);
        Thread.sleep(500);
        gateway.sendMessage(msg2);

        Thread.sleep(3000);
        context.close();
    }
}
第一次调用将在控制台上产生以下输出:
2014-04-17 13:00:08,223|MetadataActivator|Message processed: msg1
2014-04-17 13:00:08,726|MetadataActivator|Message discarded: msg1
2014-04-17 13:00:09,229|MetadataActivator|Message processed: msg2
现在请记住,PropertiesPersistingMetadataStore将数据存储在属性文件中。 这意味着该数据将在ApplicationContext重新启动后继续存在。 因此,如果我们不删除属性文件,而是再次运行示例,结果将有所不同:
2014-04-17 13:02:27,117|MetadataActivator|Message discarded: msg1
2014-04-17 13:02:27,620|MetadataActivator|Message discarded: msg1
2014-04-17 13:02:28,123|MetadataActivator|Message discarded: msg2
9.发送操作调用请求
本教程讨论的最后一种机制是控制总线 。 控制总线将使您以与应用程序相同的方式管理系统。 该消息将作为Spring Expression Language执行。 若要从控制总线执行,该方法需要使用@ManagedAttribute或@ManagedOperation批注。
本节的示例使用控制总线来调用Bean上的方法:
<context:component-scan base-package="xpadro.spring.integration.control.bus"/>

<int:channel id="entryChannel"/>

<int:control-bus input-channel="entryChannel" output-channel="resultChannel"/>

<int:channel id="resultChannel"/>

<int:service-activator input-channel="resultChannel" ref="controlbusActivator"/>
将被调用的操作如下:
@Component("controlbusBean")
public class ControlBusBean {

    @ManagedOperation
    public String greet(String name) {
        return "Hello " + name;
    }
}
运行该示例的应用程序发送一条消息,其中包含要执行的表达式:
public class ControlBusApp {
    public static void main(String[] args) throws InterruptedException {
        AbstractApplicationContext context = new ClassPathXmlApplicationContext("classpath:xpadro/spring/integration/control/bus/config/int-control-bus-config.xml");
        MessageChannel channel = context.getBean("entryChannel", MessageChannel.class);

        Message<String> msg = MessageBuilder.withPayload("@controlbusBean.greet('World!')").build();
        channel.send(msg);

        Thread.sleep(3000);
        context.close();
    }
}
结果显示在控制台上:
2014-04-17 13:21:42,910|ControlBusActivator|Message received: Hello World!翻译自: https://www.javacodegeeks.com/2015/09/monitoring-and-management.html


 418
418

 被折叠的 条评论
为什么被折叠?
被折叠的 条评论
为什么被折叠?
 到【灌水乐园】发言


