


1.简介
这篇文章的目的是使用Spring Integration HTTP入站适配器实现HTTP Restful API。 本教程分为两个部分:
- XML配置示例(同一篇文章)。
- Java DSL示例。 这将在本教程的下一部分中进行说明,展示如何使用Spring Integration Java DSL配置应用程序,并提供Java 7和Java 8的示例。
在查看代码之前,让我们看一下下图,该图显示了应用程序公开的不同服务:
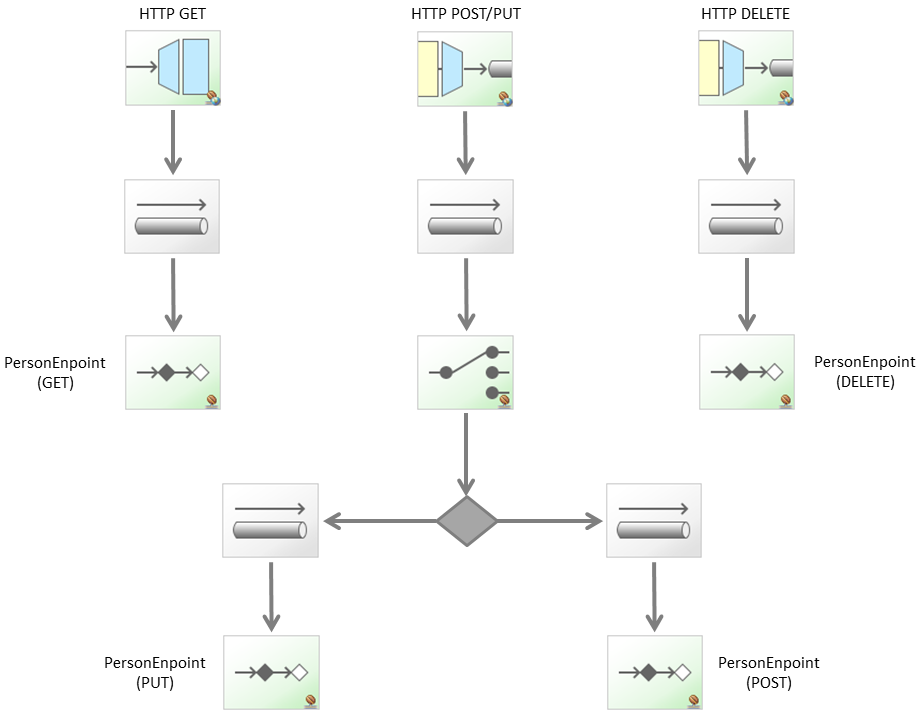
GET操作由HTTP入站网关处理,而其余操作(PUT,POST和DELETE)由HTTP入站通道适配器处理,因为没有响应主体发送回客户端。 以下各节将说明每个操作:
- 介绍
- 应用配置
- 进行操作
- 放置和发布操作
- 删除操作
- 结论
源代码可从Github获得 。
2.应用程序配置
web.xml文件包含分派器Servlet的定义:
<servlet>
    <servlet-name>springServlet</servlet-name>
    <servlet-class>org.springframework.web.servlet.DispatcherServlet</servlet-class>
    <init-param>
        <param-name>contextConfigLocation</param-name>
        <param-value>classpath:xpadro/spring/integration/configuration/http-inbound-config.xml</param-value>
    </init-param>
</servlet>
<servlet-mapping>
    <servlet-name>springServlet</servlet-name>
    <url-pattern>/spring/*</url-pattern>
</servlet-mapping>以下各节将说明http-inbound-config.xml文件。
下面是pom.xml文件的详细信息。 重要的是要注意杰克逊库。 由于我们将使用JSON表示资源,因此这些库必须存在于类路径中。 否则,框架将不会注册所需的转换器。
<properties>
    <spring-version>4.1.3.RELEASE</spring-version>
    <spring-integration-version>4.1.0.RELEASE</spring-integration-version>
    <slf4j-version>1.7.5</slf4j-version>
    <junit-version>4.9</junit-version>
    <jackson-version>2.3.0</jackson-version>
</properties>

<dependencies>
    <!-- Spring Framework - Core -->
    <dependency>
        <groupId>org.springframework</groupId>
        <artifactId>spring-context</artifactId>
        <version>${spring-version}</version>
    </dependency>
    <dependency>
        <groupId>org.springframework</groupId>
        <artifactId>spring-webmvc</artifactId>
        <version>${spring-version}</version>
    </dependency>

    <!-- Spring Framework - Integration -->
    <dependency>
        <groupId>org.springframework.integration</groupId>
        <artifactId>spring-integration-core</artifactId>
        <version>${spring-integration-version}</version>
    </dependency>
    <dependency>
        <groupId>org.springframework.integration</groupId>
        <artifactId>spring-integration-http</artifactId>
        <version>${spring-integration-version}</version>
    </dependency>

    <!-- JSON -->
    <dependency>
        <groupId>com.fasterxml.jackson.core</groupId>
        <artifactId>jackson-core</artifactId>
        <version>${jackson-version}</version>
    </dependency>
    <dependency>
        <groupId>com.fasterxml.jackson.core</groupId>
        <artifactId>jackson-databind</artifactId>
        <version>${jackson-version}</version>
    </dependency>

    <!-- Testing -->
    <dependency>
        <groupId>junit</groupId>
        <artifactId>junit</artifactId>
        <version>${junit-version}</version>
        <scope>test</scope>
    </dependency>

    <!-- Logging -->
    <dependency>
        <groupId>org.slf4j</groupId>
        <artifactId>slf4j-api</artifactId>
        <version>${slf4j-version}</version>
    </dependency>
    <dependency>
        <groupId>org.slf4j</groupId>
        <artifactId>slf4j-log4j12</artifactId>
        <version>${slf4j-version}</version>
    </dependency>
</dependencies>
3.进行操作
该流程的配置如下所示:
http-inbound-config.xml
网关接收到以下路径的请求:/ persons / {personId}。 请求到达后,将创建一条消息并将其发送到httpGetChannel通道。 然后,网关将等待服务激活器 (personEndpoint)返回响应:
现在,需要解释一些要点:
- 支持的方法 :此属性指示网关支持哪些方法(仅GET请求)。
- payload-expression :我们在这里所做的是从URI模板中的personId变量获取值并将其放入消息的有效负载中。 例如,请求路径“ / persons / 3”将成为一条值为“ 3”的消息作为有效负载。
- request-mapping :我们可以包含此元素以指定多个属性,并过滤哪些请求将被映射到网关。 在示例中,此网关仅处理包含Content-Type头(consumes属性)和Accept头(produces属性)的值“ application / json”的请求。
将请求映射到此网关后,便会生成一条消息并将其发送到服务激活器。 在示例中,我们定义了一个简单的Bean,它将从服务中获取所需的信息:
@Component
public class PersonEndpoint {
    private static final String STATUSCODE_HEADER = "http_statusCode";

    @Autowired
    private PersonService service;

    public Message<?> get(Message<String> msg) {
        long id = Long.valueOf(msg.getPayload());
        ServerPerson person = service.getPerson(id);

        if (person == null) {
            return MessageBuilder.fromMessage(msg)
                .copyHeadersIfAbsent(msg.getHeaders())
                .setHeader(STATUSCODE_HEADER, HttpStatus.NOT_FOUND)
                .build();
        }

        return MessageBuilder.withPayload(person)
            .copyHeadersIfAbsent(msg.getHeaders())
            .setHeader(STATUSCODE_HEADER, HttpStatus.OK)
            .build();
    }

    //Other operations
}
根据从服务收到的响应,我们将返回被请求的人员或指示未找到人员的状态代码。
现在,我们将测试一切是否按预期进行。 首先,我们定义将响应转换为的ClientPerson类:
@JsonIgnoreProperties(ignoreUnknown = true)
public class ClientPerson implements Serializable {
    private static final long serialVersionUID = 1L;

    @JsonProperty("id")
    private int myId;
    private String name;

    public ClientPerson() {}

    public ClientPerson(int id, String name) {
        this.myId = id;
        this.name = name;
    }

    //Getters and setters
}
然后我们执行测试。 在buildHeaders方法中,我们指定了Accept和Content-Type标头。 请记住,我们在这些标头中使用'application / json'值限制了请求。
@RunWith(BlockJUnit4ClassRunner.class)
public class GetOperationsTest {
    private static final String URL = "http://localhost:8081/int-http-xml/spring/persons/{personId}";
    private final RestTemplate restTemplate = new RestTemplate();

    private HttpHeaders buildHeaders() {
        HttpHeaders headers = new HttpHeaders();
        headers.setAccept(Arrays.asList(MediaType.APPLICATION_JSON));
        headers.setContentType(MediaType.APPLICATION_JSON);

        return headers;
    }

    @Test
    public void getResource_responseIsConvertedToPerson() {
        HttpEntity<Integer> entity = new HttpEntity<>(buildHeaders());
        ResponseEntity<ClientPerson> response = restTemplate.exchange(URL, HttpMethod.GET, entity, ClientPerson.class, 1);
        assertEquals("John" , response.getBody().getName());
        assertEquals(HttpStatus.OK, response.getStatusCode());
    }

    @Test
    public void getResource_responseIsReceivedAsJson() {
        HttpEntity<Integer> entity = new HttpEntity<>(buildHeaders());
        ResponseEntity<String> response = restTemplate.exchange(URL, HttpMethod.GET, entity, String.class, 1);
        assertEquals("{\"id\":1,\"name\":\"John\",\"age\":25}", response.getBody());
        assertEquals(HttpStatus.OK, response.getStatusCode());
    }

    @Test(expected=HttpClientErrorException.class)
    public void getResource_sendXml_415errorReturned() {
        HttpHeaders headers = new HttpHeaders();
        headers.setAccept(Arrays.asList(MediaType.APPLICATION_JSON));
        headers.setContentType(MediaType.APPLICATION_XML);
        HttpEntity<Integer> entity = new HttpEntity<>(headers);
        restTemplate.exchange(URL, HttpMethod.GET, entity, ClientPerson.class, 1);
    }

    @Test(expected=HttpClientErrorException.class)
    public void getResource_expectXml_receiveJson_406errorReturned() {
        HttpHeaders headers = new HttpHeaders();
        headers.setAccept(Arrays.asList(MediaType.APPLICATION_XML));
        headers.setContentType(MediaType.APPLICATION_JSON);
        HttpEntity<Integer> entity = new HttpEntity<>(headers);
        restTemplate.exchange(URL, HttpMethod.GET, entity, ClientPerson.class, 1);
    }

    @Test(expected=HttpClientErrorException.class)
    public void getResource_resourceNotFound_404errorReturned() {
        HttpEntity<Integer> entity = new HttpEntity<>(buildHeaders());
        restTemplate.exchange(URL, HttpMethod.GET, entity, ClientPerson.class, 8);
    }
}
在Content-Type标头中未指定正确的值将导致415不支持的媒体类型错误,因为网关不支持此媒体类型。
另一方面,在Accept标头中指定不正确的值将导致406 Not Acceptable错误,因为网关返回的内容类型不同于预期。
4.放置和发布操作
对于PUT和POST操作,我们使用相同的HTTP入站通道适配器,从而可以为它定义多个路径和方法。 一旦请求到达,路由器将负责将消息传递到正确的端点。
http-inbound-config.xml
<int-http:inbound-channel-adapter channel="routeRequest"
    status-code-expression="T(org.springframework.http.HttpStatus).NO_CONTENT"
    supported-methods="POST, PUT"
    path="/persons, /persons/{personId}"
    request-payload-type="xpadro.spring.integration.server.model.ServerPerson">

    <int-http:request-mapping consumes="application/json"/>
</int-http:inbound-channel-adapter>

<int:router input-channel="routeRequest" expression="headers.http_requestMethod">
    <int:mapping value="PUT" channel="httpPutChannel"/>
    <int:mapping value="POST" channel="httpPostChannel"/>
</int:router>

<int:service-activator ref="personEndpoint" method="put" input-channel="httpPutChannel"/>
<int:service-activator ref="personEndpoint" method="post" input-channel="httpPostChannel"/>
此通道适配器包括两个新属性:
- status-code-expression :默认情况下,通道适配器确认已收到请求,并返回200状态码。 如果要覆盖此行为,可以在此属性中指定其他状态代码。 在这里,我们指定这些操作将返回204 No Content状态代码。
- request-payload-type :此属性指定将请求主体转换为哪个类。 如果我们没有定义它,它将无法转换为服务激活器期望的类(ServerPerson)。
收到请求后,适配器会将其发送到路由器期望它的routeRequest通道。 该路由器将检查消息头,并根据“ http_requestMethod”头的值将其传递到适当的端点。
PUT和POST操作都由同一个bean处理:
@Component
public class PersonEndpoint {
    @Autowired
    private PersonService service;

    //Get operation

    public void put(Message<ServerPerson> msg) {
        service.updatePerson(msg.getPayload());
    }

    public void post(Message<ServerPerson> msg) {
        service.insertPerson(msg.getPayload());
    }
}
返回类型为空,因为没有期望的响应; 入站适配器将处理状态码的返回。
PutOperationsTest验证是否返回了正确的状态码以及资源是否已更新:
@RunWith(BlockJUnit4ClassRunner.class)
public class PutOperationsTest {
    private static final String URL = "http://localhost:8081/int-http-xml/spring/persons/{personId}";
    private final RestTemplate restTemplate = new RestTemplate();

    //build headers method

    @Test
    public void updateResource_noContentStatusCodeReturned() {
        HttpEntity<Integer> getEntity = new HttpEntity<>(buildHeaders());
        ResponseEntity<ClientPerson> response = restTemplate.exchange(URL, HttpMethod.GET, getEntity, ClientPerson.class, 4);
        ClientPerson person = response.getBody();
        person.setName("Sandra");
        HttpEntity<ClientPerson> putEntity = new HttpEntity<ClientPerson>(person, buildHeaders());

        response = restTemplate.exchange(URL, HttpMethod.PUT, putEntity, ClientPerson.class, 4);
        assertEquals(HttpStatus.NO_CONTENT, response.getStatusCode());

        response = restTemplate.exchange(URL, HttpMethod.GET, getEntity, ClientPerson.class, 4);
        person = response.getBody();
        assertEquals("Sandra", person.getName());
    }
}PostOperationsTest验证是否已添加新资源:
@RunWith(BlockJUnit4ClassRunner.class)
public class PostOperationsTest {
    private static final String POST_URL = "http://localhost:8081/int-http-xml/spring/persons";
    private static final String GET_URL = "http://localhost:8081/int-http-xml/spring/persons/{personId}";
    private final RestTemplate restTemplate = new RestTemplate();

    //build headers method

    @Test
    public void addResource_noContentStatusCodeReturned() {
        ClientPerson person = new ClientPerson(9, "Jana");
        HttpEntity<ClientPerson> entity = new HttpEntity<ClientPerson>(person, buildHeaders());

        ResponseEntity<ClientPerson> response = restTemplate.exchange(POST_URL, HttpMethod.POST, entity, ClientPerson.class);
        assertEquals(HttpStatus.NO_CONTENT, response.getStatusCode());

        HttpEntity<Integer> getEntity = new HttpEntity<>(buildHeaders());
        response = restTemplate.exchange(GET_URL, HttpMethod.GET, getEntity, ClientPerson.class, 9);
        person = response.getBody();
        assertEquals("Jana", person.getName());
    }
}
5.删除操作
我们的RESTful API的最后一个操作是删除操作。 这次我们为此使用一个单通道适配器:
<int-http:inbound-channel-adapter channel="httpDeleteChannel"
    status-code-expression="T(org.springframework.http.HttpStatus).NO_CONTENT"
    supported-methods="DELETE"
    path="/persons/{personId}"
    payload-expression="#pathVariables.personId">

    <int-http:request-mapping consumes="application/json"/>
</int-http:inbound-channel-adapter>

<int:service-activator ref="personEndpoint" method="delete" input-channel="httpDeleteChannel"/>
通道适配器使我们可以定义返回的状态代码,并且正在使用有效负载表达式属性将请求的personId映射到消息正文。 该配置与先前操作中的配置略有不同,但是这里没有任何未解释的内容。
服务激活者,我们的人员端点,将请求人员服务删除此资源。
public void delete(Message<String> msg) {
    long id = Long.valueOf(msg.getPayload());
    service.deletePerson(id);
}
最后,所需的测试:
@RunWith(BlockJUnit4ClassRunner.class)
public class DeleteOperationsTest {
    private static final String URL = "http://localhost:8081/int-http-xml/spring/persons/{personId}";
    private final RestTemplate restTemplate = new RestTemplate();

    //build headers method

    @Test
    public void deleteResource_noContentStatusCodeReturned() {
        HttpEntity<Integer> entity = new HttpEntity<>(buildHeaders());
        ResponseEntity<ClientPerson> response = restTemplate.exchange(URL, HttpMethod.DELETE, entity, ClientPerson.class, 3);
        assertEquals(HttpStatus.NO_CONTENT, response.getStatusCode());

        try {
            response = restTemplate.exchange(URL, HttpMethod.GET, entity, ClientPerson.class, 3);
            Assert.fail("404 error expected");
        } catch (HttpClientErrorException e) {
            assertEquals(HttpStatus.NOT_FOUND, e.getStatusCode());
        }
    }
}
六,结论
这篇文章是对我们的应用程序的介绍,目的是从已知的角度(xml配置)了解它的结构。 在本教程的下一部分中,我们将使用Java DSL来实现相同的应用程序。 该应用程序将配置为可与Java 8一起运行,但是当使用lambda时,我还将展示如何使用Java 7来完成。
我正在Google Plus和Twitter上发布我的新帖子。 如果您要更新新内容,请关注我。


 340
340

 被折叠的 条评论
为什么被折叠?
被折叠的 条评论
为什么被折叠?
 到【灌水乐园】发言


