


 本文探讨了OSGi在Java模块化和微服务架构中的作用,以及它如何解决依赖管理、小体积、独立发布和热重部署等问题。通过一个包含数据访问、商业服务和REST服务的示例应用,展示了如何使用OSGi、Apache OpenJPA和Apache CXF构建模块化的应用程序。文章还介绍了如何在Apache Karaf容器中部署和管理这些模块。
在构建可扩展,可靠的分布式系统的背景下,“模块化”和“微服务体系结构”这两个术语如今经常出现。 众所周知,Java平台本身在模块化方面很弱( Java 9将通过交付Jigsaw项目来解决这一问题),从而为OSGi和JBoss Modules等框架的出现提供了机会。
当我在2007年第一次听说OSGi时 ,我真的很高兴Java应用程序可以基于OSGi的所有优点而受益。 但是很快就产生了挫败感,而不是兴奋感:没有工具支持,兼容的库和框架非常有限,非常不稳定,很难对运行时进行故障排除。 显然,普通的Java开发人员还没有准备好使用它,因此,我不得不把它放在架子上。 多年来, OSGi已经成熟很多,并得到了广泛的社区支持。
好奇的读者可能会问:特别是使用模块和OSGi有什么好处? 仅举几个问题,它有助于解决:
- 显式(和版本控制)依赖关系管理:模块声明所需的内容(以及版本范围)
- 占用空间小:模块未包装所有依赖项
- 易于发布:模块可以独立开发和发布
- 热重新部署:可以重新部署各个模块,而不会影响其他模块
在今天的帖子中,我们将对使用OSGi构建模块化Java应用程序的最新技术水平进行10000英尺的考察。 撇开OSGi的好坏进行讨论,我们将构建一个包含以下模块的示例应用程序:
- 数据访问模块
- 商业服务模块
- REST服务模块
用于数据访问的Apache OpenJPA 2.3.0 / JPA 2.0 (不幸的是,我们选择的OSGi实现尚未支持JPA 2.1 ),用于REST层的Apache CXF 3.0.1 / JAX-RS 2.0是应用程序的两个主要构建块。 我发现Christian Schneider的博客Liquid Liquidity是有关OSGi (以及许多其他主题)的宝贵信息来源。
在OSGi世界中,模块称为bundles 。 捆绑包显示了它们的依赖关系(导入包)和它们公开的包(导出包),因此其他捆绑包可以使用它们。 Apache Maven也支持此打包模型。 捆绑包由OSGi运行时或容器管理,在我们的情况下将是Apache Karaf 3.0.1 (实际上,这是我们需要下载 和解压缩的内容)。
让我停止说话,更好地显示一些代码。 我们将从顶部( REST )开始,一直到底部(数据访问),因为它更容易遵循。 我们的PeopleRestService是JAX-RS 2.0服务实现的典型示例:
package com.example.jaxrs;

import java.util.Collection;

import javax.ws.rs.DELETE;
import javax.ws.rs.DefaultValue;
import javax.ws.rs.FormParam;
import javax.ws.rs.GET;
import javax.ws.rs.POST;
import javax.ws.rs.PUT;
import javax.ws.rs.Path;
import javax.ws.rs.PathParam;
import javax.ws.rs.Produces;
import javax.ws.rs.QueryParam;
import javax.ws.rs.core.Context;
import javax.ws.rs.core.MediaType;
import javax.ws.rs.core.Response;
import javax.ws.rs.core.UriInfo;

import com.example.data.model.Person;
import com.example.services.PeopleService;

@Path( "/people" )
public class PeopleRestService {
    private PeopleService peopleService;

    @Produces( { MediaType.APPLICATION_JSON } )
    @GET
    public Collection< Person > getPeople(
            @QueryParam( "page") @DefaultValue( "1" ) final int page ) {
        return peopleService.getPeople( page, 5 );
    }

    @Produces( { MediaType.APPLICATION_JSON } )
    @Path( "/{email}" )
    @GET
    public Person getPerson( @PathParam( "email" ) final String email ) {
        return peopleService.getByEmail( email );
    }

    @Produces( { MediaType.APPLICATION_JSON  } )
    @POST
    public Response addPerson( @Context final UriInfo uriInfo,
            @FormParam( "email" ) final String email,
            @FormParam( "firstName" ) final String firstName,
            @FormParam( "lastName" ) final String lastName ) {

        peopleService.addPerson( email, firstName, lastName );
        return Response.created( uriInfo
            .getRequestUriBuilder()
            .path( email )
            .build() ).build();
    }

    @Produces( { MediaType.APPLICATION_JSON  } )
    @Path( "/{email}" )
    @PUT
    public Person updatePerson( @PathParam( "email" ) final String email,
            @FormParam( "firstName" ) final String firstName,
            @FormParam( "lastName" )  final String lastName ) {

        final Person person = peopleService.getByEmail( email );

        if( firstName != null ) {
            person.setFirstName( firstName );
        }

        if( lastName != null ) {
            person.setLastName( lastName );
        }

        return person;
    }

    @Path( "/{email}" )
    @DELETE
    public Response deletePerson( @PathParam( "email" ) final String email ) {
        peopleService.removePerson( email );
        return Response.ok().build();
    }

    public void setPeopleService( final PeopleService peopleService ) {
        this.peopleService = peopleService;
    }
}我们可以看到,这里没有任何关于OSGi的信息 。 唯一的依赖是在某种程度上应该被注入PeopleRestService的PeopleService。 怎么样? 通常, OSGi应用程序使用蓝图作为依赖项注入框架,这与旧伙伴基于XML的Spring配置非常相似。 它应该与应用程序一起打包在OSGI-INF / blueprint文件夹中。 这是基于Apache CXF 3.0.1构建的REST模块的蓝图示例:
<blueprint xmlns="http://www.osgi.org/xmlns/blueprint/v1.0.0"
    xmlns:xsi="http://www.w3.org/2001/XMLSchema-instance"
    xmlns:jaxrs="http://cxf.apache.org/blueprint/jaxrs"
    xmlns:cxf="http://cxf.apache.org/blueprint/core"
    xsi:schemaLocation="
        http://www.osgi.org/xmlns/blueprint/v1.0.0
        http://www.osgi.org/xmlns/blueprint/v1.0.0/blueprint.xsd
        http://cxf.apache.org/blueprint/jaxws
        http://cxf.apache.org/schemas/blueprint/jaxws.xsd
        http://cxf.apache.org/blueprint/jaxrs
        http://cxf.apache.org/schemas/blueprint/jaxrs.xsd
        http://cxf.apache.org/blueprint/core
        http://cxf.apache.org/schemas/blueprint/core.xsd">

    <cxf:bus id="bus">
        <cxf:features>
            <cxf:logging/>
        </cxf:features>
    </cxf:bus>

    <jaxrs:server address="/api" id="api">
        <jaxrs:serviceBeans>
            <ref component-id="peopleRestService"/>
        </jaxrs:serviceBeans>
        <jaxrs:providers>
            <bean class="com.fasterxml.jackson.jaxrs.json.JacksonJsonProvider" />
        </jaxrs:providers>
    </jaxrs:server>

    <!-- Implementation of the rest service -->
    <bean id="peopleRestService" class="com.example.jaxrs.PeopleRestService">
        <property name="peopleService" ref="peopleService"/>
    </bean>

    <reference id="peopleService" interface="com.example.services.PeopleService" />
</blueprint>非常小而简单:基本上,配置仅指出为了使模块正常工作,应该提供对com.example.services.PeopleService的引用(有效地由OSGi容器提供)。 为了了解它将如何发生,让我们看一下另一个公开服务的模块。 它仅包含一个接口PeopleService :
package com.example.services;

import java.util.Collection;

import com.example.data.model.Person;

public interface PeopleService {
    Collection< Person > getPeople( int page, int pageSize );
    Person getByEmail( final String email );
    Person addPerson( final String email, final String firstName, final String lastName );
    void removePerson( final String email );
}并提供其实现作为PeopleServiceImpl类:
package com.example.services.impl;

import java.util.Collection;

import org.osgi.service.log.LogService;

import com.example.data.PeopleDao;
import com.example.data.model.Person;
import com.example.services.PeopleService;

public class PeopleServiceImpl implements PeopleService {
    private PeopleDao peopleDao;
    private LogService logService;

    @Override
    public Collection< Person > getPeople( final int page, final int pageSize ) {
        logService.log( LogService.LOG_INFO, "Getting all people" );
        return peopleDao.findAll( page, pageSize );
    }

    @Override
    public Person getByEmail( final String email ) {
        logService.log( LogService.LOG_INFO,
            "Looking for a person with e-mail: " + email );
        return peopleDao.find( email );
    }

    @Override
    public Person addPerson( final String email, final String firstName,
            final String lastName ) {
        logService.log( LogService.LOG_INFO,
            "Adding new person with e-mail: " + email );
        return peopleDao.save( new Person( email, firstName, lastName ) );
    }

    @Override
    public void removePerson( final String email ) {
        logService.log( LogService.LOG_INFO,
            "Removing a person with e-mail: " + email );
        peopleDao.delete( email );
    }

    public void setPeopleDao( final PeopleDao peopleDao ) {
        this.peopleDao = peopleDao;
    }

    public void setLogService( final LogService logService ) {
        this.logService = logService;
    }
}这次又一次是非常小的,干净的实现,它具有两个可注入的依赖项org.osgi.service.log.LogService和com.example.data.PeopleDao 。 它的蓝图配置位于OSGI-INF / blueprint文件夹中,看起来也很紧凑:
<blueprint xmlns="http://www.osgi.org/xmlns/blueprint/v1.0.0"
    xmlns:xsi="http://www.w3.org/2001/XMLSchema-instance"
    xsi:schemaLocation="
        http://www.osgi.org/xmlns/blueprint/v1.0.0
        http://www.osgi.org/xmlns/blueprint/v1.0.0/blueprint.xsd">

    <service ref="peopleService" interface="com.example.services.PeopleService" />
    <bean id="peopleService" class="com.example.services.impl.PeopleServiceImpl">
        <property name="peopleDao" ref="peopleDao" />
        <property name="logService" ref="logService" />
    </bean>

    <reference id="peopleDao" interface="com.example.data.PeopleDao" />
    <reference id="logService" interface="org.osgi.service.log.LogService" />
</blueprint>预期由OSGi容器在运行时提供对PeopleDao和LogService的引用。 但是, PeopleService的实现是作为服务公开的,一旦其捆绑包被激活, OSGi容器将能够将其注入PeopleRestService 。
难题的最后一部分是数据访问模块,它稍微复杂一些:它包含持久性配置( META-INF / persistence.xml ),并且基本上依赖于OSGi容器的JPA 2.0功能。 persistence.xml非常基本:
<persistence xmlns="http://java.sun.com/xml/ns/persistence"
    xmlns:xsi="http://www.w3.org/2001/XMLSchema-instance"
    version="2.0">

    <persistence-unit name="peopleDb" transaction-type="JTA">
        <jta-data-source>
        osgi:service/javax.sql.DataSource/(osgi.jndi.service.name=peopleDb)
        </jta-data-source>
        <class>com.example.data.model.Person</class>

        <properties>
            <property name="openjpa.jdbc.SynchronizeMappings"
                value="buildSchema"/>
        </properties>
    </persistence-unit>
</persistence>与服务模块类似,还有一个PeopleDao公开的接口:
package com.example.data;

import java.util.Collection;

import com.example.data.model.Person;

public interface PeopleDao {
    Person save( final Person person );
    Person find( final String email );
    Collection< Person > findAll( final int page, final int pageSize );
    void delete( final String email );
}通过其实现PeopleDaoImpl :
package com.example.data.impl;

import java.util.Collection;

import javax.persistence.EntityManager;
import javax.persistence.criteria.CriteriaBuilder;
import javax.persistence.criteria.CriteriaQuery;

import com.example.data.PeopleDao;
import com.example.data.model.Person;

public class PeopleDaoImpl implements PeopleDao {
    private EntityManager entityManager;

    @Override
    public Person save( final Person person ) {
        entityManager.persist( person );
        return person;
    }

    @Override
    public Person find( final String email ) {
        return entityManager.find( Person.class, email );
    }

    public void setEntityManager( final EntityManager entityManager ) {
        this.entityManager = entityManager;
    }

    @Override
    public Collection< Person > findAll( final int page, final int pageSize ) {
        final CriteriaBuilder cb = entityManager.getCriteriaBuilder();

        final CriteriaQuery< Person > query = cb.createQuery( Person.class );
        query.from( Person.class );

        return entityManager
            .createQuery( query )
            .setFirstResult(( page - 1 ) * pageSize )
            .setMaxResults( pageSize )
            .getResultList();
    }

    @Override
    public void delete( final String email ) {
        entityManager.remove( find( email ) );
    }
}
请注意,尽管我们正在执行数据操作,但是没有提及事务,也没有对实体管理器的事务API的显式调用。 我们将使用声明式方法进行事务处理,因为蓝图配置支持(位置不变, OSGI-INF / blueprint文件夹):
<blueprint xmlns="http://www.osgi.org/xmlns/blueprint/v1.0.0"
    xmlns:jpa="http://aries.apache.org/xmlns/jpa/v1.1.0"
    xmlns:tx="http://aries.apache.org/xmlns/transactions/v1.0.0"
    xmlns:xsi="http://www.w3.org/2001/XMLSchema-instance"
    xsi:schemaLocation="
        http://www.osgi.org/xmlns/blueprint/v1.0.0
        http://www.osgi.org/xmlns/blueprint/v1.0.0/blueprint.xsd">

    <service ref="peopleDao" interface="com.example.data.PeopleDao" />
    <bean id="peopleDao" class="com.example.data.impl.PeopleDaoImpl">
     <jpa:context unitname="peopleDb" property="entityManager" />
     <tx:transaction method="*" value="Required"/>
    </bean>

    <bean id="dataSource" class="org.hsqldb.jdbc.JDBCDataSource">
       <property name="url" value="jdbc:hsqldb:mem:peopleDb"/>
    </bean>

    <service ref="dataSource" interface="javax.sql.DataSource">
        <service-properties>
            <entry key="osgi.jndi.service.name" value="peopleDb" />
        </service-properties>
    </service>
</blueprint>要记住的一件事:应用程序不需要创建JPA 2.1的实体管理器: OSGi运行时能够做到这一点,并将其注入到需要的地方,由jpa:context声明驱动。 因此, tx:transaction指示运行时将选定的服务方法包装在事务内。
现在,当提供最后一个服务PeopleDao时 ,我们准备使用Apache Karaf 3.0.1部署我们的模块。 三个步骤很容易做到:
- 运行Apache Karaf 3.0.1容器
bin/karaf (or bin\karaf.bat on Windows) - 从Apache Karaf 3.0.1 shell执行以下命令:
feature:repo-add cxf 3.0.1 feature:install http cxf jpa openjpa transaction jndi jdbc install -s mvn:org.hsqldb/hsqldb/2.3.2 install -s mvn:com.fasterxml.jackson.core/jackson-core/2.4.0 install -s mvn:com.fasterxml.jackson.core/jackson-annotations/2.4.0 install -s mvn:com.fasterxml.jackson.core/jackson-databind/2.4.0 install -s mvn:com.fasterxml.jackson.jaxrs/jackson-jaxrs-base/2.4.0 install -s mvn:com.fasterxml.jackson.jaxrs/jackson-jaxrs-json-provider/2.4.0 - 构建我们的模块并将其复制到Apache Karaf 3.0.1的deploy文件夹中(容器仍在运行时):
mvn clean package
cp module*/target/*jar apache-karaf-3.0.1/deploy/
在Apache Karaf 3.0.1 Shell中运行list命令时,应该看到所有激活的捆绑软件(模块)的列表,类似于此列表:
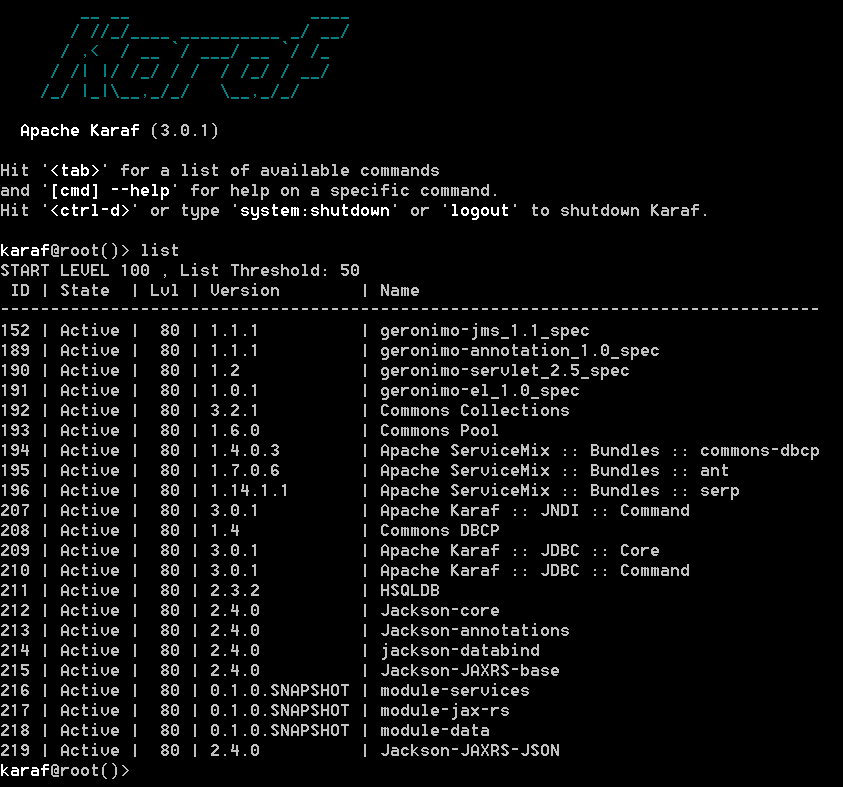
其中module-service , module-jax-rs和module-data对应于我们正在开发的模块。 默认情况下,我们所有的Apache CXF 3.0.1服务将在基本URL http:// :8181 / cxf / api /上提供。 通过在Apache Karaf 3.0.1 shell中执行cxf:list-endpoints -f命令很容易检查。

让我们通过发送几个HTTP请求来确保REST层按预期工作。 让我们创建一个新人:
curl http://localhost:8181/cxf/api/people -iX POST -d "firstName=Tom&lastName=Knocker&email=a@b.com"

HTTP/1.1 201 Created
Content-Length: 0
Date: Sat, 09 Aug 2014 15:26:17 GMT
Location: http://localhost:8181/cxf/api/people/a@b.com
Server: Jetty(8.1.14.v20131031)
并确认该人已成功创建:
curl -i http://localhost:8181/cxf/api/people

HTTP/1.1 200 OK
Content-Type: application/json
Date: Sat, 09 Aug 2014 15:28:20 GMT
Transfer-Encoding: chunked
Server: Jetty(8.1.14.v20131031)

[{"email":"a@b.com","firstName":"Tom","lastName":"Knocker"}]
还要很好地检查数据库是否有人填充。 使用Apache Karaf 3.0.1 shell,只需执行两个命令即可轻松完成: jdbc:datasources和jdbc:query peopleDb“ select * from people” 。

太棒了! 我希望这篇介绍性很强的博客文章能打开您可以用来开发健壮,可扩展,模块化和可管理的软件的另一项有趣的技术。 我们没有涉及很多东西,但是您可以在这里找到它们。 完整的源代码可在GitHub上获得 。
Hibernate 4.2.x / 4.3.x用户注意:不幸的是,在当前版本的Apache Karaf 3.0.1中 , Hibernate 4.3.x完全可以正常工作(因为尚不支持JPA 2.1 ),但是我设法做到了与Hibernate 4.2.x一起运行时,容器通常拒绝解析与JPA相关的依赖关系。
翻译自: https://www.javacodegeeks.com/2014/08/osgi-the-gateway-into-micro-services-architecture.html


 441
441

 被折叠的 条评论
为什么被折叠?
被折叠的 条评论
为什么被折叠?
 到【灌水乐园】发言


