


![]()
在本文中,我将展示一个简单的Mule ESB流程,以了解实际中使用的Active MQ 的DLQ功能 。
我假设您有一个正在运行的Apache ActiveMQ实例(如果没有,则可以在此处下载一个版本)。 在此示例中,我使用了Mule ESB 3.4.2和ActiveMQ 5.9.0。 我们可以基于以下pom文件创建一个简单的Mule项目:
<?xml version="1.0" encoding="UTF-8"?>
<project xmlns="http://maven.apache.org/POM/4.0.0" xmlns:xsi="http://www.w3.org/2001/XMLSchema-instance"
         xsi:schemaLocation="http://maven.apache.org/POM/4.0.0 http://maven.apache.org/maven-v4_0_0.xsd">

    <modelVersion>4.0.0</modelVersion>
    <groupId>net.pascalalma.demo</groupId>
    <artifactId>activemq-test-flow</artifactId>
    <packaging>mule</packaging>
    <name>${project.artifactId}</name>
    <version>1.0.0-SNAPSHOT</version>
    <properties>
        <mule.version>3.4.2</mule.version>
        <project.build.sourceEncoding>UTF-8</project.build.sourceEncoding>
        <project.reporting.outputEncoding>UTF-8</project.reporting.outputEncoding>
        <jdk.version>1.7</jdk.version>
        <junit.version>4.9</junit.version>
        <activemq.version>5.9.0</activemq.version>
    </properties>
    <dependencies>
        <!-- Mule Dependencies -->
        <dependency>
            <groupId>org.mule</groupId>
            <artifactId>mule-core</artifactId>
            <version>${mule.version}</version>
        </dependency>
        <!-- Mule Transports -->
        <dependency>
            <groupId>org.mule.transports</groupId>
            <artifactId>mule-transport-jms</artifactId>
            <version>${mule.version}</version>
        </dependency>
        <dependency>
            <groupId>org.mule.transports</groupId>
            <artifactId>mule-transport-vm</artifactId>
            <version>${mule.version}</version>
        </dependency>
        <!-- Mule Modules -->
        <dependency>
            <groupId>org.mule.modules</groupId>
            <artifactId>mule-module-client</artifactId>
            <version>${mule.version}</version>
        </dependency>
        <dependency>
            <groupId>org.mule.modules</groupId>
            <artifactId>mule-module-scripting</artifactId>
            <version>${mule.version}</version>
        </dependency>
        <!-- for testing -->
        <dependency>
            <groupId>org.mule.tests</groupId>
            <artifactId>mule-tests-functional</artifactId>
            <version>${mule.version}</version>
        </dependency>
        <dependency>
            <groupId>junit</groupId>
            <artifactId>junit</artifactId>
            <version>${junit.version}</version>
        </dependency>
        <dependency>
            <groupId>org.apache.activemq</groupId>
            <artifactId>activemq-client</artifactId>
            <version>${activemq.version}</version>
        </dependency>
    </dependencies>
    <build>
        <plugins>
            <plugin>
                <groupId>org.apache.maven.plugins</groupId>
                <artifactId>maven-compiler-plugin</artifactId>
                <version>2.3.2</version>
                <configuration>
                    <source>${jdk.version}</source>
                    <target>${jdk.version}</target>
                    <encoding>${project.build.sourceEncoding}</encoding>
                </configuration>
            </plugin>
            <plugin>
                <groupId>org.apache.maven.plugins</groupId>
                <artifactId>maven-resources-plugin</artifactId>
                <version>2.5</version>
                <configuration>
                    <encoding>${project.build.sourceEncoding}</encoding>
                </configuration>
            </plugin>
            <plugin>
                <groupId>org.mule.tools</groupId>
                <artifactId>maven-mule-plugin</artifactId>
                <version>1.9</version>
                <extensions>true</extensions>
                <configuration>
                    <copyToAppsDirectory>false</copyToAppsDirectory>
                </configuration>
            </plugin>
        </plugins>
    </build>
</project>
这里没有什么特别的。 除了必要的依赖关系之外,我还添加了maven-mule-plugin,以便可以创建“ mule”打包类型并从IDE运行Mule。
有了此Maven pom,我们可以创建以下两个Mule配置。 一个用于测试交易的Mule流:
<?xml version="1.0" encoding="UTF-8"?>
<mule xmlns="http://www.mulesoft.org/schema/mule/core"
      xmlns:scripting="http://www.mulesoft.org/schema/mule/scripting"
      version="EE-3.4.1"
      xmlns:xsi="http://www.w3.org/2001/XMLSchema-instance"
      xsi:schemaLocation="
		http://www.mulesoft.org/schema/mule/core http://www.mulesoft.org/schema/mule/core/current/mule.xsd
		http://www.mulesoft.org/schema/mule/scripting http://www.mulesoft.org/schema/mule/scripting/current/mule-scripting.xsd">
    <flow name="MainFlow">
        <inbound-endpoint ref="event-queue" />
        <logger category="net.pascalalma.demo.MainFlow" level="INFO" message="Received message from activeMQ" />
        <scripting:component>
            <scripting:script engine="Groovy">
                throw new Exception('Soap Fault Response detected')
            </scripting:script>
        </scripting:component>
        <outbound-endpoint ref="result-queue" />
    </flow>
</mule>
在此流程中,我们从入站端点接收到一条消息,记录一条消息并引发异常,然后将该消息放入下一个队列。 如我们所见,我没有添加任何异常处理程序。 端点和连接器的配置如下所示:
<?xml version="1.0" encoding="UTF-8"?>

<mule xmlns="http://www.mulesoft.org/schema/mule/core"
      xmlns:jms="http://www.mulesoft.org/schema/mule/jms"
      xmlns:spring="http://www.springframework.org/schema/beans"
      version="EE-3.4.1"
      xmlns:xsi="http://www.w3.org/2001/XMLSchema-instance"
      xsi:schemaLocation="
		http://www.mulesoft.org/schema/mule/core http://www.mulesoft.org/schema/mule/core/current/mule.xsd
		http://www.mulesoft.org/schema/mule/jms http://www.mulesoft.org/schema/mule/jms/current/mule-jms.xsd">

    <spring:bean id="redeliveryPolicy" class="org.apache.activemq.RedeliveryPolicy">
        <spring:property name="maximumRedeliveries" value="5"/>
        <spring:property name="initialRedeliveryDelay" value="500"/>
        <spring:property name="maximumRedeliveryDelay" value="10000"/>
        <spring:property name="useExponentialBackOff" value="false"/>
        <spring:property name="backOffMultiplier" value="3"/>
    </spring:bean>
    <!-- ActiveMQ Connection factory -->
    <spring:bean id="amqFactory" class="org.apache.activemq.ActiveMQConnectionFactory" lazy-init="true">
        <spring:property name="brokerURL" value="tcp://localhost:61616" />
        <spring:property name="redeliveryPolicy" ref="redeliveryPolicy" />
    </spring:bean>
    <jms:activemq-connector name="activeMqConnector"
                            connectionFactory-ref="amqFactory"
                            persistentDelivery="true"
                            numberOfConcurrentTransactedReceivers="2"
                            specification="1.1" />
    <jms:endpoint name="event-queue" connector-ref="activeMqConnector" queue="event-queue" >
        <jms:transaction action="ALWAYS_BEGIN" />
    </jms:endpoint>
    <jms:endpoint name="result-queue" connector-ref="activeMqConnector" queue="result-queue" >
        <jms:transaction action="ALWAYS_JOIN" />
    </jms:endpoint>
</mule>我为ActiveMQ连接工厂定义了一个Spring bean,并为该工厂的重新交付策略定义了一个Spring bean。 使用此重新分发策略,我们可以配置当原始尝试失败时,Mule应该重试处理队列中消息的频率。 重新交付策略中的一个不错的功能是“ backOffMultiplier”和“ useExponentialBackOff”组合。 使用这些选项,您可以使两次重新交付尝试之间的间隔成倍增加,直到达到'maximumRedeliveryDelay'。 在那种情况下,M子将等待“ maximumRedeliveryDelay”等待下一次尝试。
因此,使用这些配置,我们可以创建一个Mule测试类并运行它。 测试类如下所示:
package net.pascalalma.demo;

import org.junit.Test;
import org.mule.DefaultMuleMessage;
import org.mule.api.MuleMessage;
import org.mule.module.client.MuleClient;
import org.mule.tck.junit4.FunctionalTestCase;

public class TransactionFlowTest extends FunctionalTestCase {

    @Override
    protected String getConfigResources() {
        return "app/test-flow.xml, app/test-endpoints.xml";
    }

    @Test
    public void testError() throws Exception {
        MuleClient client = new MuleClient(muleContext);
        MuleMessage inMsg = new DefaultMuleMessage("<txt>Some message</txt>", muleContext);
        client.dispatch("event-queue", inMsg);

        // Give Mule the chance to redeliver the message
        Thread.sleep(4000);
    }
}
如果我们运行此测试,您将在日志中看到如下消息:
Exception stack is:
1. "Message with id "ID:Pascals-MacBook-Pro-2.local-59158-1406440948059-1:1:3:1:1" has been redelivered 3 times on endpoint "jms://event-queue", which exceeds the maxRedelivery setting of 0 on the connector "activeMqConnector". Message payload is of type: ActiveMQTextMessage (org.mule.transport.jms.redelivery.MessageRedeliveredException)
org.mule.transport.jms.redelivery.JmsXRedeliveryHandler:87 (http://www.mulesoft.org/docs/site/current3/apidocs/org/mule/transport/jms/redelivery/MessageRedeliveredException.html) 如果现在我们切换到ActiveMQ控制台 ,可以通过http:// localhost:8161进行默认本地安装,则可以看到以下队列: 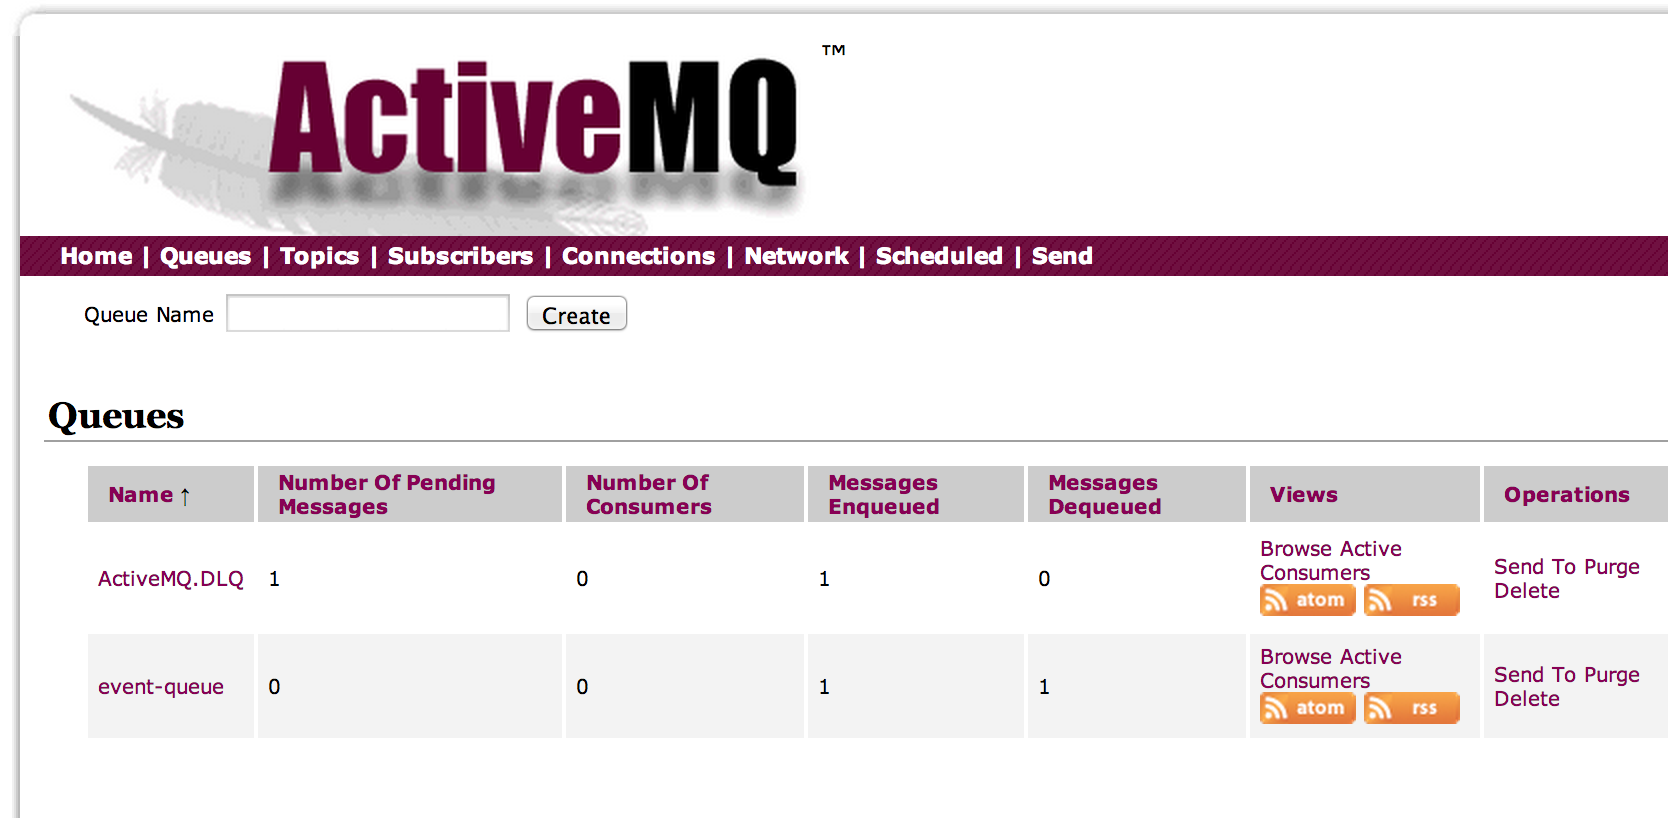 不出所料,我们看到正在创建两个队列,事件队列为空,默认的ActiveMQ.DLQ包含我们的消息:
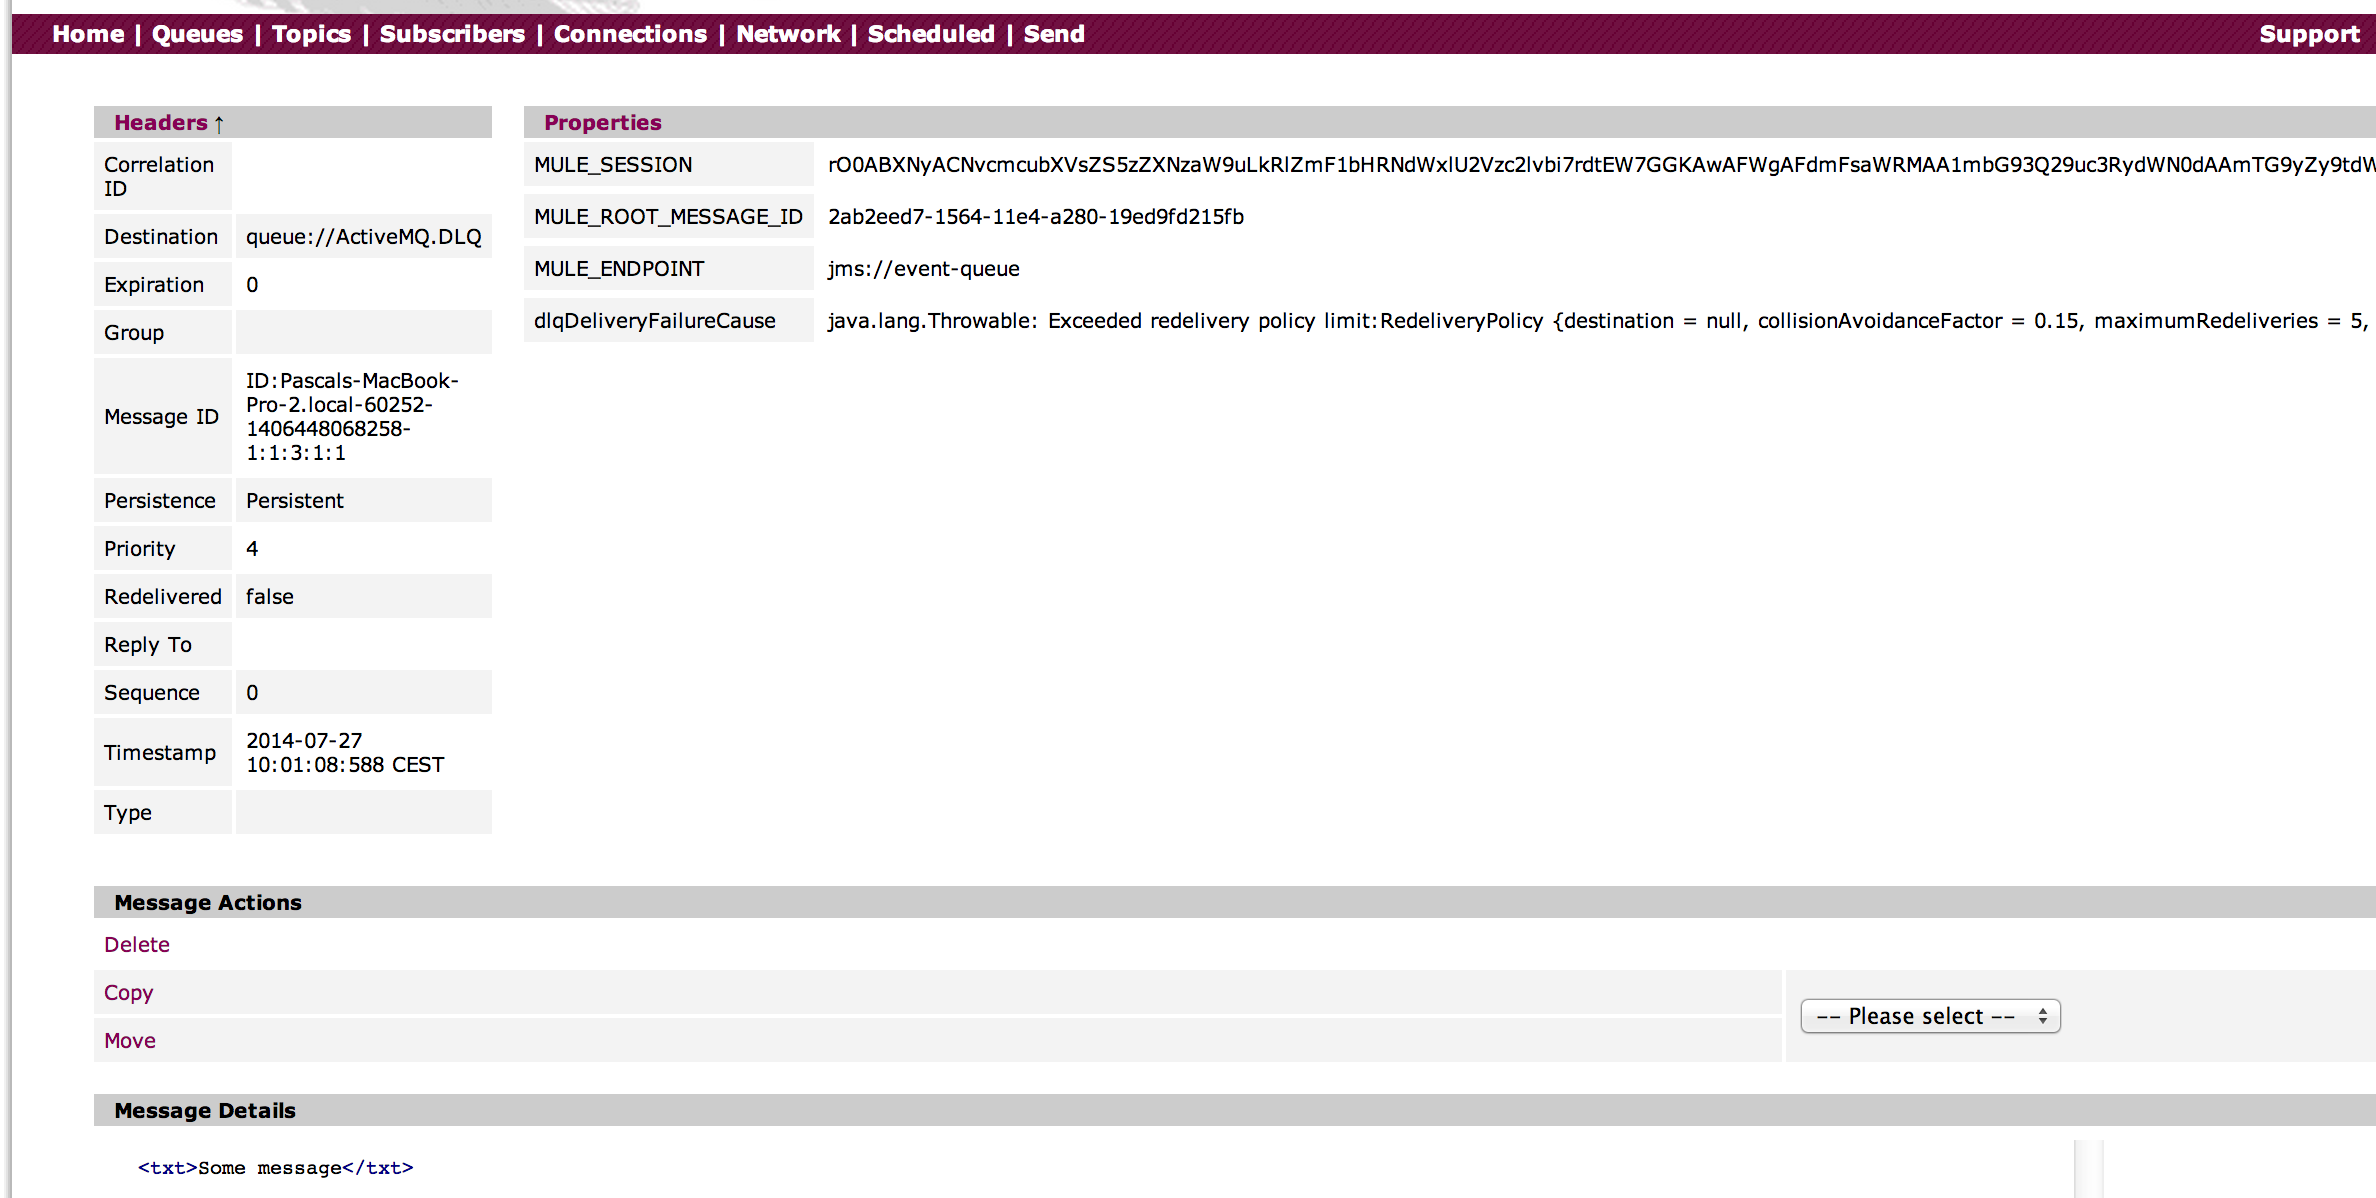
正如您可以想象的那样,为每个队列使用一个特定的DLQ而不是一个包含各种无法传递的消息的DLQ可能很方便。 幸运的是,这很容易在ActiveMQ中配置。 只需将以下内容放在“ $ ACTIVEMQ_HOME / conf”文件夹中的“ activemq.xml”文件中。
<!-- Set the following policy on all queues using the '>' wildcard -->
<policyEntry queue=">">
  <deadLetterStrategy>
    <individualDeadLetterStrategy queuePrefix="DLQ." useQueueForQueueMessages="true" />
  </deadLetterStrategy>
</policyEntry>
如果现在重新启动ActiveMQ,请删除现有队列并重新运行测试,我们将看到以下结果: 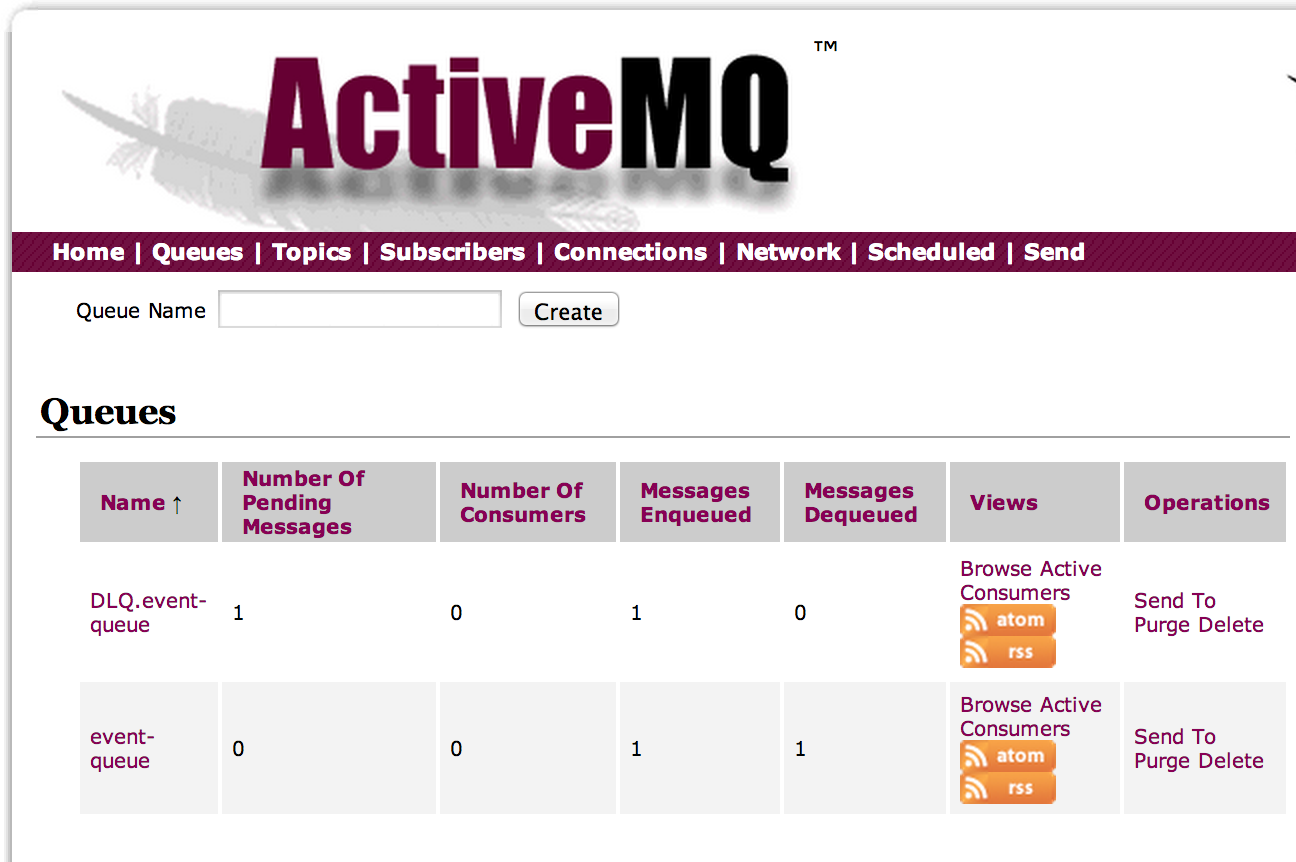 因此,使用此设置,每个队列都有自己的DLQ。 有关这些ActieMQ设置的更多选项,请参见此处 。 通过本文中创建的Mule流,可以轻松测试和使用这些设置。
翻译自: https://www.javacodegeeks.com/2014/07/mule-esb-activemq-and-the-dlq.html


 1880
1880

 被折叠的 条评论
为什么被折叠?
被折叠的 条评论
为什么被折叠?
 到【灌水乐园】发言


