


这是该系列中有关Spring REST异常处理的最后一篇文章。 最后,这次我将讨论在表单处理期间可能发生的REST异常的处理。 因此,在本教程中,您将看到与REST,表单和异常处理有关的所有内容。 客户端呢? jQuery将用于反映REST服务的所有响应。
与以前的教程一样,我将使用Smartphone应用程序 。 现在是宣布此帖子主要目的的好时机– 智能手机实体需要在创建和编辑之前进行验证。
让我们看一下更新的Smartphone类:
@Entity
@Table(name="smartphones")
public class Smartphone {

        @Id
        @GeneratedValue
        private Integer id;

        @Length(min=1, max=20)
        private String producer;

        @Length(min=1, max=20)
        private String model;

        @Range(min=1, max=1500)
        private double price;

        /**
         * Method updates already existed {@link Smartphone} object with values from the inputed argument.
         * @param sPhone - Object which contains new Smartphone values.
         * @return {@link Smartphone} object to which this method applied.
         */
        public Smartphone update(Smartphone sPhone) {
                this.producer = sPhone.producer;
                this.model = sPhone.model;
                this.price = sPhone.price;
                return this;
        }

        @Override
        public String toString() {
                return producer+": "+model+" with price "+price;
        }

        //getters and setters are omitted

}请注意@Length和@Range批注。 这些注释是bean验证的标准方法。 在通过添加以下依赖项来更新已存在的pom.xml文件之后,可以使用这些注释:
org.hibernate
                        hibernate-validator
                        5.0.1.Final

                        javax.validation
                        validation-api
                        1.1.0.Final
在此之后,我需要更新messages.properties文件:
Length.smartphone.producer = Length of a Smartphone producer should be from 1 to 20 characters.
Length.smartphone.model = Length of a Smartphone model should be from 1 to 20 characters.
Range.smartphone.price = Price of a Smartphone should be from 1 to 1 500.00 $现在,让我们看一下SmartphoneController类中的createSmartphone方法:
...
        @RequestMapping(value="/create", method=RequestMethod.POST,
                        produces = MediaType.APPLICATION_JSON_VALUE,
                        consumes = MediaType.APPLICATION_JSON_VALUE)
        @ResponseBody
        public Smartphone createSmartphone(@RequestBody @Valid Smartphone smartphone) {
                return smartphoneService.create(smartphone);
        }
... @Valid注释应用于方法参数。 要特别注意缺少BindingResult ,它不需要像传统的Spring MVC应用程序中那样进行验证。 如果Smartphone对象中的某些属性的值不合适,则@Value批注将引发MethodArgumentNotValidException 。
在实体创建/编辑期间处理异常需要使用不同的模型来表示信息。 我的意思是上一篇文章中的 ErrorInfo类。 我们需要传输其他信息,其中包含错误字段名称和该字段的某些错误消息。 为此,这里是一个新类:
public class ErrorFormInfo {

        private String url;
        private String message;
        private List< FieldErrorDTO > fieldErrors = new ArrayList< FieldErrorDTO >();

        public ErrorFormInfo() {}

        public ErrorFormInfo(String url, String message) {
                this.url = url;
                this.message = message;
        }

        public ErrorFormInfo(List< FieldErrorDTO > fieldErrors, String url, String message) {
                this.fieldErrors = fieldErrors;
                this.url = url;
                this.message = message;
        }

    //getters and setters are omitted

} 第二个类是FieldErrorDTO它在上面的代码示例中使用:
public class FieldErrorDTO {

        private String fieldName;
        private String fieldError;

        public FieldErrorDTO(String fieldName, String fieldError) {
                this.fieldName = fieldName;
                this.fieldError = fieldError;
        }

        //getters and setters are omitted

} 引入错误传输对象后,我可以继续@ControllerAdvice类中的错误处理。 这是RestExceptionProcessor类的代码片段:
...
        @ExceptionHandler(MethodArgumentNotValidException.class)
        @ResponseStatus(value=HttpStatus.BAD_REQUEST)
        @ResponseBody
        public ErrorFormInfo handleMethodArgumentNotValid(HttpServletRequest req, MethodArgumentNotValidException ex) {

                String errorMessage = localizeErrorMessage("error.bad.arguments");
                String errorURL = req.getRequestURL().toString();

                ErrorFormInfo errorInfo = new ErrorFormInfo(errorURL, errorMessage);

                BindingResult result = ex.getBindingResult();
                List< FieldError > fieldErrors = result.getFieldErrors();

                errorInfo.getFieldErrors().addAll(populateFieldErrors(fieldErrors));

                return errorInfo;
        }

        /**
         * Method populates {@link List} of {@link FieldErrorDTO} objects. Each list item contains
         * localized error message and name of a form field which caused the exception.
         * Use the {@link #localizeErrorMessage(String) localizeErrorMessage} method.
         *
         * @param fieldErrorList - {@link List} of {@link FieldError} items
         * @return {@link List} of {@link FieldErrorDTO} items
         */
        public List< FieldErrorDTO > populateFieldErrors(List< FieldError > fieldErrorList) {
                List< FieldErrorDTO > fieldErrors = new ArrayList< FieldErrorDTO >();
                StringBuilder errorMessage = new StringBuilder("");

                for (FieldError fieldError : fieldErrorList) {

                        errorMessage.append(fieldError.getCode()).append(".");
                        errorMessage.append(fieldError.getObjectName()).append(".");
                        errorMessage.append(fieldError.getField());

                        String localizedErrorMsg = localizeErrorMessage(errorMessage.toString());

                        fieldErrors.add(new FieldErrorDTO(fieldError.getField(), localizedErrorMsg));
                        errorMessage.delete(0, errorMessage.capacity());
                }
                return fieldErrors;
        }

        /**
         * Method retrieves appropriate localized error message from the {@link MessageSource}.
         *
         * @param errorCode - key of the error message
         * @return {@link String} localized error message
         */
        public String localizeErrorMessage(String errorCode) {
                Locale locale = LocaleContextHolder.getLocale();
                String errorMessage = messageSource.getMessage(errorCode, null, locale);
                return errorMessage;
        }
... 可以通过本文开头的链接找到RestExceptionProcessor类的完整版本。 我希望上面的代码片段能自我解释。 如果否,请随时在评论中提问。
我需要做的最后一件事是开发客户端代码端:
$(document).ready(function() {

      $('#newSmartphoneForm').submit(function(event) {

              var producer = $('#producer').val();
              var model = $('#model').val();
              var price = $('#price').val();
              var json = { "producer" : producer, "model" : model, "price": price};

        $.ajax({
                url: $("#newSmartphoneForm").attr( "action"),
                data: JSON.stringify(json),
                type: "POST",

                beforeSend: function(xhr) {
                        xhr.setRequestHeader("Accept", "application/json");
                        xhr.setRequestHeader("Content-Type", "application/json");
                        $(".error").remove();
                },
                success: function(smartphone) {
                        var respContent = "";

                                  respContent += "Smartphone was created: [";
                                  respContent += smartphone.producer + " : ";
                                  respContent += smartphone.model + " : " ;
                                  respContent += smartphone.price + "]";

                        $("#sPhoneFromResponse").html(respContent);
                },
                error: function(jqXHR, textStatus, errorThrown) {
                        var respBody = $.parseJSON(jqXHR.responseText);
                        var respContent = "";

                        respContent += "";
                        respContent += respBody.message;
                        respContent += "";

                        $("#sPhoneFromResponse").html(respContent);

                        $.each(respBody.fieldErrors, function(index, errEntity) {
                                var tdEl = $("."+errEntity.fieldName+"-info");
                                tdEl.html(""+errEntity.fieldError+"");
                        });
                }
        });

        event.preventDefault();
      });

}); 客户端new-phone.jsp文件的完整版本可通过本文开头的链接找到。
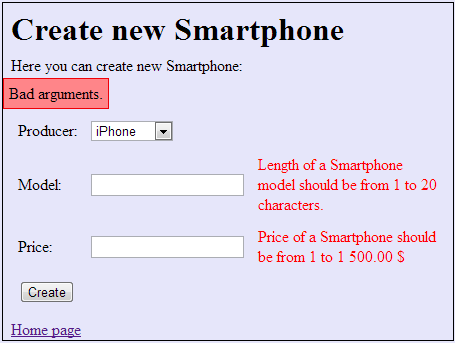
到此为止,我必须对上面文章中开发的所有内容进行演示。 因此场景很简单,我将打开“新智能手机”页面并提交包含无效数据的表单。
摘要
我希望我关于Spring REST应用程序中异常处理的三篇文章对您有所帮助,并且您学到了一些新知识。 这些文章仅重点介绍了异常处理的基本流程,以及您只能在实际项目的整个实践中获得的所有其他内容。 感谢您阅读我的博客。
翻译自: https://www.javacodegeeks.com/2013/12/spring-rest-exception-handling-vol-3.html


 被折叠的 条评论
为什么被折叠?
被折叠的 条评论
为什么被折叠?
 到【灌水乐园】发言


