


前一段时间,我想看看使用Spring Web Services编写Web服务代理(wsproxy)有多么容易。 所以,我想我会在Github上分享结果。 可以随意使用它 (Apache v2许可证)或将其用作自己开发的基础。 本文的其余部分将解释该思想,如何使用Spring Web服务构建它以及有关如何使用当前实现的简短指南。
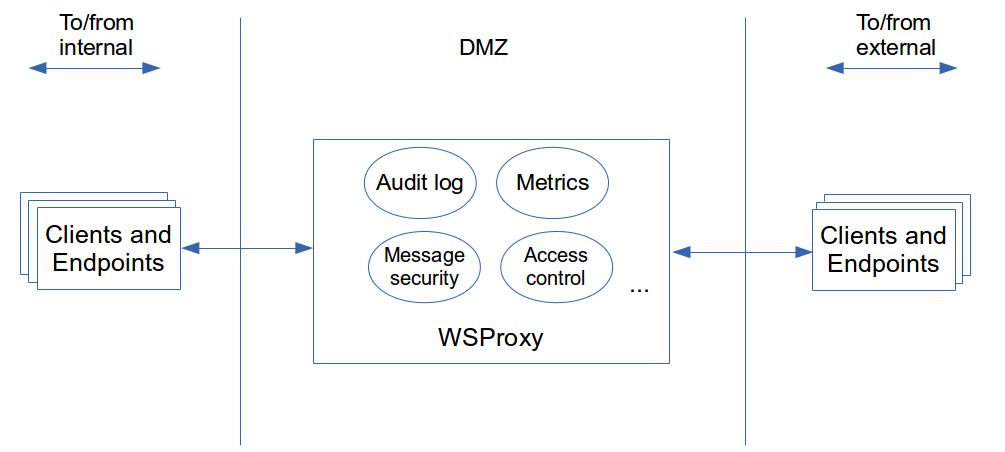
在此上下文中,wsproxy是中央肥皂感知访问层,可在系统之间中继消息。 这种中继在两个方向上起作用。 对于内部托管的服务(入站模式),对于外部托管的服务,我们都是客户端(出站模式)。 可以将其与传统的HTTP正向/反向代理进行比较,但它无需在应用程序传输上进行操作,而是在堆栈中上移了一层,处理应用程序消息。 在这种情况下,肥皂。
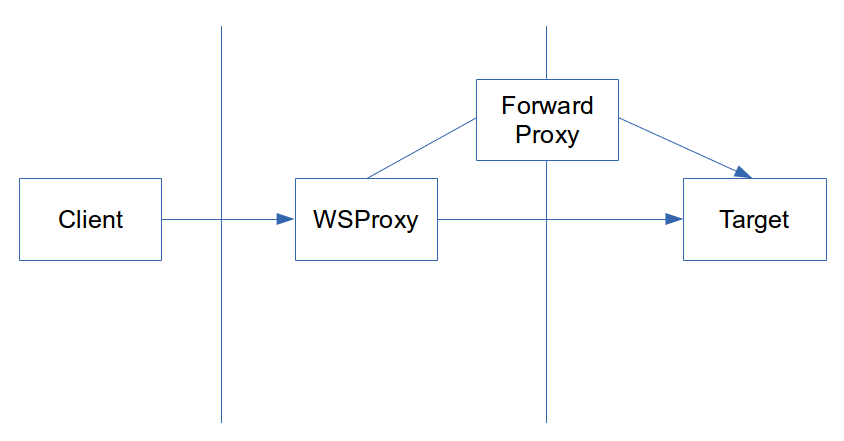
在出站模式下,我们的内部服务(通常)将wsproxy用作http转发代理。 然后它将处理将收到的消息传递到实际目标。 对于入站模式,该模块将充当反向代理,接受来自外部客户端的传入消息,并将其中继到我们的内部服务。
在继续之前,请先介绍一下正向/反向代理:
除了指定目标URL外,转发代理是客户端显式配置的内容。 客户端的http堆栈将消息发送到配置的代理,并通过http标头(主机标头)发送实际所需目标主机的主机/端口。 然后,代理将请求转发到所需的目标主机/端口,并将响应返回给客户端。 因此,代理从http Host标头中组成目标URL的主机和端口。 对于路径,它将使用从客户端收到的请求中的路径。 反向代理的行为(从客户端的角度而言)是实际的目标服务器。 客户端不知道任何代理,也不需要配置任何特殊的东西。 客户端用作目标URL的是反向代理的URL。 反向代理将能够拦截来自客户端的消息,并将其转发到网络中的实际目标。 反向代理将需要额外的配置,例如目标服务的URL(主机,端口和可能的路径),因为无法从请求或HTTP标头中推断出主机/端口。
使用此模块时,仍然可以在边界上实现实际的HTTP反向代理,以实现TLS卸载或其他传输目的。 对于外部入站流量(来自发往内部服务的外部客户端的消息),wsproxy模块将只是进入请求中的第二个反向代理。 对于内部出站流量(来自内部客户端的消息,这些消息发往外部端点),http反向代理的URL将被配置为wsproxy模块上该特定服务的目标URL。
具有这种肥皂感知性的wsproxy的特征之一是集中关注点。 目的是可以拦截通过的肥皂流量。 通过这种方式,我们可以实现诸如审核日志记录,监视,访问控制,消息安全性之类的功能……这样,我们就可以创建一个集中的位置来处理这些需求,而不必针对每个应用程序重新实现它们。
我之所以选择Spring Web服务,是因为没有复杂的基础架构或设计需要理解。 它也非常可扩展,并且可以根据我们的要求在适当的级别上重复使用。
但是,此时我还应该指出,现有的解决方案也可以做到这一点,甚至更多。 它们通常以xml安全网关的名义出现,并以软件包或功能齐全的设备的形式出现。 与往常一样,与自己编写某些东西相比,您应该超过这些现有解决方案的好处。 事实是,它们不是免费提供的(至少可以说),并且您仍然需要具有正确技能的人员来配置和维护它们。 正如我们将看到的,只需一点代码(并在Spring Web Services的帮助下)即可轻松满足我们的要求,从而为我们提供所需的所有控制。
对于这些要求,我考虑到了以下开箱即用的要求,因此很容易扩展设计:
- 对于标准用法,出站模式需要免费配置。 这意味着当需要访问新的外部服务时,我们的代理应该中继消息而无需进行额外的配置
- 通过网关的消息需要记录。 如果没有额外的配置,则默认情况下应记录整个消息。 (可选)我们需要能够配置更细粒度的特定服务需要记录的部分
- 对于(主要是外部)出站通信,我们应该能够配置正向代理或使用预先配置的主机(现有的反向代理或实际端点)覆盖目标
- 万一没有用于卸载出站安全传输的外部反向代理,该模块必须能够通过安全传输转发消息。 对于入站安全传输,我们将通过运行模块的容器来处理此问题。 所以这超出了模块的范围
- 能够应用和处理消息的完整性/机密性
组件设计如下所示:
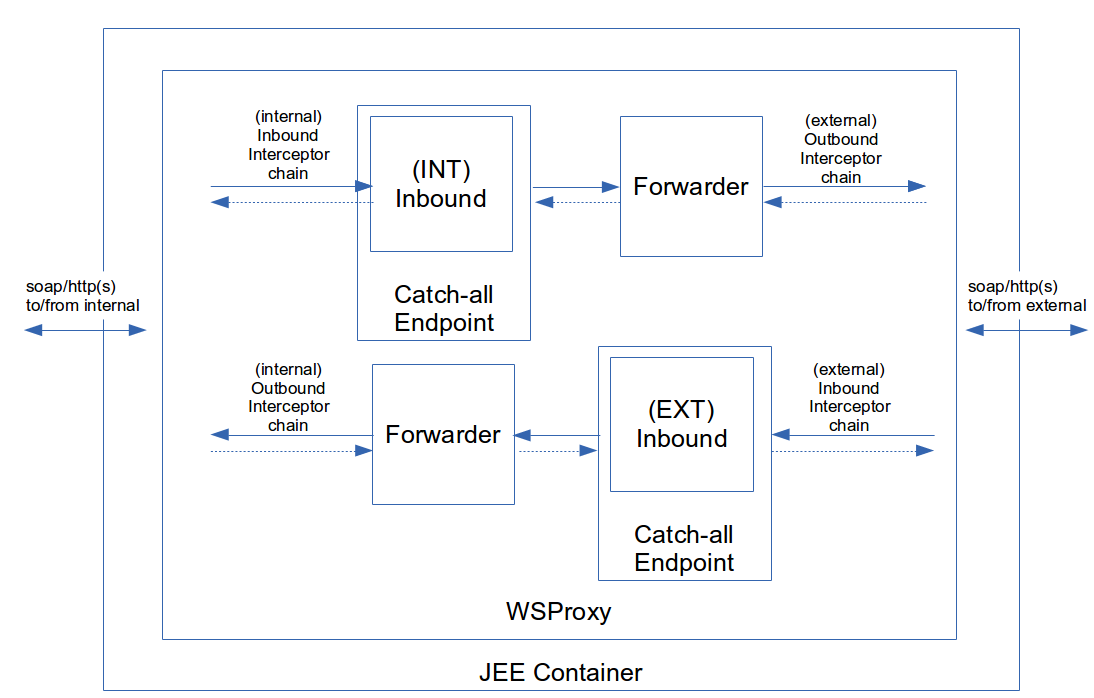
有3个主要组成部分。 终结点 (图中的全部终结点),它将充当发送到wsproxy的消息的接收者。 转发器 ,它将转发消息到目标。 最后,拦截器链是挂钩,我们可以在其中拦截发送/接收的消息并对其进行处理。
这3个组件由Spring Web Services提供。 终点是实现org.springframework.ws.server.endpoint.MessageEndpoint能够接收原始有效载荷的org.springframework.ws.server.endpoint.annotation.Endpoint。 转发器使用org.springframework.ws.client.core.WebServiceTemplate ,拦截器链是org.springframework.ws.client.support.interceptor.ClientInterceptor和/或org.springframework.ws.server.EndpointInterceptor,具体取决于它们需要哪一边发挥作用(稍后再介绍)。 为了消息安全,我们将使用WSS4J,但这只是拦截器的实现,因此不是新组件。
重要的是要意识到有两个拦截器链。 从wsproxy的角度来看,我们将第一个称为“入站链”。 这是在客户端和wsproxy之间进行的操作。 “出站链”是在wsproxy和目标端点之间运行的链。 因此,如果我们有一个内部客户端通过wsproxy访问外部端点,则wsproxy收到消息后,将调用入站链。 从wsproxy将消息中继到目标端点的那一刻起,将调用出站链。 Spring有两个接口来区分拦截器在哪个“侧面”上运行(拦截器还可以实现两个接口,从而使其能够在两个侧面上都起作用)。 org.springframework.ws.server.EndpointInterceptor在端点侧运行,对于wsproxy而言是入站的。 org.springframework.ws.client.support.interceptor.ClientInterceptor在客户端运行,因此对于wsproxy来说是出站的。 顺便说一句; 我们使用入站和出站,而不是原始的Spring命名(客户端/端点),以避免混淆。 正如您现在所注意到的,wsproxy也是端点和客户端。 但是,当我们提到“客户端”时,是指实际的服务客户端,而“端点”是实际的目标服务。
该模块本身将作为典型的Spring应用程序在标准JEE servlet容器上运行。 对于所有入站流量,都使用容器中的http(或https)连接器。 对于所有出站流量,使用WebServiceTemplate并在其内部配置了commons httpclient,如果需要,我们可以将其同时用于http和https。 服务识别以“ doclit”样式完成。 这意味着我们采用主体的第一个元素,包括其名称空间。 这表示为QName 。 此标识非常重要,因为我们将基于每个服务进行配置,例如转发代理,转发协议,端点URL映射,特定记录器等。
够了。 让我们带这个宝贝去兜风吧! 在您选择的IDE中导入项目,请确保将其导入为Maven项目,因为Maven必须过滤文件active_environment.properties (通过默认配置文件自动完成)。 然后,我们将:
- 设置一个基于普通独立肥皂的端点
- 部署wsproxy
- 使用Web服务客户端通过代理模块访问端点
为了引导简单端点,在测试源中预见到一个类SimpleEndpoint ,该类使用JDK内部JAX-WS和http服务器来引导Web服务端点:
public class SimpleEndpoint {

 public static void main(String args[]) {
  Endpoint.publish("http://localhost:9999/simple", new SimpleWebServiceEndpoint());
 }

 @WebService
 public static class SimpleWebServiceEndpoint {
  public Date getCurrentDate(String randomParameter) {
   return new Date();
  }
 }
}
只需将其作为新的Java应用程序运行,它将一直运行,直到进程被杀死。 通过将项目部署到您选择的服务器(我将使用Tomcat7)来启动wsproxy,不需要任何额外的配置。 对于客户端,我们将使用soap-ui(如果愿意,也可以使用cURL)。 在soap-ui中,我们首先必须创建项目。 我们基于测试服务公开的WSDL(可从http:// localhost:9999 / simple?WSDL访问)进行此操作。 接下来,我们必须将wsproxy模块配置为soap-ui中的HTTP转发代理:

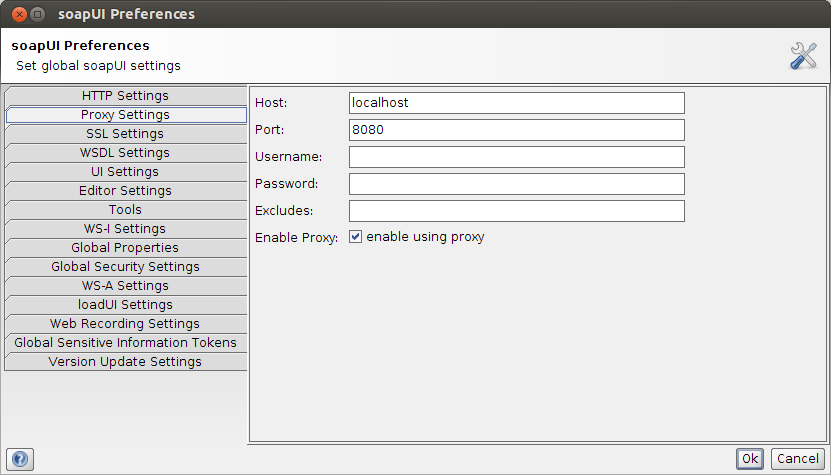
如果需要, 在项目中也可以使用soap-ui项目。 别忘了启用上述代理设置,它们不会保存为项目的一部分。
重要提示:如果您要开始一个新项目,请不要忘记再次禁用代理设置。 soap-ui将使用代理设置来处理标准的http流量,而不仅用于soap / http。 例如; 当基于WSDL URL创建新项目时,soap-ui还将使用http代理设置来检索WSDL。 由于wsproxy模块不是纯HTTP代理(而是肥皂代理),因此它将不允许非肥皂流量通过。
我们需要配置的最后一件事是soap-ui中的目标URL。 默认情况下(至少在tomcat上)部署wsproxy模块,该上下文根以文件名命名。 在我们的情况下,这意味着该模块在以下位置可访问:http:// localhost:8080 / ws-proxy /
有两种选择:
- 而是将模块部署在应用程序服务器(/)的根目录下。 在这种情况下,无需将任何内容更改为目标URL。 目标网址将与没有代理模块时将使用的网址相同
- 使用选择的上下文根,但是在这种情况下,您必须在上下文根之前添加目标URL
在第二种情况下,这意味着我们必须将建议的目标URL从“ http:// localhost:9999 / simple”更改为“ http:// localhost:9999 / ws-proxy / simple ”。
发生的是soap-ui将请求发送到代理设置中指定的主机/端口(因此,它不会将请求发送到localhost:9999,而是发送到localhost:8080)。 但是,路径保留了下来。 该请求实际上通过路径“ ws-proxy / simple”发送到localhost:8080。 通过将模块部署在“ ws-proxy”下,您现在可以了解为什么必须在此路径前缀。 如果路径以“ simple”开头,则将得到404。路径的其余部分对于基础结构并不重要,因为Spring调度程序servlet(配置可以在WsProxyWebApplicationInitializer中找到)绑定到“ / *”。 因此,每种情况下,servlet都会处理每个后续路径。
为了能够将消息转发到实际目标,模块将计算目标URL:
- 首先根据服务标识(有效负载根元素+名称空间)检查给定端点是否有预先配置的目标URL。 这是在EndpointTargetUrlMapping中配置的,我们将在后面看到。
- 如果未找到任何内容,请检查是否存在http Host标头,并将host:port用作目标服务器。 对于路径,请使用请求中存在的路径,但减去在其中部署此模块的上下文根(如果有)
后者意味着在我们的示例中,模块部署在“ ws-proxy”下,请求路径为“ ws-proxy / simple”,这将导致目标URL为“ http:// localhost:999 / simple”。执行请求,我们将得到以下答案:
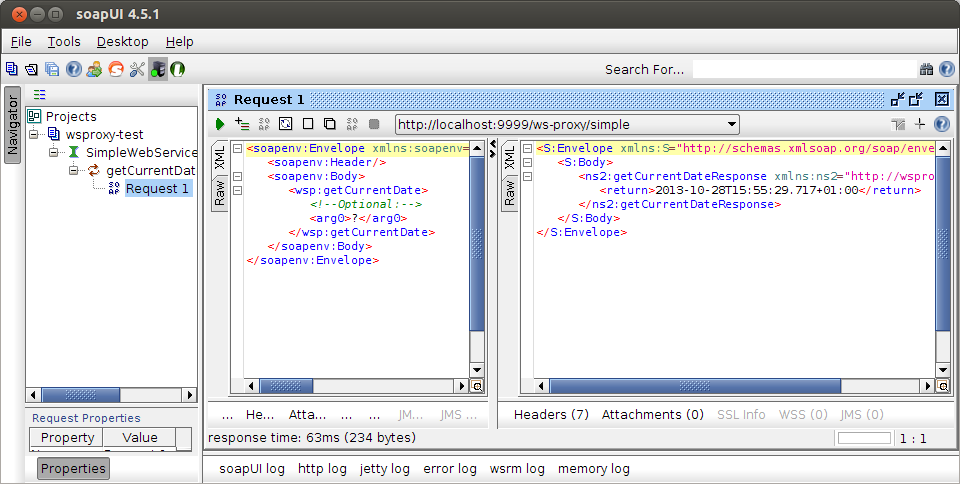
在wsproxy日志文件中,我们可以看到截获的请求和响应正在记录:
51948 [http-bio-8080-exec-5] DEBUG be.error.wsproxy.interceptors.internalchain.LoggingInterceptor  - SID:{http://wsproxy.error.be/}getCurrentDate INBOUND SIDE Request:<?xml version="1.0" encoding="UTF-8" standalone="no"?>
<soapenv:Envelope xmlns:soapenv="http://schemas.xmlsoap.org/soap/envelope/" xmlns:wsp="http://wsproxy.error.be/">
   <soapenv:Header/>
   <soapenv:Body>
      <wsp:getCurrentDate>
         <!--Optional:-->
         <arg0>?</arg0>
      </wsp:getCurrentDate>
   </soapenv:Body>
</soapenv:Envelope>

51949 [http-bio-8080-exec-5] DEBUG be.error.wsproxy.core.ForwardingClient  - Using information from Host header as hostname/port
51949 [http-bio-8080-exec-5] DEBUG be.error.wsproxy.core.ForwardingClient  - Got webservice forwarding request, sending to:http://localhost:9999/simple
51981 [http-bio-8080-exec-5] DEBUG be.error.wsproxy.core.ForwardingClient  - Using interceptors:[class be.error.wsproxy.interceptors.externalchain.HttpRequestHeaderTransfererInterceptor]
51981 [http-bio-8080-exec-5] DEBUG be.error.wsproxy.core.ForwardingClient$3  - Opening [org.springframework.ws.transport.http.HttpComponentsConnection@1dd5e19a] to [http://localhost:9999/simple]
51991 [http-bio-8080-exec-5] DEBUG be.error.wsproxy.core.ForwardingClient  - Forwarding (http://localhost:9999/simple) done.
51994 [http-bio-8080-exec-5] DEBUG be.error.wsproxy.interceptors.internalchain.LoggingInterceptor  - SID:{http://wsproxy.error.be/}getCurrentDate INBOUND SIDE Response:<?xml version="1.0" encoding="UTF-8" standalone="no"?>
<S:Envelope xmlns:S="http://schemas.xmlsoap.org/soap/envelope/">
  <S:Body>
    <ns2:getCurrentDateResponse xmlns:ns2="http://wsproxy.error.be/">
      <return>2013-10-28T15:55:29.717+01:00</return>
    </ns2:getCurrentDateResponse>
  </S:Body>
</S:Envelope>
在默认设置中,默认日志记录发生在入站侧。 入站拦截器在这里配置:
@Configuration
public class InboundInterceptors {

 @Autowired
 private PayloadRootAnnotationMethodEndpointMapping catchAllEndpointMapping;
 @Autowired
 private MessageDispatcher messageDispatcher;

 @Configuration
 public static class FirstInlineInterceptors {
  @Bean
  public DelegatingSmartSoapEndpointInterceptor loggingInterceptor() {
   return new DelegatingSmartSoapEndpointInterceptor(new LoggingInterceptor());
  }
 }

 @Configuration
 public static class ServiceSpecificInterceptors {

 }

 @Configuration
 public static class LastInLineInterceptors {

 }
} 如果要在出站侧也配置此日志记录拦截器,则可以将它们添加到OutboundInterceptors中 。 LoggingInterceptor都实现EndpointInterceptor和ClientInterceptor 。 为了满足我们的要求,还有一个拦截器,该拦截器能够基于XPath表达式记录片段。 LoggingXPathInterceptor是特定于服务的,因此,我们会将其添加到ServiceSpecificInterceptor中。 不同之处在于,特定于服务的拦截器使用PayloadRootSmartSoapEndpointInterceptor ,我们需要提供命名空间和有效负载根元素来标识服务。 配置的拦截器将仅针对该服务被调用。 首次使用和最后使用
DelegatingSmartSoapEndpointInterceptor ,将为任何请求调用。
@Configuration
 public static class ServiceSpepcificInterceptors {
  @Bean
  public PayloadRootSmartSoapEndpointInterceptor getCurrentDateLoggingInterecptor() {
   LoggingXPathInterceptor loggingXPathInterceptor = new LoggingXPathInterceptor();
   loggingXPathInterceptor.addRequestXPaths(new WebServiceMessageXPathExpressionMetaData(
     "//*[local-name()='arg0']", "requestParameter"));
   loggingXPathInterceptor.addResponseXPaths(new WebServiceMessageXPathExpressionMetaData(
     "//*[local-name()='return']", "responseParameter"));
   return new PayloadRootSmartSoapEndpointInterceptor(loggingXPathInterceptor, "http://wsproxy.error.be/",
     "getCurrentDate");
  }
 }
当我们在soap-ui中再次执行请求时,我们可以看到将请求参数和响应值提取到日志文件中:
DEBUG be.error.wsproxy.interceptors.internalchain.LoggingXPathInterceptor - SID:{http://wsproxy.error.be/}getCurrentDate XPATHID:requestParameter VALUE:?
DEBUG be.error.wsproxy.interceptors.internalchain.LoggingXPathInterceptor - SID:{http://wsproxy.error.be/}getCurrentDate XPATHID:responseParameter VALUE:2013-10-28T16:50:29.537+01:00WebServiceMessageXPathExpressionMetaData默认情况下在肥皂主体(有效负载)上运行,并将给定的XPath视为强制性(但非阻塞性)。 要查看其他选项,请检查WebServiceMessageXPathExpressionMetaData上的javadoc。
可以配置的属性位于包be.error.wsproxy.configuration.properties中 。 存在以下类:
通过默认的Maven过滤器Maven启用的默认Spring配置文件“本地”将通过以下属性文件解析它们:
wsproxy_local_demo.properties 。 配置始终存储为简单的字符串,以便在例如JNDI环境中轻松进行外部化。 从EndpointProtocolMapping开始,前三个属性确定如何转发消息:
在上述情况下,由于我们的内部客户端将模块用作转发代理,因此从Host参数自动推导出了目标URL。 由于主机参数不包含有关协议的任何概念,因此默认情况下,wsproxy会将http假定为转发协议。 如果没有负责减轻TLS负担的反向代理,则可以要求代理模块通过https转发。 您可以通过将特定服务的协议映射设置为https来做到这一点:
endpoint.protocol.mapping={namespace}payloadRootElementLocalName=https,...EndpointTargetUrlMapping允许直接定义目标URL。 在外部客户端将访问我们的内部服务的情况下,这是必需的。 在这种情况下,无法再推导目标URL。 外部客户端将不会使用我们的模块作为转发代理,但是该消息只会作为实际服务最终出现在我们的模块上。 然后,模块需要知道将消息转发到的位置:
endpoint.target.url.mapping={namespace}payloadRootElementLocalName=http(s)://host:port/path,....这也可以用于一起覆盖目标URL。 转发器将首先查看是否有为给定服务定义的显式URL,如果是,则将为该URL赋予优先级。
当wsproxy模块需要通过http转发代理进行通信才能到达目标时,可以配置ForwardProxy。 也可以基于每个服务进行配置。
请记住,前向代理不会改变目标URL的计算方式。 如果使用该设置,则消息将转发到已配置的代理,而不是直接访问目标URL:
forward.proxy=={namespace}payloadRootElementLocalName=host:port,...密钥库指向包含商店位置,商店密码,密钥别名和密钥密码的密钥库配置。 当我们要应用消息安全性时将使用它们,我们将在后面讨论。
keystores.location=${project.root.dir}/config/test-keystores
keystore=${keystores.location}/keystore.jks
keystore.password=changeme
key.alias=mykey
key.password=changeme
truststore=${keystores.location}/truststore.jks
truststore.password=changeme
为了满足最后一个要求(完整性/机密性),我们将通过Spring Wss4jSecurityInterceptor使用WSS4J。 在我们的示例中,如果我们有内部客户端访问外部服务,则需要在出站侧配置此拦截器。 我们将执行的步骤:
- 设置安全的基于独立Soap的端点
- 为给定服务配置具有消息安全性的wsproxy
- 部署wsproxy
- 使用Web服务客户端通过代理模块访问端点
对于安全端点,可以使用JAXWS和WSIT预测SimpleSecuredEndpoint 。 可以在META-INF / wsit-be.error.wsproxy.SimpleSecuredEndpoint $ SimpleWebServiceEndpoint.xml中找到WSIT配置,以在端点上启用消息完整性。
public class SimpleSecuredEndpoint {

 public static void main(String args[]) throws IOException {
  // Set WSIT_HOME manually, we're only using this for testing purposes. This way we can have a dynamic path based
  // on the project location in filesystem to resolve the keystores via the WSIT configuratin in META-INF
  System.setProperty("WSIT_HOME", new ClassPathResource("").getFile().getParent() + "/../config/test-keystores/");
  Endpoint.publish("http://localhost:9999/simple", new SimpleWebServiceEndpoint());
 }

 @WebService(serviceName = "SimpleEndpoint")
 @Addressing(enabled = false, required = false)
 public static class SimpleWebServiceEndpoint {
  public Date getCurrentDateSecured(String randomParameter) {
   return new Date();
  }
 }
}
重要: JDK附带的JAXWS实现不包含WSIT。 它只是JAXWS RI。 为了使它起作用,您必须自己下载最新的Metro版本,它将所有内容捆绑在一起。 参见Metro主页 。 下载Metro后,运行SimpleSecuredEndpoint并附带已认可的系统属性: -Djava.endorsed.dirs = / path_to_metro / lib 。 这将确保从外部库中使用整个JAXWS实现。 当一切运行正常时,您会看到一条线:
INFO: WSP5018: Loaded WSIT configuration from file: file:/home/koen/.... 。
WSS4J拦截器的配置可在OutboundInterceptors中实现消息完整性:
@Bean
 public Map<QName, List<ClientInterceptor>> customClientInterceptors() throws Exception {
  Map<QName, List<ClientInterceptor>> mapping = new HashMap<>();

  List<ClientInterceptor> list = new ArrayList<>();
  list.add(getCurrentDateServiceSecurityInterceptor());
  list.add(new LoggingInterceptor());
  mapping.put(new QName("http://wsproxy.error.be/", "getCurrentDateSecured"), list);

  return mapping;
 }

 private Wss4jSecurityInterceptor getCurrentDateServiceSecurityInterceptor() throws Exception {
  Wss4jSecurityInterceptor interceptor = new Wss4jSecurityInterceptor();

  // Outgoing
  interceptor.setSecurementActions("Signature Timestamp");
  interceptor
    .setSecurementSignatureParts("{}{http://schemas.xmlsoap.org/soap/envelope/}Body;{}{http://docs.oasis-open.org/wss/2004/01/oasis-200401-wss-wssecurity-utility-1.0.xsd}Timestamp");
  interceptor.setSecurementSignatureKeyIdentifier("IssuerSerial");
  Pair<String, String> key = keystore.getKeyAliasPasswords().get(0);
  interceptor.setSecurementUsername(key.getLeft());
  interceptor.setSecurementPassword(key.getRight());
  interceptor.setSecurementSignatureAlgorithm("http://www.w3.org/2000/09/xmldsig#rsa-sha1");
  interceptor.setSecurementSignatureDigestAlgorithm("http://www.w3.org/2000/09/xmldsig#sha1");
  interceptor.setSecurementTimeToLive(700);
  interceptor.setValidationTimeToLive(700);
  interceptor.setSecurementSignatureCrypto(keystoreCrypto);

  // Incomming
  interceptor.setValidationActions("Timestamp Signature");
  interceptor.setValidationSignatureCrypto(truststoreCrypto);

  return interceptor;
 }
在第6行和第7行,我们将自定义拦截器添加到ForwardingClient使用的拦截器列表中。 我们还在出站上添加了LoggingInterceptor,以便可以看到受保护的消息传出和传入。要测试消息安全配置,请部署wsproxy并使用soap-ui触发请求。 soap-ui设置与非安全端点的设置没有什么不同。
重要提示: C14N似乎有问题。 当请求正常发送时,WSIT将抱怨计算的摘要与消息中的摘要不匹配。 我将对此进行进一步调查,但这似乎是WSIT而不是WSS4J的问题,因为当soap-ui配置为安全客户端并直接与端点进行通信而不是使用wsproxy模块时,也会发生相同的问题。 要解决此问题并查看测试工作,请删除soap Body起始元素和有效负载根起始元素之间的换行。 还要删除皂体末端元素和有效负载根末端元素之间的换行符:
<soapenv:Envelope xmlns:soapenv="http://schemas.xmlsoap.org/soap/envelope/" xmlns:wsp="http://wsproxy.error.be/">
   <soapenv:Header/>
   <soapenv:Body><wsp:getCurrentDateSecured>
         <!--Optional:-->
         <arg0>?</arg0>
 </wsp:getCurrentDateSecured></soapenv:Body>
</soapenv:Envelope>
如果需要, 在项目中也可以使用soap-ui项目。 别忘了启用代理设置,如前所述,它们不会保存为项目的一部分。
结果:
<S:Envelope xmlns:S="http://schemas.xmlsoap.org/soap/envelope/" xmlns:ds="http://www.w3.org/2000/09/xmldsig#" xmlns:exc14n="http://www.w3.org/2001/10/xml-exc-c14n#" xmlns:wsse="http://docs.oasis-open.org/wss/2004/01/oasis-200401-wss-wssecurity-secext-1.0.xsd" xmlns:wsu="http://docs.oasis-open.org/wss/2004/01/oasis-200401-wss-wssecurity-utility-1.0.xsd" xmlns:xs="http://www.w3.org/2001/XMLSchema">
   <S:Header/>
   <S:Body wsu:Id="_5002">
      <ns2:getCurrentDateSecuredResponse xmlns:ns2="http://wsproxy.error.be/">
         <return>2013-10-29T14:26:25.789+01:00</return>
      </ns2:getCurrentDateSecuredResponse>
   </S:Body>
</S:Envelope>
wsproxy在转发请求时增加了消息安全性,而在返回响应时将其删除了,这并不奇怪。 如果我们查看wsproxy日志文件,首先将看到在inboud端输入的请求:
34   [http-bio-8080-exec-3] DEBUG be.error.wsproxy.interceptors.logging.LoggingInterceptor  - SID:{http://wsproxy.error.be/}getCurrentDate INBOUND SIDE Request:<?xml version="1.0" encoding="UTF-8" standalone="no"?>
<soapenv:Envelope xmlns:soapenv="http://schemas.xmlsoap.org/soap/envelope/" xmlns:wsp="http://wsproxy.error.be/">
   <soapenv:Header/>
   <soapenv:Body>
    <wsp:getCurrentDateSecured>
         <!--Optional:-->
         <arg0>?</arg0>
 </wsp:getCurrentDateSecured>
  </soapenv:Body>
</soapenv:Envelope>
该请求被保护并转发到端点:
394  [http-bio-8080-exec-3] DEBUG be.error.wsproxy.interceptors.logging.LoggingInterceptor  - SID:{http://wsproxy.error.be/}getCurrentDate OUTBOUND SIDE Request:<?xml version="1.0" encoding="UTF-8" standalone="no"?>
<soapenv:Envelope xmlns:soapenv="http://schemas.xmlsoap.org/soap/envelope/" xmlns:wsp="http://wsproxy.error.be/">
   <soapenv:Header>
    <wsse:Security xmlns:wsse="http://docs.oasis-open.org/wss/2004/01/oasis-200401-wss-wssecurity-secext-1.0.xsd" xmlns:wsu="http://docs.oasis-open.org/wss/2004/01/oasis-200401-wss-wssecurity-utility-1.0.xsd" soapenv:mustUnderstand="1">
      <wsu:Timestamp wsu:Id="TS-518848887F924441AB13830540361321">
        <wsu:Created>2013-10-29T13:40:36.130Z</wsu:Created>
        <wsu:Expires>2013-10-29T13:45:36.130Z</wsu:Expires>
      </wsu:Timestamp>
      <ds:Signature xmlns:ds="http://www.w3.org/2000/09/xmldsig#" Id="SIG-518848887F924441AB13830540361916">
        <ds:SignedInfo>
...
从端点接收到安全响应;
524  [http-bio-8080-exec-3] DEBUG be.error.wsproxy.interceptors.logging.LoggingInterceptor  - SID:{http://wsproxy.error.be/}getCurrentDate OUTBOUND SIDE Response:<?xml version="1.0" encoding="UTF-8" standalone="no"?>
<S:Envelope xmlns:S="http://schemas.xmlsoap.org/soap/envelope/" xmlns:ds="http://www.w3.org/2000/09/xmldsig#" xmlns:exc14n="http://www.w3.org/2001/10/xml-exc-c14n#" xmlns:wsse="http://docs.oasis-open.org/wss/2004/01/oasis-200401-wss-wssecurity-secext-1.0.xsd" xmlns:wsu="http://docs.oasis-open.org/wss/2004/01/oasis-200401-wss-wssecurity-utility-1.0.xsd" xmlns:xs="http://www.w3.org/2001/XMLSchema">
  <S:Header>
    <wsse:Security S:mustUnderstand="1">
      <wsu:Timestamp xmlns:ns15="http://www.w3.org/2003/05/soap-envelope" xmlns:ns16="http://docs.oasis-open.org/ws-sx/ws-secureconversation/200512" wsu:Id="_3">
        <wsu:Created>2013-10-29T13:40:36Z</wsu:Created>
        <wsu:Expires>2013-10-29T13:45:36Z</wsu:Expires>
      </wsu:Timestamp>
      <ds:Signature xmlns:ns15="http://www.w3.org/2003/05/soap-envelope" xmlns:ns16="http://docs.oasis-open.org/ws-sx/ws-secureconversation/200512" Id="_1">
        <ds:SignedInfo>
...
安全信息得到处理和验证。 如果可以,则剥离安全信息并返回响应(在这种情况下,返回给我们的客户端soap-ui):
567  [http-bio-8080-exec-3] DEBUG be.error.wsproxy.interceptors.logging.LoggingInterceptor  - SID:{http://wsproxy.error.be/}getCurrentDate INBOUND SIDE Response:<?xml version="1.0" encoding="UTF-8" standalone="no"?>
<S:Envelope xmlns:S="http://schemas.xmlsoap.org/soap/envelope/" xmlns:ds="http://www.w3.org/2000/09/xmldsig#" xmlns:exc14n="http://www.w3.org/2001/10/xml-exc-c14n#" xmlns:wsse="http://docs.oasis-open.org/wss/2004/01/oasis-200401-wss-wssecurity-secext-1.0.xsd" xmlns:wsu="http://docs.oasis-open.org/wss/2004/01/oasis-200401-wss-wssecurity-utility-1.0.xsd" xmlns:xs="http://www.w3.org/2001/XMLSchema">
  <S:Header/>
  <S:Body wsu:Id="_5002">
    <ns2:getCurrentDateSecuredResponse xmlns:ns2="http://wsproxy.error.be/">
      <return>2013-10-29T14:40:36.357+01:00</return>
    </ns2:getCurrentDateSecuredResponse>
  </S:Body>
</S:Envelope>
到目前为止,已经完成了所有模拟内部客户端访问外部服务的测试。 如果您想使用模块做逆运算; 服务外部客户端访问内部托管的服务,情况更多。 对于模块将转发到的每个内部托管服务,您必须使用endpoint.target.url.mapping配置参数注册目标URL。 拦截器继续以相同的方式工作,但是请记住,例如,出于消息安全性,您可能希望在入站侧配置Wss4jSecurityInterceptor,因为在这种情况下,入站侧是面向外部的一侧。 在入站和出站侧为不同的服务配置Wss4jSecurityInterceptor没问题; 所有配置均基于每个服务。
例如:服务x(由名称空间和有效负载根元素标识)是内部托管服务。 服务y是内部客户端要访问的外部服务。 为了保护内部服务x,我们将在InboundInterceptors配置中添加Wss4jSecurityInterceptor作为服务特定的入站拦截器。 因此,此拦截器将仅在wsproxy端点上处于活动状态(仅服务于入站侧,在此示例中为面向外部的侧),并且仅对于服务x有效。 为了保护对服务y的调用,我们将在OutboundInterceptors中注册Wss4jSecurityInterceptor,为wsproxy模块发送到外部服务y的消息增加消息安全性。
好的,就是这样! 如果这对您有用,或者您有改进的想法,请随时给我留言。


 被折叠的 条评论
为什么被折叠?
被折叠的 条评论
为什么被折叠?
 到【灌水乐园】发言


