


Spring 3使JSON REST服务非常容易。 本教程将通过几个步骤向您展示如何进行。 您可以在GitHub上获取代码。
先决条件
您应该有一个运行中的Spring MVC应用程序。 如果尚未设置正常的Spring MVC应用程序,请按照本教程进行操作 。 我们将定义三个REST服务:1)检索随机的Person,2)按ID检索Person,以及3)保存新的Person。 我们将在示例页面上使用jQuery使用这些服务。 首先,我将展示用于REST服务的Spring Controller,然后逐步介绍它们的工作方式:
PersonController.java
package com.codetutr.controller;

import org.springframework.beans.factory.annotation.Autowired;
import org.springframework.stereotype.Controller;
import org.springframework.web.bind.annotation.PathVariable;
import org.springframework.web.bind.annotation.RequestMapping;
import org.springframework.web.bind.annotation.RequestMethod;
import org.springframework.web.bind.annotation.RequestParam;
import org.springframework.web.bind.annotation.ResponseBody;

import com.codetutr.domain.Person;
import com.codetutr.service.PersonService;

@Controller
@RequestMapping("api")
public class PersonController {

	PersonService personService;

	@Autowired
	public PersonController(PersonService personService) {
		this.personService = personService;
	}

	@RequestMapping("person/random")
	@ResponseBody
	public Person randomPerson() {
		return personService.getRandom();
	}

	@RequestMapping("person/{id}")
	@ResponseBody
	public Person getById(@PathVariable Long id) {
		return personService.getById(id);
	}

	/* same as above method, but is mapped to
	 * /api/person?id= rather than /api/person/{id}
	 */
	@RequestMapping(value="person", params="id")
	@ResponseBody
	public Person getByIdFromParam(@RequestParam Long id) {
		return personService.getById(id);
	}

	/**
	 * Saves new person. Spring automatically binds the name
	 * and age parameters in the request to the person argument
	 * @param person
	 * @return String indicating success or failure of save
	 */
	@RequestMapping(value="person", method=RequestMethod.POST)
	@ResponseBody
	public String savePerson(Person person) {
		personService.save(person);
		return "Saved person: " + person.toString();
	}
}
好的,因此,如您所见,该控制器中有4个请求处理程序。 第一种方法返回一个随机的人。 接下来的两个ID检索一个人–只是两种不同的URL映射方法。 最后一种方法可以保存一个人。
记住Spring控制器通常如何返回String类型(以指示结果视图名称)。 相反,这里我们使用Spring的@ResponseBody批注并返回要发送给客户端的对象。 @ResponseBody注释告诉Spring我们将在响应主体中返回数据,而不是呈现JSP。
当使用@ResponseBody批注时,Spring将以客户端可接受的格式返回数据。 也就是说,如果客户端请求具有用于接受json的标头,并且类路径中存在Jackson-Mapper,则Spring将尝试将返回值序列化为JSON。 如果请求标头指示XML是可接受的(accept = application / xml),并且Jaxb在类路径中,并且返回类型使用Jaxb注释进行注释,则Spring将尝试将返回值编组为XML。
如前所述,如果您希望服务返回JSON,则必须在类路径中包含Jackson。 这是您需要添加到项目中的唯一依赖项:
Gradle
compile 'org.codehaus.jackson:jackson-mapper-asl:1.9.12'或者,如果您使用的是Maven:
<dependency>
    <groupId>org.codehaus.jackson</groupId>
    <artifactId>jackson-mapper-asl</artifactId>
    <version>1.9.12</version>
</dependency>
或者,如果您希望服务返回XML,则包括您喜欢的Jaxb实现。 com.sun.xml.bind:jaxb:2.1.9 。
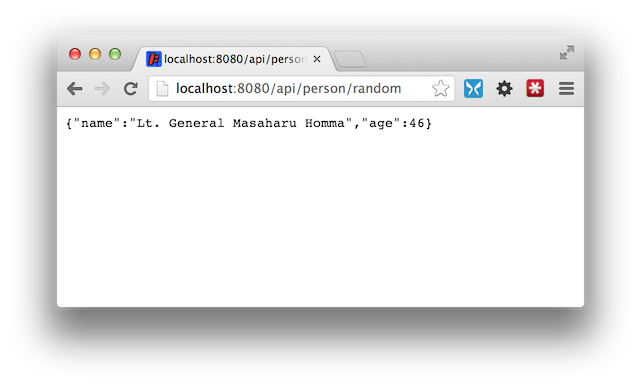
稍后,我们将构建一个前端,以使用AJAX调用这些服务,但是如果您现在部署应用程序,则可以使用REST客户端(或仅在浏览器中键入URL)试用您的服务。 例如:
如果您对此感到满意,可以停止关注。 现在,我将通过编码客户端jQuery来连接所有组件:
home.jsp
<%@ taglib prefix="c" uri="http://java.sun.com/jsp/jstl/core" %>
<%@ taglib prefix="form" uri="http://www.springframework.org/tags/form" %>
<!DOCTYPE HTML>
<html>
<head>
<title>Spring MVC - Ajax</title>
<script src="//ajax.googleapis.com/ajax/libs/jquery/1.9.1/jquery.min.js"></script>
<style>
body { background-color: #eee; font: helvetica; }
#container { width: 500px; background-color: #fff; margin: 30px auto; padding: 30px; border-radius: 5px; box-shadow: 5px; }
.green { font-weight: bold; color: green; }
.message { margin-bottom: 10px; }
label { width:70px; display:inline-block;}
.hide { display: none; }
.error { color: red; font-size: 0.8em; }
</style>
</head>
<body>
<div id="container">
<h1>Person Page</h1>
<p>This page demonstrates Spring MVC's powerful Ajax functionality. Retrieve a
random person, retrieve a person by ID, or save a new person, all without page reload.
</p>
<h2>Random Person Generator</h2>
<input type="submit" id="randomPerson" value="Get Random Person" /><br/><br/>
<div id="personResponse"> </div>
<hr/>
<h2>Get By ID</h2>
<form id="idForm">
<div class="error hide" id="idError">Please enter a valid ID in range 0-3</div>
<label for="personId">ID (0-3): </label><input name="id" id="personId" value="0" type="number" />
<input type="submit" value="Get Person By ID" /> <br /><br/>
<div id="personIdResponse"> </div>
</form>
<hr/>
<h2>Submit new Person</h2>
<form id="newPersonForm">
<label for="nameInput">Name: </label>
<input type="text" name="name" id="nameInput" />
<br/>
<label for="ageInput">Age: </label>
<input type="text" name="age" id="ageInput" />
<br/>
<input type="submit" value="Save Person" /><br/><br/>
<div id="personFormResponse" class="green"> </div>
</form>
</div>
<script type="text/javascript">
$(document).ready(function() {
// Random Person AJAX Request
$('#randomPerson').click(function() {
$.getJSON('${pageContext.request.contextPath}/api/person/random', function(person) {
$('#personResponse').text(person.name + ', age ' + person.age);
});
});
// Request Person by ID AJAX
$('#idForm').submit(function(e) {
var personId = +$('#personId').val();
if(!validatePersonId(personId))
return false;
$.get('${pageContext.request.contextPath}/api/person/' + personId, function(person) {
$('#personIdResponse').text(person.name + ', age ' + person.age);
});
e.preventDefault(); // prevent actual form submit
});
// Save Person AJAX Form Submit
$('#randomPerson').click(function() {
$.getJSON('${pageContext.request.contextPath}/api/person/random', function(person) {
$('#personResponse').text(person.name + ', age ' + person.age);
});
});
$('#newPersonForm').submit(function(e) {
// will pass the form date using the jQuery serialize function
$.post('${pageContext.request.contextPath}/api/person', $(this).serialize(), function(response) {
$('#personFormResponse').text(response);
});
e.preventDefault(); // prevent actual form submit and page reload
});
});
function validatePersonId(personId) {
console.log(personId);
if(personId === undefined || personId < 0 || personId > 3) {
$('#idError').show();
return false;
}
else {
$('#idError').hide();
return true;
}
}
</script>
</body>
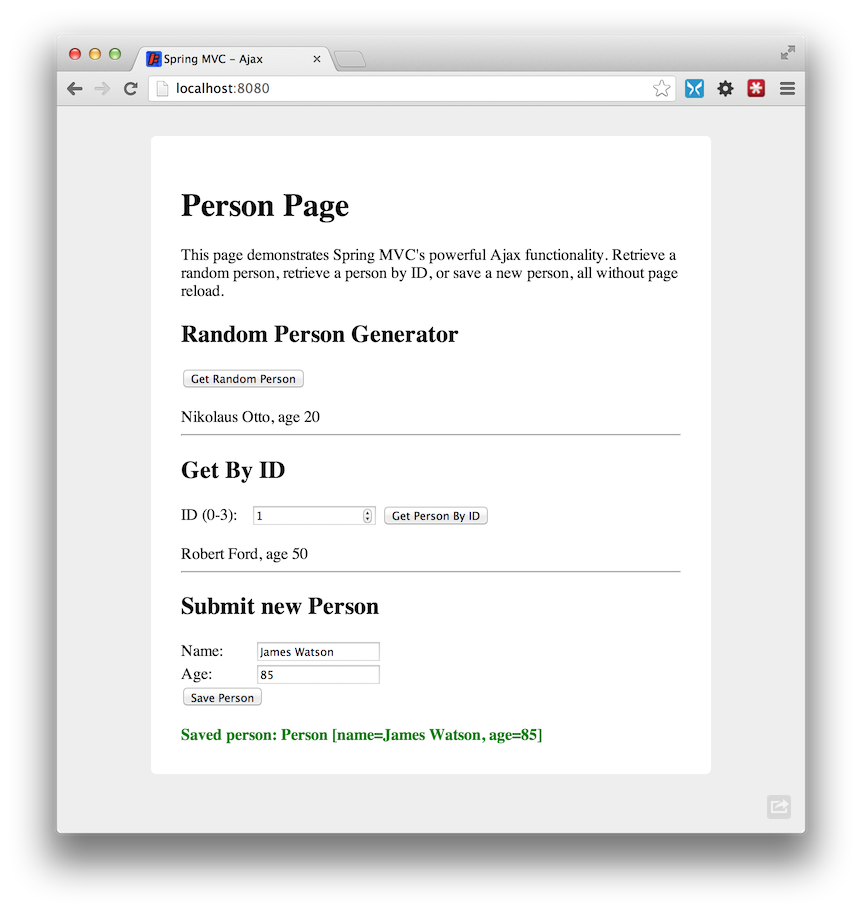
</html>一切就绪后,您应该拥有一个如下所示的页面:
完整资料:
ZIP , GitHub上
要运行本教程中的代码:必须已安装Gradle 。 下载ZIP。 提取。 打开命令提示符以提取位置。 运行gradle jettyRunWar。 在浏览器中导航到http:// localhost:8080。


 6万+
6万+

 被折叠的 条评论
为什么被折叠?
被折叠的 条评论
为什么被折叠?
 到【灌水乐园】发言


