


在本教程中,我们将学习如何使用Servlet创建非常基本的Web应用程序。
Servlet是一类,扩展了服务器拦截和响应传入请求的功能。 Servlet是一个Web组件,可在服务器上进行编写,构建和部署,以创建动态Web页面。
首先,我们需要在系统中安装Eclipse IDE,并按照下面列出的步骤进行操作。
1.打开Eclipse并创建一个动态Web项目 。

2.指定项目详细信息,如下所示,然后单击“下一步”。
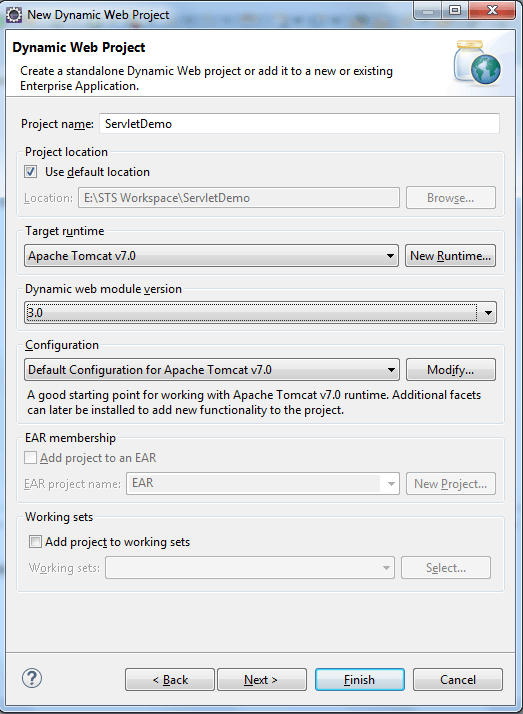
3.设置Web模块详细信息并生成web.xml。
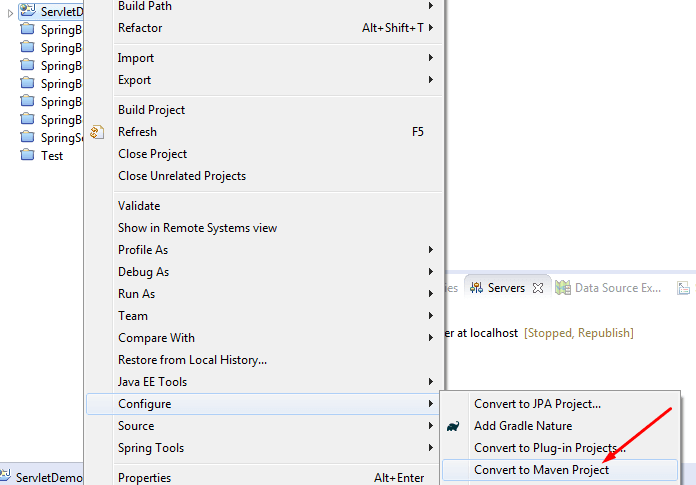
4.单击完成。 右键单击Servlet Demo项目,然后单击“转换为Maven项目”。
而已。 基本设置已完成。
验证web.xml文件如下所示。
web.xml
<?xml version="1.0" encoding="UTF-8"?>
<web-app xmlns:xsi="http://www.w3.org/2001/XMLSchema-instance" xmlns="http://java.sun.com/xml/ns/javaee" xsi:schemaLocation="http://java.sun.com/xml/ns/javaee http://java.sun.com/xml/ns/javaee/web-app_3_0.xsd" id="WebApp_ID" version="3.0">
  <display-name>ServletDemo</display-name>
  <welcome-file-list>
    <welcome-file>hello.jsp</welcome-file>
  </welcome-file-list>
  <servlet>
    <description></description>
    <display-name>DemoServlet</display-name>
    <servlet-name>demo</servlet-name>
    <servlet-class>com.jcombat.sample.DemoServlet</servlet-class>
  </servlet>
  <servlet-mapping>
    <servlet-name>demo</servlet-name>
    <url-pattern>/demo</url-pattern>
  </servlet-mapping>
</web-app>
在与web.xml中指定的相同的包中创建DemoServlet类。
DemoServlet.java
package com.jcombat.sample;

import java.io.IOException;

import javax.servlet.ServletException;
import javax.servlet.http.HttpServlet;
import javax.servlet.http.HttpServletRequest;
import javax.servlet.http.HttpServletResponse;

public class DemoServlet extends HttpServlet {
	private static final long serialVersionUID = 1L;

    /**
     * @see HttpServlet#HttpServlet()
     */
    public DemoServlet() {
        super();
    }

	/**
	 * @see HttpServlet#doGet(HttpServletRequest request, HttpServletResponse response)
	 */
	protected void doGet(HttpServletRequest request, HttpServletResponse response) throws ServletException, IOException {
		doPost(request, response);
	}

	/**
	 * @see HttpServlet#doPost(HttpServletRequest request, HttpServletResponse response)
	 */
	protected void doPost(HttpServletRequest request, HttpServletResponse response) throws ServletException, IOException {
		request.getRequestDispatcher("/Test.jsp").forward(request, response);
	}

}
现在,让我们在Web Content下创建两个JSP文件– hello.jsp和test.jsp 。
hello.jsp
<%@ page language="java" contentType="text/html; charset=ISO-8859-1"
	pageEncoding="ISO-8859-1"%>
<!DOCTYPE html PUBLIC "-//W3C//DTD HTML 4.01 Transitional//EN" "http://www.w3.org/TR/html4/loose.dtd">
<html>
	<head>
		<meta http-equiv="Content-Type" content="text/html; charset=ISO-8859-1">
		<title>Hello World</title>
	</head>
	<body>Welcome to landing page</body>
</html>
Test.jsp
@ page language="java" contentType="text/html; charset=ISO-8859-1"
	pageEncoding="ISO-8859-1"%>
<!DOCTYPE html PUBLIC "-//W3C//DTD HTML 4.01 Transitional//EN" "http://www.w3.org/TR/html4/loose.dtd">
<html>
	<head>
		<meta http-equiv="Content-Type" content="text/html; charset=ISO-8859-1">
		<title>Demo Page</title>
	</head>
	<body>Welcome to demo page</body>
</html>接下来,将pom.xml与以下提到的内容进行比较和验证–
pom.xml
<project xmlns="http://maven.apache.org/POM/4.0.0" xmlns:xsi="http://www.w3.org/2001/XMLSchema-instance"
	xsi:schemaLocation="http://maven.apache.org/POM/4.0.0 http://maven.apache.org/xsd/maven-4.0.0.xsd">
	<modelVersion>4.0.0</modelVersion>
	<groupId>com.jcombat.sample</groupId>
	<artifactId>ServletDemo</artifactId>
	<version>0.0.1-SNAPSHOT</version>
	<packaging>war</packaging>
	<name>Servlet with Maven Demo</name>
	<description>Servlet with Maven & Tomcat Demo</description>

	<dependencies>
		<dependency>
			<groupId>javax.servlet</groupId>
			<artifactId>javax.servlet-api</artifactId>
			<version>3.0.1</version>
			<scope>provided</scope>
		</dependency>
	</dependencies>

	<build>
		<sourceDirectory>src</sourceDirectory>
		<plugins>
			<plugin>
				<artifactId>maven-war-plugin</artifactId>
				<version>2.4</version>
				<configuration>
					<warSourceDirectory>WebContent</warSourceDirectory>
					<failOnMissingWebXml>false</failOnMissingWebXml>
				</configuration>
			</plugin>
			<plugin>
				<artifactId>maven-compiler-plugin</artifactId>
				<configuration>
					<source>1.7</source>
					<target>1.7</target>
				</configuration>
			</plugin>
		</plugins>
	</build>
</project>
翻译自: https://www.javacodegeeks.com/2018/07/creating-first-servlet.html


 414
414


 被折叠的 条评论
为什么被折叠?
被折叠的 条评论
为什么被折叠?
 到【灌水乐园】发言


