


该博客将说明如何使用Docker创建部署在多个主机上的多容器应用程序。 这将使用Docker Machine,Swarm和Compose实现。
是的,所有这三个工具一起使此博客更加有趣! 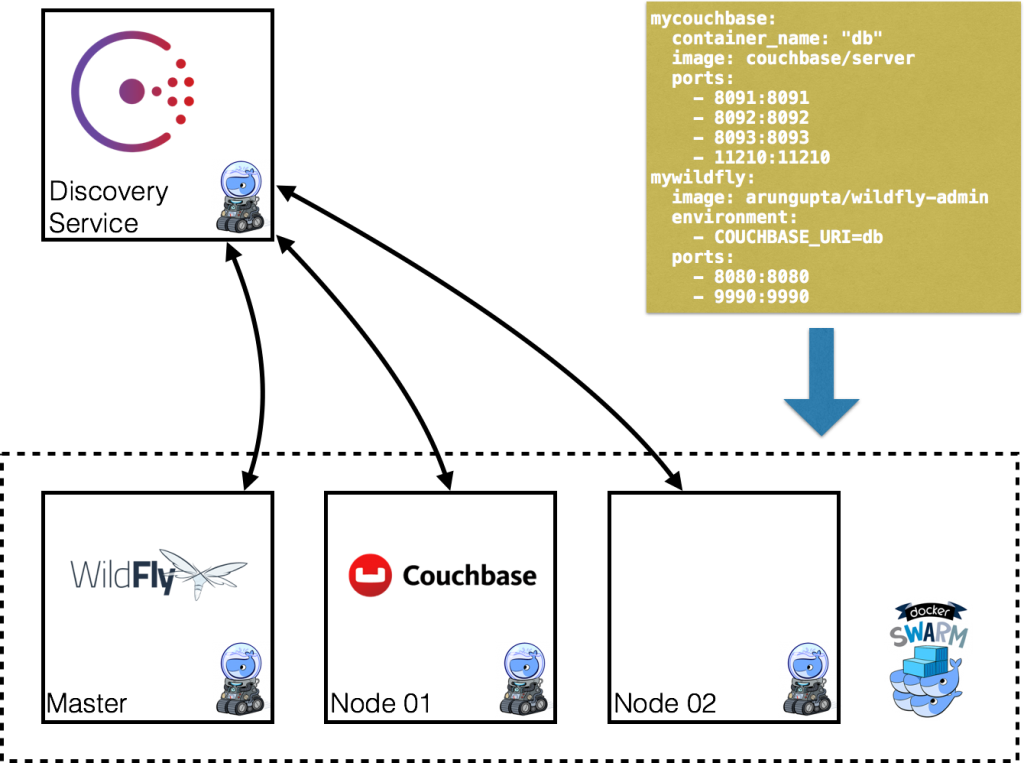
该图说明了关键组件:
- Docker Machine用于配置多个Docker主机
- Docker Swarm将用于创建多主机集群
- 使用Consul注册/发现Docker Swarm集群中的每个节点
- 多容器应用程序将使用Docker Compose进行部署
- WildFly和Couchbase在不同的主机上配置
- Docker多主机网络用于WildFly和Couchbase进行通信
此外,Maven用于配置Couchbase并将应用程序部署到WildFly。
- Docker上针对Java开发人员的最新说明。
没有故事,只有纯代码,就去做吧!
使用Docker Machine创建发现服务
- 创建将托管发现服务的计算机:
docker-machine create -d=virtualbox consul-machine Running pre-create checks... Creating machine... Waiting for machine to be running, this may take a few minutes... Machine is running, waiting for SSH to be available... Detecting operating system of created instance... Provisioning created instance... Copying certs to the local machine directory... Copying certs to the remote machine... Setting Docker configuration on the remote daemon... To see how to connect Docker to this machine, run: docker-machine env consul-machine - 连接到此机器:
eval $(docker-machine env consul-machine) - 使用以下Compose文件运行Consul服务:
myconsul: image: progrium/consul restart: always hostname: consul ports: - 8500:8500 command: "-server -bootstrap"可在https://github.com/arun-gupta/docker-images/blob/master/consul/docker-compose.yml上找到此Compose文件。
docker-compose up -d
Pulling myconsul (progrium/consul:latest)...
latest: Pulling from progrium/consul
3b4d28ce80e4: Pull complete
e5ab901dcf2d: Pull complete
30ad296c0ea0: Pull complete
3dba40dec256: Pull complete
f2ef4387b95e: Pull complete
53bc8dcc4791: Pull complete
75ed0b50ba1d: Pull complete
17c3a7ed5521: Pull complete
8aca9e0ecf68: Pull complete
4d1828359d36: Pull complete
46ed7df7f742: Pull complete
b5e8ce623ef8: Pull complete
049dca6ef253: Pull complete
bdb608bc4555: Pull complete
8b3d489cfb73: Pull complete
c74500bbce24: Pull complete
9f3e605442f6: Pull complete
d9125e9e799b: Pull complete
Digest: sha256:8cc8023462905929df9a79ff67ee435a36848ce7a10f18d6d0faba9306b97274
Status: Downloaded newer image for progrium/consul:latest
Creating consul_myconsul_1
启动的容器可以验证为:
docker ps
CONTAINER ID        IMAGE               COMMAND                  CREATED             STATUS              PORTS                                                                            NAMES
f05d8dd11e7f        progrium/consul     "/bin/start -server -"   30 seconds ago      Up 29 seconds       53/tcp, 53/udp, 8300-8302/tcp, 8400/tcp, 0.0.0.0:8500->8500/tcp, 8301-8302/udp   consul_myconsul_1
使用Docker Machine创建Docker Swarm集群
Swarm与Machine完全集成在一起,因此是最简单的入门方法。
- 创建一个Swarm Master并指向Consul发现服务:
docker-machine create -d virtualbox --virtualbox-disk-size "5000" --swarm --swarm-master --swarm-discovery="consul://$(docker-machine ip consul-machine):8500" --engine-opt="cluster-store=consul://$(docker-machine ip consul-machine):8500" --engine-opt="cluster-advertise=eth1:2376" swarm-master
Running pre-create checks...
Creating machine...
Waiting for machine to be running, this may take a few minutes...
Machine is running, waiting for SSH to be available...
Detecting operating system of created instance...
Provisioning created instance...
Copying certs to the local machine directory...
Copying certs to the remote machine...
Setting Docker configuration on the remote daemon...
Configuring swarm...
To see how to connect Docker to this machine, run: docker-machine env swarm-master
很少有选择看这里:
-
--swarm使用Swarm配置机器 -
--swarm-master将创建的Machine配置为Swarm master -
--swarm-discovery定义发现服务的地址 -
--cluster-advertise在网络上播发计算机 -
--cluster-store指定集群的分布式k / v存储后端 -
--virtualbox-disk-size将创建的计算机的磁盘--virtualbox-disk-size设置为5GB。 这是必需的,以便可以在任何节点上下载WildFly和Couchbase映像。
-
- 查找有关此机器的一些信息:
docker-machine inspect --format='{{json .Driver}}'  swarm-master
{"Boot2DockerImportVM":"","Boot2DockerURL":"","CPU":1,"DiskSize":5000,"HostOnlyCIDR":"192.168.99.1/24","HostOnlyNicType":"82540EM","HostOnlyPromiscMode":"deny","IPAddress":"192.168.99.102","MachineName":"swarm-master","Memory":1024,"NoShare":false,"SSHPort":51972,"SSHUser":"docker","StorePath":"/Users/arungupta/.docker/machine","SwarmDiscovery":"consul://192.168.99.100:8500","SwarmHost":"tcp://0.0.0.0:3376","SwarmMaster":true,"VBoxManager":{}}
请注意,磁盘大小为5GB。
- 使用以下命令连接到主服务器:
eval "$(docker-machine env --swarm swarm-master)" - 查找有关集群的一些信息:
docker info Containers: 2 Images: 1 Role: primary Strategy: spread Filters: health, port, dependency, affinity, constraint Nodes: 1 swarm-master: 192.168.99.102:2376 └ Containers: 2 └ Reserved CPUs: 0 / 1 └ Reserved Memory: 0 B / 1.021 GiB └ Labels: executiondriver=native-0.2, kernelversion=4.1.13-boot2docker, operatingsystem=Boot2Docker 1.9.1 (TCL 6.4.1); master : cef800b - Fri Nov 20 19:33:59 UTC 2015, provider=virtualbox, storagedriver=aufs CPUs: 1 Total Memory: 1.021 GiB Name: d074fd97682e - 创建一个新计算机以加入该集群:
docker-machine create -d virtualbox --virtualbox-disk-size "5000" --swarm --swarm-discovery="consul://$(docker-machine ip consul-machine):8500" --engine-opt="cluster-store=consul://$(docker-machine ip consul-machine):8500" --engine-opt="cluster-advertise=eth1:2376" swarm-node-01
Running pre-create checks...
Creating machine...
Waiting for machine to be running, this may take a few minutes...
Machine is running, waiting for SSH to be available...
Detecting operating system of created instance...
Provisioning created instance...
Copying certs to the local machine directory...
Copying certs to the remote machine...
Setting Docker configuration on the remote daemon...
Configuring swarm...
To see how to connect Docker to this machine, run: docker-machine env swarm-node-01
请注意,此命令中未指定
--swarm-master。 这样可以确保创建的计算机是工作程序节点。 - 创建第二个Swarm节点以加入该集群:
docker-machine create -d virtualbox --virtualbox-disk-size "5000" --swarm --swarm-discovery="consul://$(docker-machine ip consul-machine):8500" --engine-opt="cluster-store=consul://$(docker-machine ip consul-machine):8500" --engine-opt="cluster-advertise=eth1:2376" swarm-node-02 Running pre-create checks... Creating machine... Waiting for machine to be running, this may take a few minutes... Machine is running, waiting for SSH to be available... Detecting operating system of created instance... Provisioning created instance... Copying certs to the local machine directory... Copying certs to the remote machine... Setting Docker configuration on the remote daemon... Configuring swarm... To see how to connect Docker to this machine, run: docker-machine env swarm-node-02 - 列出所有创建的计算机:
docker-machine ls
NAME             ACTIVE   DRIVER       STATE     URL                         SWARM
consul-machine   -        virtualbox   Running   tcp://192.168.99.100:2376
swarm-master     *        virtualbox   Running   tcp://192.168.99.101:2376   swarm-master (master)
swarm-node-01    -        virtualbox   Running   tcp://192.168.99.102:2376   swarm-master
swarm-node-02    -        virtualbox   Running   tcp://192.168.99.103:2376   swarm-master
属于群集的计算机在“群集”列中具有群集的名称,否则为空白。 例如,
consul-machine是一台独立的机器,其他所有机器都是swarm-master集群的一部分。 Swarm主机也由SWARM列中的(主机)标识。 - 连接到Swarm集群并找到有关它的一些信息:
eval "$(docker-machine env --swarm swarm-master)"
docker info
注意,指定
--swarm连接到Swarm集群。 否则,该命令将仅连接到swarm-master计算机。输出显示为:
docker info
Containers: 4
Images: 3
Role: primary
Strategy: spread
Filters: health, port, dependency, affinity, constraint
Nodes: 3
 swarm-master: 192.168.99.102:2376
  └ Containers: 2
  └ Reserved CPUs: 0 / 1
  └ Reserved Memory: 0 B / 1.021 GiB
  └ Labels: executiondriver=native-0.2, kernelversion=4.1.13-boot2docker, operatingsystem=Boot2Docker 1.9.1 (TCL 6.4.1); master : cef800b - Fri Nov 20 19:33:59 UTC 2015, provider=virtualbox, storagedriver=aufs
 swarm-node-01: 192.168.99.103:2376
  └ Containers: 1
  └ Reserved CPUs: 0 / 1
  └ Reserved Memory: 0 B / 1.021 GiB
  └ Labels: executiondriver=native-0.2, kernelversion=4.1.13-boot2docker, operatingsystem=Boot2Docker 1.9.1 (TCL 6.4.1); master : cef800b - Fri Nov 20 19:33:59 UTC 2015, provider=virtualbox, storagedriver=aufs
 swarm-node-02: 192.168.99.104:2376
  └ Containers: 1
  └ Reserved CPUs: 0 / 1
  └ Reserved Memory: 0 B / 1.021 GiB
  └ Labels: executiondriver=native-0.2, kernelversion=4.1.13-boot2docker, operatingsystem=Boot2Docker 1.9.1 (TCL 6.4.1); master : cef800b - Fri Nov 20 19:33:59 UTC 2015, provider=virtualbox, storagedriver=aufs
CPUs: 3
Total Memory: 3.064 GiB
Name: d074fd97682e
有3个节点-一个Swarm主节点和2个Swarm 工作节点。 此群集中总共有4个容器在运行–主节点和每个节点上有一个Swarm代理,主节点上还有一个额外的swarm-agent-master。 可以通过连接到主数据库并列出所有容器来验证这一点。
- 使用以下命令列出集群中的节点:
docker run swarm list consul://$(docker-machine ip consul-machine):8500
192.168.99.102:2376
192.168.99.103:2376
192.168.99.104:2376
使用Docker Compose启动应用程序环境
通过提供命令eval "$(docker-machine env --swarm swarm-master)"确保连接到集群。
- 列出到目前为止Docker创建的所有网络:
docker network ls
NETWORK ID          NAME                   DRIVER
33a619ddc5d2        swarm-node-02/bridge   bridge
e0b73c96ffec        swarm-node-02/none     null
b315e67f0363        swarm-node-02/host     host
879d6167be47        swarm-master/bridge    bridge
f771ddc7d957        swarm-node-01/none     null
e042754df336        swarm-node-01/host     host
d2f3b512f9dc        swarm-node-01/bridge   bridge
5b5bcf135d7b        swarm-master/none      null
fffc34eae907        swarm-master/host      host
Docker为每个主机自动创建三个网络:
网络名字 目的 bridge容器连接的默认网络。 在所有Docker安装中,这是 docker0网络。none特定于容器的网络堆栈 host在主机网络堆栈上添加一个容器。 网络配置与主机相同。
这说明了九个网络,每个节点三个,如该Swarm集群所示。 - 使用Compose文件启动WildFly和Couchbase:
mycouchbase:
  container_name: "db"
  image: couchbase/server
  ports:
    - 8091:8091
    - 8092:8092
    - 8093:8093
    - 11210:11210
mywildfly:
  image: arungupta/wildfly-admin
  environment:
    - COUCHBASE_URI=db
  ports:
    - 8080:8080
    - 9990:9990
在此撰写文件中:
- Couchbase服务具有由
container_name定义的自定义容器名称。 在WildFly启动期间创建新的环境变量COUCHBASE_URI时使用此名称。 -
arungupta/wildfly-admin映像是因为它将WildFly的管理绑定到所有网络接口,此外还公开了端口9990。这使WildFly Maven插件可用于部署应用程序。此文件的源位于https://github.com/github .com / arun-gupta / docker-images / blob / master / wildfly-couchbase-javaee7 / docker-compose.yml 。
此应用程序环境可以通过以下方式启动:
docker-compose --x-networking up -d Creating network "wildflycouchbasejavaee7" with driver "None" Pulling mywildfly (arungupta/wildfly-admin:latest)... swarm-node-02: Pulling arungupta/wildfly-admin:latest... : downloaded swarm-master: Pulling arungupta/wildfly-admin:latest... : downloaded swarm-node-01: Pulling arungupta/wildfly-admin:latest... : downloaded Creating wildflycouchbasejavaee7_mywildfly_1 Pulling mycouchbase (couchbase/server:latest)... swarm-node-02: Pulling couchbase/server:latest... : downloaded swarm-master: Pulling couchbase/server:latest... : downloaded swarm-node-01: Pulling couchbase/server:latest... : downloaded Creating db--x-networking为Swarm集群创建一个覆盖网络。 可以通过再次列出网络来验证:docker network ls NETWORK ID NAME DRIVER 5e93fc34b4d9 swarm-node-01/docker_gwbridge bridge 1c041242f51d wildflycouchbasejavaee7 overlay cc8697c6ce13 swarm-master/docker_gwbridge bridge f771ddc7d957 swarm-node-01/none null 879d6167be47 swarm-master/bridge bridge 5b5bcf135d7b swarm-master/none null fffc34eae907 swarm-master/host host e042754df336 swarm-node-01/host host d2f3b512f9dc swarm-node-01/bridge bridge 33a619ddc5d2 swarm-node-02/bridge bridge e0b73c96ffec swarm-node-02/none null b315e67f0363 swarm-node-02/host host创建了三个新的网络:
- 连接到多主机网络的容器会自动连接到
docker_gwbridge网络。 该网络允许容器在其群集之外具有外部连接,并在每个工作节点上创建。 - 创建了一个新的覆盖网络
wildflycouchbasejavaee7。 连接到不同的Swarm节点并检查其上是否存在覆盖网络。让我们以master开头:eval "$(docker-machine env swarm-master)" docker network ls NETWORK ID NAME DRIVER 1c041242f51d wildflycouchbasejavaee7 overlay 879d6167be47 bridge bridge 5b5bcf135d7b none null fffc34eae907 host host cc8697c6ce13 docker_gwbridge bridge接下来,使用
swarm-node-01:eval "$(docker-machine env swarm-node-01)" docker network ls NETWORK ID NAME DRIVER 1c041242f51d wildflycouchbasejavaee7 overlay d2f3b512f9dc bridge bridge f771ddc7d957 none null e042754df336 host host 5e93fc34b4d9 docker_gwbridge bridge最后,使用
swarm-node-02:eval "$(docker-machine env swarm-node-02)" docker network ls NETWORK ID NAME DRIVER 1c041242f51d wildflycouchbasejavaee7 overlay e0b73c96ffec none null b315e67f0363 host host 33a619ddc5d2 bridge bridge如图所示,
wildflycouchbasejavaee7覆盖网络存在于所有计算机上。 这确认为Swarm群集创建的覆盖网络已添加到群集中的每个主机。docker_gwbridge仅在运行应用程序容器的机器上存在。阅读有关Docker Networks的更多信息。
- Couchbase服务具有由
- 验证WildFly和Couchbase是否正在运行:
docker ps
CONTAINER ID        IMAGE                     COMMAND                  CREATED             STATUS              PORTS                                                                                                             NAMES
23a581295a2b        couchbase/server          "/entrypoint.sh couch"   9 seconds ago       Up 8 seconds        192.168.99.102:8091-8093->8091-8093/tcp, 11207/tcp, 11211/tcp, 192.168.99.102:11210->11210/tcp, 18091-18092/tcp   swarm-master/db
7a8a885b23f3        arungupta/wildfly-admin   "/opt/jboss/wildfly/b"   9 seconds ago       Up 8 seconds        192.168.99.103:8080->8080/tcp, 192.168.99.103:9990->9990/tcp                                                      swarm-node-01/wildflycouchbasejavaee7_mywildfly_1
配置应用程序和数据库
- 克隆https://github.com/arun-gupta/couchbase-javaee.git 该工作空间包含一个简单的Java EE应用程序,该应用程序部署在WildFly上,并通过Couchbase中的
travel-sample存储桶提供REST API。 - 可以使用REST API配置Couchbase服务器。 该应用程序包含一个Maven配置文件,该配置文件允许使用
travel-sample存储桶配置Couchbase服务器。 可以通过以下方式调用:mvn install -Pcouchbase -Ddocker.host=$(docker-machine ip swarm-master) . . . * Server auth using Basic with user 'Administrator' > POST /sampleBuckets/install HTTP/1.1 > Authorization: Basic QWRtaW5pc3RyYXRvcjpwYXNzd29yZA== . . . } [data not shown] * upload completely sent off: 17 out of 17 bytes < HTTP/1.1 202 Accepted * Server Couchbase Server is not blacklisted < Server: Couchbase Server . . . - 通过指定三个参数将应用程序部署到WildFly:
- 运行WildFly的主机IP地址
- WildFly管理领域中用户的用户名
- WildFly管理领域中指定的用户密码
mvn install -Pwildfly -Dwildfly.hostname=$(docker-machine ip swarm-node-01) -Dwildfly.username=admin -Dwildfly.password=Admin#007

. . .

Nov 29, 2015 12:11:14 AM org.xnio.Xnio <clinit>
INFO: XNIO version 3.3.1.Final
Nov 29, 2015 12:11:14 AM org.xnio.nio.NioXnio <clinit>
INFO: XNIO NIO Implementation Version 3.3.1.Final
Nov 29, 2015 12:11:15 AM org.jboss.remoting3.EndpointImpl <clinit>
INFO: JBoss Remoting version 4.0.9.Final
[INFO] Authenticating against security realm: ManagementRealm
[INFO] ------------------------------------------------------------------------
[INFO] BUILD SUCCESS
[INFO] ------------------------------------------------------------------------

. . .
访问应用
既然WildFly和Couchbase服务器已经启动,就可以访问该应用程序。 您需要指定运行WildFly的计算机的IP地址:
curl http://$(docker-machine ip swarm-node-01):8080/couchbase-javaee/resources/airline
[{"travel-sample":{"id":10123,"iata":"TQ","icao":"TXW","name":"Texas Wings","callsign":"TXW","type":"airline","country":"United States"}}, {"travel-sample":{"id":10642,"iata":null,"icao":"JRB","name":"Jc royal.britannica","callsign":null,"type":"airline","country":"United Kingdom"}}, {"travel-sample":{"id":112,"iata":"5W","icao":"AEU","name":"Astraeus","callsign":"FLYSTAR","type":"airline","country":"United Kingdom"}}, {"travel-sample":{"id":1355,"iata":"BA","icao":"BAW","name":"British Airways","callsign":"SPEEDBIRD","type":"airline","country":"United Kingdom"}}, {"travel-sample":{"id":10765,"iata":"K5","icao":"SQH","name":"SeaPort Airlines","callsign":"SASQUATCH","type":"airline","country":"United States"}}, {"travel-sample":{"id":13633,"iata":"WQ","icao":"PQW","name":"PanAm World Airways","callsign":null,"type":"airline","country":"United States"}}, {"travel-sample":{"id":139,"iata":"SB","icao":"ACI","name":"Air Caledonie International","callsign":"AIRCALIN","type":"airline","country":"France"}}, {"travel-sample":{"id":13391,"iata":"-+","icao":"--+","name":"U.S. Air","callsign":null,"type":"airline","country":"United States"}}, {"travel-sample":{"id":1191,"iata":"UU","icao":"REU","name":"Air Austral","callsign":"REUNION","type":"airline","country":"France"}}, {"travel-sample":{"id":1316,"iata":"FL","icao":"TRS","name":"AirTran Airways","callsign":"CITRUS","type":"airline","country":"United States"}}]- github.com/arun-gupta/couchbase-javaee中记录了此应用程序的完整REST API 集合 。
Docker上针对Java开发人员的最新说明。
请享用!


 4589
4589

 被折叠的 条评论
为什么被折叠?
被折叠的 条评论
为什么被折叠?
 到【灌水乐园】发言


