


python捕获摄像头帧
到目前为止,在我们的Xuggler教程系列中,我们已经对视频处理的Xuggler进行了介绍,并讨论了转码和媒体修改 。 在本教程中,我们将看到如何解码视频和捕获帧,以及如何从头开始创建视频。
让我们开始解码视频流并以预定义的时间间隔捕获一些帧。 例如,可以使用它来制作媒体文件的缩略图 。 为此,我们将再次使用MediaTool API ,这是用于解码,编码和修改视频的高级API。
概念是打开媒体文件,循环播放特定的视频流,并以特定的间隔捕获相应的帧,将其转换为图像,然后将二进制内容转储到文件中。 这是所有这些代码的样子:
package com.javacodegeeks.xuggler;

import java.awt.image.BufferedImage;
import java.io.File;
import java.io.IOException;

import javax.imageio.ImageIO;

import com.xuggle.mediatool.IMediaReader;
import com.xuggle.mediatool.MediaListenerAdapter;
import com.xuggle.mediatool.ToolFactory;
import com.xuggle.mediatool.event.IVideoPictureEvent;
import com.xuggle.xuggler.Global;

public class VideoThumbnailsExample {

    public static final double SECONDS_BETWEEN_FRAMES = 10;

    private static final String inputFilename = "c:/Java_is_Everywhere.mp4";
    private static final String outputFilePrefix = "c:/snapshots/mysnapshot";

    // The video stream index, used to ensure we display frames from one and
    // only one video stream from the media container.
    private static int mVideoStreamIndex = -1;

    // Time of last frame write
    private static long mLastPtsWrite = Global.NO_PTS;

    public static final long MICRO_SECONDS_BETWEEN_FRAMES =
        (long)(Global.DEFAULT_PTS_PER_SECOND * SECONDS_BETWEEN_FRAMES);

    public static void main(String[] args) {

        IMediaReader mediaReader = ToolFactory.makeReader(inputFilename);

        // stipulate that we want BufferedImages created in BGR 24bit color space
        mediaReader.setBufferedImageTypeToGenerate(BufferedImage.TYPE_3BYTE_BGR);

        mediaReader.addListener(new ImageSnapListener());

        // read out the contents of the media file and
        // dispatch events to the attached listener
        while (mediaReader.readPacket() == null) ;

    }

    private static class ImageSnapListener extends MediaListenerAdapter {

        public void onVideoPicture(IVideoPictureEvent event) {

            if (event.getStreamIndex() != mVideoStreamIndex) {
                // if the selected video stream id is not yet set, go ahead an
                // select this lucky video stream
                if (mVideoStreamIndex == -1)
                    mVideoStreamIndex = event.getStreamIndex();
                // no need to show frames from this video stream
                else
                    return;
            }

            // if uninitialized, back date mLastPtsWrite to get the very first frame
            if (mLastPtsWrite == Global.NO_PTS)
                mLastPtsWrite = event.getTimeStamp() - MICRO_SECONDS_BETWEEN_FRAMES;

            // if it's time to write the next frame
            if (event.getTimeStamp() - mLastPtsWrite >=
                    MICRO_SECONDS_BETWEEN_FRAMES) {

                String outputFilename = dumpImageToFile(event.getImage());

                // indicate file written
                double seconds = ((double) event.getTimeStamp()) /
                    Global.DEFAULT_PTS_PER_SECOND;
                System.out.printf(
                        "at elapsed time of %6.3f seconds wrote: %s\n",
                        seconds, outputFilename);

                // update last write time
                mLastPtsWrite += MICRO_SECONDS_BETWEEN_FRAMES;
            }

        }

        private String dumpImageToFile(BufferedImage image) {
            try {
                String outputFilename = outputFilePrefix +
                     System.currentTimeMillis() + ".png";
                ImageIO.write(image, "png", new File(outputFilename));
                return outputFilename;
            }
            catch (IOException e) {
                e.printStackTrace();
                return null;
            }
        }

    }

}
这看起来似乎有些不知所措,但确实非常简单。 让我为您提供一些详细信息。 我们首先从输入文件创建IMediaReader 。 媒体读取器用于读取和解码媒体。 由于我们希望将捕获的视频帧作为图像进行处理,因此我们使用setBufferedImageTypeToGenerate方法来表示这一点。 阅读器打开媒体容器,从中读取数据包,解码数据,然后将有关数据的信息分发到任何已注册的IMediaListener对象。 这是我们的自定义类ImageSnapListener起作用的地方。
我们的侦听器扩展了MediaListenerAdapter ,它是实现IMediaListener接口的适配器(提供空方法)。 通知实现此接口的对象有关视频处理期间生成的事件的信息。 我们只关心处理视频事件,因此我们仅实现IMediaListener.onVideoPicture方法。 在其中,我们使用提供的IVideoPictureEvent对象查找正在处理的流(仅视频)。
由于我们希望在特定时间捕获帧,因此我们不得不在时间戳上加点混乱。 首先,我们通过检查Global.NO_PTS常数的值来确保处理第一帧,该值意味着没有为给定对象设置时间戳。 然后,如果经过了最短的时间,我们通过调用IVideoPictureEvent.getImage方法来捕获帧,该方法返回基础BufferedImage 。 请注意,我们所说的是经过的视频时间,而不是“实时”。 然后,使用ImageIO.write实用程序方法将图像数据转储为PNG格式的文件。 最后,我们更新最后的写入时间。
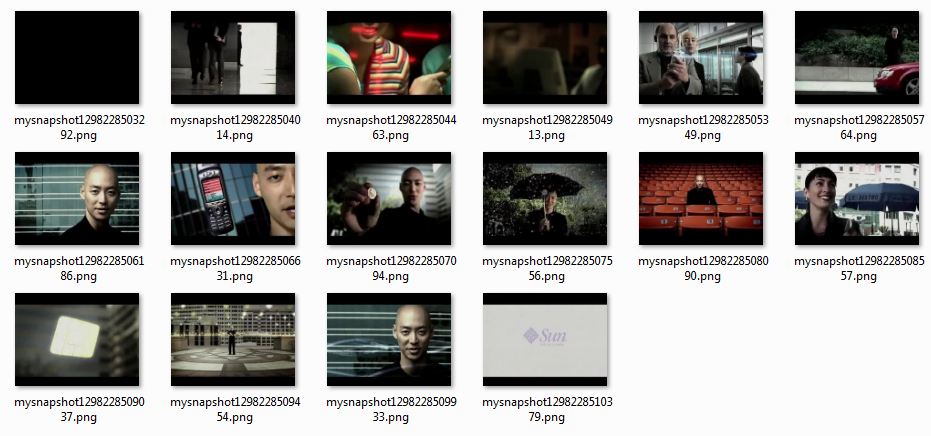
让我们运行此应用程序以查看结果。 作为输入文件,我使用的是一个古老的Sun商业广告,它宣称“ Java无处不在 ”。 我已经在本地下载了提供的MP4版本。 输出控制台如下所示:
在经过0.000秒时写道:c:/snapshots/mysnapshot1298228503292.png
在10.010秒的经过时间写道:c:/snapshots/mysnapshot1298228504014.png
在20.020秒的经过时间写道:c:/snapshots/mysnapshot1298228504463.png
…
在经过时间130.063秒时写道:c:/snapshots/mysnapshot1298228509454.png
在经过140.007秒时写道:c:/snapshots/mysnapshot1298228509933.png
在经过150.017秒的时间时写道:c:/snapshots/mysnapshot1298228510379.png
视频总时间约为151秒,因此我们捕获了16帧。 这是我的文件夹中捕获的图像的样子:
好的,就是用来制作视频缩略图的。 现在让我们看看如何从头开始创建视频。 作为输入,我们将使用桌面上的顺序快照 。 这可以用于基本的屏幕记录应用程序。
为了创建视频,与到目前为止所见的MediaTool API相比,我们将不得不采取一些更底层的方法。 不过请不要担心,它不会很复杂。 主要思想是,我们创建一个媒体编写器,向其中添加一些流信息,对我们的媒体(屏幕截图图像)进行编码,然后关闭该编写器。 让我们看看用于实现此目的的代码:
package com.javacodegeeks.xuggler;

import java.awt.AWTException;
import java.awt.Dimension;
import java.awt.Rectangle;
import java.awt.Robot;
import java.awt.Toolkit;
import java.awt.image.BufferedImage;
import java.util.concurrent.TimeUnit;

import com.xuggle.mediatool.IMediaWriter;
import com.xuggle.mediatool.ToolFactory;
import com.xuggle.xuggler.ICodec;

public class ScreenRecordingExample {

    private static final double FRAME_RATE = 50;

    private static final int SECONDS_TO_RUN_FOR = 20;

    private static final String outputFilename = "c:/mydesktop.mp4";

    private static Dimension screenBounds;

    public static void main(String[] args) {

        // let's make a IMediaWriter to write the file.
        final IMediaWriter writer = ToolFactory.makeWriter(outputFilename);

        screenBounds = Toolkit.getDefaultToolkit().getScreenSize();

        // We tell it we're going to add one video stream, with id 0,
        // at position 0, and that it will have a fixed frame rate of FRAME_RATE.
        writer.addVideoStream(0, 0, ICodec.ID.CODEC_ID_MPEG4,
                   screenBounds.width/2, screenBounds.height/2);

        long startTime = System.nanoTime();

        for (int index = 0; index < SECONDS_TO_RUN_FOR * FRAME_RATE; index++) {

            // take the screen shot
            BufferedImage screen = getDesktopScreenshot();

            // convert to the right image type
            BufferedImage bgrScreen = convertToType(screen,
                   BufferedImage.TYPE_3BYTE_BGR);

            // encode the image to stream #0
            writer.encodeVideo(0, bgrScreen, System.nanoTime() - startTime,
                   TimeUnit.NANOSECONDS);

            // sleep for frame rate milliseconds
            try {
                Thread.sleep((long) (1000 / FRAME_RATE));
            }
            catch (InterruptedException e) {
                // ignore
            }

        }

        // tell the writer to close and write the trailer if  needed
        writer.close();

    }

    public static BufferedImage convertToType(BufferedImage sourceImage, int targetType) {

        BufferedImage image;

        // if the source image is already the target type, return the source image
        if (sourceImage.getType() == targetType) {
            image = sourceImage;
        }
        // otherwise create a new image of the target type and draw the new image
        else {
            image = new BufferedImage(sourceImage.getWidth(),
                 sourceImage.getHeight(), targetType);
            image.getGraphics().drawImage(sourceImage, 0, 0, null);
        }

        return image;

    }

    private static BufferedImage getDesktopScreenshot() {
        try {
            Robot robot = new Robot();
            Rectangle captureSize = new Rectangle(screenBounds);
            return robot.createScreenCapture(captureSize);
        }
        catch (AWTException e) {
            e.printStackTrace();
            return null;
        }

    }

}我们首先从给定的输出文件创建一个IMediaWriter 。 此类对媒体进行编码和解码,同时处理音频和视频流。 Xuggler猜测文件扩展名(在我们的情况下为MP4)的输出格式,并适当设置一些默认值。 然后,我们使用addVideoStream方法添加新的视频流,并提供其索引,使用的编解码器类型 (此处为MPEG-4 )和视频尺寸。 在此示例中,尺寸设置为等于屏幕尺寸的一半。
然后,我们执行一个循环,循环的次数等于所需的帧速率乘以所需的运行时间。 在循环内部,我们按照Java2D:带有Java屏幕快照的文章中的描述生成屏幕快照。 我们将屏幕快照作为BufferedImage检索,并将其转换为适当的类型( TYPE_3BYTE_BGR )(如果尚不存在)。
接下来,我们使用IMediaWriter.encodeVideo方法将图像编码为视频流。 我们提供流索引,图像,经过的视频时间和时间单位。 然后,我们根据所需的帧速率睡眠适当的时间。 循环结束后,根据视频格式,我们关闭编写器并编写预告片(这由Xuggler自动完成)。
如果我们执行该应用程序,则会创建一个视频,其中记录了您的桌面操作。 这是浏览JavaCodeGeeks网站时的静止图像:

伙计们,这是Xuggler的另一篇教程,描述了如何从输入文件中捕获视频帧以及如何使用桌面快照生成视频。 与往常一样,您可以下载为本教程创建的Eclipse项目 。 请继续关注JavaCodeGeeks上的更多Xuggler教程! 别忘了分享!
相关文章:
翻译自: https://www.javacodegeeks.com/2011/02/xuggler-tutorial-frames-capture-video.html
python捕获摄像头帧


 被折叠的 条评论
为什么被折叠?
被折叠的 条评论
为什么被折叠?
 到【灌水乐园】发言


