


Magento拥有十分强大的后台管理系统。作为一名开发人员,这套后台管理系统可以让你的用户简单直接的配置Magento系统或者你创建的模块。和Magento的其他功能一样,你第一次使用这套管理系统的时候可能觉得麻烦,但是一旦你上手了,你会发现它强大的功能是那么吸引人。那么让我们开始吧。我们这一章的例子依然是基于Helloworld模块。
7.1 添加系统配置文件
首先我们要为模块添加一个系统配置文件。这个文件和“config.xml”是不搭界的:
app/code/local/Infinity/Helloworld/etc/system.xml和全局配置(global config)相似,系统配置也是单独存储的。我们可以通过下面这段代码来获取系统配置文件:
//header('Content-Type: text/xml');
    header('Content-Type: text/plain');
    echo $config = Mage::getConfig()
    ->loadModulesConfiguration('system.xml')
    ->getNode()
    ->asXML();
    exit;
你可以把这段代码放到任何执行函数(Action Method)中。“loadModulesConfiguration”方法会搜索所有配置好的模块的“etc”文件夹,寻找以传入的参数为名字的文件,在这个例子中是“system.xml”。Magento有很多不同的配置文件,比如api.xml, wsdl.xml, wsdl2.xml, convert.xml, compilation.xml, install.xml。你可以为你创建的模块创建这些配置文件。
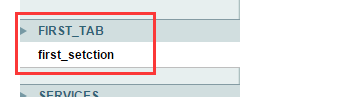
7.2 添加一个标签页
我们首先在后台系统管理页面添加一个标签页(Tab)。标签页就是后台“System->Configuration”页面左侧的导航栏。默认的标签页有General,Catalog,Customers,Sales,Services等等。我们来创建一个新的标签页叫做“Hello Config”。创建如下文件:
Location: app/code/local/Infinity/Helloworld/etc/system.xml
    <config>
        <tabs>
            <helloconfig translate="label" module="helloworld">
                <label>Hello Config</label>
                <sort_order>99999</sort_order>
            </helloconfig>
        </tabs>
    </config>
我们来解释一下各个节点(Tag)的意思,“< tabs>”就是我们要添加的标签页的定义节点,“helloconfig”是节点的ID。你可以任意命名这个ID,但是必须全局唯一,也就是不能和别人用同样的ID。这个ID是用来唯一标示你的标签页的。“module=helloworld”,意思是这个标签页属于哪个模块。“< label>”节点的内容是标签的名字,也就是要显示在界面上的名字。“< sort_order>”指明了这个标签页显示的位置。
打开后台“System->Configuration”,你会看到如下错误:
Fatal error: Class 'Mage_Helloworld_Helper_Data' not found in….7.3 Magento Helper简介
正如许多其他的PHP MVC系统一样,Magento也有帮助类(Helper Classes)。这些类用来提供一些不适合放在模型,视图或者控制器中的功能。Magento的帮助类也是采用分组类名的机制。也就是说我们可以覆盖默认的帮助类,同时我们需要在config.xml中指定帮助类的基类名。
Magento系统默认模块有一个默认的帮助类。正如我们上面的异常显示,我们的Helloworld模块并没有指定一个默认的帮助类。下面让我们来添加一个。修改config.xml
File: app/code/local/Infinity/Helloworld/etc/config.xml
    < !– … –>
    <global>
        < !– … –>
        <helpers>
            <helloworld>
                <class>Infinity_Helloworld_Helper</class>
            </helloworld>
        </helpers>
        < !– … –>
    </global>
    < !– … –>
你现在应该对这类配置相当熟悉了。“< helloworld>”节点就是模块的名字,“< class>”就是帮助类的基类名,命名方式如下:
Packagename_Modulename_Helper
帮助类是通过全局对象Mage的静态方法“helper”来装载的。
Mage::helper(‘helloworld/foo’)
根据我们的配置,上面这行代码将会装载以下类:
**app/code/local/Infinity/Helper/Foo.php
class Infinity_Helloworld_Helper_Foo**
我们上面说过Magento默认每个模块有一个帮助类“data”:
Mage::helper('helloworld');
    Mage::helper('helloworld/data');
上面这两行代码是等价的,都会装载以下类:
app/code/local/Infinity/Helper/Data.php
    class Infinity_Helloworld_Helper_Data
下面我们来创建我们的帮助类:
File: app/code/local/Infinity/Helper/Data.php
    class Infinity_Helloworld_Helper_Data extends Mage_Core_Helper_Abstract
    {
    }
清空Magento缓存,重新装载页面,你会发现错误不见了,但是我们的标签页还是没有出来。如果你好奇帮助类究竟能干什么,建议你去看看“Mage_Core_Helper_Abstract”类。
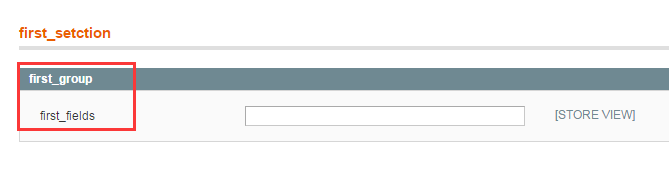
7.4 添加新的段
好了,帮助类的介绍到此结束。下面我们来看看为什么我们的标签页不显示出来。在Magento中,每一个标签页都包含很多段(section)。举个例子,“Advanced”标签页默认包含“Admin, System, Advanced, Developer”四个段。如果一个标签页不包含任何段,那么这个标签页不会被显示出来。下面我们在system.xml中添加“< sections>”节点:
Location: app/code/local/Infinity/Helloworld/etc/system.xml
    <config>
        <tabs>
            <helloconfig translate="label" module="helloworld">
                <label>Hello Config</label>
                <sort_order>99999</sort_order>
            </helloconfig>
        </tabs>
        <sections>
            <helloworld_options translate="label" module="helloworld">
                <label>Hello World Config Options</label>
                <tab>helloconfig</tab>
                <frontend_type>text</frontend_type>
                <sort_order>1000</sort_order>
                <show_in_default>1</show_in_default>
                <show_in_website>1</show_in_website>
                <show_in_store>1</show_in_store>
            </helloworld_options>
        </sections>
    </config>
这里有些节点你应该很熟悉,就不多解释了,来讲讲以前没见过的。
什么是< sections>?
和前面的相似,这个节点是用来唯一标示你的段,“helloworld_options”就是段的ID,可以随意取名,只要不重复就好。
什么是< frontend_type>?
这个节点有点怪。“< frontend_type>”在配置文件的其他部分有用(稍后会讲),放在这里其实没什么作用。但是核心模块在此处的配置文件都包含这个节点,所以我们也把它添加进去。
什么是< show_in_default />,< show_in_website />,?
这些节点的值是布尔类型的,0或者1。这些标签是用来控制在不同的环境下(Global、website、store view)时当前段是否应该显示。
好了,我们已经配置好段了,清空缓存,再一次刷新页面,你应该看到“HELLO CONFIG”标签页显示出来了。
7.5 访问控制(ACL权限配置)
如果你刚才点了我们创建的标签页下面的“Hello World Config Options”,你大概会很失望。什么都没有显示出来,连左边的导航栏都没有了。这是因为“Adminhtml”在权限控制列表(Access Control List, ACL)中找不到我们创建的段的权限信息。【注:Adminhtml就是Magento的后台管理系统,属于Magento的一个核心模块】
ACL是一个很复杂的话题,但是我会介绍一些最基本的概念,以便于理解Magento的权限控制。这部分内容和上下文关系不大,如果你不感兴趣,可以直接跳到本节结尾,复制一段XML到你的config.xml就行了。
在Magento中,对于有些资源的访问时有限制的。用户必须先经过认证才能访问相关资源。在这里,资源(Resource)是一个广义的概念,它可能是指一个页面,也可能是一个功能。Magento的系统配置功能(System Config)就是需要认证才能访问的资源。
任何一个资源都是通过一个URI来标识。比如说“web”配置段(属于后台管理General标签页)的URI是:
admin/system/config/web我们“helloworld_options”段的URI是
admin/system/config/helloworld_options
当一个用户访问一个受保护的资源的时候,后台管理系统(Adminhtml)的执行控制器会执行以下步骤:
1)为用户正在访问的资源生成一个URI。
2)根据ACL系统检查该用户是否有权限访问指定的资源。
3)如果用户拥有访问权限,那么进行用户指定的操作。否则,跳转到相应的错误页面(也可能是停止操作或者显示空白页面)。
如果你去“System -> Permissions -> Roles”页面,点击“Add New Role”按钮,你会看到所有系统的资源都以树形结构显示在页面上。
添加ACL权限
刚才说ACL中没有我们配置段的信息,那么我们来创建一个。请注意,如果你是创建一个新的段,那么你需要创建一个新的权限,如果你在已有的段上添加内容,你不需要创建权限。
在config.xml中,添加以下内容:
File: app/code/local/Infinity/Helloworld/etc/config.xml
    <config>
        < !– … –>
        <adminhtml>
            <acl>
                <resources>
                    <admin>
                        <children>
                            <system>
                                <children>
                                    <config>
                                        <children>
                                            <helloworld_options>
                                                <title>Store Hello World Module Section</title>
                                            </helloworld_options>
                                        </children>
                                    </config>
                                </children>
                            </system>
                        </children>
                    </admin>
                </resources>
            </acl>
        </adminhtml>
        < !– … –>
    </config>
让我们来分析一下这段代码。所有的资源定义都包含在如下代码中:
<adminhtml>
        <acl>
            <resources>
            ……
            </resources>
    </acl>
    </adminhtml>

在节点下面,每一个子节点都是URI的一部分,比如:

<admin>
        <children>
            <system>
                <children>…</children>
            </system>
        </children>
</admin>

代表URI:

admin/system

最后一个节点:

<helloworld_options>
        <title>Store Hello World Module Section</title>
    </helloworld_options>
清空Magento缓存,刷新页面,你应该能看到我们创建的配置段了,标准的后台管理页面,但是主体内容是空的,只有一个“Save Config”按钮。你可能需要重新登录后台管理才能看到正确的页面。那是因为后台管理有一些额外的缓存。【注:我们添加了权限以后,管理员是默认拥有该权限的,所以我们用管理员登录后台管理系统就能访问我们创建的段】
7.6 添加组Groups
按照逻辑,这里应该讲的内容是添加选项。Mageto中,选项是按照组(Group)来划分的,所以我们在添加选项之前得先添加组。修改system.xml:
Location: app/code/local/Infinity/Helloworld/etc/system.xml
    <config>
        <tabs>
            <helloconfig translate="label" module="helloworld">
                <label>Hello Config</label>
                <sort_order>99999</sort_order>
            </helloconfig>
        </tabs>
        <sections>
            <helloworld_options translate="label" module="helloworld">
                <label>Hello World Config Options</label>
                <tab>helloconfig</tab>
                <frontend_type>text</frontend_type>
                <sort_order>1000</sort_order>
                <show_in_default>1</show_in_default>
                <show_in_website>1</show_in_website>
                <show_in_store>1</show_in_store>
                <groups>
                    <messages translate="label">
                        <label>Demo Of Config Fields</label>
                        <frontend_type>text</frontend_type>
                        <sort_order>1</sort_order>
                        <show_in_default>1</show_in_default>
                        <show_in_website>1</show_in_website>
                        <show_in_store>1</show_in_store>
                    </messages>
                </groups>
            </helloworld_options>
        </sections>
    </config>

这里也没什么好解释的。刷新一下页面看看你就什么都明白了。
7.7 添加配置选项
最后,我们要添加每一个单独的配置选项。配置选项是以节点的形式添加到节点下面的。
< !– … –>
    <messages translate="label">
        <label>Demo Of Config Fields</label>
        <frontend_type>text</frontend_type>
        <sort_order>1</sort_order>
        <show_in_default>1</show_in_default>
        <show_in_website>1</show_in_website>
        <show_in_store>1</show_in_store>
        <fields>
            <hello_message>
                <label>Message</label>
                <frontend_type>text</frontend_type>
                <sort_order>1</sort_order>
                <show_in_default>1</show_in_default>
                <show_in_website>1</show_in_website>
                <show_in_store>1</show_in_store>
            </hello_message>
        </fields>
    </messages>
    < !– … –>
这里有一个节点需要说明,“< frontend_type>”刚才说这个节点没什么用。但是这里有用了,这个节点说明了这个选项的数据类型。你可以把它换成别的类型,比如“time”。这里支持大部分默认的Varien定义的数据类型(lib/Varien/Data/Form/Element)。这个有点像是工厂(Factory)设计模式。让我们把类型改成“select”。你会看到一个下拉框,但是没有选项。我们来添加选项,首先我们要添加一个源模型(Source Model):
<frontend_type> 类型:
 button
 checkboxes
 checkbox
 date
 file
 hidden
 image
 label
 link
 multiline
 multiselect
 password
 radio
 radios
 select
 submit
 textarea
 text
time<hello_message>
<label>Message</label>
<frontend_type>select</frontend_type>
< !– adding a source model –>
<source_model>helloworld/words</source_model>
<sort_order>1</sort_order>
<show_in_default>1</show_in_default>
<show_in_website>1</show_in_website>
<show_in_store>1</show_in_store>
</hello_message>
“< source_model>”定义了源模型的URI。和我们以前创建的模型一样,源模型也是一个模型,为“select”提供了默认的数据。我想我不说你也明白,根据这里的URI定义,我们要创建以下文件:
source_model: Certain type of fields such as a select field can take options
from a source model. Magento already provides several useful classes under
Mage/Adminhtml/Model/System/Config/Source. Some of the classes we
can find are:
 YesNo
 Country
 Currency
 AllRegions
 Category
 Language
File: app/code/local/Infinity/Helloworld/Model/Words.php
class Infinity_Helloworld_Model_Words
{
public function toOptionArray()
{
return array(
array('value'=>1, 'label'=>Mage::helper('helloworld')->__('Hello')),
array('value'=>2, 'label'=>Mage::helper('helloworld')->__('Goodbye')),
array('value'=>3, 'label'=>Mage::helper('helloworld')->__('Yes')),
array('value'=>4, 'label'=>Mage::helper('helloworld')->__('No')),
);
}
}源模型提供了一个方法“toOptionsArray”,返回的数据时用来填充我们之前定义的配置选项的。这个方法在运行时会被“initFields”调用。“initFields”在以下类中定义:
app/code/core/Mage/Adminhtml/Block/System/Config/Form.php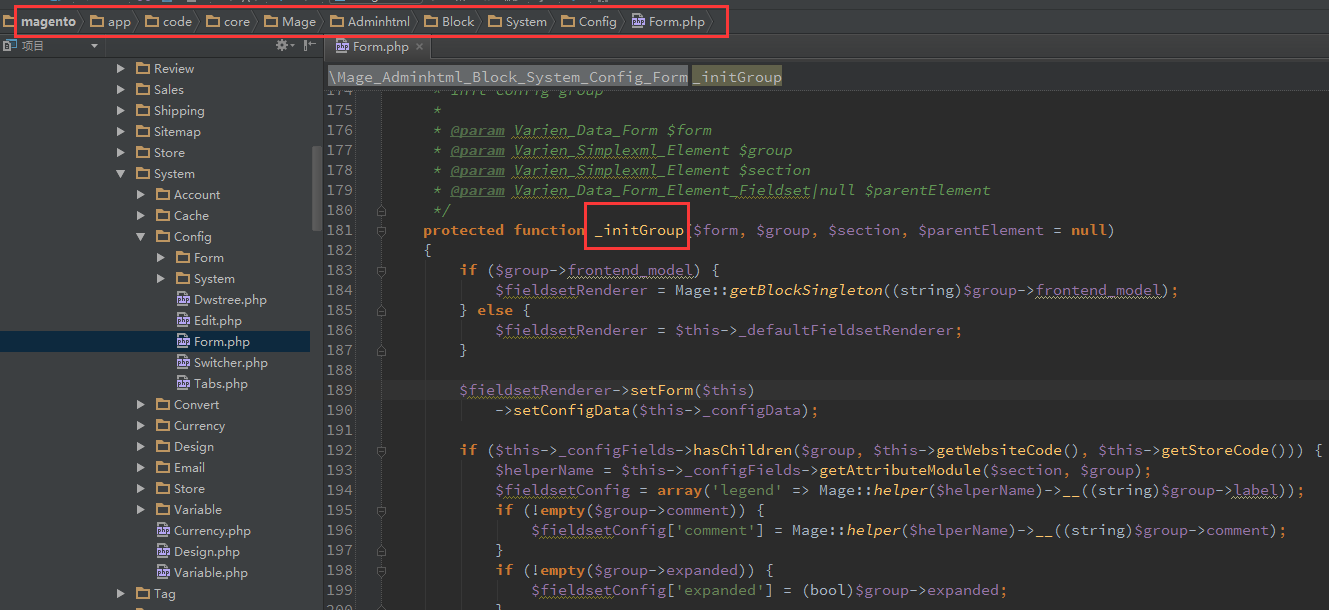
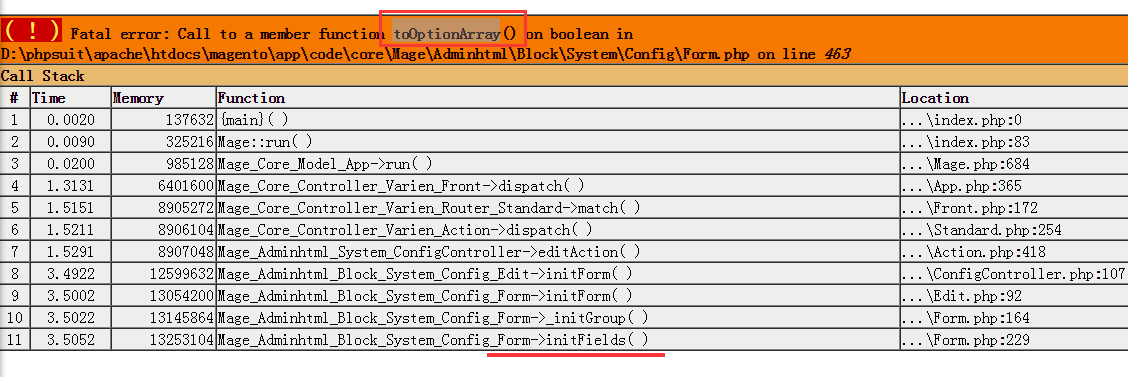
我们这里调用了帮助类的翻译函数(__)来获取数据。虽然不是必要的,但调用翻译函数总是一个好习惯。说不定哪天你要将模块翻译成日文呢。【注:值得注意的是我们这里创建的模型不需要继承任何父类,只需要拥有“toOptionArray”方法就可以了。我觉得这个很不科学,起码要继承一个接口吧】
7.8 在已有的配置段或者组中添加数据
除了新建一个标签页,或者配置段,你也可以利用已有的标签页和配置段,向里面添加内容。比如我们添加以下代码到system.xml:
File: app/code/local/Infinity/Helloworld/etc/system.xml
    <config>
        < !– … –>
        <sections>
            < !– … –>
            <general>
                <groups>
                    <example>
                        <label>Example of Adding a Group</label>
                        <frontend_type>text</frontend_type>
                        <sort_order>1</sort_order>
                        <show_in_default>1</show_in_default>
                        <show_in_website>1</show_in_website>
                        <show_in_store>1</show_in_store>
                    </example>
                </groups>
            </general>
            < !– … –>

    </sections></config>

刷新页面,你会在“General”标签页下面看到一个新的组,叫做“Example of Adding a Group”。
7.9 如何获得配置数据
到目前为止,我们只是讲了如何设置Magento,可以让用户可以配置我们的模块。现在让我们来看看如何获取用户的配置数据。
Mage::getStoreConfig('helloworld_options/messages/hello_message');上面这行代码就可以获取我们上面配置的那个“select”选项的数据。这个函数的参数是我们要获取的数据的URI,格式如下:
section_name/group_name/field_name你也可以通过以下代码来获取一个组或者段的所有值:
Mage::getStoreConfig('helloworld_options/messages');
    Mage::getStoreConfig('helloworld_options');
最后,如果你想获取针对某个特定店面(store)的数据,你可以传入store ID:
Mage::getStoreConfig('helloworld_options',1);7.10 总结
这一章我们讲了如何在Magento的后台管理中添加个性化的配置。我们也顺便介绍了帮助类的使用和ACL基础。这里最重要的内容是后台配置的层级结构,标签页包含了配置段,配置段包含了组,组包含了配置选项。我们将在以后的章节中介绍系统配置的高级内容,包括自定义格式,数据验证等等。


 1347
1347

 被折叠的 条评论
为什么被折叠?
被折叠的 条评论
为什么被折叠?
 到【灌水乐园】发言


