windows下编译最新版ffmpeg3.3
win下编译:
1.下载安装MinGW:http://sourceforge.net/projects/mingw/files/
2.下载yasm http://yasm.tortall.net/Download.html
3.下载 ffmpeg:https://www.ffmpeg.org/download.html
- 编辑ffmpeg文件夹下面的configure文件,找到
SLIBNAME_WITH_MAJOR='$(SLIBNAME).$(LIBMAJOR)'
LIB_INSTALL_EXTRA_CMD='$$(RANLIB) "$(LIBDIR)/$(LIBNAME)"'
SLIB_INSTALL_NAME='$(SLIBNAME_WITH_VERSION)'
SLIB_INSTALL_LINKS='$(SLIBNAME_WITH_MAJOR) $(SLIBNAME)'
将其修改成:
SLIBNAME_WITH_MAJOR='$(SLIBPREF)$(FULLNAME)-$(LIBMAJOR)$(SLIBSUF)'
LIB_INSTALL_EXTRA_CMD='$$(RANLIB) "$(LIBDIR)/$(LIBNAME)"'
SLIB_INSTALL_NAME='$(SLIBNAME_WITH_MAJOR)'
SLIB_INSTALL_LINKS='$(SLIBNAME)'
============================================
2.新建一个build_android.sh文件
注意:要根据环境配置前四项,且每行末尾不能有空格。 export TMPDIR,NDK,SYSROOT,TOOLCHAIN –cross-prefix一定有
#!/bin/bash
export TMPDIR="C:/Users/shuo.wang/Desktop/ff"
NDK=C:/Users/shuo.wang/AppData/Local/Android/sdk/ndk-bundle
SYSROOT=$NDK/platforms/android-21/arch-arm/
TOOLCHAIN=$NDK/toolchains/arm-linux-androideabi-4.9/prebuilt/windows-x86_64
function build_one {
./configure \
     --prefix=$PREFIX \
     --enable-shared \
     --disable-static \
     --disable-doc \
     --disable-ffmpeg \
     --disable-ffplay \
     --disable-ffprobe \
     --disable-ffserver \
     --disable-avdevice \
     --disable-doc \
     --disable-symver \
     --cross-prefix=$TOOLCHAIN/bin/arm-linux-androideabi- \
     --target-os=linux \
     --arch=arm \
     --enable-cross-compile \
     --sysroot=$SYSROOT \
     --extra-cflags="-Os -fpic $ADDI_CFLAGS" \
     --extra-ldflags="$ADDI_LDFLAGS" \
     $ADDITIONAL_CONFIGURE_FLAG
     make clean
     make
     make install
 }
 CPU=arm
 PREFIX=$(pwd)/android/$CPU
 ADDI_CFLAGS="-marm"
 build_one
- 1
- 2
- 3
- 4
- 5
- 6
- 7
- 8
- 9
- 10
- 11
- 12
- 13
- 14
- 15
- 16
- 17
- 18
- 19
- 20
- 21
- 22
- 23
- 24
- 25
- 26
- 27
- 28
- 29
- 30
- 31
- 32
- 33
- 34
然后在MinGW中进入cd进ffmpeg目录。
命令:
1. chmod 777 ./build_android.sh
2. ./build_android.sh 然后就开始编译了。
注意因为 NDK和ffmpeg,版本问题。ffmpeg3.1编译不过。
ffmpeg3.3可以。
编译完成后这时会发现 FFmpeg下多了一个文件夹android
下面开始移植到Android studio中
需要Android studio版本2.2以上,并安装CMake。本例中用Android studio2.3
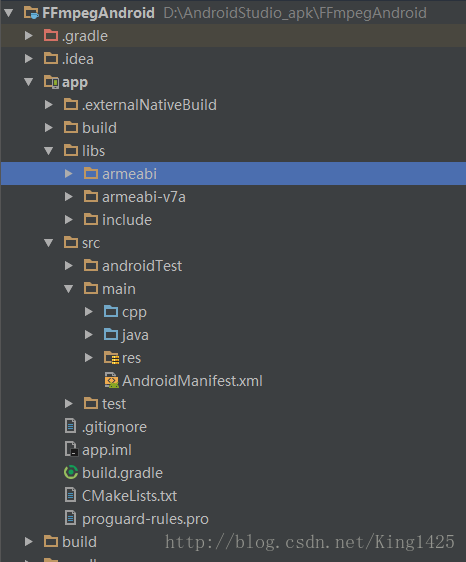
1.新建工程取名为FFmpegAndroid,然后选中include c++ support,然后下一步直到新建完成为止。
2.然后打开app中build.gradle。
添加如下:
externalNativeBuild {
cmake {
cppFlags ""
}
}
ndk {
abiFilters "armeabi", "armeabi-v7a"
}
sourceSets.main {
jniLibs.srcDirs = ['libs']
jni.srcDirs = []
}
externalNativeBuild {
cmake {
path "CMakeLists.txt"
}
}
- 1
- 2
- 3
- 4
- 5
- 6
- 7
- 8
- 9
- 10
- 11
- 12
- 13
- 14
- 15
- 16
- 17
- 18
- 19
- 20
- 21
3.把之前编译好的.so库拷贝进项目libs目录
如图:
4.重点 CMakeLists.txt配置
cmake_minimum_required(VERSION 3.4.1)
add_library( native-lib
             SHARED
             src/main/cpp/native-lib.cpp )
find_library(
log-lib
log )
set(distribution_DIR ${CMAKE_SOURCE_DIR}/../../../../libs)
add_library( avutil-55
             SHARED
             IMPORTED )
set_target_properties( avutil-55
                       PROPERTIES IMPORTED_LOCATION
                       ../../../../libs/armeabi-v7a/libavutil-55.so )
add_library( swresample-2
SHARED
IMPORTED )
set_target_properties( swresample-2
PROPERTIES IMPORTED_LOCATION
../../../../libs/armeabi-v7a/libswresample-2.so )
add_library( avcodec-57
SHARED
IMPORTED )
set_target_properties( avcodec-57
PROPERTIES IMPORTED_LOCATION
../../../../libs/armeabi-v7a/libavcodec-57.so )
add_library( avfilter-6
SHARED
IMPORTED)
set_target_properties( avfilter-6
PROPERTIES IMPORTED_LOCATION
../../../../libs/armeabi-v7a/libavfilter-6.so )
add_library( swscale-4
SHARED
IMPORTED)
set_target_properties( swscale-4
PROPERTIES IMPORTED_LOCATION
../../../../libs/armeabi-v7a/libswscale-4.so )
add_library( avdevice-57
SHARED
IMPORTED)
set_target_properties( avdevice-57
PROPERTIES IMPORTED_LOCATION
../../../../libs/armeabi-v7a/libavdevice-57.so )
add_library( avformat-57
SHARED
IMPORTED)
set_target_properties( avformat-57
PROPERTIES IMPORTED_LOCATION
../../../../libs/armeabi-v7a/libavformat-57.so )
set(CMAKE_CXX_FLAGS "${CMAKE_CXX_FLAGS} -std=gnu++11")
include_directories(libs/include)
target_link_libraries( native-lib swresample-2 avcodec-57 avfilter-6 swscale-4 avdevice-57 avformat-57
${log-lib} )
- 1
- 2
- 3
- 4
- 5
- 6
- 7
- 8
- 9
- 10
- 11
- 12
- 13
- 14
- 15
- 16
- 17
- 18
- 19
- 20
- 21
- 22
- 23
- 24
- 25
- 26
- 27
- 28
- 29
- 30
- 31
- 32
- 33
- 34
- 35
- 36
- 37
- 38
- 39
- 40
- 41
- 42
- 43
- 44
- 45
- 46
- 47
- 48
- 49
- 50
- 51
- 52
- 53
- 54
- 55
- 56
- 57
- 58
- 59
- 60
- 61
- 62
- 63
- 64
- 65
- 66
- 67
- 68
- 69
- 70
- 71
- 72
- 73
- 74
cmake_minimum_required(VERSION 3.4.1):表示cmake的最低版本是3.4.1。
add_library():添加库,分为两种,一种是需要编译为库的代码,一种是已经编译好的库文件。
比如上面编译好的ffmpeg的库
这里用到的需要生产的.so文件
add_library( native-lib
SHARED
src/main/cpp/native-lib.cpp )
最后的参数是源码的路径,如果有更多的源码就接下去写上。
add_library( avutil-55
SHARED
IMPORTED )
这里avutil-55表示库的名称,SHARED表示是共享库,一般.so文件,还有STATIC,一般.a文件。IMPORTED表示引用的不是生成的。
set_target_properties:对于已经编译好的so文件需要引入,所以需要设置。
set_target_properties( avutil-55
PROPERTIES IMPORTED_LOCATION
../../../../libs/armeabi-v7a/libavutil-55.so )
这里avutil-55是名字,然后是PROPERTIES IMPORTED_LOCATION加上库的路径。
include_directories:一般外面引入的库文件需要头文件,所以可以通过这个来引入:
include_directories(libs/include)
target_link_libraries:链接,把需要的so文件链接起来,这里native-lib需要链接ffmpeg的库文件。
5.修改native-lib.cpp
extern "C"
{
jstring
Java_com_ws_ffmpeg_ffmpegandroid_MainActivity_stringFromJNI(
JNIEnv *env,
jobject /* this */) {
std::string hello = "Hello from C++";
return env->NewStringUTF(hello.c_str());
}
jstring
Java_com_ws_ffmpeg_ffmpegandroid_MainActivity_urlprotocolinfo(
JNIEnv *env, jobject) {
char info[40000] = {0};
av_register_all();
struct URLProtocol *pup = NULL;
struct URLProtocol **p_temp = &pup;
avio_enum_protocols((void **) p_temp, 0);
while ((*p_temp) != NULL) {
sprintf(info, "%sInput: %s\n", info, avio_enum_protocols((void **) p_temp, 0));
}
pup = NULL;
avio_enum_protocols((void **) p_temp, 1);
while ((*p_temp) != NULL) {
sprintf(info, "%sInput: %s\n", info, avio_enum_protocols((void **) p_temp, 1));
}
return env->NewStringUTF(info);
}
jstring
Java_com_ws_ffmpeg_ffmpegandroid_MainActivity_avformatinfo(
JNIEnv *env, jobject) {
char info[40000] = {0};
av_register_all();
AVInputFormat *if_temp = av_iformat_next(NULL);
AVOutputFormat *of_temp = av_oformat_next(NULL);
while (if_temp != NULL) {
sprintf(info, "%sInput: %s\n", info, if_temp->name);
if_temp = if_temp->next;
}
while (of_temp != NULL) {
sprintf(info, "%sOutput: %s\n", info, of_temp->name);
of_temp = of_temp->next;
}
return env->NewStringUTF(info);
}
jstring
Java_com_ws_ffmpeg_ffmpegandroid_MainActivity_avcodecinfo(
JNIEnv *env, jobject) {
char info[40000] = {0};
av_register_all();
AVCodec *c_temp = av_codec_next(NULL);
while (c_temp != NULL) {
if (c_temp->decode != NULL) {
sprintf(info, "%sdecode:", info);
} else {
sprintf(info, "%sencode:", info);
}
switch (c_temp->type) {
case AVMEDIA_TYPE_VIDEO:
sprintf(info, "%s(video):", info);
break;
case AVMEDIA_TYPE_AUDIO:
sprintf(info, "%s(audio):", info);
break;
default:
sprintf(info, "%s(other):", info);
break;
}
sprintf(info, "%s[%10s]\n", info, c_temp->name);
c_temp = c_temp->next;
}
return env->NewStringUTF(info);
}
jstring
Java_com_ws_ffmpeg_ffmpegandroid_MainActivity_avfilterinfo(
JNIEnv *env, jobject) {
char info[40000] = {0};
avfilter_register_all();
AVFilter *f_temp = (AVFilter *) avfilter_next(NULL);
while (f_temp != NULL) {
sprintf(info, "%s%s\n", info, f_temp->name);
f_temp = f_temp->next;
}
return env->NewStringUTF(info);
}
}
- 1
- 2
- 3
- 4
- 5
- 6
- 7
- 8
- 9
- 10
- 11
- 12
- 13
- 14
- 15
- 16
- 17
- 18
- 19
- 20
- 21
- 22
- 23
- 24
- 25
- 26
- 27
- 28
- 29
- 30
- 31
- 32
- 33
- 34
- 35
- 36
- 37
- 38
- 39
- 40
- 41
- 42
- 43
- 44
- 45
- 46
- 47
- 48
- 49
- 50
- 51
- 52
- 53
- 54
- 55
- 56
- 57
- 58
- 59
- 60
- 61
- 62
- 63
- 64
- 65
- 66
- 67
- 68
- 69
- 70
- 71
- 72
- 73
- 74
- 75
- 76
- 77
- 78
- 79
- 80
- 81
- 82
- 83
- 84
- 85
- 86
- 87
- 88
- 89
- 90
- 91
- 92
- 93
- 94
- 95
- 96
- 97
- 98
- 99
- 100
- 101
- 102
- 103
- 104
- 105
- 106
- 107
- 108
- 109
- 110
6.调用native方法
package com.ws.ffmpeg.ffmpegandroid;
import android.os.Bundle;
import android.support.v7.app.AppCompatActivity;
import android.view.View;
import android.widget.Button;
import android.widget.TextView;
public class MainActivity extends AppCompatActivity implements View.OnClickListener {
static {
System.loadLibrary("native-lib");
}
private Button protocol,format,codec,filter;
private TextView tv_info;
@Override
protected void onCreate(Bundle savedInstanceState) {
super.onCreate(savedInstanceState);
setContentView(R.layout.activity_main);
init();
}
private void init() {
protocol = (Button) findViewById(R.id.btn_protocol);
format = (Button) findViewById(R.id.btn_format);
codec = (Button) findViewById(R.id.btn_codec);
filter = (Button) findViewById(R.id.btn_filter);
tv_info = (TextView) findViewById(R.id.tv_info);
protocol.setOnClickListener(this);
format.setOnClickListener(this);
codec.setOnClickListener(this);
filter.setOnClickListener(this);
}
@Override
public void onClick(View view) {
switch (view.getId()) {
case R.id.btn_protocol:
tv_info.setText(urlprotocolinfo());
break;
case R.id.btn_format:
tv_info.setText(avformatinfo());
break;
case R.id.btn_codec:
tv_info.setText(avcodecinfo());
break;
case R.id.btn_filter:
tv_info.setText(avfilterinfo());
break;
default:
break;
}
}
public native String stringFromJNI();
public native String urlprotocolinfo();
public native String avformatinfo();
public native String avcodecinfo();
public native String avfilterinfo();
}
- 1
- 2
- 3
- 4
- 5
- 6
- 7
- 8
- 9
- 10
- 11
- 12
- 13
- 14
- 15
- 16
- 17
- 18
- 19
- 20
- 21
- 22
- 23
- 24
- 25
- 26
- 27
- 28
- 29
- 30
- 31
- 32
- 33
- 34
- 35
- 36
- 37
- 38
- 39
- 40
- 41
- 42
- 43
- 44
- 45
- 46
- 47
- 48
- 49
- 50
- 51
- 52
- 53
- 54
- 55
- 56
- 57
- 58
- 59
- 60
- 61
- 62
- 63
- 64
- 65
- 66
- 67
- 68
ok ! 效果如图:
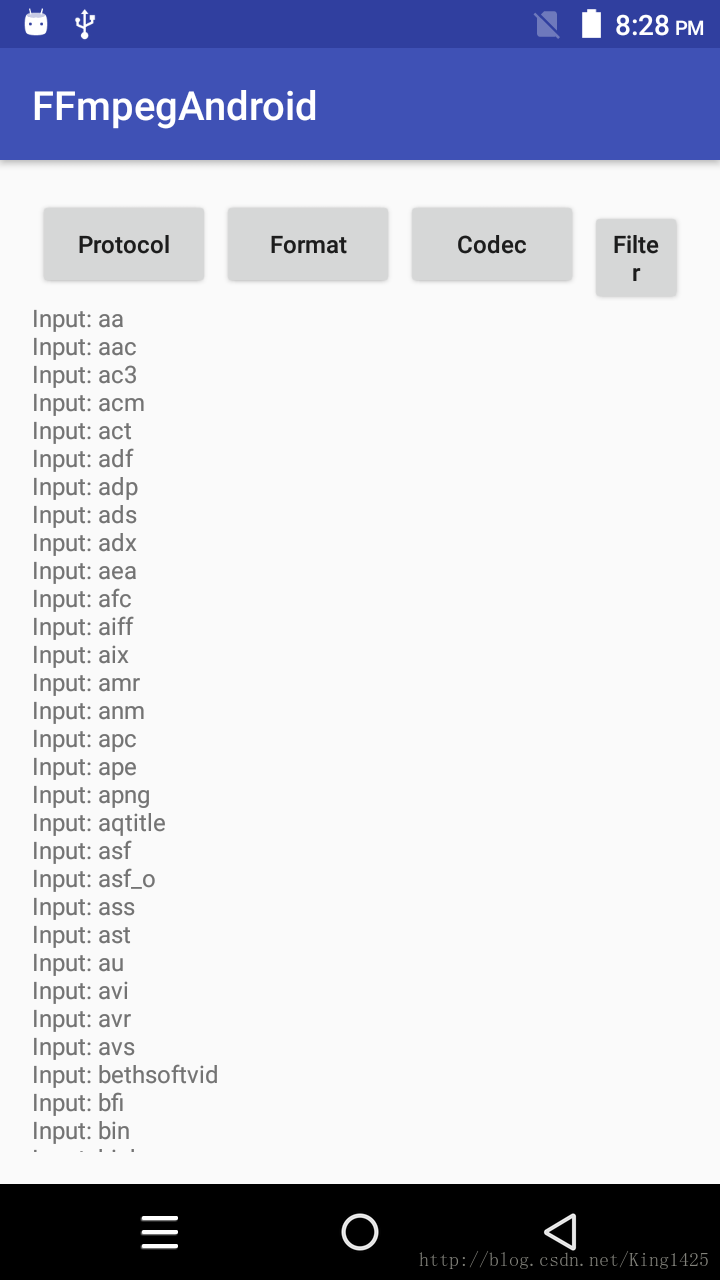
按照这6部相信各位客官也可以搞定!
github地址:https://github.com/WangShuo1143368701/FFmpegAndroid


 296
296

 被折叠的 条评论
为什么被折叠?
被折叠的 条评论
为什么被折叠?
 到【灌水乐园】发言


