


- 服务发现简介
- Eureka配置
- Eureka高可用
- Eureka的自我保护模式
- Eureka用户认证
1、服务发现组件
为了解决微服务中代码中存在的硬编码问题,服务发现组件顺势而生。使用服务发现组件有一系列好处,存储各个微服务的信息、服务消费者可从服务发现组件查看服务提供者的信息、和服务消费者进行通信等功能。服务发现组件和服务提供者、服务消费者之间的架构如图:
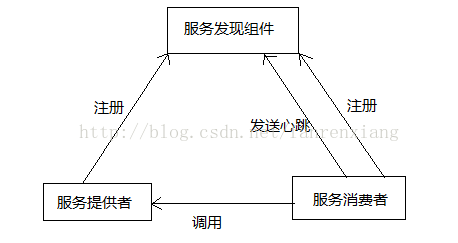
spring Cloud支持多种服务发现组件,Eureka、zookeeper等,这里以Eureka为例
2、创建一个Eureka server并配置
pom.xml添加依赖:
<?xml version="1.0" encoding="UTF-8"?>
<project xmlns="http://maven.apache.org/POM/4.0.0"
         xmlns:xsi="http://www.w3.org/2001/XMLSchema-instance"
         xsi:schemaLocation="http://maven.apache.org/POM/4.0.0 http://maven.apache.org/xsd/maven-4.0.0.xsd">
    <modelVersion>4.0.0</modelVersion>

    <groupId>com.simons.cn</groupId>
    <artifactId>discovery-eureka</artifactId>
    <version>1.0-SNAPSHOT</version>
    <packaging>jar</packaging>

    <parent>
        <groupId>org.springframework.boot</groupId>
        <artifactId>spring-boot-starter-parent</artifactId>
        <version>1.4.3.RELEASE</version>
    </parent>

    <properties>
        <project.build.sourceEncoding>UTF-8</project.build.sourceEncoding>
        <java.version>1.7</java.version>
    </properties>

    <dependencies>
        <!--Eureka依赖-->
        <dependency>
            <groupId>org.springframework.cloud</groupId>
            <artifactId>spring-cloud-starter-eureka-server</artifactId>
        </dependency>
    </dependencies>

    <!-- 引入spring cloud的依赖 -->
    <dependencyManagement>
        <dependencies>
            <dependency>
                <groupId>org.springframework.cloud</groupId>
                <artifactId>spring-cloud-dependencies</artifactId>
                <version>Camden.SR4</version>
                <type>pom</type>
                <scope>import</scope>
            </dependency>
        </dependencies>
    </dependencyManagement>

    <!-- 添加spring-boot的maven插件 -->
    <build>
        <plugins>
            <plugin>
                <groupId>org.springframework.boot</groupId>
                <artifactId>spring-boot-maven-plugin</artifactId>
            </plugin>
        </plugins>
    </build>
</project>
编写启动类EurekaApplication
import org.springframework.boot.SpringApplication;
import org.springframework.boot.autoconfigure.SpringBootApplication;
import org.springframework.cloud.netflix.eureka.server.EnableEurekaServer;

@EnableEurekaServer
@SpringBootApplication
public class EurekaApplication {

    public static void main(String[] args) {
        SpringApplication.run(EurekaApplication.class,args);
    }

}
配置application.yml
server:
  port: 8500
eureka:
  client:
    registerWithEureka: false  #是否将自己注册到Eureka Server,默认true
    fetchRegistry: false       #是否从Eureka Server获取注册信息,默认true
    serviceUrl:
     defaultZone: http://localhost:8500/eureka   #与Eureka Server交互的地址,查询、注册服务关联此地址
eureka.client.registerWithEureka=false表示不将自己注册到Eureka Server;
eureka.client..fetchRegistry=false表示不从Eureka Server获取注册信息,本例是单节点,故不存在同步一说;
eureka.client.serviceUrl.defaultZone表示与Eureka Server的交互地址,多个可逗号分隔;
测试:浏览器访问http://localhost:8500/,如下:
配置好了Eureka server后,现在将用户微服务注册到Eureka server上。新建一个用户微服务模块(或者直接copy之前的user-provider项目)
pom.xml文件中加入Eureka依赖:
<dependency>
    <groupId>org.springframework.cloud</groupId>
    <artifactId>spring-cloud-starter-eureka-server</artifactId>
</dependency>
application.yml文件中加入以下配置:
#端口
server:
  port: 8001
# 数据库连接信息
spring:
  datasource:
           url: jdbc:mysql://118.190.104.220:3306/simons?useUnicode=true&characterEncoding=utf-8&allowMultiQueries=true&useSSL=false
           username: root
           password: root
           driver-class-name: com.mysql.jdbc.Driver
  application:
    name: user-provider

# mybatis扫描信息
mybatis:
  typeAliasesPackage: com.simons.cn.bean       #实体对象所以在包
  mapper-locations: classpath:mapper/*.xml       #xml文件位置

eureka:
  client:
    serviceUrl:
      defaultZone: http://localhost:8500/eureka/
  instance:
     prefer-ip-address: true
spring.application.name表示注册到Eureka Server上的应用的名称;prefer-ip-address=true,表示将是否将自己的IP注册到Eureka Server。
启动类UserProviderEurekaApplication头部加上@EnableDiscoveryClient注解,完成用户微服务的Eureka Server注册
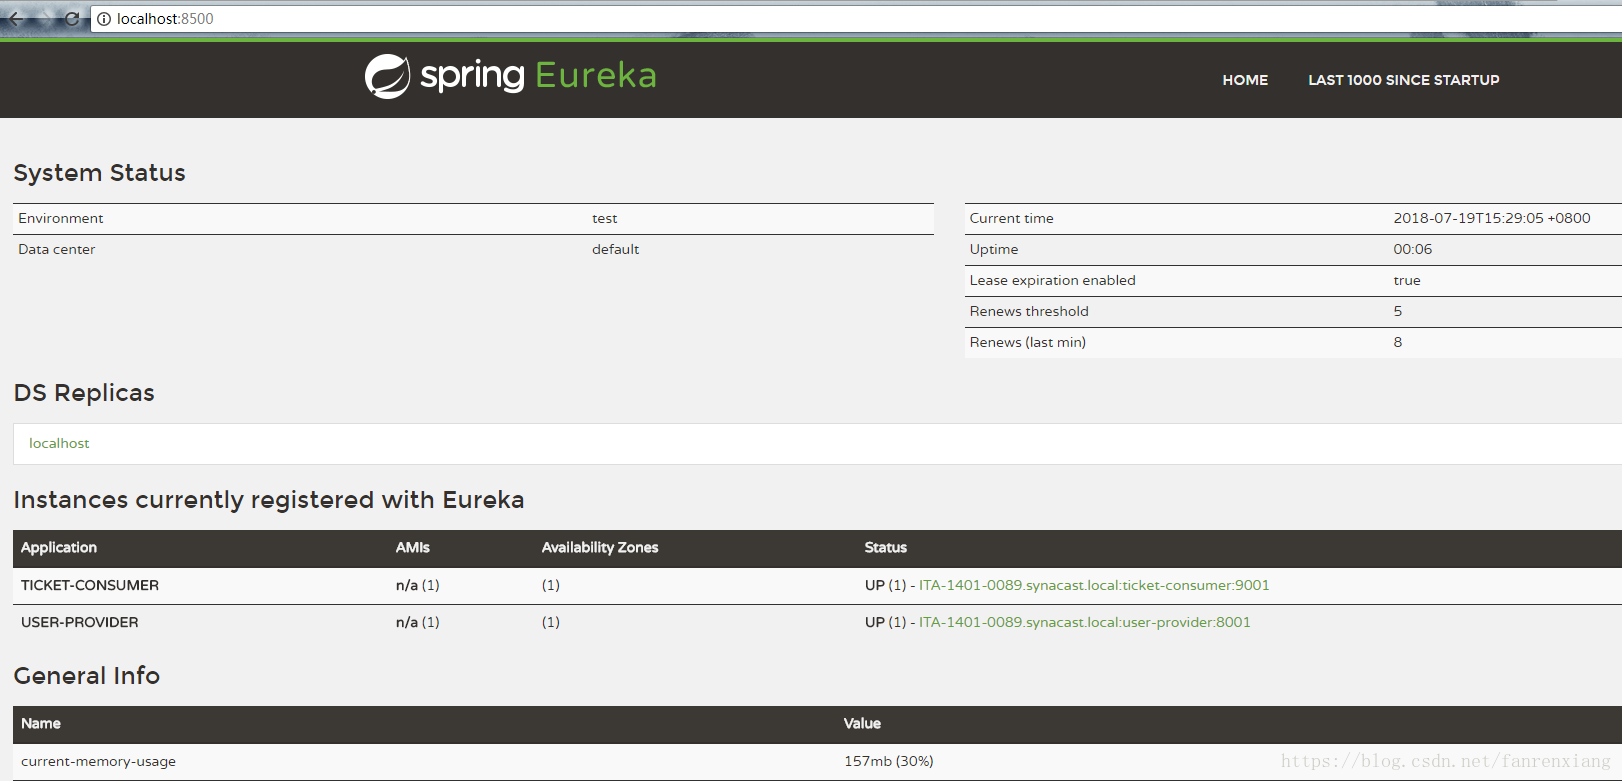
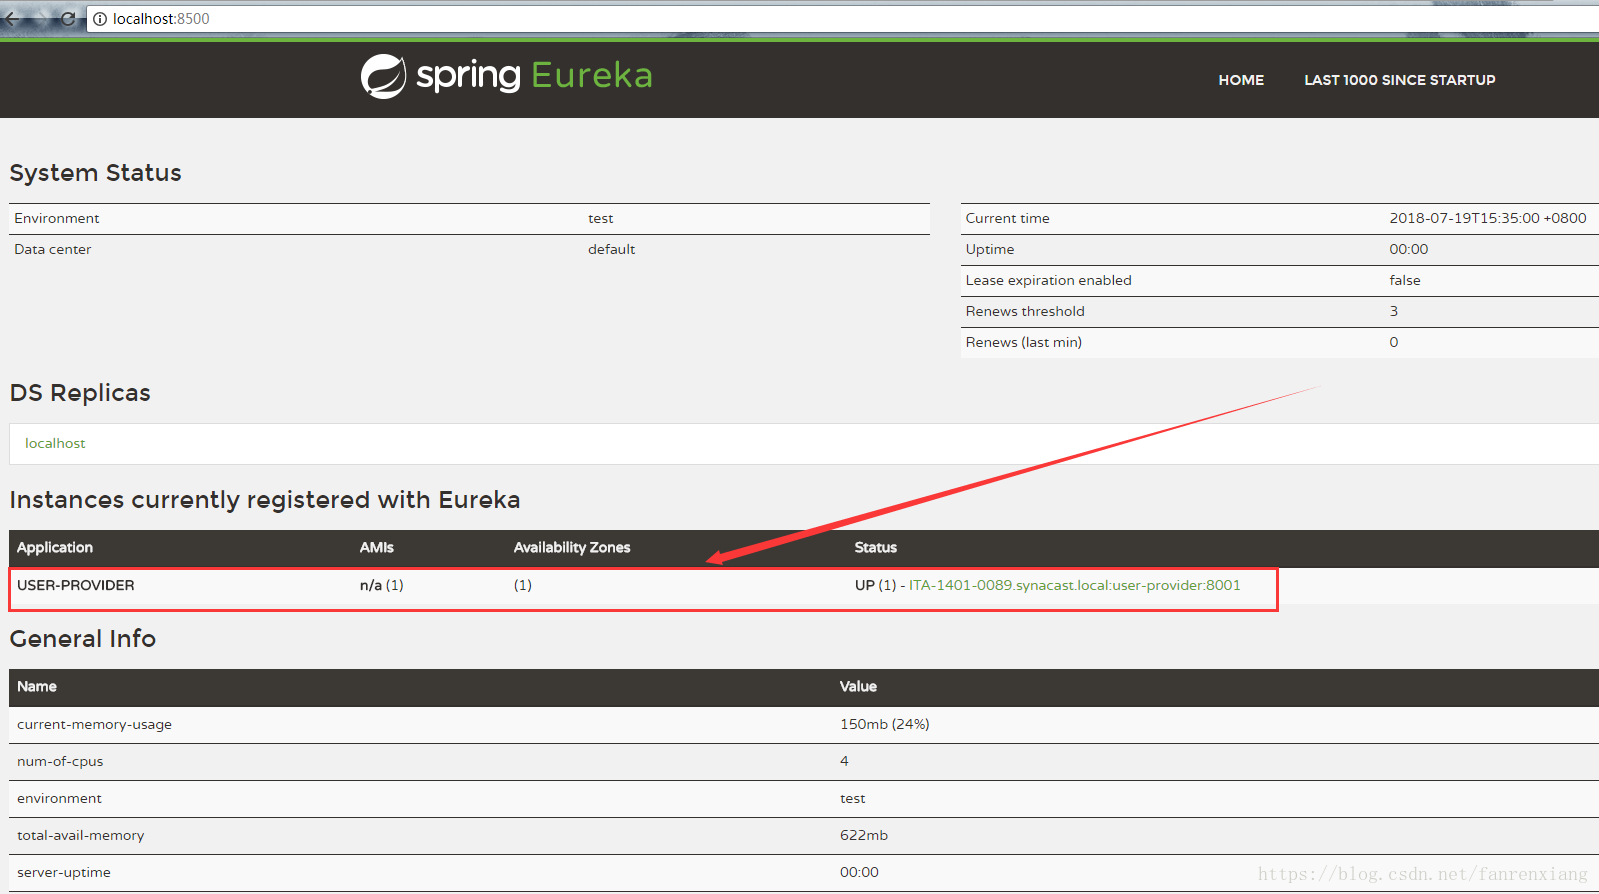
测试:启动项目user-provider-eureka和项目discovery-eureka,浏览器访问http://localhost:8500/,如下图:
同理也可以将服务消费者-售票系统微服务注册到Eureka Server。
3、Eureka的高可用
通过部署Euraka Server多个实例,各个实例之间通过相互注册(本质即复制实现同步)的方式进行信息的交互同步,实现高可用。下面进入部署(支持copy上面那个单例Eureka实例即可,修改下面说到的部分):
如果你是windows请修改 C:\Windows\System32\drivers\etc\hosts 文件,若是linux系统请在 /etc/hosts里面配置如下信息:
127.0.0.1 node1 node2修改application.yml文件:
spring:
  application:
    name: discovery-eureka-ha
---
spring:
  profiles: node1
server:
       port: 8501
eureka:
  instance:
    hostname: node1
  client:
    serviceUrl:
      defaultZone: http://node2:8502/eureka/
---
spring:
  profiles: node2
server:
  port: 8502
eureka:
  instance:
    hostname: node2
  client:
    serviceUrl:
      defaultZone: http://node1:8501/eureka/
这里通过'---'将配置分成了3段,由spring.profiles指定启动哪个实例,显然基本原理就是node1和node2两者交叉同步(你中有我,我中有你)。
测试:打包后(jar)运行(表示分别启动node1、node2实例)
java -jar discovery-eureka-ha-1.0-SNAPSHOT.jar --spring.profiles.active=node1

java -jar discovery-eureka-ha-1.0-SNAPSHOT.jar --spring.profiles.active=node2浏览器访问:http://node1:8501/ 和 http://node2:8502/
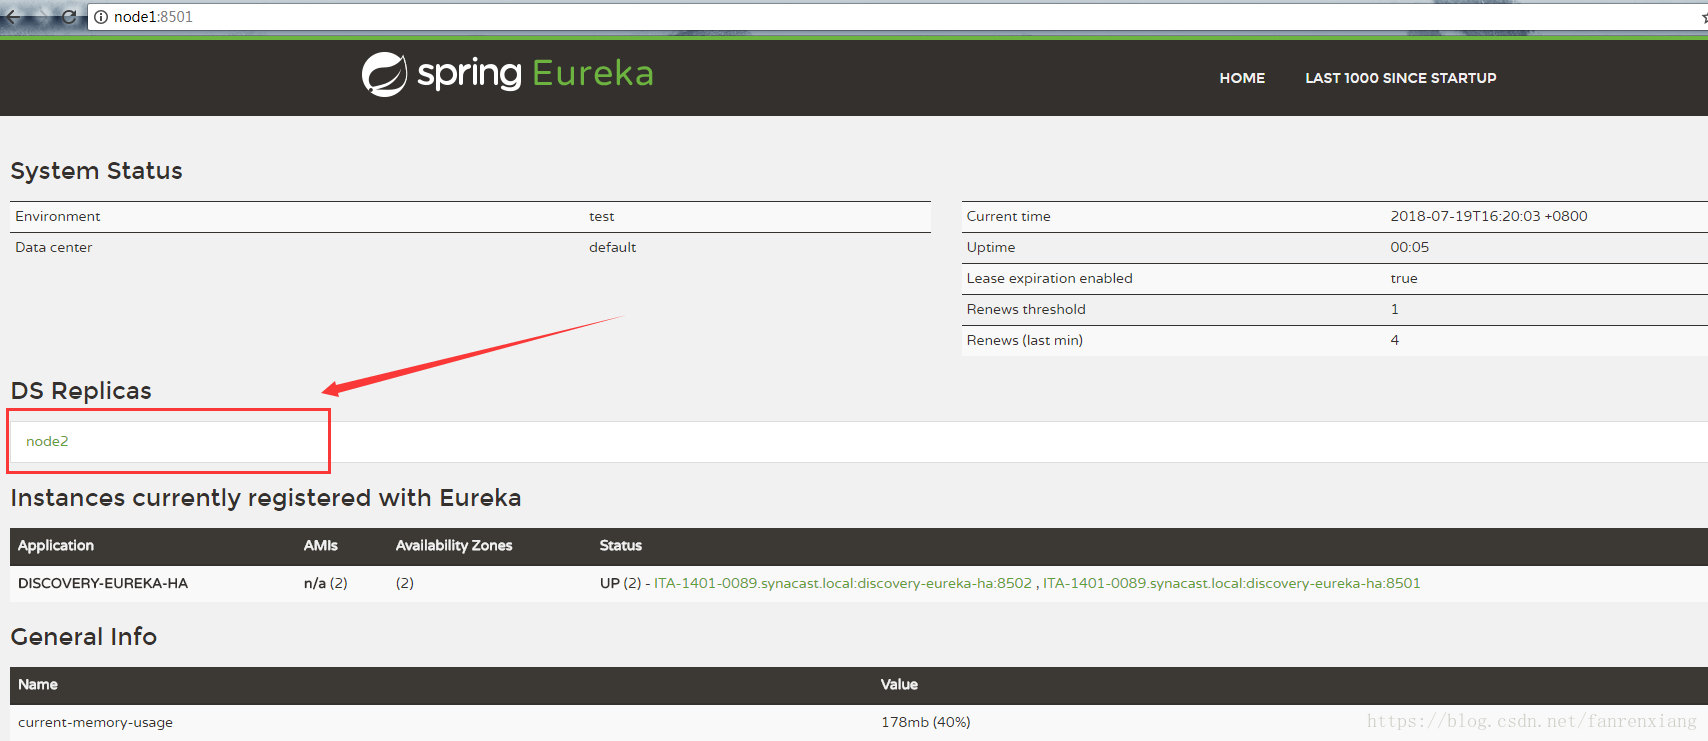
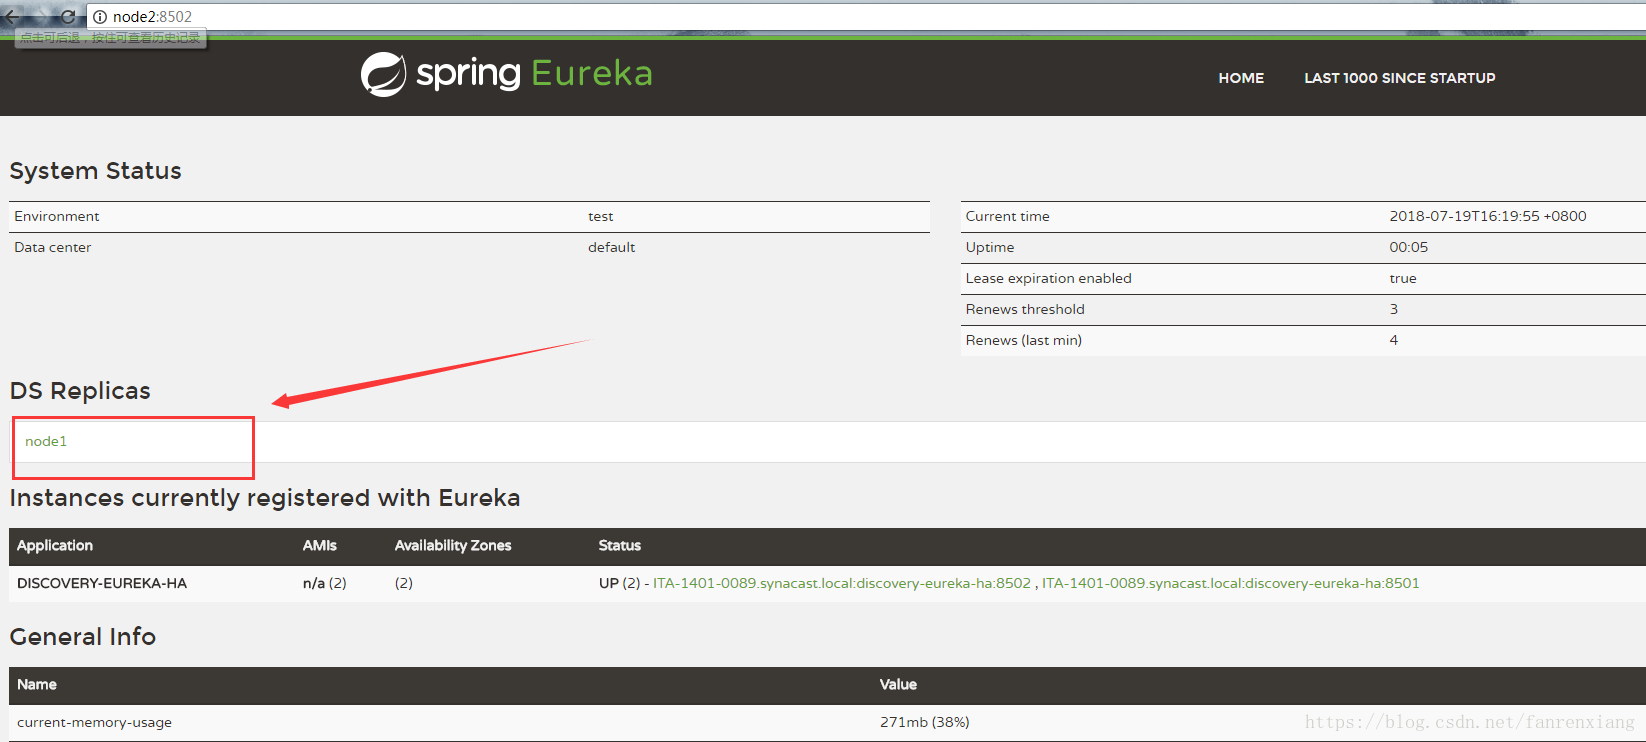
这里可以看到,node1的Eureka中有node2节点的Eurekal,node2也如此,说明已经相互注册了,顺利实现了Eureka Server的高可用。这里要注意一点的是,启动类头部加的注解@EnableEurekaServer(标识Eureka Server端)不要写成@EnableDiscoveryClient(表示Eureka Client端),不然分别启动两个实例后会报错:
was unable to send heartbeat接着便可以将用户微服务注册到Eureka Server集群了,只需简单的修改之前用户微服务(user-provider-eureka项目)的application.yml文件即可:
eureka:
  client:
    serviceUrl:
      defaultZone: http://node1:8501/eureka/,http://node2:8502/eureka/
这样用户微服务成功注册到Eureka Server集群上。
4、Eureka的自我保护模式
当Eureka server在一定时间内(默认为90s)没有接收到注册上其上面的微服务的"心跳"时,Eureka server就会强制注销该微服务实例,但这并不是我们想要的,有时候网络延迟或网络故障等使得Eureka和服务无法通信,这时候注销实例是不可取的。
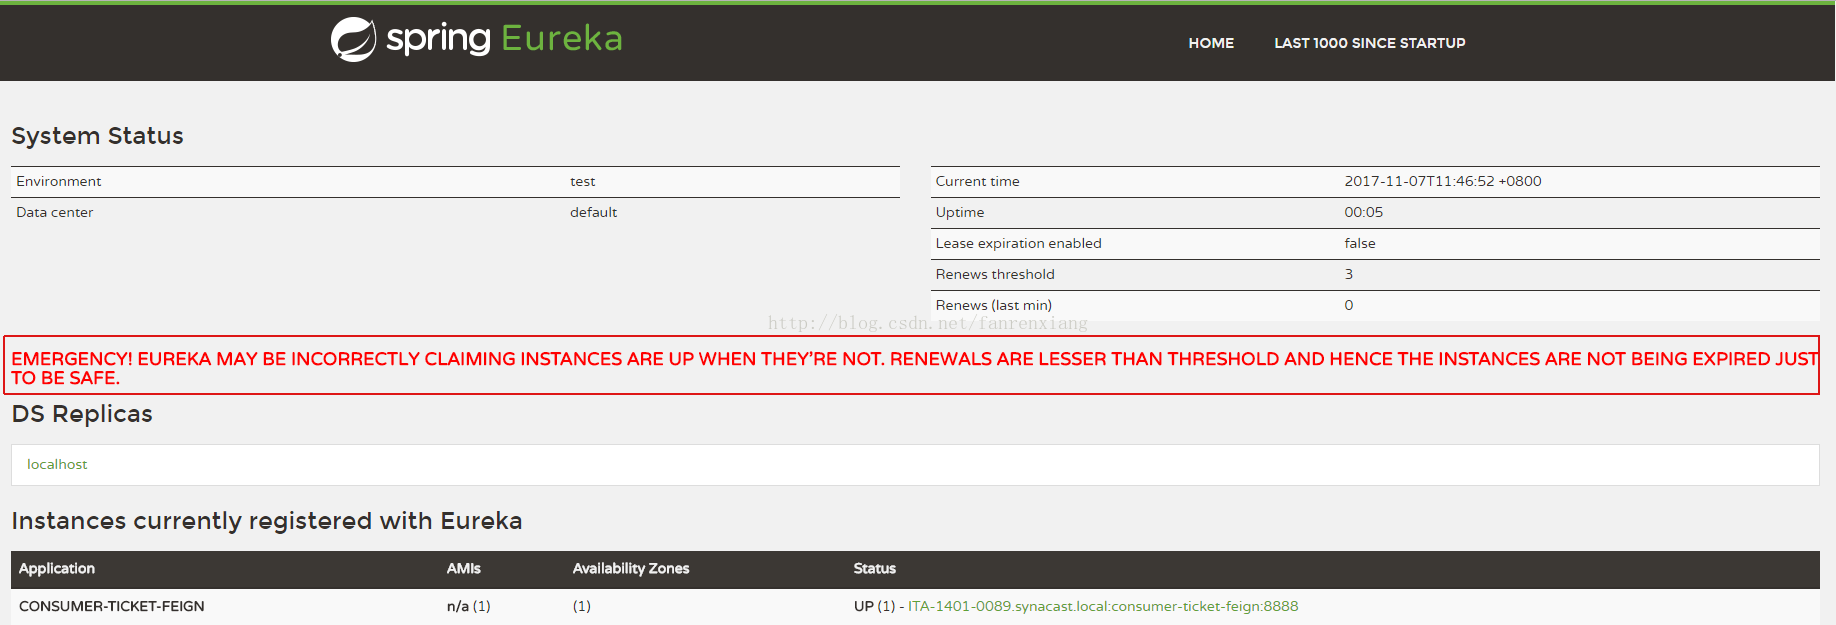
Eureka的自我保护模式就是为了解决此问题。自我保护模式的理念就是:宁可保留所有在Eureka serve注册的实例(其中包括健康和不健康的),也不轻易注销注册服务实例。它使得Eureka集群工作更加的"人性化"。根据实际情况选择开启或关闭Eureka的自我保护模式(默认开启)。
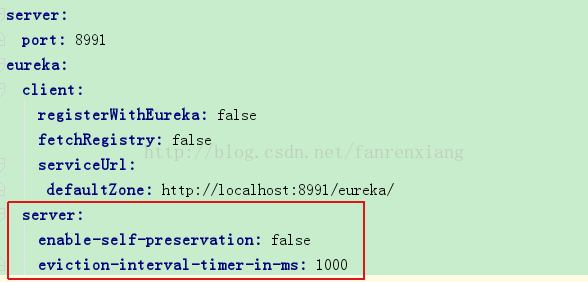
上述参数表示关闭Eureka的自我保护模式,并设置Eureka server清理无效的服务节点时间间隔为1000毫秒。
5、Eureka添加用户认证
如上项目示例中,访问Eureka是不需要任何认证的,下面简单搭建一个需要认证的Eureka Server。
修改上面discovery-eureka-ha项目中的pom文件,添加如下依赖
  <dependency>
      <groupId>org.springframework.boot</groupId>
      <artifactId>spring-boot-starter-security</artifactId>
  </dependency>
修改application.yml配置文件,添加如下内容:
security:
  basic:
    enabled: true
  user:
    name: eureka
    password: A!@#VC#$%^&*(!
启动访问效果就不截图了!


 1562
1562


 被折叠的 条评论
为什么被折叠?
被折叠的 条评论
为什么被折叠?
 到【灌水乐园】发言


