


转载请注明出处 CSDN废墟的树
前言
有关Android进程间通信之Aidl编程的基本使用步骤已经在上一篇博客中有讲解,Android studio 下的aidl编程实现Android的夸进程间通信。上一篇博客中只是演示了怎么利用Aidl实现跨进程间传递Java基本类型,以及Aidl传递Bitamap对象。可能在一些场景下你需要跨进程传递一个对象,那么Aidl是否能传递一个对象呢?答案是肯定的,网上也有很多相关的资料,之所以写这篇博客:一是当作自己学习笔记咯,二是把自己遇到的问题分享出来。
Aidl传递对象简介
由于Aidl只支持Java基本类型数据传递,因此是不能直接传递一个复杂类型对象的,所以为了解决这个问题,Android提供了一套机制—-将需要传递的对象序列化,然后在反序列化。
- 序列化:把Java对象转换为字节序列的过程。
- 反序列化:把字节序列恢复为Java对象的过程。
Java有一套自己的序列化机制Serializable,不过Android也自己实现了一套自己的序列化机制Parcelable。有关Serializable和Parcelable的区别请自行网上搜一把。总之:Aidl可以实现跨进程传递序列化之后的对象,接下来详细介绍实现的过程。
Aidl传递对象步骤
服务端Aidl
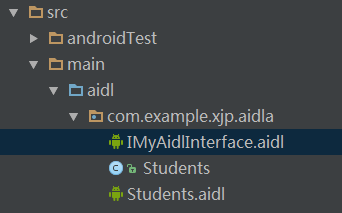
基本步骤和上一篇博客一样,在main目录下新建一个aidl目录,然后新建一个aidl接口类IMyAidlInterface.aidl。现在假如我们需要传递的对象是一个Students对象,那么在aidl目录下新建Students类,并实例化该类。最后在同样的目录下新建Students的aidl文件Students.aidl。目录结构如下:
相关代码如下:
Students
package com.example.xjp.aidla;

import android.os.Parcel;
import android.os.Parcelable;

/**
 1. Created by 850302 on 2016/4/29.
 */
public class Students implements Parcelable {

    private int id;
    private String name;
    private String className;
    private int age;


    protected Students(Parcel in) {
        id = in.readInt();
        name = in.readString();
        className = in.readString();
        age = in.readInt();
    }

    public Students(int id, String name, String className, int age) {
        this.id = id;
        this.name = name;
        this.className = className;
        this.age = age;
    }

    public Students(){}

    public static final Creator<Students> CREATOR = new Creator<Students>() {
        @Override
        public Students createFromParcel(Parcel in) {
            return new Students(in);
        }

        @Override
        public Students[] newArray(int size) {
            return new Students[size];
        }
    };

    @Override
    public int describeContents() {
        return 0;
    }

    @Override
    public void writeToParcel(Parcel dest, int flags) {
        dest.writeInt(id);
        dest.writeString(name);
        dest.writeString(className);
        dest.writeInt(age);
    }

    public void readFromParcel(Parcel source) {
        id = source.readInt();
        name = source.readString();
        className = source.readString();
        age = source.readInt();
    }


    public int getId() {
        return id;
    }

    public void setId(int id) {
        this.id = id;
    }

    public String getName() {
        return name;
    }

    public void setName(String name) {
        this.name = name;
    }

    public String getClassName() {
        return className;
    }

    public void setClassName(String className) {
        this.className = className;
    }

    public int getAge() {
        return age;
    }

    public void setAge(int age) {
        this.age = age;
    }
}
Students类继承了Parcelable接口类,并且实现了其中的方法。值得注意的是writeToParcel方法和readFromParcel方法里面的写和读取顺序是需要一一对应的,就比如writeToParcel方法里写的顺序是
@Override
    public void writeToParcel(Parcel dest, int flags) {
        dest.writeInt(id);//1:写一个int类型的值
        dest.writeString(name);//2:写一个String类型的值
        dest.writeString(className);//3:写一个String类型的值
        dest.writeInt(age);//4:写一个int类型的值
    }
以上写数值的顺序是
- 写一个int类型的值
- 写一个String类型的值
- 写一个String类型的值
- 写一个int类型的值
那么readFromParcel方法里的读取顺序也应该是按照以上顺序读取,否则读取的数据会错乱。
- 读取一个int类型的值
- 读取一个String类型的值
- 读取一个String类型的值
- 读取一个int类型的值
代码如下:
public void readFromParcel(Parcel source) {
        id = source.readInt();
        name = source.readString();
        className = source.readString();
        age = source.readInt();
    }
Students.aidl
package com.example.xjp.aidla;
parcelable Students;
该类很简单,仅仅是申明了 Students为parcelable类型。**注意:**parcelable开头是小写p,不是Parcelable。别问我为什么是这样,我也不知道 ^_^,只能说这是游戏规则。
IMyAidlInterface.aidl
// IMyAidlInterface.aidl
package com.example.xjp.aidla;

import com.example.xjp.aidla.Students;
interface IMyAidlInterface {

    int add(int arg1, int arg2);

    String inStudentInfo(in Students student);

    String outStudentInfo(out Students student);

    String inOutStudentInfo(inout Students student);

}
以上方法的参数都是Students,但是每个参数前面都有一个修饰符:in,out,inout,且这些修饰符是必须的,否则会报错。那么他们代表什么意思呢?
- in:参数由客户端设置,或者理解成客户端传入参数值。
- out:参数由服务端设置,或者理解成由服务端返回值。
- inout:客户端输入端都可以设置,或者理解成可以双向通信。
值得注意的是:由于IMyAidlInterface接口类中使用到了Students类,所以你得主动import引入该类
import com.example.xjp.aidla.Students;否则会报错,即使是Students类和IMyAidlInterface在同一个报名下也得引入。
服务端MyService
package com.example.xjp.aidl;

import android.app.ActivityManager;
import android.app.Service;
import android.content.Context;
import android.content.Intent;
import android.os.IBinder;
import android.os.RemoteException;
import android.util.Log;

import com.example.xjp.aidla.IMyAidlInterface;
import com.example.xjp.aidla.Students;

/**
 * Created by 850302 on 2016/4/28.
 */
public class MyServer extends Service {

    IMyAidlInterface.Stub mStub = new IMyAidlInterface.Stub() {
        @Override
        public int add(int arg1, int arg2) throws RemoteException {
            return arg1 + arg2;
        }

        @Override
        public String inStudentInfo(Students student) throws RemoteException {
            String msg = "table1" + "\n" + "----------------------------------------------" + "\n" + "|" +
                    " id " + "|" + " " +
                    "age " +
                    "|" + " name " + "|" + " className " + "|" + "\n" +
                    "----------------------------------------------" + "\n" + "|  " + student.getId() + " " +
                    "|  " + student
                    .getAge() + "  |  " + student.getName() + "   |     " + student.getClassName() + "   | " +
                    "\n" + "----------------------------------------------";
            return msg;
        }

        @Override
        public String outStudentInfo(Students student) throws RemoteException {
//            student.setClassName("090412");
//            student.setName("Tom2");

//            String msg = "Id = " + student.getId() + " age = " + student.getAge() + " ClassName = " +
//                    student.getClassName() + " Name = " + student.getName();
            String msg = "table2" + "\n" + "----------------------------------------------" + "\n" + "|" +
                    " id " + "|" + " " +
                    "age " +
                    "|" + " name " + "|" + " className " + "|" + "\n" +
                    "----------------------------------------------" + "\n" + "|  " + student.getId() + " " +
                    "|  " + student
                    .getAge() + "  |  " + student.getName() + "   |     " + student.getClassName() + "   | " +
                    "\n" + "----------------------------------------------";
            return msg;
        }

        public String inOutStudentInfo(Students student) throws RemoteException {
            student.setClassName("090411");
            student.setAge(22)
            String msg = "table3" + "\n" + "----------------------------------------------" + "\n" + "|" +
                    " id " + "|" + " " +
                    "age " +
                    "|" + " name " + "|" + " className " + "|" + "\n" +
                    "----------------------------------------------" + "\n" + "|  " + student.getId() + " " +
                    "|  " + student
                    .getAge() + "  |  " + student.getName() + "   |     " + student.getClassName() + "   | " +
                    "\n" + "----------------------------------------------";

            return msg;
        }

    };

    @Override
    public void onCreate() {
        super.onCreate();
        Log.e("xjp", "the remote Process Name is ==>" + getCurProcessName(this));
    }


    @Override
    public IBinder onBind(Intent intent) {
        Log.e("xjp", "the remote onBind......");
        return mStub;
    }


    @Override
    public void onRebind(Intent intent) {
        Log.e("xjp", "the remote onRebind......");
        super.onRebind(intent);
    }

    @Override
    public boolean onUnbind(Intent intent) {
        Log.e("xjp", "the remote onUnbind......");
        return super.onUnbind(intent);
    }

    @Override
    public void onDestroy() {
        super.onDestroy();
        Log.e("xjp", "the remote onDestroy......");
    }

    /**
     * get current process name
     *
     * @param context
     * @return
     */
    private String getCurProcessName(Context context) {
        int pid = android.os.Process.myPid();
        ActivityManager mActivityManager = (ActivityManager) context
                .getSystemService(Context.ACTIVITY_SERVICE);
        for (ActivityManager.RunningAppProcessInfo appProcess : mActivityManager
                .getRunningAppProcesses()) {
            if (appProcess.pid == pid) {
                return appProcess.processName;
            }
        }
        return null;
    }
}
服务端的工作是根据客户端传递过来的Students信息来生成对应的Student的一张信息表。
在AndroidManifest.xml文件里配置Service:
  <service
        android:name="com.example.xjp.aidl.MyServer">
        <intent-filter>
           <action android:name="com.xjp.myService"></action>
        </intent-filter>
  </service>
当然你可以配置属性android:process,也可以不配置。不配置也就是默认配置时,该Service的进程名就是当前应用的包名,如果配置的话就会覆盖默认进程名。
OK,到此服务端所有的工作都准备好了,此时你去编译整个工程,发现编译出错,错误提示:找不到 符号类Students。
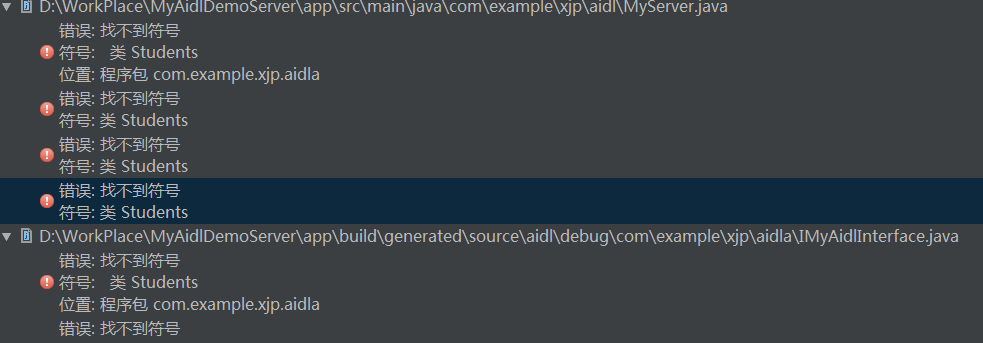
卧槽,懵圈了,该定义的都定义了,该import的也引入了,怎么会报错了?不知道Eclipse中是否有这个问题,反正Android Studio是有的,然后就网上搜吧,这方面的资料不多,有给出如下解答可以解决问题的。配置当前应用的 build.gradle文件,在该文件中添加如下配置即可。
sourceSets {
        main {
//            manifest.srcFile 'src/main/AndroidManifest.xml'
            java.srcDirs = ['src/main/java', 'src/main/aidl']
//            resources.srcDirs = ['src/main/java', 'src/main/aidl']
//            aidl.srcDirs = ['src/main/aidl']
//            res.srcDirs = ['src/main/res']
//            assets.srcDirs = ['src/main/assets']
        }
}注:我的AS是1.3的,所以只配置了一行 java.srcDirs = [‘src/main/java’, ‘src/main/aidl’] 就解决问题了。这一行的意思是指定源文件的路径,把aidl包含进去了。
此时你再去编译就OK啦!
客户端aidl
客户端aidl就简单啦,直接把刚才的服务端的整个aidl目录拷贝到客户端即可。这里重复利用服务端的aidl代码,无需重写。
客户端
package com.example.xjp.myaidldemocustomer;

import android.app.Activity;
import android.content.ComponentName;
import android.content.Context;
import android.content.Intent;
import android.content.ServiceConnection;
import android.os.Bundle;
import android.os.IBinder;
import android.os.RemoteException;
import android.util.Log;
import android.view.View;
import android.widget.ImageView;
import android.widget.TextView;

import com.example.xjp.aidla.IMyAidlInterface;
import com.example.xjp.aidla.Students;

public class MainActivity extends Activity {

    private IMyAidlInterface mStub;
    private TextView txt;
    private ImageView img;
    private View unBindService;
    private boolean isBind;

    private ServiceConnection serviceConnection = new ServiceConnection() {
        @Override
        public void onServiceConnected(ComponentName name, IBinder service) {
            mStub = IMyAidlInterface.Stub.asInterface(service);
        }

        @Override
        public void onServiceDisconnected(ComponentName name) {
            Log.e("xjp", "the onServiceDisconnected");
            mStub = null;
        }
    };

    @Override
    protected void onCreate(Bundle savedInstanceState) {
        super.onCreate(savedInstanceState);
        setContentView(R.layout.activity_main);

        txt = (TextView) findViewById(R.id.text);
    }

    public void bindService(View v) {
        isBind = true;
        if (unBindService != null) unBindService.setEnabled(true);
        Intent intent = new Intent();
        intent.setAction("com.xjp.myService");
        intent.setComponent(new ComponentName("com.example.xjp.aidl", "com.example.xjp.aidl.MyServer"));
        bindService(intent, serviceConnection, Context.BIND_AUTO_CREATE);
    }

    public void getTableInfo(View v) {
        if (mStub == null) {
            Log.e("xjp", "the mStub is null");
        } else {
            try {
                String info1 = mStub.inStudentInfo(new Students(1, "Jim", "090415", 18));
                String info2 = mStub.outStudentInfo(new Students(2, "Lida", "090416", 17));
                String info3 = mStub.inOutStudentInfo(new Students(3, "Tom", "090417", 16));

                txt.setText(info1 + "\n" + "===========line=========" + "\n" + info2 + "\n" +
                        "===========line=========" + "\n" + info3);
            } catch (RemoteException e) {
                e.printStackTrace();
            }

        }
    }

    public void unbindService(View v) {
        if (isBind) {
            isBind = false;
            unbindService(serviceConnection);
            unBindService = v;
            v.setEnabled(false);
        }

    }

    @Override
    protected void onDestroy() {
        if (isBind) unbindService(serviceConnection);
        super.onDestroy();
    }

}
客户端代码也很简单,实现ServiceConnection 连接服务的回调得到远程 binder,之后实现绑定服务方法,解绑服务方法,远程调用方法等。
同样客户端也需要配置 build.gradle文件,配置和服务端一样:
 sourceSets {
        main {
            java.srcDirs = ['src/main/java', 'src/main/aidl']
        }
    }
自此,整个Aidl传递对象的步骤基本完成。运行结果如下:
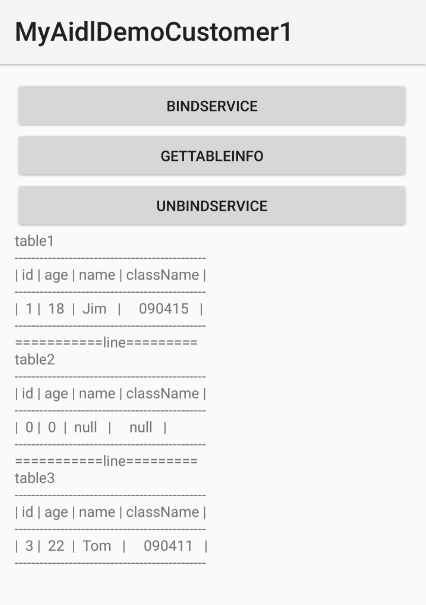
由以上三张表格的输出信息可以看出来:
String inStudentInfo(in Students student);//对应table1信息

String outStudentInfo(out Students student);//对应table2信息

String inOutStudentInfo(inout Students student);//对应table3信息
table1:表格信息是由客户端传入过去,且显示的信息也是客户端设置的信息,由此也证明in修饰符表示值由客户端设置。
table2:表格信息为空的,此时虽然客户端传入了Students参数,但是不生效,从此也证明了out修饰符表示由服务端设置值。
table3:表格信息和客户端传入的有变化,id=3,name=Tom没有改变,age=16变成22,className=“090417”变成了“090411”。这些改变都是在服务端修改的,也侧面说明了inout修饰符表示客户端和服务端都可以设置值。
总结
Aidl传递对象就实现了,需要注意点有如下:
- 传递的对象参数前面需要 in,out,inout三个当中的其中一个修饰符,否则会报错。
- 对象Students序列化重写writeToParcel和readFromParcel方法中写数据操作和读取操作顺序必须保持一致,否则会报错。
- 在使用到Students对象的地方都需要引入 import com.example.xjp.aidla.Students;包路径。否则也会报错找不到 Students类。
- 编译代码之前需要在 build.gradle配置文件中添加如下配置
sourceSets {
        main {
            java.srcDirs = ['src/main/java', 'src/main/aidl']
        }
    }


 888
888


 被折叠的 条评论
为什么被折叠?
被折叠的 条评论
为什么被折叠?
 到【灌水乐园】发言


