


VSTS提供了一个丰富、强大的工具平台,融合了软件开发领域的各个角色,涵盖软件开发生命周期的各个阶段,包括设计,开发,测试,管理,而这一整套构件的融会贯通,让它可以有效地改善软件开发过程中各个阶段的弊端,提高团队之间不同的角色的协调能力,提高工作效率。
本文就简单介绍一下如何利用VSTS给一个网站做压力测试。
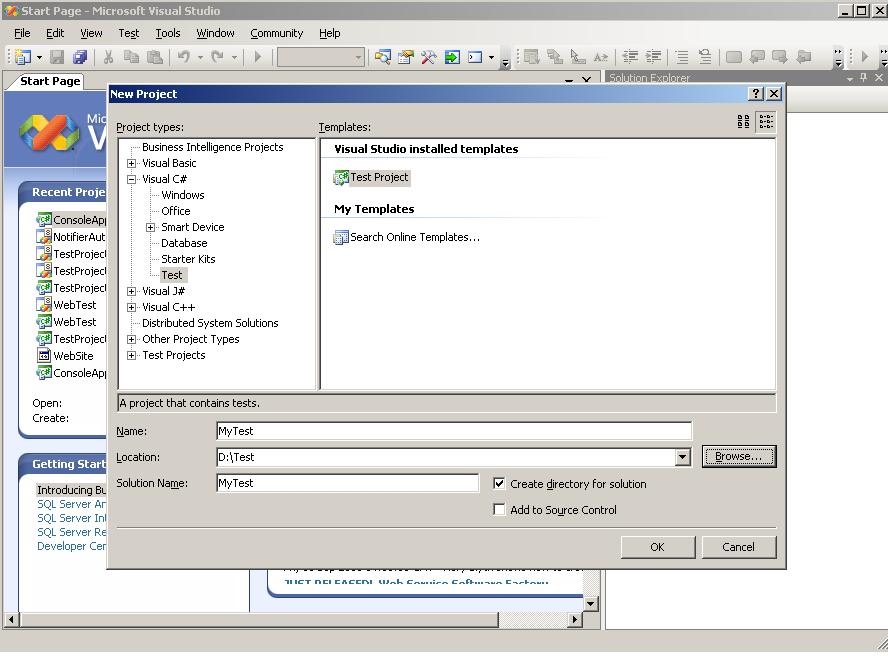
1 建立一个测试项目,起名MyTest
2 建立一个Web Test
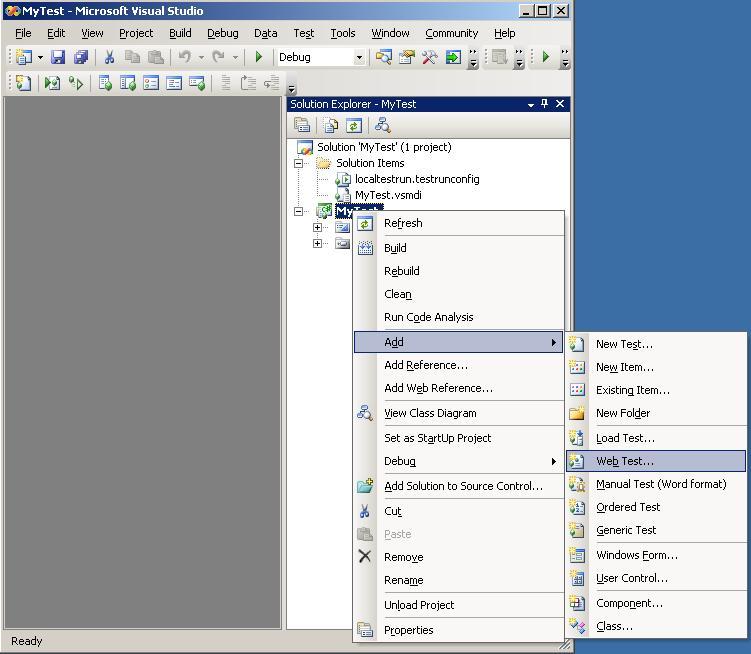
点击Web Test...
IE马上就会弹出一个窗口,这样录制脚本工作就可以开始了。
3 在IE里输入要测试的网站地址: 比如 http://localhost/WebSite/Default.aspx
4 对该网站做一些操作, 此时VSTS会纪录下你的这些操作,用以作为压力测试的场景。
5 录制脚本毕,点击 "STOP"
6 点击生成代码,可以看到刚才录制的类似如下的代码:
 //
------------------------------------------------------------------------------
//
------------------------------------------------------------------------------
//
<auto-generated>
//
This code was generated by a tool.
//
Runtime Version:2.0.50727.42
//
//
Changes to this file may cause incorrect behavior and will be lost if
//
the code is regenerated.
//
</auto-generated>
//
------------------------------------------------------------------------------
namespace
MyTest


 {
{
 using System;
using System.Collections.Generic;
using System.Text;
using Microsoft.VisualStudio.TestTools.WebTesting;
using Microsoft.VisualStudio.TestTools.WebTesting.Rules;
public class WebTest1Coded : WebTest

 {
{
public WebTest1Coded()
{
this.PreAuthenticate = true;
 }
}
public override IEnumerator<WebTestRequest> GetRequestEnumerator()
{
WebTestRequest request1 = new WebTestRequest("http://localhost/WebSite/Default.aspx");
request1.ThinkTime = 1688;
ExtractHiddenFields rule1 = new ExtractHiddenFields();
rule1.ContextParameterName = "1";
request1.ExtractValues += new EventHandler<ExtractionEventArgs>(rule1.Extract);
yield return request1;
WebTestRequest request2 = new WebTestRequest("http://localhost/WebSite/Default.aspx");
request2.ThinkTime = 2;
request2.Method = "POST";
FormPostHttpBody request2Body = new FormPostHttpBody();
request2Body.FormPostParameters.Add("__VIEWSTATE", this.Context["$HIDDEN1.__VIEWSTATE"].ToString());
request2Body.FormPostParameters.Add("Button1", "Go to Test Page");
request2Body.FormPostParameters.Add("__VIEWSTATEENCRYPTED", this.Context["$HIDDEN1.__VIEWSTATEENCRYPTED"].ToString());
request2Body.FormPostParameters.Add("__EVENTVALIDATION", this.Context["$HIDDEN1.__EVENTVALIDATION"].ToString());
request2.Body = request2Body;
ExtractHiddenFields rule2 = new ExtractHiddenFields();
rule2.ContextParameterName = "1";
request2.ExtractValues += new EventHandler<ExtractionEventArgs>(rule2.Extract);
yield return request2;
WebTestRequest request3 = new WebTestRequest("http://localhost/WebSite/test.aspx");
request3.Method = "POST";
FormPostHttpBody request3Body = new FormPostHttpBody();
request3Body.FormPostParameters.Add("__VIEWSTATE", this.Context["$HIDDEN1.__VIEWSTATE"].ToString());
request3Body.FormPostParameters.Add("Button1", "Go to default page.");
request3Body.FormPostParameters.Add("__EVENTVALIDATION", this.Context["$HIDDEN1.__EVENTVALIDATION"].ToString());
request3.Body = request3Body;
yield return request3;
}
}
 }
}
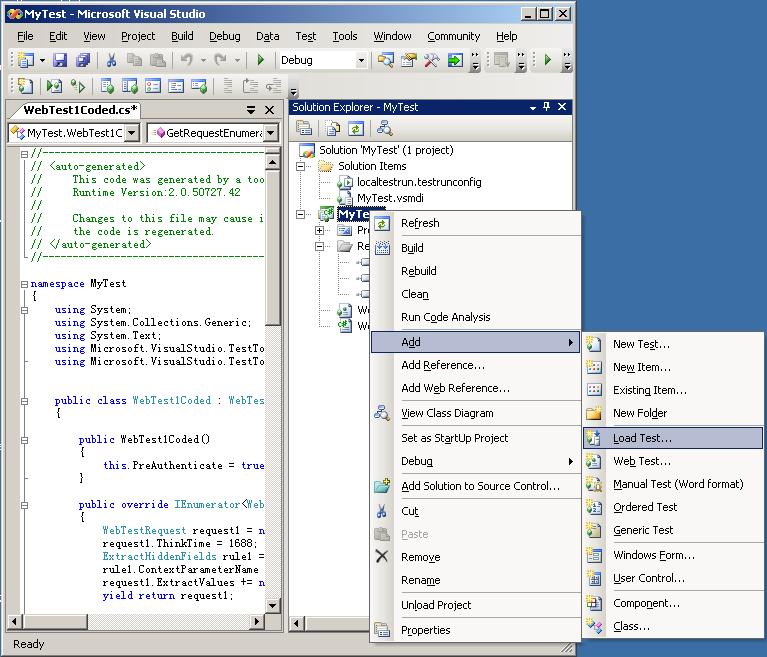
7 添加一个Load Test ...
8 填写好Load Test的各项参数
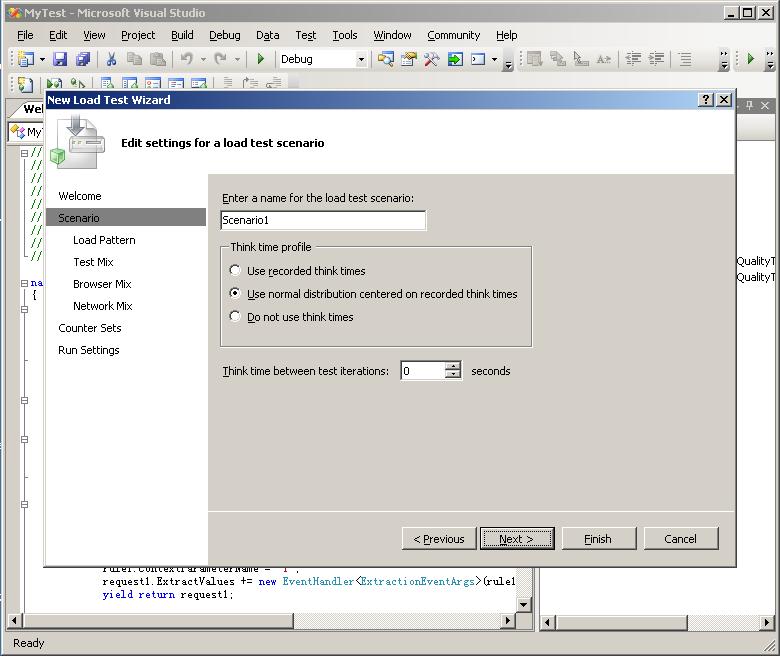
1) 第一步是填写场景名
2) 第二步是填写装载的样式
如果选择一次装载固定的用户数,选择第一项Constant Load
如果选择"Setp Load",表示步增,设置好开始时的用户数,以及经过多久每次增加的用户数
3) Test Mix
4) Browser Mix
5) Network Mix
6) 在Counter Sets 选择Add Compuer...,表示要对某个PC进行监控
7) Run Settings
9 点击Finish
10 点击Run Test,测试就开始了。
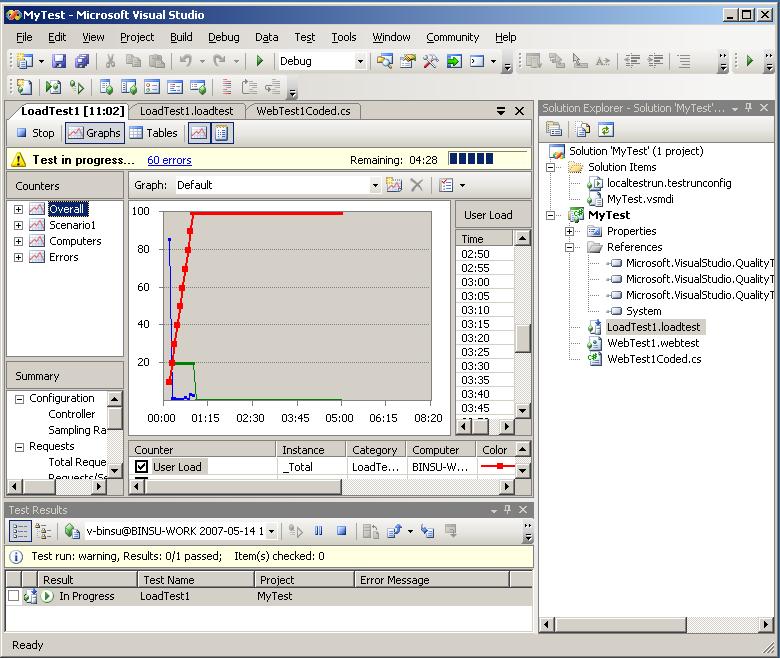
压力测试运行后,我们就可以选中某个参数,查看某个时刻机器个方面的性能。参看下图:
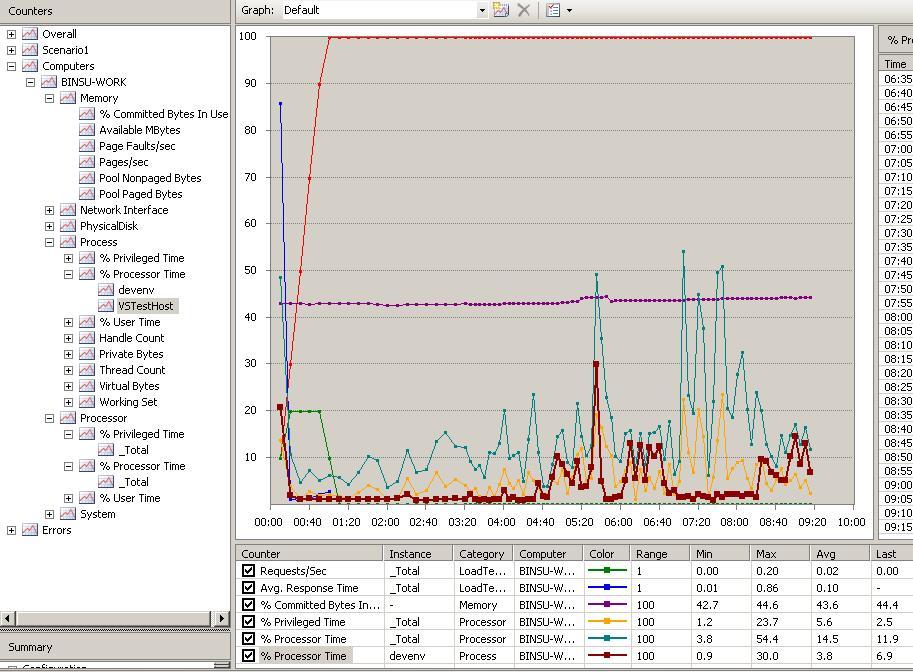
我们也可以运行perfmon,通过Performance查看机器的各项指标。
本文就简单介绍一下如何利用VSTS给一个网站做压力测试。
1 建立一个测试项目,起名MyTest
2 建立一个Web Test
点击Web Test...
IE马上就会弹出一个窗口,这样录制脚本工作就可以开始了。
3 在IE里输入要测试的网站地址: 比如 http://localhost/WebSite/Default.aspx
4 对该网站做一些操作, 此时VSTS会纪录下你的这些操作,用以作为压力测试的场景。
5 录制脚本毕,点击 "STOP"
6 点击生成代码,可以看到刚才录制的类似如下的代码:
//
------------------------------------------------------------------------------
//
<auto-generated>
//
This code was generated by a tool.
//
Runtime Version:2.0.50727.42
//
//
Changes to this file may cause incorrect behavior and will be lost if
//
the code is regenerated.
//
</auto-generated>
//
------------------------------------------------------------------------------
namespace
MyTest
{ using System; using System.Collections.Generic; using System.Text; using Microsoft.VisualStudio.TestTools.WebTesting; using Microsoft.VisualStudio.TestTools.WebTesting.Rules; public class WebTest1Coded : WebTest { public WebTest1Coded() { this.PreAuthenticate = true; } public override IEnumerator<WebTestRequest> GetRequestEnumerator() { WebTestRequest request1 = new WebTestRequest("http://localhost/WebSite/Default.aspx"); request1.ThinkTime = 1688; ExtractHiddenFields rule1 = new ExtractHiddenFields(); rule1.ContextParameterName = "1"; request1.ExtractValues += new EventHandler<ExtractionEventArgs>(rule1.Extract); yield return request1; WebTestRequest request2 = new WebTestRequest("http://localhost/WebSite/Default.aspx"); request2.ThinkTime = 2; request2.Method = "POST"; FormPostHttpBody request2Body = new FormPostHttpBody(); request2Body.FormPostParameters.Add("__VIEWSTATE", this.Context["$HIDDEN1.__VIEWSTATE"].ToString()); request2Body.FormPostParameters.Add("Button1", "Go to Test Page"); request2Body.FormPostParameters.Add("__VIEWSTATEENCRYPTED", this.Context["$HIDDEN1.__VIEWSTATEENCRYPTED"].ToString()); request2Body.FormPostParameters.Add("__EVENTVALIDATION", this.Context["$HIDDEN1.__EVENTVALIDATION"].ToString()); request2.Body = request2Body; ExtractHiddenFields rule2 = new ExtractHiddenFields(); rule2.ContextParameterName = "1"; request2.ExtractValues += new EventHandler<ExtractionEventArgs>(rule2.Extract); yield return request2; WebTestRequest request3 = new WebTestRequest("http://localhost/WebSite/test.aspx"); request3.Method = "POST"; FormPostHttpBody request3Body = new FormPostHttpBody(); request3Body.FormPostParameters.Add("__VIEWSTATE", this.Context["$HIDDEN1.__VIEWSTATE"].ToString()); request3Body.FormPostParameters.Add("Button1", "Go to default page."); request3Body.FormPostParameters.Add("__EVENTVALIDATION", this.Context["$HIDDEN1.__EVENTVALIDATION"].ToString()); request3.Body = request3Body; yield return request3; } }}
7 添加一个Load Test ...
8 填写好Load Test的各项参数
1) 第一步是填写场景名
2) 第二步是填写装载的样式
如果选择一次装载固定的用户数,选择第一项Constant Load
如果选择"Setp Load",表示步增,设置好开始时的用户数,以及经过多久每次增加的用户数
3) Test Mix
4) Browser Mix
5) Network Mix
6) 在Counter Sets 选择Add Compuer...,表示要对某个PC进行监控
7) Run Settings
9 点击Finish
10 点击Run Test,测试就开始了。
压力测试运行后,我们就可以选中某个参数,查看某个时刻机器个方面的性能。参看下图:
我们也可以运行perfmon,通过Performance查看机器的各项指标。


 3487
3487

 被折叠的 条评论
为什么被折叠?
被折叠的 条评论
为什么被折叠?
 到【灌水乐园】发言


