


先从第一步做起,怎么去注册一个设备。内核里面有个文档
这里有个instantiating-devices。这个文件的名字叫做实例化设备。
第一种方法
第一种方法通过总线设备来声明设备,这里有个例子,我们直接看源码方便一些

I2C_BOARD_INFO解析起来就是I2C单板信息。定义一个board_info结构体。I2C_BOARD_INFO("24c08",0x50);24c08表示名字,0x50表示设备地址信息。总线通过名字可以找到驱动。然后注册这个结构体

我们进这个函数里面去看一看,怎么他是怎么注册这个I2C_CLIENT,
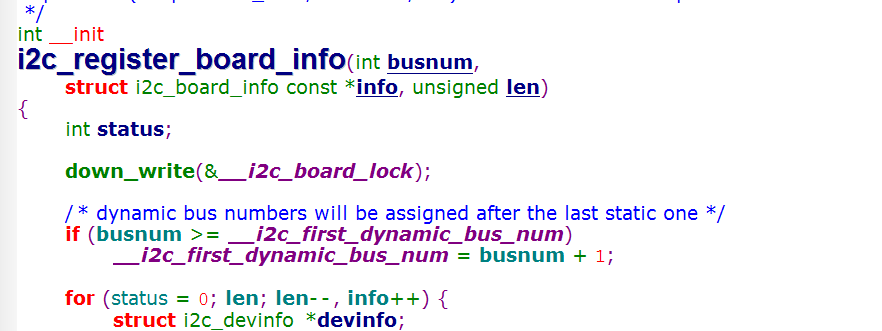
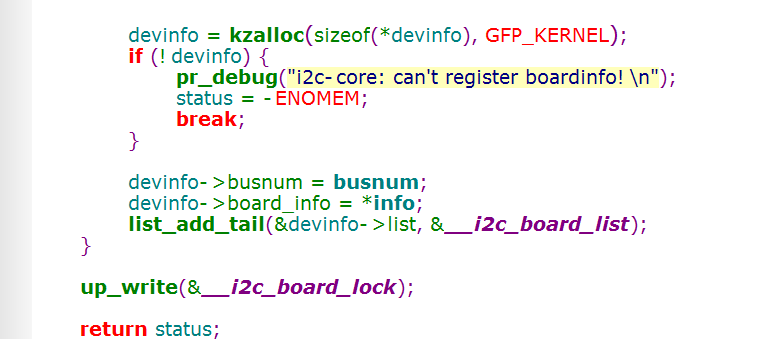
struct i2c_board_info const *info 这是一个数组,这个数组有多少个项,这里有个长度unsigned len。它就一项一项去处理你。这里有个list_add_tail,这个是将devinfo->list放入__i2c_board_list这个链表,这个链表什么时候用,这个链表在这里用
在/driver/i2c/i2c-core.c里面用
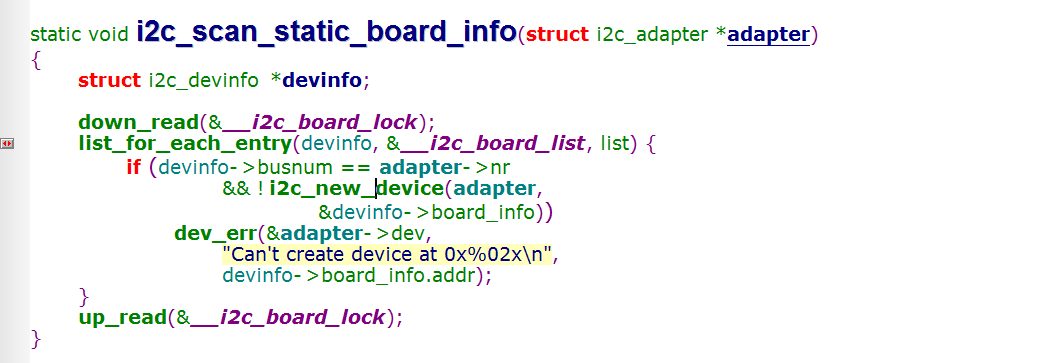
在这里用,I2C扫描静态的单板信息,对这个链表里面的每个成员都调用I2C_NEW_DEVICE,这个i2c_new_device是干嘛用的,这个非常重要,我写出了名字和地址怎么注册,就是通过i2c_new_device,这个i2c_new_device就是构造i2c_client,把它放到这个平台设备的链表里面去,然后驱动就是通过i2c_add_driver放到设备的链表里面去。
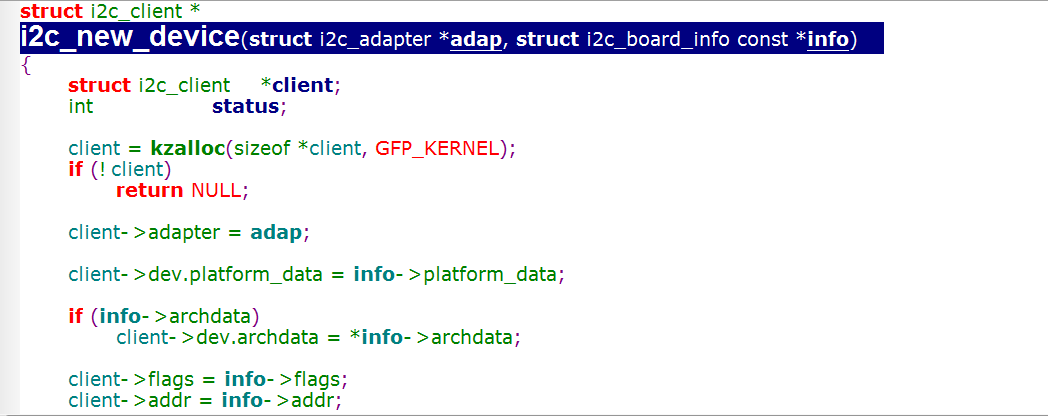
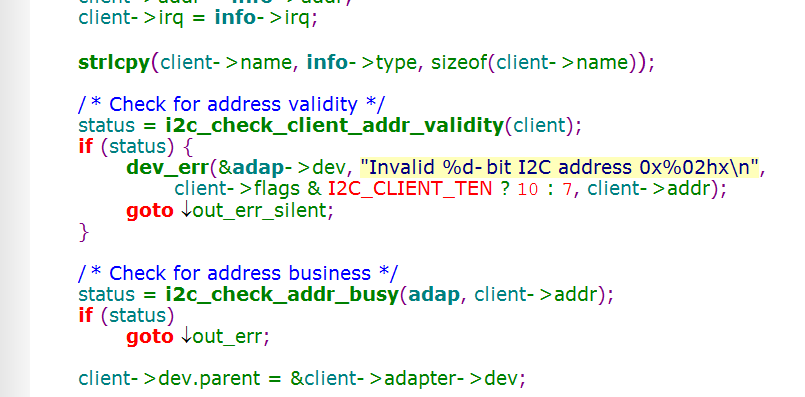
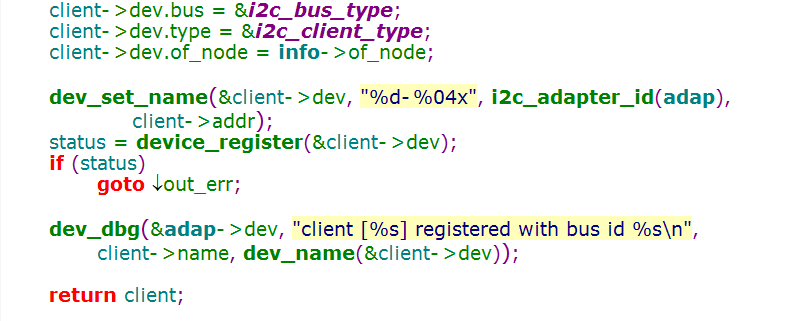
在上面的代码可以看出把所有的东西之后通过device_register注册设备,这些我们都不管。
这个static void i2c_scan_static_board_info(struct i2c_adapter *adapter) 这个函数又是被static int i2c_register_adapter(struct i2c_adapter *adap)这个函数给调用,注册设备器,这个设备器就是你CPU的I2C的控制器的驱动程序,注册完之后就会去扫描下I2C静态的单板信息。
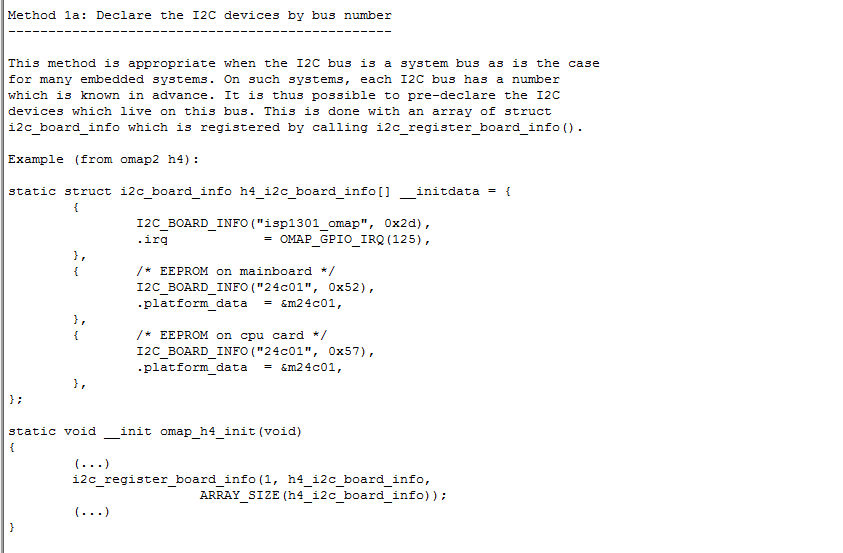
我们先看看int __init i2c_register_board_info(int busnum,struct i2c_board_info const *info, unsigned len)这个函数的参数,第一个参数是busnum,总线num,表示是哪一个适配器。这就是通过总线序号来声明
我们来看看这段英文
Method 1a: Declare the I2C devices by bus number
------------------------------------------------
This method is appropriate when the I2C bus is a system bus as is the case
for many embedded systems. On such systems, each I2C bus has a number
which is known in advance. It is thus possible to pre-declare the I2C
devices which live on this bus. This is done with an array of struct
i2c_board_info which is registered by calling i2c_register_board_info().
通过总线号来声明I2C设备,对应我们前面的那个就是busnum等于0,怎么声明呢,看这个例子
static struct i2c_board_info h4_i2c_board_info[] __initdata = {
{
I2C_BOARD_INFO("isp1301_omap", 0x2d), 这里是名字,设备地址
.irq = OMAP_GPIO_IRQ(125), 这里是一些其他信息,这些信息用不用由你决定,以后在说,这个信息是给你的probe函数用的
},
{ /* EEPROM on mainboard */
I2C_BOARD_INFO("24c01", 0x52),
.platform_data= &m24c01,
},
{ /* EEPROM on cpu card */
I2C_BOARD_INFO("24c01", 0x57),
.platform_data= &m24c01,
},
};
static void __init omap_h4_init(void)
{
(...)
i2c_register_board_info(1, h4_i2c_board_info,
ARRAY_SIZE(h4_i2c_board_info));
(...)
}
第一种方式就是这样的,第一种方式在什么地方才会有效呢?使用限制:必须在static int i2c_register_adapter(struct i2c_adapter *adap)这个函数注册之前i2c_register_board_info。因为我这个是在注册之前放到链表里面去才会i2c_register_adapter会调用那个扫描函数才会拿出来,所以不适合我们动态加载
第二种直接i2c_new_device,或者直接i2c_new_probed_device,我们先看一看文档里面怎么说
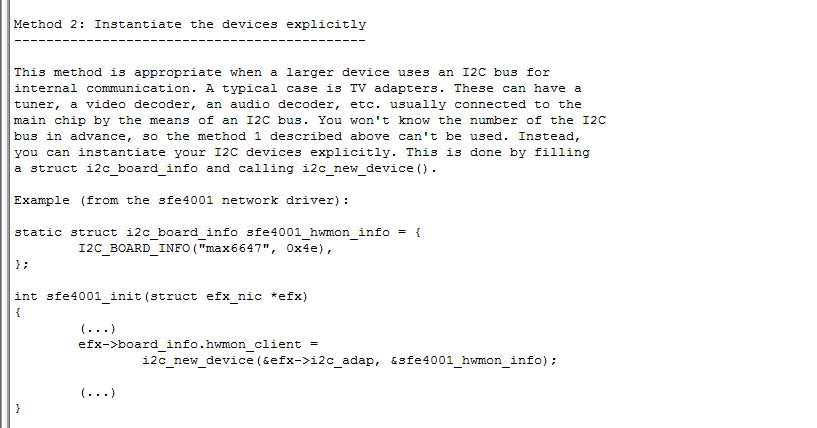
实例化,直接看我们i2c_new_device就行了,我们先看看有几个参数

adapter是适配器的意思,就是I2C的控制器。还要指定单板信息。
我们现在开始写代码
写一个最简单的I2C驱动代码
设备端
#include <linux/kernel.h>
#include <linux/i2c.h>
#include <linux/mutex.h>
static struct i2c_board_info gh24xx_info ={
I2C_BOARD_INFO("24cl04",0x50),
};
struct i2c_client *client;
static int gh24cl04_device_init(void)
{
//注册一个设备,这个适配器怎么取得,board_info结构体怎么取得
//board_info结构体我们可以自己指定
struct i2c_adapter *i2c_adap;
//获得适配器
i2c_adap = i2c_get_adapter(0);
client=i2c_new_device(i2c_adap,&gh24xx_info);
//用完之后释放适配器
i2c_put_adapter(i2c_adap);
return 0;
}
static void gh24cl04_device_exit(void)
{
i2c_unregister_device(client);
}
module_init(gh24cl04_device_init);
module_exit(gh24cl04_device_exit);
MODULE_LICENSE("GPL");
驱动端
#include <linux/kernel.h>
#include <linux/module.h>
#include <linux/platform_device.h>
#include <linux/i2c.h>
#include <linux/slab.h>
static int at24cl04_probe(struct i2c_client *client,const struct i2c_device_id *id)
{
printk("24cl04_probe\n");
return 0;
}
static int at24cl04_remove(struct i2c_client *client)
{
printk("24cl04_remove\n");
return 0;
}
static const struct i2c_device_id at24cl04_id_table[] = {
{ "24cl04", 0 },
{}
};
static struct i2c_driver at24cl04_driver = {
.driver = {
.name = "24cl04",
.owner = THIS_MODULE,
},
.probe = at24cl04_probe,
.remove = at24cl04_remove,
.id_table = at24cl04_id_table,
};
/*1. 分配/设置 i2c_driver*/
static int at24cl04_driver_init(void)
{
int ret;
ret = i2c_add_driver(&at24cl04_driver);
if (ret != 0)
pr_err("Failed to register 88PM860x I2C driver: %d\n", ret);
return ret;
}
static void at24cl04_driver_exit(void)
{
i2c_del_driver(&at24cl04_driver);
}
module_init(at24cl04_driver_init);
module_exit(at24cl04_driver_exit);
MODULE_LICENSE("GPL");
输出结果

但是这种方法存在一个问题,你把那个地址怎么改,他都认为是存在的
i2c_new_device 强制认为你设备肯定存在
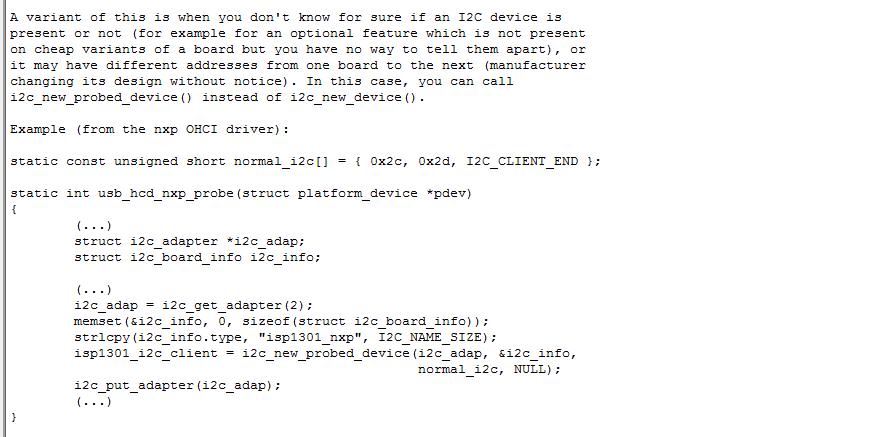
i2c_new_probed_device创建新设备,对于“已经识别出来的设备”probed_device才会创建new device
来看看这个函数怎么用,先看原型

第一个参数是适配器,第二个参数是扳机信息,第三个是addr_list,第四个是probe函数
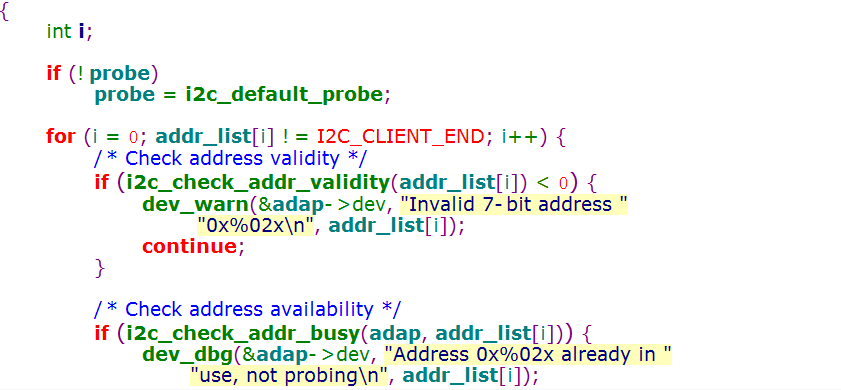
如果你不提供probe函数,他就会使用默认的probe函数,这个probe函数的作用是用这个函数确定下你这个设备是否真实存在,怎么写呢,看文档
我们看看这个代码做了什么
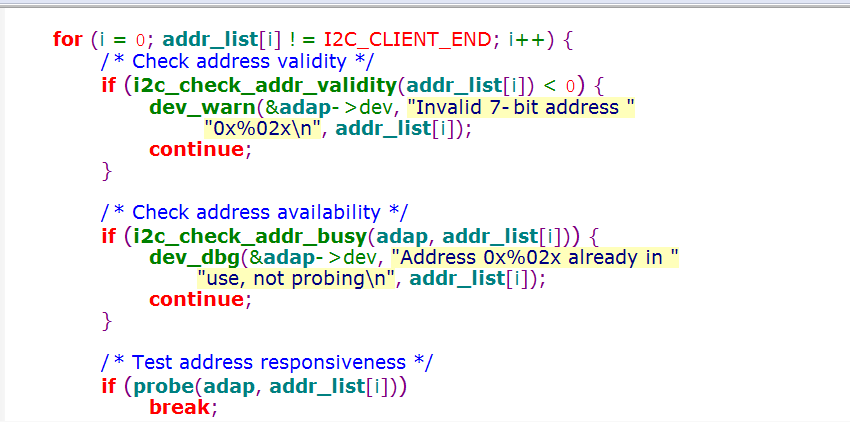
这里对链表里面的地址一个一个来执行,先检查地址是否被用了,然后测试地址有没有回应,有回应的话就表示你这个地址是存在的,然后i2c_new_device
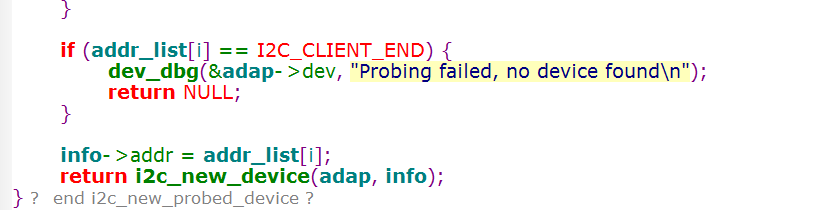
这里又回到了我们的前面啊,只是说如果存在的话就new_device, 只是这里检测了是否存在
范例代码如下
#include <linux/kernel.h>
#include <linux/i2c.h>
#include <linux/mutex.h>
struct i2c_client *client;
//i2c 设备的地址链表,比如这里写50,表示看50是否存在,写60表示看是否60存在,你可以放一大堆的地址
static const unsigned short normal_i2c[] = { 0x60,0x50,I2C_CLIENT_END };
static int gh24cl04_device_init(void)
{
//注册一个设备,这个适配器怎么取得,board_info结构体怎么取得
//board_info结构体我们可以自己指
struct i2c_adapter *i2c_adap;
struct i2c_board_info gh24xx_info;
memset(&gh24xx_info, 0, sizeof(struct i2c_board_info));
strlcpy(gh24xx_info.type, "24cl04", I2C_NAME_SIZE);
//获得适配器
i2c_adap = i2c_get_adapter(0);
client=i2c_new_probed_device(i2c_adap,&gh24xx_info,normal_i2c);
//client = i2c_new_probed_device(NULL,NULL,NULL);
if(client)
{
printk("have this facility\n");
}
else
{
printk("have no this facility\n");
}
//用完之后释放适配器
i2c_put_adapter(i2c_adap);
return 0;
}
static void gh24cl04_device_exit(void)
{
i2c_unregister_device(client);
}
module_init(gh24cl04_device_init);
module_exit(gh24cl04_device_exit);
MODULE_LICENSE("GPL");
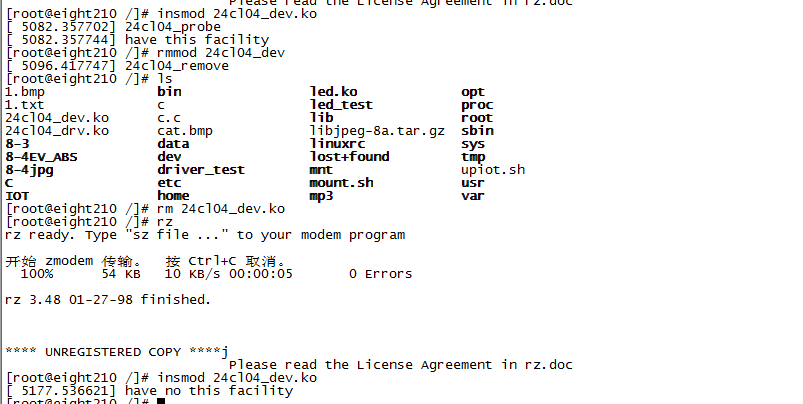
如果把0x50去掉会没有发现设备,如下
第三中,从用户空间创建,文档介绍如下
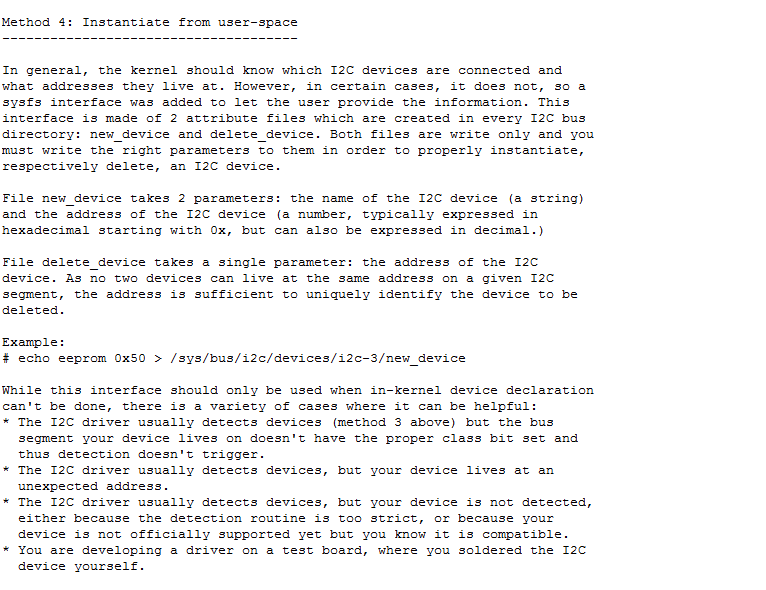
你可以想new_device上写上一些数据,它就可以帮你创建设备,

我们有三款适配器,我们来看看适配器下面有什么文件

有个new_device有个delete_device
我们直接来演示,英文自己看
创建设备,如下图

删除设备 如下图

上面的创建设备肯定是导致I2C_NEW_DEVICE被调用 这个i2c-0就可以知道adpater参数,从前面就知道board_info参数
删除那里肯定是导致注销函数被调用,不信的话可以看I2C_CORE里面

操作new_device函数的时候导致 i2c_sysfs_new_device被调用 操作delete_device的时候导致i2c_sysfs_delete_device被调用
来看看new_device函数做了什么事情

在取得信息之后直接new_device
delete_device怎么做,同样的
前面几种方法都要事先确定适配器(I2C总线,I2C控制器),但是如果我事先并不知道,这个I2C设备在那个适配器上怎么办?
这里就要用到我们的第四种方法,对于我们的文档里面就是第三种方法
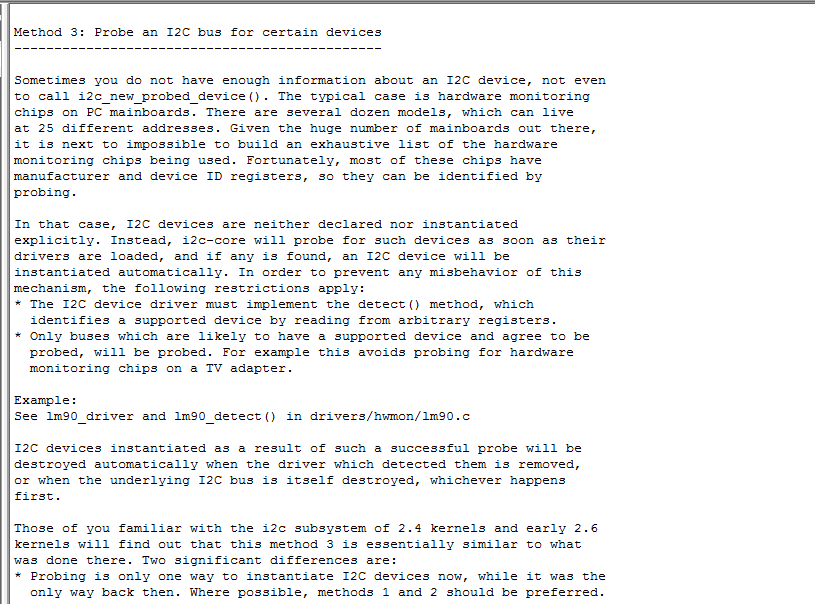
这里面说了有个例子 See lm90_driver and lm90_detect() in drivers/hwmon/lm90.c
我们打开lm90.c这个代码
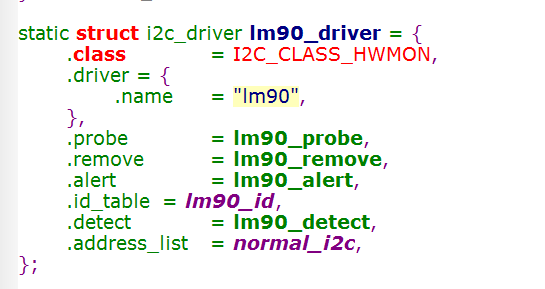
定义了一个i2c_driver,有class.class表示去哪一类的I2C适配器上去查找有没有这个设备,还有id_table,id_table的作用是跟client来比较,看是否支持的
我们先写下来
static struct i2c_driver lm90_driver = {
.class = I2C_CLASS_HWMON, //去哪一类I2C适配器查找能支持的设备
.driver = {
.name = "lm90",
},
.probe = lm90_probe,
.remove = lm90_remove,
.alert = lm90_alert,
.id_table = lm90_id,
.detect = lm90_detect, //用这个函数来检测能否找到这个设备
.address_list = normal_i2c, //表示说这些设备的地址,我这个driver回去看看能不能支持这些设备,
};
去"class表示的这类适配器,用delect函数"来确定能否找到address_list里面的设备,如果能够找到就调用i2c_new_device,然后跟driver里面的id_table进行比较
这个时候就不需要device那部分了,这个函数里面都包含有
代码如下
#include <linux/kernel.h>
#include <linux/module.h>
#include <linux/platform_device.h>
#include <linux/i2c.h>
#include <linux/slab.h>
static int at24cl04_probe(struct i2c_client *client,const struct i2c_device_id *id)
{
printk("24cl04_probe\n");
return 0;
}
static int at24cl04_remove(struct i2c_client *client)
{
printk("24cl04_remove\n");
return 0;
}
static const unsigned short normal_i2c[] = {0x50, 0x60,I2C_CLIENT_END };
static const struct i2c_device_id at24cl04_id_table[] = {
{ "24cl04", 0x50 },
{}
};
static int at24cl04_detect(struct i2c_client *new_client,struct i2c_board_info *info)
{
//本来是发出一些I2C的命令来检测是否存在的,这里做简单一点
printk("address = 0x%x\n",new_client->addr);
if(new_client->addr==0x50)
{
strlcpy(info->type, "24cl04", I2C_NAME_SIZE);
return 0;
}
else
return -ENODEV;
}
static struct i2c_driver at24cl04_driver = {
.class = I2C_CLASS_HWMON,//表示去那些适配器上去找设备
.driver = {
.name = "at24cl04",
},
.probe = at24cl04_probe,
.remove = at24cl04_remove,
//.alert = lm90_alert,
.id_table = at24cl04_id_table,
.detect = at24cl04_detect,
.address_list = normal_i2c,
};
/*1. 分配/设置 i2c_driver*/
static int at24cl04_driver_init(void)
{
int ret;
ret= i2c_add_driver(&at24cl04_driver);
if (ret != 0)
pr_err("Failed to register 88PM860x I2C driver: %d\n", ret);
return ret;
}
static void at24cl04_driver_exit(void)
{
i2c_del_driver(&at24cl04_driver);
}
module_init(at24cl04_driver_init);
module_exit(at24cl04_driver_exit);
MODULE_LICENSE("GPL");
我们来说过程,这个i2c_add_driver会把at24cl04_driver放入i2c_bus_type的driver链表,看看源码

看看注释,回放入链表取出能匹配的I2C_CLIENT并调用probe函数
如果没有呢,看看下面

对于每个适配器,调用 __process_new_driver这个函数 实际上适配器也是挂在总线上的,怎么分辨呢,里面有个type,
我们来看看这个函数

如果你不是适配器的话就换回i2c_do_add_adapter,对每一个适配器调用它 的函数确定address_list的设备是否存在,如果存在,再调用detect函数进一步判断设置,然后new_device

这里会调用这个i2c_detect,看注释是检测一下这个bus支持的设备,并实例化
进去看一看
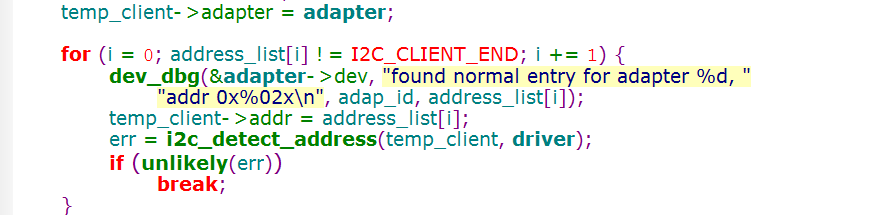
对于address_list的每一项,调用detect_address

这里面又调用了这个函数,就是看看你地址有没有回应。这个函数就是简单的发出start的信号,确定有ACK,判断一下这个地址是否存在
如果存在的话,调用delect函数 ,因为你地址可能冲突,所以这个delect函数里面做一些处理帮你区分

能运行到这个detect函数说明addr的设备是存在的,但是有些设备单凭地址无法分辨(A芯片的地址是0x50,B的地址也是0x50)还需要进一步读写I2C设备来分辨是那一块芯片
这个芯片肯定是不能接在同一条总线上的,这个函数是用来进一步判断的,
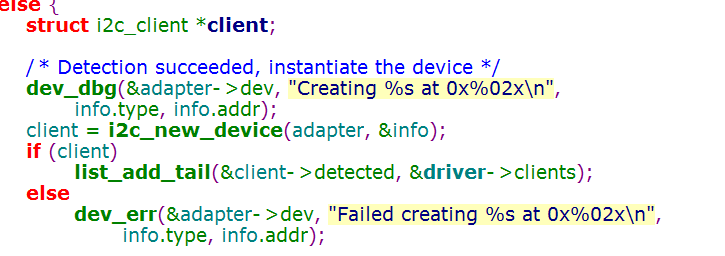
然后new_device

在前面已经设置了地址,所以我们这里需要在这个delect函数设置type


 590
590


 被折叠的 条评论
为什么被折叠?
被折叠的 条评论
为什么被折叠?
 到【灌水乐园】发言


