


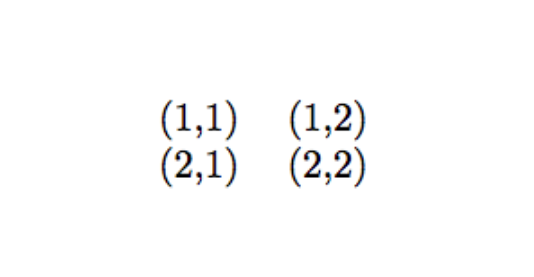
1.基本格式
-
\documentclass
{article}
-
-
\begin
{document}
-
-
\begin
{tabular}
{cc}
%一个c表示有一列,格式为居中显示(center)
-
(
1,
1)&(
1,
2)\\
%第一行第一列和第二列 中间用&连接
-
(
2,
1)&(
2,
2)\\
%第二行第一列和第二列 中间用&连接
-
\
end
{tabular}
-
-
\
end
{document}
效果如下:
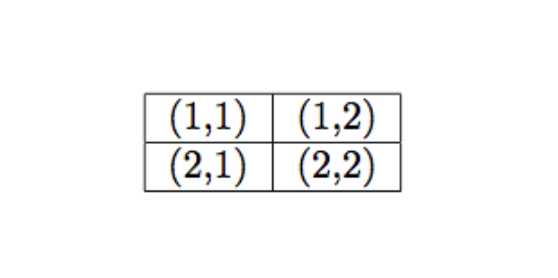
2.添加竖线和横线
-
\documentclass
{article}
-
-
\begin
{document}
-
-
\begin
{tabular}
{|c|c|}
% 通过添加 | 来表示是否需要绘制竖线
-
\hline
% 在表格最上方绘制横线
-
(
1,
1)&(
1,
2)\\
-
\hline
%在第一行和第二行之间绘制横线
-
(
2,
1)&(
2,
2)\\
-
\hline
% 在表格最下方绘制横线
-
\
end
{tabular}
-
-
\
end
{document}
效果如下:
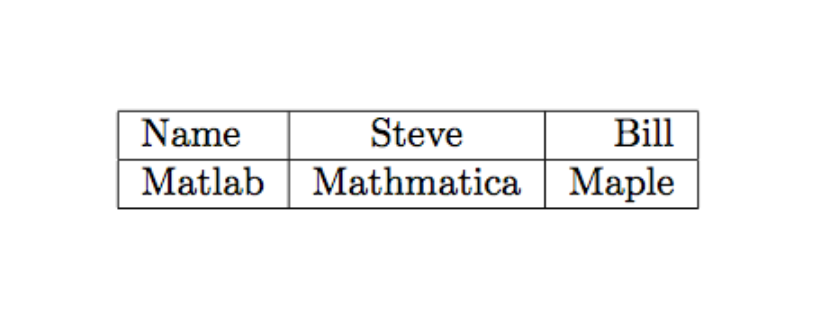
3.设置每一列的单元格格式
-
\documentclass
{article
}
-
-
\begin
{document
}
-
-
\begin
{tabular
}
{|l|c|r|
}
%l(left)居左显示 r(right)居右显示 c居中显示
-
\hline
-
Name
&Steve
&Bill
\\
-
\hline
-
Matlab
&Mathmatica
&Maple
\\
-
\hline
-
\end
{tabular
}
-
-
\end
{document
}
效果如下:
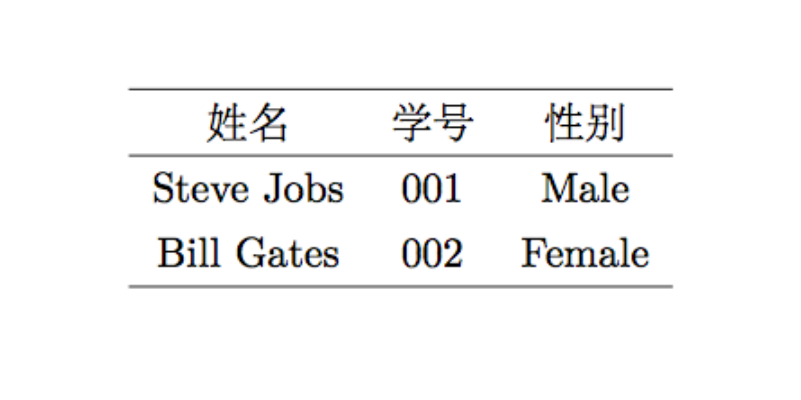
4.常见的三线表
-
\documentclass
[UTF8
]
{ctexart
}
-
\begin
{document
}
-
-
\begin
{tabular
}
{ccc
}
-
\hline
-
姓名
& 学号
& 性别
\\
-
\hline
-
Steve Jobs
& 001
& Male
\\
-
Bill Gates
& 002
& Female
\\
-
\hline
-
\end
{tabular
}
-
-
\end
{document
}
效果如下:
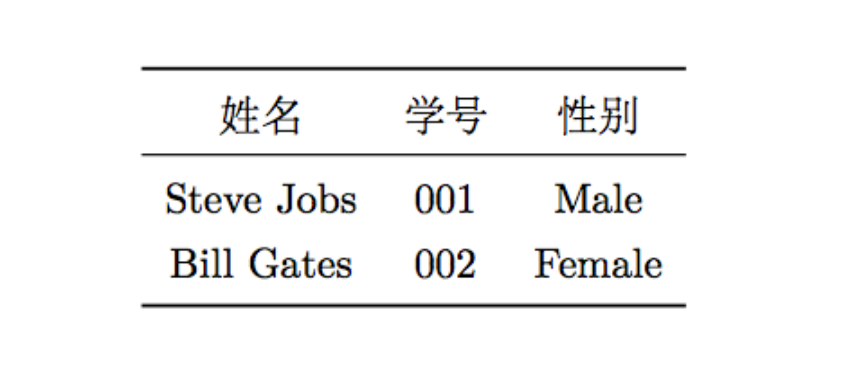
通常来说,我们会希望表格的第一根线和最后一根线比表格中的横线更粗一些。
booktabs 宏包为我们提供了这个功能,加载 booktabs 宏包之后可以使用 \toprule 和 \bottomrule 命令分别画出表格头和表格底的粗横线,而用 \midrule 画出表格中的横线。
-
\documentclass
[UTF8]
{ctexart}
-
\usepackage
{booktabs}
%需要加载宏包{booktabs}
-
\begin
{document}
-
-
\begin
{tabular}
{ccc}
-
\toprule
%添加表格头部粗线
-
姓名& 学号& 性别\\
-
\midrule
%添加表格中横线
-
Steve Jobs&
001& Male\\
-
Bill Gates&
002& Female\\
-
\bottomrule
%添加表格底部粗线
-
\
end
{tabular}
-
-
\
end
{document}
效果如下:
5.table环境
-
\documentclass
[UTF8
]
{ctexart
}
-
\usepackage
{booktabs
}
-
\begin
{document
}
-
-
\begin
{table
}
[!htbp
]
-
\centering
-
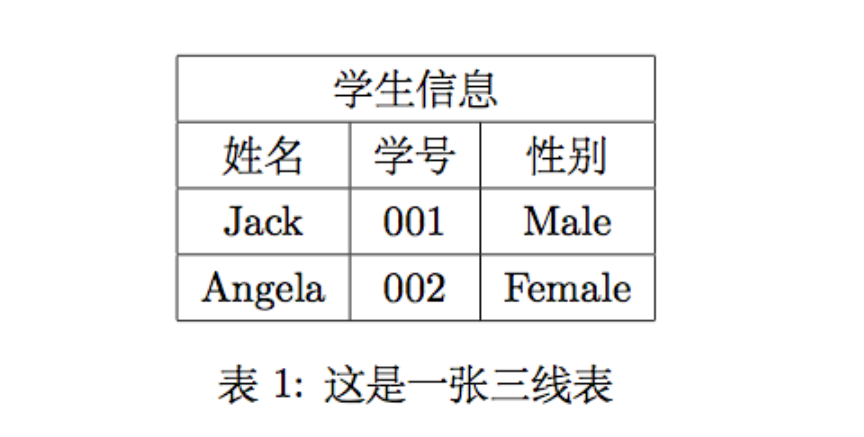
\caption
{这是一张三线表
}
\label
{tab:aStrangeTable
}
%添加标题 设置标签
-
\begin
{tabular
}
{ccc
}
-
\toprule
-
姓名
& 学号
& 性别
\\
-
\midrule
-
Steve Jobs
& 001
& Male
\\
-
Bill Gates
& 002
& Female
\\
-
\bottomrule
-
\end
{tabular
}
-
%\caption{这是一张三线表}\label{tab:aStrangeTable} 标题放在这里也是可以的
-
\end
{table
}
-
-
\end
{document
}
{table}有若干可选参数 [!htbp] h代表here,将表格排在当前文字位置 t 表示将表格放在下一页的 top (页首) b 表示将表格放在当前页的 bottom (底部) !表示忽略美观因素,尽可能按照参数指定的方式来处理表格浮动位置。
表格将会按照所给参数,依次尝试按照每个参数进行排版,当无法排版时,将会按照下一个参数
6.单元格合并
-
\documentclass
[UTF8
]
{ctexart
}
-
\begin
{document
}
-
-
\begin
{table
}
[!htbp
]
-
\centering
-
\begin
{tabular
}
{|c|c|c|
}
-
\hline
-
\multicolumn
{3
}
{|c|
}
{学生信息
}
\\
% 用\multicolumn{3}表示横向合并三列
-
% |c|表示居中并且单元格两侧添加竖线 最后是文本
-
\hline
-
姓名
&学号
&性别
\\
-
\hline
-
Jack
& 001
& Male
\\
-
\hline
-
Angela
& 002
& Female
\\
-
\hline
-
\end
{tabular
}
-
\caption
{这是一张三线表
}
-
\end
{table
}
-
-
\end
{document
}
效果如下:
-
\documentclass
[UTF8]
{ctexart}
-
\usepackage
{multirow}
-
\begin
{document}
-
-
\begin
{table}
[!htbp]
-
\centering
-
\begin
{tabular}
{|c|c|c|c|c|c|c|}
%表格7列 全部居中显示
-
\hline
-
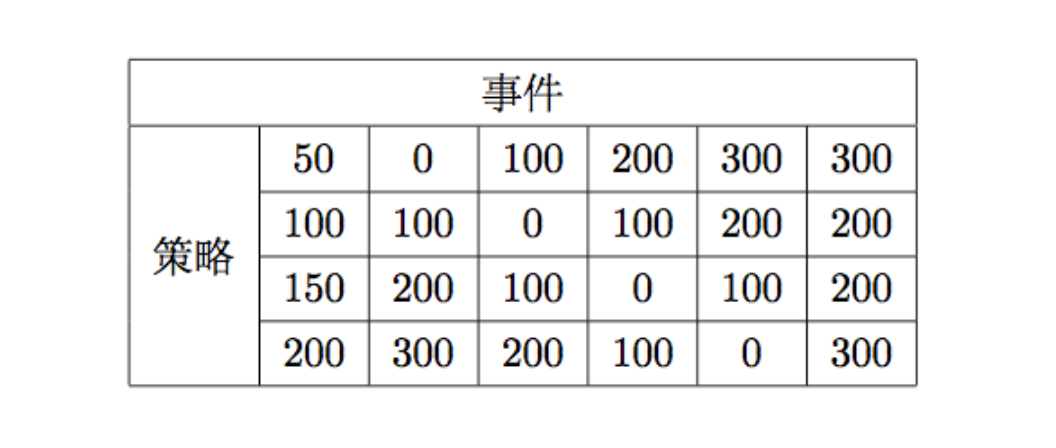
\multicolumn
{7}
{|c|}
{事件}\\
%横向合并7列单元格 两侧添加竖线
-
\hline
-
\multirow
{4}*
{策略}&
50&
0&
100&
200&
300&
300\\
%纵向合并4行单元格
-
\cline
{2-7}
%为第二列到第七列添加横线
-
&
100&
100&
0&
100&
200&
200\\
-
\cline
{2-7}
-
&
150&
200&
100&
0&
100&
200\\
-
\cline
{2-7}
-
&
200&
300&
200&
100&
0&
300\\
-
\hline
-
\
end
{tabular}
-
\
end
{table}
-
-
\
end
{document}
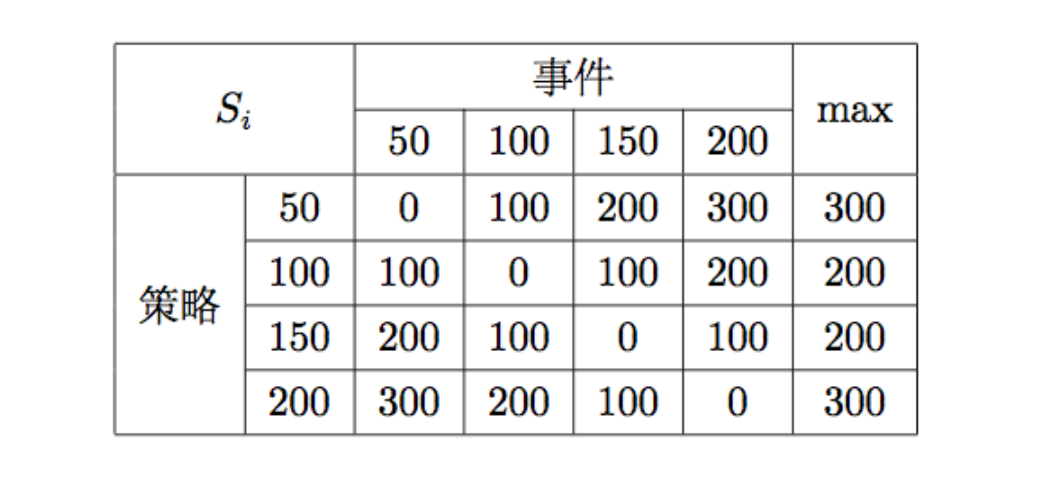
横向合并和纵向合并可以嵌套,代码如下:
-
\documentclass
[UTF8]
{ctexart}
-
\usepackage
{multirow}
-
\begin
{document}
-
-
\begin
{table}
[!htbp]
-
\centering
-
\begin
{tabular}
{|c|c|c|c|c|c|c|}
-
\hline
-
-
\multicolumn
{2}
{|c|}
{ \multirow{2}*
{$S_i$} }& \multicolumn
{4}
{c|}
{事件} &\multirow
{2}*
{max}\\
-
\cline
{3-6}
-
\multicolumn
{2}
{|c|}
{}&
50&
100&
150&
200&\\
-
\hline
-
\multirow
{4}*
{策略}&
50&
0&
100&
200&
300&
300\\
-
\cline
{2-7}
-
&
100&
100&
0&
100&
200&
200\\
-
\cline
{2-7}
-
&
150&
200&
100&
0&
100&
200\\
-
\cline
{2-7}
-
&
200&
300&
200&
100&
0&
300\\
-
\hline
-
\
end
{tabular}
-
\
end
{table}
-
-
\
end
{document}
效果如下:
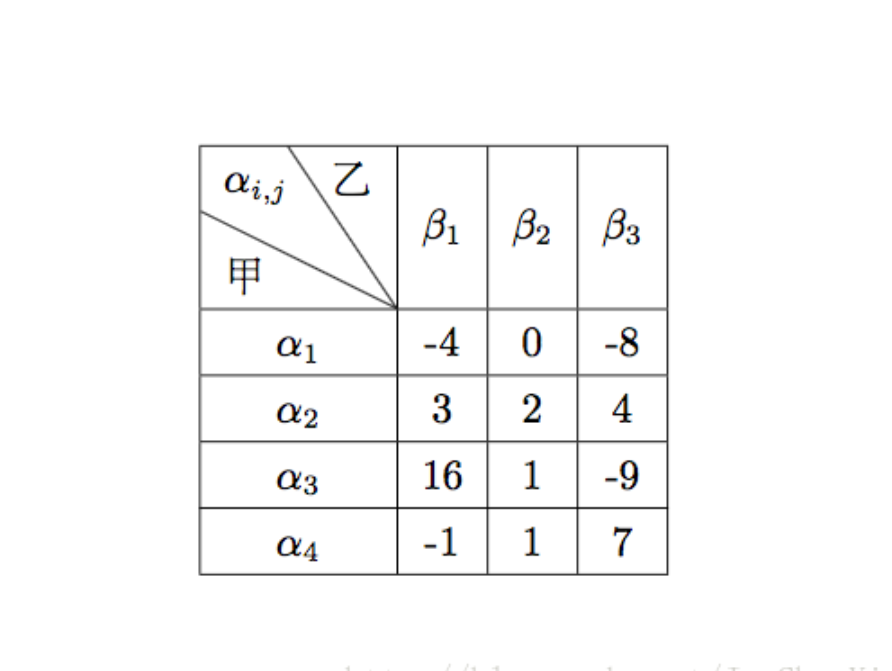
7.斜线表头
需要使用{diagbox}宏包
-
\documentclass
{UTF8
}
{ctexart
}
-
\usepackage
{diagbox
}
% 加载宏包
-
\begin
{document
}
-
-
\begin
{table
}
[!htbp
]
-
\centering
-
\begin
{tabular
}
{|c|c|c|c|
}
-
\hline
-
\diagbox
{甲
}
{
$\alpha_{i,j}$
}
{乙
}
&
$\beta_1$
&
$\beta_2$
&
$\beta_3$
\\
%添加斜线表头
-
\hline
-
$\alpha_1$
&-4
&0
&-8
\\
-
\hline
-
$\alpha_2$
&3
&2
&4
\\
-
\hline
-
$\alpha_3$
&16
&1
&-9
\\
-
\hline
-
$\alpha_4$
&-1
&1
&7
\\
-
\hline
-
\end
{tabular
}
-
\end
{table
}
-
-
\end
{document
}
效果如下:
##### 转载请注明出处 https://blog.csdn.net/gentleman_qin/article/details/79970563 #####
<li class="tool-item tool-active is-like "><a href="javascript:;"><svg class="icon" aria-hidden="true"> <use xlink:href="#csdnc-thumbsup"></use> </svg><span class="name">点赞</span> <span class="count">3</span> </a></li> <li class="tool-item tool-active is-collection "><a href="javascript:;" data-report-click="{"mod":"popu_824"}"><svg class="icon" aria-hidden="true"> <use xlink:href="#icon-csdnc-Collection-G"></use> </svg><span class="name">收藏</span></a></li> <li class="tool-item tool-active is-share"><a href="javascript:;"><svg class="icon" aria-hidden="true"> <use xlink:href="#icon-csdnc-fenxiang"></use> </svg>分享</a></li> <!--打赏开始--> <!--打赏结束--> <li class="tool-item tool-more"> <a> <svg t="1575545411852" class="icon" viewBox="0 0 1024 1024" version="1.1" xmlns="http://www.w3.org/2000/svg" p-id="5717" xmlns:xlink="http://www.w3.org/1999/xlink" width="200" height="200"><defs><style type="text/css"></style></defs><path d="M179.176 499.222m-113.245 0a113.245 113.245 0 1 0 226.49 0 113.245 113.245 0 1 0-226.49 0Z" p-id="5718"></path><path d="M509.684 499.222m-113.245 0a113.245 113.245 0 1 0 226.49 0 113.245 113.245 0 1 0-226.49 0Z" p-id="5719"></path><path d="M846.175 499.222m-113.245 0a113.245 113.245 0 1 0 226.49 0 113.245 113.245 0 1 0-226.49 0Z" p-id="5720"></path></svg> </a> <ul class="more-box"> <li class="item"><a class="article-report">文章举报</a></li> </ul> </li> </ul> </div> </div> <div class="person-messagebox"> <div class="left-message"><a href="https://blog.csdn.net/Gentleman_Qin"> <img src="https://profile.csdnimg.cn/B/5/8/3_gentleman_qin" class="avatar_pic" username="Gentleman_Qin"> <img src="https://g.csdnimg.cn/static/user-reg-year/1x/4.png" class="user-years"> </a></div> <div class="middle-message"> <div class="title"><span class="tit"><a href="https://blog.csdn.net/Gentleman_Qin" data-report-click="{"mod":"popu_379"}" target="_blank">秦皓楠Howard_XDU</a></span> </div> <div class="text"><span>发布了53 篇原创文章</span> · <span>获赞 227</span> · <span>访问量 26万+</span></div> </div> <div class="right-message"> <a href="https://im.csdn.net/im/main.html?userName=Gentleman_Qin" target="_blank" class="btn btn-sm btn-red-hollow bt-button personal-letter">私信 </a> <a class="btn btn-sm attented bt-button personal-watch" data-report-click="{"mod":"popu_379"}">已关注</a> </div> </div> </div>


 2万+
2万+


 被折叠的 条评论
为什么被折叠?
被折叠的 条评论
为什么被折叠?
 到【灌水乐园】发言


