


上次做接口压力测试前一直研究使用jmeter,本以为可以拿来使用了,但是真正进行并发接口时,发现jmeter在单机下并发1000个时,台式电脑单机资源早就被使用完,整个jmeter卡得死死的,结果那晚使用jmeter并发失败,幸好之前也准备了另外一个压测小公举Apache ab。最后使用ab勉强完成任务。估计jmeter压测接口研究得远远不够。后续继续研究吧。事后发现基于Python开发的Locust单机并发能力很理想,于是乎在测试环境拿来压测那次的接口。好像真的可以实现几千的并发。记录下方便自己下次使用:
Locust压测接口性能2
Locust是完全基于Python,http请求完全是基于requests库。Locust支持http、https协议,还支持测试其他协议,websocket等,只要采用Python调用对应的库就可以了。
http/https采用requests;
websocket采用websocket ;
等等。
Locust和jmeter、lr优点对比3
性能测试很难在单机上获得很高的并发量,lr、jmeter这类工具采用进程和线程来压测,单机并发量不高。(一般都要用几台电脑做压力发射机)
Locust并发机制摈弃了进程和线程,采用协程(gevent)机制。协程避免了系统级资源调度,可以大大提高单机并发能力。
Locust安装使用3
centos6.7使用Locust
Python安装Locust,从GitHub克隆下来,进入输入Python setup.py install 进行安装;
GitHub地址:https://github.com/locustio/locust
在安装之前最好先安装下面依赖包:
install_requires=["gevent>=1.2.2", "flask>=0.10.1", "requests>=2.9.1", "msgpack-python>=0.4.2", "six>=1.10.0", "pyzmq==15.2.0"]
- 1.gevent:在Python中实现协程的第三方库。协程又叫微线程Corouine。使用gevent可以获取极高的并发能力;
- 2.flask:Python的一个web开发框架,和django相当;
- 3.requests:支持http/https访问的库;
- 4.msgpack-python:一种快速、紧凑的二进制序列化格式,使用与类似json的数据;
- 5.six:提供了一些简单的工具封装Python2和Python3 之间的差异;
- 6.pyzmq:安装这个第三方库,可以把Locust运行在多个进程或多个机器(分布式执行测试任务)
在centos 6.7安装这些库(注意版本):使用pip安装就可以了;
最后在命令行中输入Python setup.py install ,首先会检查以上的三方库有没有合法安装,最后安装成功;
验证安装:
命令航输入 locust --help
-
[root@localhost locust]# locust --help -
Usage: locust [options] [LocustClass [LocustClass2 ... ]] -
Options: -
-h, --help show this help message and exit -
-H HOST, --host=HOST Host to load test in the following format: -
http://10.21.32.33 #设置运行的测试地址(被测试系统的域名或IP) -
--web-host=WEB_HOST Host to bind the web interface to. Defaults to '' (all -
interfaces) -
-P PORT, --port=PORT, --web-port=PORT -
Port on which to run web host -
-f LOCUSTFILE, --locustfile=LOCUSTFILE #指定性能测试脚本文件 -
Python module file to import, e.g. '../other.py'. -
Default: locustfile -
--csv=CSVFILEBASE, --csv-base-name=CSVFILEBASE -
Store current request stats to files in CSV format. -
--master Set locust to run in distributed mode with this -
process as master -
--slave Set locust to run in distributed mode with this -
process as slave -
--master-host=MASTER_HOST -
Host or IP address of locust master for distributed -
load testing. Only used when running with --slave. -
Defaults to 127.0.0.1. -
--master-port=MASTER_PORT -
The port to connect to that is used by the locust -
master for distributed load testing. Only used when -
running with --slave. Defaults to 5557. Note that -
slaves will also connect to the master node on this -
port + 1. -
--master-bind-host=MASTER_BIND_HOST -
Interfaces (hostname, ip) that locust master should -
bind to. Only used when running with --master. -
Defaults to * (all available interfaces). -
--master-bind-port=MASTER_BIND_PORT -
Port that locust master should bind to. Only used when -
running with --master. Defaults to 5557. Note that -
Locust will also use this port + 1, so by default the -
master node will bind to 5557 and 5558. -
--expect-slaves=EXPECT_SLAVES -
How many slaves master should expect to connect before -
starting the test (only when --no-web used). -
--no-web Disable the web interface, and instead start running -
the test immediately. Requires -c and -r to be -
specified. #表示不使用web界面运行测试,接口压力测试一般使用该些参数 -
-c NUM_CLIENTS, --clients=NUM_CLIENTS -
Number of concurrent clients. Only used together with -
--no-web #设置虚拟用户数 -
-r HATCH_RATE, --hatch-rate=HATCH_RATE #设置每秒启动的虚拟用户数 -
The rate per second in which clients are spawned. Only -
used together with --no-web -
-n NUM_REQUESTS, --num-request=NUM_REQUESTS #设置请求个数 -
Number of requests to perform. Only used together with -
--no-web -
-L LOGLEVEL, --loglevel=LOGLEVEL -
Choose between DEBUG/INFO/WARNING/ERROR/CRITICAL. -
Default is INFO. -
--logfile=LOGFILE Path to log file. If not set, log will go to -
stdout/stderr -
--print-stats Print stats in the console -
--only-summary Only print the summary stats -
--no-reset-stats Do not reset statistics once hatching has been -
completed -
-l, --list Show list of possible locust classes and exit -
--show-task-ratio print table of the locust classes' task execution -
ratio -
--show-task-ratio-json -
print json data of the locust classes' task execution -
ratio -
-V, --version show program's version number and exit
Locust脚本使用说明3
注意:增加打开文件限制的最大数量:
在每一个HTTP连接的机器上打开一个新文件(技术文件描述符)。操作系统可以设置一个可以打开的文件的最大数量的下限。如果限制小于模拟用户的数量,在测试时,会发生故障。增加操作系统的默认最大数量的文件限制到一个数字高于模拟用户数的数量,才能达到你想要的测试,在centos中在命令行中执行ulimit 655336,更改文件描述符最大就行不会报open too many file 的错误。
并发单个url的例子:
-
from locust import HttpLocust,TaskSet,task -
# 定义用户行为,继承TaskSet类,用于描述用户行为 -
# (这个类下面放各种请求,请求是基于requests的,每个方法请求和requests差不多,请求参数、方法、响应对象和requests一样的使用,url这里写的是路径) -
# client.get===>requests.get -
# client.post===>requests.post -
class test_126(TaskSet): -
# task装饰该方法为一个事务方法的参数用于指定该行为的执行权重。参数越大,每次被虚拟用户执行概率越高,不设置默认是1, -
@task() -
def test_baidu(self): -
# 定义requests的请求头 -
header = {"User-Agent": "Mozilla/5.0 " -
"(Windows NT 6.1; Win64; x64) AppleWebKit/537.36 " -
"(KHTML, like Gecko) Chrome/60.0.3112.101 Safari/537.36"} -
# r是包含所有响应内容的一个对象 -
r = self.client.get("/",timeout=30,headers=header) -
# 这里可以使用assert断言请求是否正确,也可以使用if判断 -
assert r.status_code == 200 -
# 这个类类似设置性能测试,继承HttpLocust -
class websitUser(HttpLocust): -
# 指向一个上面定义的用户行为类 -
task_set = test_126 -
#执行事物之间用户等待时间的下界,单位毫秒,相当于lr中的think time -
min_wait = 3000 -
max_wait = 6000
启动测试:
-
[root @ localhost locust_baidu] # locust -f locustfile.py --host=http://www.126.com -
[2017 - 06 - 08 12: 33:42, 662] localhost.localdomain / INFO / locust.main: Starting web monitor at *: 8089 -
[2017 - 06 - 08 12: 33:42, 663] localhost.localdomain / INFO / locust.main: Starting Locust 0.8 a3
1.-f 指定性能测试文件;
2.--host 指定被测试url的主机地址(IP地址)
通过浏览器访问:http://192.168.0.107:8089/(默认端口是8089)
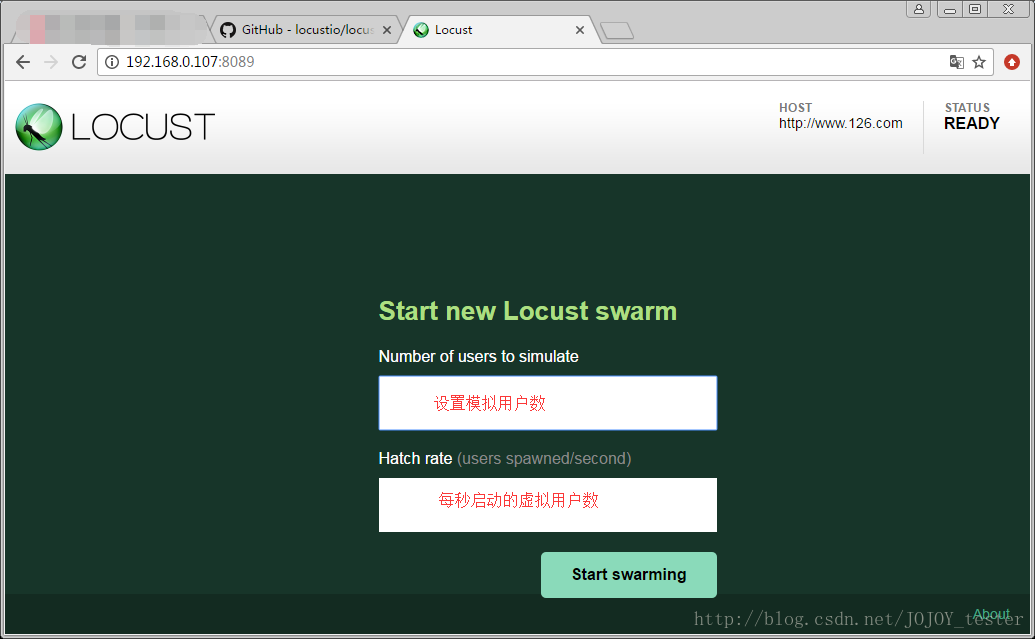
点击start swarming进行测试:
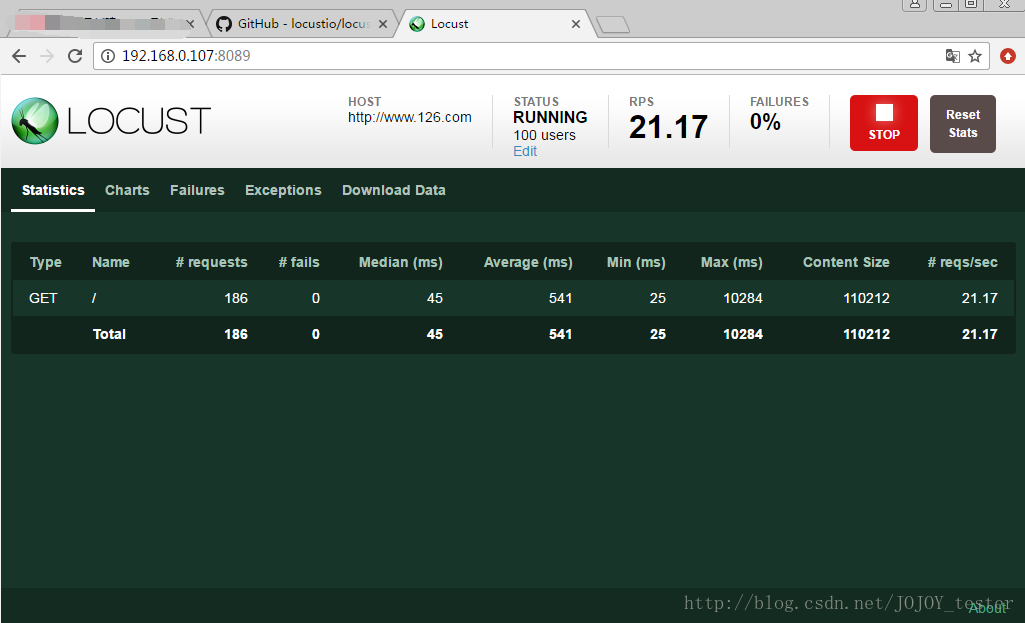
- 1.Type:请求类型;
- 2.Name:请求路径;
- 3.requests:当前请求的数量;
- 4.fails:当前请求失败的数量;
- 5.Median:中间值,单位毫秒,一般服务器响应时间低于该值,而另一半高于该值;
- 6.Average:所有请求的平均响应时间,毫秒;
- 7.Min:请求的最小的服务器响应时间,毫秒;
- 8.Max:请求的最大服务器响应时间,毫秒;
- 9.Content Size:单个请求的大小,单位字节;
- 10.reqs/sec:每秒钟请求的个数。
图表显示:
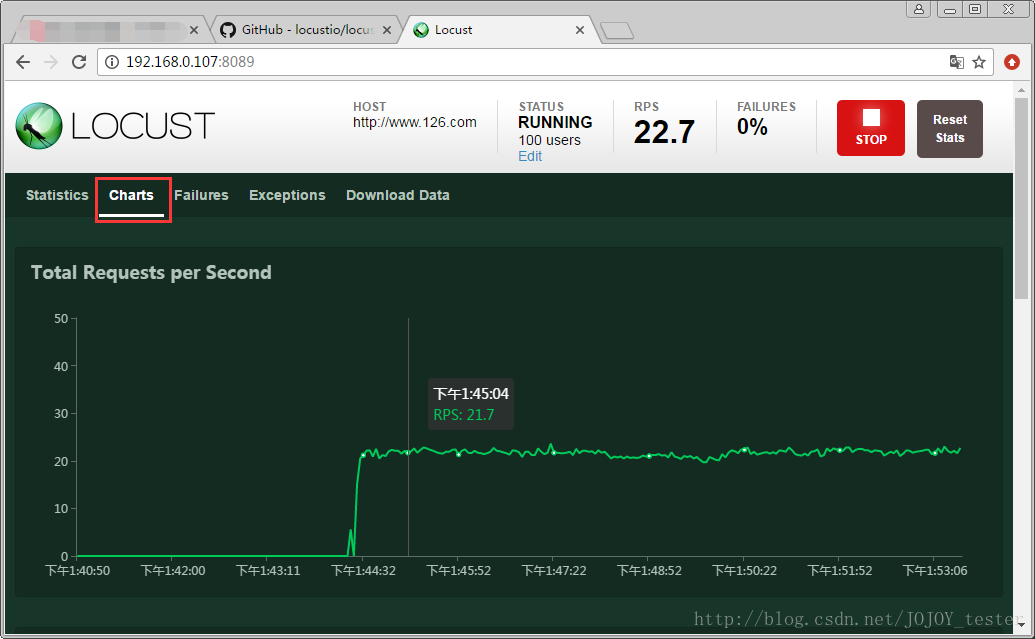
从上到下:
- 1.吞吐量/每秒响应事务数(rps)实时统计
- 2.平均响应时间/平均事务数实时统计
- 3.虚拟用户数运行
另外,还有其他统计表格:失败请求、异常请求(断言失败结果显示在这里)、下载测试结果。
这个是通过浏览器测试的形式,可以通过测试场景设计的时间长度运行,压力测试时间(一般都是5分钟以上吧)足够后,需要手动点击stop按钮,结束压力测试。
如果希望请求数量维持在一定的情况,可以使用--no-web形式:
在shell中直接输入:
-
[root@localhost locust_baidu]# locust -f locustfile.py --host=http://www.126.com --no-web -c 10 -r 10 -n 30 -
[2017-06-08 13:13:31,385] localhost.localdomain/INFO/locust.main: Starting Locust 0.8a3 -
[2017-06-08 13:13:31,385] localhost.localdomain/INFO/locust.runners: Hatching and swarming 10 clients at the rate 10 clients/s... -
Name -
# 测试过程的实时数据 -
。。。。。。 -
#测试结束 -
[2017-06-08 13:13:52,588] localhost.localdomain/INFO/locust.runners: All locusts dead -
#数据统计 -
[2017-06-08 13:13:52,588] localhost.localdomain/INFO/locust.main: Shutting down (exit code 0), bye. -
Name # reqs # fails Avg Min Max | Median req/s -
-------------------------------------------------------------------------------------------------------------------------------------------- -
GET / 39 0(0.00%) 305 28 5155 | 40 2.00 -
-------------------------------------------------------------------------------------------------------------------------------------------- -
Total 39 0(0.00%) 2.00 -
Percentage of the requests completed within given times -
Name # reqs 50% 66% 75% 80% 90% 95% 98% 99% 100% -
-------------------------------------------------------------------------------------------------------------------------------------------- -
GET / 39 40 41 44 47 52 5100 5200 5200 5155 -
--------------------------------------------------------------------------------------------------------------------------------------------
启动参数说明:
- 1.--no-web:表示不使用web界面运行测试;
- 2.-c:设置虚拟用户总数;
- 3.-r:设置每秒启动虚拟用户数;
- 4.-n:设置请求总个数;
测试环境压测接口脚本:
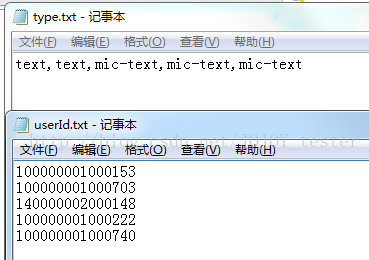

参数化数据:
readData.py
-
# 思路:在userId.txt、type.txt文件中填写数据源,两个文件数据是一一对应的,通过readlines()读取,保存为一个列表, -
# 通过list的索引读取数据,索引使用随机数 -
import random -
class Readdata(): -
# 随机数放在init方法中,保证只获取一次随机数,因为类只实例化一次 -
def __init__(self): -
with open("./userId.txt") as f: -
userId = f.readlines() -
# 随机数范围0--(数组长度-1)为了和list下标一样,从0开始 -
self.ran = random.randint(0,len(userId)-1) -
def readUserid(self): -
with open("./userId.txt") as f: -
userId = f.readlines() -
userIds = [] -
# readlines获取每一行数据保存为list,每一行数据是一个元素,字符串形式, -
# 这里要遍历转为int可以去掉换行符号再append一个新数组。 -
for i in userId: -
data = int(i) -
userIds.append(data) -
# 随机获取一个数 -
userId = userIds[self.ran] -
return userId -
def readType(self): -
with open("./type.txt") as f1: -
type_ = f1.readlines() -
# 去掉list中的换行符号\n -
type1 = ''.join(type_).strip('\n') -
# 分割字符串,保存为list, -
type2 = type1.split(',') -
type3 = type2[self.ran] -
# print(type(type2)) -
return type3 -
if __name__ == "__main__": -
rd = Readdata() -
print(rd.readType()) -
print(rd.readUserid())
请求公参:
common.py
-
import sys,time,random,hashlib -
sys.path.append('../db_set') -
# from db_set.mysql_db import DB -
def setUp_(): -
tim = time.time() -
tim = tim*1000 -
tim = str(tim) -
# ts时间戳 -
ts = tim.split('.')[0] -
ran = random.randint(100,999) -
ran = str(ran) -
# reqId时间戳拼接随机数 -
reqId =ts + ran -
# 密匙 -
secret = 'xxxxxxxxxxx' -
#请求头 -
header = {"User-Agent": "Mozilla/5.0 (Windows NT 6.1; Win64; x64) AppleWebKit/537.36 (KHTML, like Gecko) Chrome/60.0.3112.101 Safari/537.36"} -
#数据库 -
# db = DB() -
#测试userId -
userId = "100000001000153" -
#测试liveId -
liveId = "140000002000038" -
#测试地址 -
host = "http://ixxxxxxxhat.com/" -
return (ts,reqId,secret,header,userId,liveId,host) -
def md5(reqSign_): -
md5 = hashlib.md5() -
str_bytes_utf8 = reqSign_.encode(encoding="utf-8") -
md5.update(str_bytes_utf8) -
sign = md5.hexdigest() -
return sign
locust文件:
-
from locust import HttpLocust,TaskSet,task -
from common import setUp_,md5 -
from readData import Readdata # 导入参数化的类 -
# 定义用户行为 -
class SpeakAdd(TaskSet): -
# 定义类的实例变量 -
ts = setUp_()[0] -
reqId = setUp_()[1] -
secret = setUp_()[2] -
header = setUp_()[3] -
# db = setUp_()[4] -
# userId = setUp_()[4] -
# liveId = setUp_()[5] -
# 获取参数化数据 -
rd = Readdata() -
# 发言类型type,因为不同用户这个是不同的 -
type = rd.readType() -
# 获取发言人id,这里和发言类型对应,上面做了处理 -
userId = rd.readUserid() -
#加密 -
reqSign = reqId + ':' + secret + ':' + ts -
sign = md5(reqSign) -
# 请求参数 -
data = { "id": reqId, -
"timestamp": ts, -
"sign": sign, -
"data": { "commentId":"", -
"topicId": "100000046000082", -
"type": type, -
"liveId": "140000002000038", -
"content": "我正在发言," + ts, -
"isReplay": "N", -
"page": {"size": "20", "page": "1"}, -
"userId": userId}} -
@task(1) -
def testSpeakadd(self): -
# 和requests请求一样写 -
r = self.client.post("/h5/speak/add",json=self.data,headers=self.header,timeout=30) -
result = r.json()# 返回字典 -
# 断言 -
assert r.status_code == 200 -
assert result['state']['code'] == 0 -
# 设置性能测试 -
class WebsiteUser(HttpLocust): -
task_set = SpeakAdd -
# 接口测试think time 设置为0 -
min_wait = 0 -
max_wait = 0 -
# 下面可以通过直接运行Python locustfile1.py c r n 进行测试,这种方式适合 --no-web运行 -
if __name__ == "__main__": -
import os,sys -
# sys.argv是一个list,元素是用户自定义的,原来是str类型,需要转换为int -
c = int(sys.argv[1]) -
r = int(sys.argv[2]) -
t = int(sys.argv[3]) -
for i in range(2): -
# os.system(命令),可以运行shell、Windows命令 -
os.system("locust -f locustfile1.py --host=http://xxxxxt2.qlchat.com --no-web -c %d -r %d -n %d" %(c,r,t))
测试方案一:
启动接口压力测试:
locust -f locustfile.py --host=http://inner.test2.qlchat.com
浏览器打开:
http://192.168.0.107:8089/
根据场景进行压力测试:
场景1:运行5分钟,用户数1000,每秒启动100,记录测试结果数据,服务器性能指标;
场景2:运行5分钟,用户数1000,每秒启动200,记录测试结果数据,服务器性能指标;
场景3:运行5分钟,用户数1000,每秒启动500,记录测试结果数据,服务器性能指标;
服务器指标:CPU、内存等
性能测试分析:
。。。。。。
测试方案二:
使用另外一种测试方式,--no-web、-c、-r、-n:
命令行中执行测试:每种场景记录测试结果数据,服务器性能指标;
场景一:locust -f locustfile.py --host=http://inner.test2.qlchat.com --no-web -c 1000 -r 100 -n 30000
场景二:locust -f locustfile.py --host=http://inner.test2.qlchat.com --no-web -c 1000 -r 500 -n 30000
场景三:locust -f locustfile.py --host=http://inner.test2.qlchat.com --no-web -c 1000 -r 1000 -n 30000
总结:
不足之处:发言人id需要不不是同一个,也准备不同的发言人,参数化。使场景更加接近用户使用场景。但是并发时还是同一个用户 ==,伤心。。。有高手看到麻烦指导下。。。
多个url压力测试也就是业务性能测试3:
。。。。
。。。
。。
。
思路:
在一个完整的业务场景中(从用户登录到退出系统),点击打开的一个页面到另一个页面,每个页面都是由url定义的,可以先写请求登录的方法,在写另一个页面的请求方法,最后把所有请求方法连接起来,就是一个完整的业务场景了。然后做登录关联、用户参数化。设置虚拟用户、每秒启动虚拟用户个数,设计场景去并发。


 297
297


 被折叠的 条评论
为什么被折叠?
被折叠的 条评论
为什么被折叠?
 到【灌水乐园】发言


