


文章目录
看图说话
流程图
借用该链接:凶残的程序员-View 的工作流程 的两张图,来表示大致的工作流程。
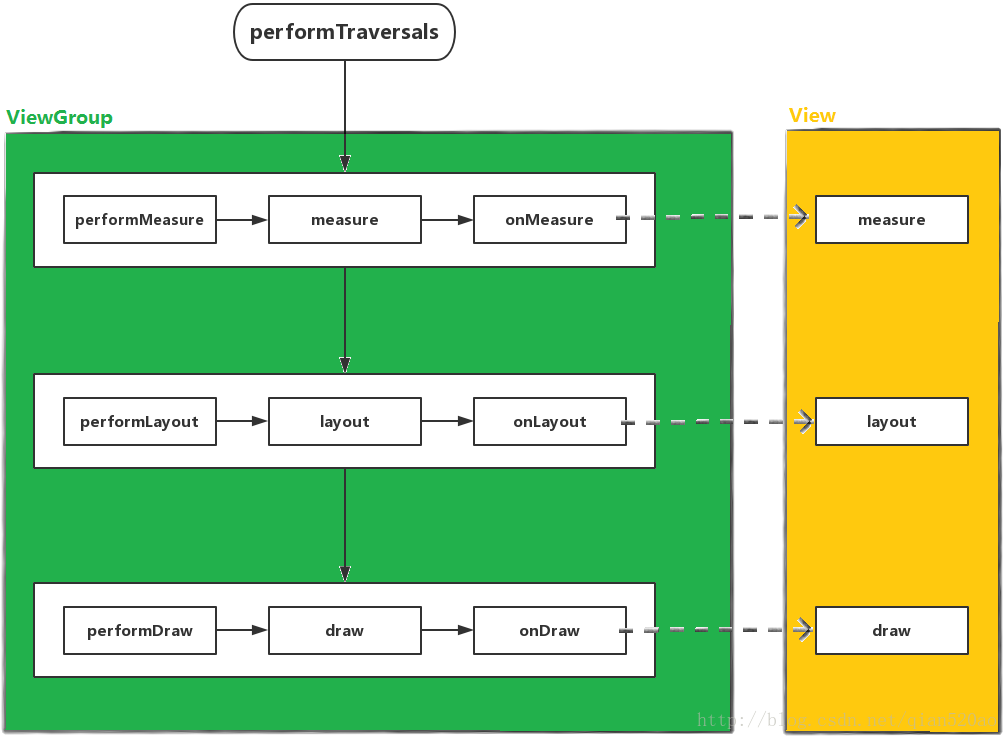
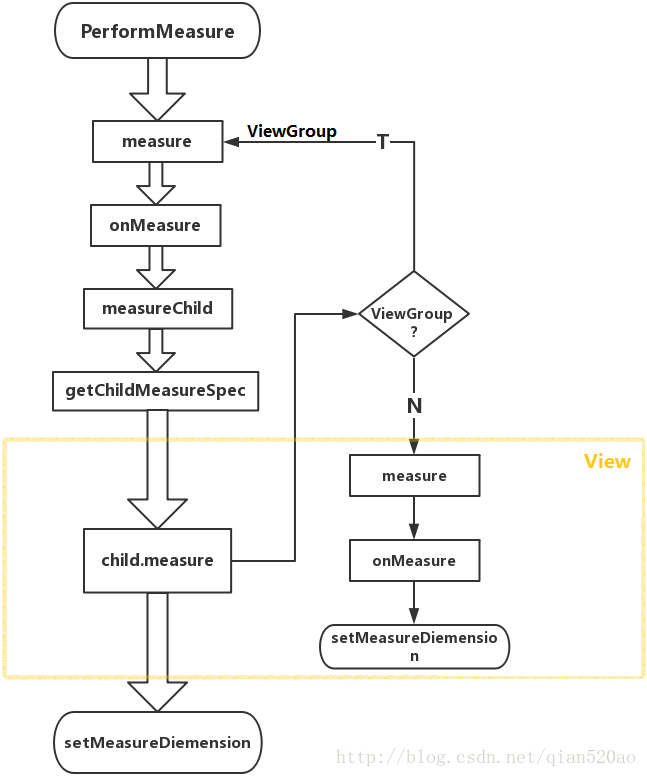
时序图
来一张时序图:
表格对比
再来一张表格,展示 measure 函数 和 onMeasure 函数在不同类实现上的一些区别:
| measure | onMeasure | measure | onMeasure | ||
|---|---|---|---|---|---|
| ViewGroup | null, 调用View#measure | null | View | 判断是否要测量, 调用 onMeasure | 默认的设置尺寸逻辑 |
| ViewGroup子类 | null | 根据自身布局的特点来测量子 View,其中会调用到 ViewGroup 的 measureChildWithMargins 函数 和 getChildMeasureSpec 函数;测出子 View 的规格后。for循环:调用 child.measure 触发子 View 的测量流程,并传递规格给子 View | View子类 | null | 完全重写,根据自身特点来测量, 调用View#setMeasuredDimension来保存测量规格 |
简单源码梳理
第0步 performTraversals
- 0,ViewRootImpl#performTraversals 源码
// 代码段0:
// ViewRootImpl 类

    public final WindowManager.LayoutParams mWindowAttributes = new WindowManager.LayoutParams();

    // These are accessed by multiple threads.
    final Rect mWinFrame; // frame given by window manager.

    // 构造函数中
    //mWinFrame = new Rect();

    private void performTraversals() {
        // cache mView since it is used so much below...
        final View host = mView;

        WindowManager.LayoutParams lp = mWindowAttributes;

        Rect frame = mWinFrame;

        if (mWidth != frame.width() || mHeight != frame.height()) {
                mWidth = frame.width();
                mHeight = frame.height();
        }

        // 2832 line
        int childWidthMeasureSpec = getRootMeasureSpec(mWidth, lp.width); // 0-1
        int childHeightMeasureSpec = getRootMeasureSpec(mHeight, lp.height);

        // 2844 line
        performMeasure(childWidthMeasureSpec, childHeightMeasureSpec); // 0-2

        ...
注释0-1处,调用 getRootMeasureSpec 函数,测量 DecorView 的宽高 MeasureSpec ;
注释0-2处,调用 performMeasure 函数 ,传入0-1处的测量结果,继续流程。
注意,入参的 lp 的值来自 mWindowAttributes,而 mWindowAttributes 在 ViewRootImpl#setView 中设置了值:
public void setView(View view, WindowManager.LayoutParams attrs, View panelParentView) {
      synchronized (this) {
    if (mView == null) {
        mView = view;

        mWindowAttributes.copyFrom(attrs);
        // 略。。。
        // Schedule the first layout -before- adding to the window
        // manager, to make sure we do the relayout before receiving
        // any other events from the system.
        requestLayout();
接着 goin 注释0-1 getRootMeasureSpec(mWidth, lp.width)
// ViewRootImpl 类

    private static int getRootMeasureSpec(int windowSize, int rootDimension) {
        int measureSpec;
        switch (rootDimension) {

        case ViewGroup.LayoutParams.MATCH_PARENT:
            // Window can't resize. Force root view to be windowSize.
            measureSpec = MeasureSpec.makeMeasureSpec(windowSize, MeasureSpec.EXACTLY);
            break;
        case ViewGroup.LayoutParams.WRAP_CONTENT:
            // Window can resize. Set max size for root view.
            measureSpec = MeasureSpec.makeMeasureSpec(windowSize, MeasureSpec.AT_MOST);
            break;
        default:
            // Window wants to be an exact size. Force root view to be that size.
            measureSpec = MeasureSpec.makeMeasureSpec(rootDimension, MeasureSpec.EXACTLY);
            break;
        }
        return measureSpec;
    }
逻辑如表格所示:
| MATCH_PARENT | WRAP_CONTENT | default | |
|---|---|---|---|
| mode | EXACTLY | AT_MOST | EXACTLY |
| size | windowSize | windowSize | rootDimension |
执行该函数得到的宽高 MeasureSpec,传入 0-2 处的 performMeasure 函数,流程继续。
第1步 performMeasure
- 1,ViewRootImpl#performMeasure 源码
// 代码段1
// ViewRootImpl 类

    private void performMeasure(int childWidthMeasureSpec, int childHeightMeasureSpec) {
        if (mView == null) {
            return;
        }
        Trace.traceBegin(Trace.TRACE_TAG_VIEW, "measure");
        try {
            // 1-1
            mView.measure(childWidthMeasureSpec, childHeightMeasureSpec);
        } finally {
            Trace.traceEnd(Trace.TRACE_TAG_VIEW);
        }
    }
在注释 1-1 处,调用 DecorView 的 measure 函数,流程继续。
第2步 DecorView#measure
- 2,DecorView#measure
DecorView 类没有重写 measure 函数,直接调用 View#measure;
DecorView 是 View 的子类,View 的 measure 函数是 final 修饰的,任何子类都必须直接使用 View 的 measure 函数,不能重写。
第3步 View#measure
- 3,View#measure 源码
// 代码段2
// 代码来源于:/sdk/sources/android-28/android/view/View.java
// View 类:

    public final void measure(int widthMeasureSpec, int heightMeasureSpec) {
        boolean optical = isLayoutModeOptical(this);
        if (optical != isLayoutModeOptical(mParent)) {
            Insets insets = getOpticalInsets();
            int oWidth  = insets.left + insets.right;
                int oHeight = insets.top  + insets.bottom;
            // 2-1,可能需要调整一下,使其不为负数
            widthMeasureSpec  = MeasureSpec.adjust(widthMeasureSpec,  optical ? -oWidth  : oWidth);
            heightMeasureSpec = MeasureSpec.adjust(heightMeasureSpec, optical ? -oHeight : oHeight);
        }

        final boolean forceLayout = (mPrivateFlags & PFLAG_FORCE_LAYOUT) == PFLAG_FORCE_LAYOUT;

	   // 。。。
        final boolean needsLayout = specChanged
                && (sAlwaysRemeasureExactly || !isSpecExactly || !matchesSpecSize);

        if (forceLayout || needsLayout) { // 2-2 判断是否需要测量

            int cacheIndex = forceLayout ? -1 : mMeasureCache.indexOfKey(key);
            if (cacheIndex < 0 || sIgnoreMeasureCache) {
                // measure ourselves, this should set the measured dimension flag back
                     onMeasure(widthMeasureSpec, heightMeasureSpec);  // 2-3
            } else {
                long value = mMeasureCache.valueAt(cacheIndex);
                // Casting a long to int drops the high 32 bits, no mask needed
                setMeasuredDimensionRaw((int) (value >> 32), (int) value);
            }

		// 。。。
        }

         mOldWidthMeasureSpec = widthMeasureSpec; // 记录旧规格
        mOldHeightMeasureSpec = heightMeasureSpec;
    }
在 2-2 处,判断是否需要测量;
在 2-3 处,调用 onMeasure 函数,其参数 widthMeasureSpec 和 heightMeasureSpec,就是入参的两个函数 ,有可能调整过,有可能原封不动。
流程继续。
第4步 DecorView#onMeasure
- 4,DecorView#onMeasure 源码
// 代码段3:
// DecorView 类

    @Override
    protected void onMeasure(int widthMeasureSpec, int heightMeasureSpec) {

        final int widthMode = getMode(widthMeasureSpec);
        final int heightMode = getMode(heightMeasureSpec);

        boolean fixedWidth = false;
        mApplyFloatingHorizontalInsets = false;
        if (widthMode == AT_MOST) {
            final TypedValue tvw = isPortrait ? mWindow.mFixedWidthMinor : mWindow.mFixedWidthMajor;
            if (tvw != null && tvw.type != TypedValue.TYPE_NULL) {
                final int w;
                if (tvw.type == TypedValue.TYPE_DIMENSION) {
                    w = (int) tvw.getDimension(metrics);
                } else if (tvw.type == TypedValue.TYPE_FRACTION) {
                    w = (int) tvw.getFraction(metrics.widthPixels, metrics.widthPixels);
                } else {
                    w = 0;
                }
                if (DEBUG_MEASURE) Log.d(mLogTag, "Fixed width: " + w);
                final int widthSize = MeasureSpec.getSize(widthMeasureSpec);
                if (w > 0) {
                    widthMeasureSpec = MeasureSpec.makeMeasureSpec(
                            Math.min(w, widthSize), EXACTLY);
                    fixedWidth = true;
                } else {
                    widthMeasureSpec = MeasureSpec.makeMeasureSpec(
                            widthSize - mFloatingInsets.left - mFloatingInsets.right,
                            AT_MOST);
                    mApplyFloatingHorizontalInsets = true;
                }
            }
        }

        // heightMode == AT_MOST, 跟 widthMode 一样的处理逻辑
        // ...

        super.onMeasure(widthMeasureSpec, heightMeasureSpec);

        // ...
    }
在 DecorView 的 onMeasure 函数中,若 widthMode == AT_MOST,强制将其规格模式设置为 EXACTLY,然后调用父类 FrameLayout 的 onMeasure 函数。
第5步 FrameLayout#onMeasure
- 5,FrameLayout#onMeasure 源码
// 代码段3.1
// FrameLayout 类

    @Override
    protected void onMeasure(int widthMeasureSpec, int heightMeasureSpec) {
        int count = getChildCount();

        int maxHeight = 0;
        int maxWidth = 0;
        int childState = 0;

        for (int i = 0; i < count; i++) {
            final View child = getChildAt(i);
            if (mMeasureAllChildren || child.getVisibility() != GONE) {
                // 3.1-1 测量 child 的 MeasureSpec,
                // 并调用 child.measure,开启 child 的测量流程
                measureChildWithMargins(child, widthMeasureSpec, 0, heightMeasureSpec, 0);
                final LayoutParams lp = (LayoutParams) child.getLayoutParams();
                maxWidth = Math.max(maxWidth,
                        child.getMeasuredWidth() + lp.leftMargin + lp.rightMargin);
                maxHeight = Math.max(maxHeight,
                        child.getMeasuredHeight() + lp.topMargin + lp.bottomMargin);
                childState = combineMeasuredStates(childState, child.getMeasuredState());
                // 。。。
            }
        }

        // 。。。

        // 3.1-2,调用基类 View 类的 setMeasuredDimension 函数,设置大小
        setMeasuredDimension(resolveSizeAndState(maxWidth, widthMeasureSpec, childState),
                resolveSizeAndState(maxHeight, heightMeasureSpec,
                        childState << MEASURED_HEIGHT_STATE_SHIFT));

    }
3.1-1 处,循环的调用 measureChildWithMargins 函数,是在 ViewGroup 中定义的,接着到第7步,看源码:
第6步 measureChildWithMargins
- 6,ViewGroup#measureChildWithMargins
// 代码段3.1.1
// ViewGroup 类

    protected void measureChildWithMargins(View child,
            int parentWidthMeasureSpec, int widthUsed,
            int parentHeightMeasureSpec, int heightUsed) {
        final MarginLayoutParams lp = (MarginLayoutParams) child.getLayoutParams();

        final int childWidthMeasureSpec = getChildMeasureSpec(parentWidthMeasureSpec,
                mPaddingLeft + mPaddingRight + lp.leftMargin + lp.rightMargin
                        + widthUsed, lp.width);
        final int childHeightMeasureSpec = getChildMeasureSpec(parentHeightMeasureSpec,
                mPaddingTop + mPaddingBottom + lp.topMargin + lp.bottomMargin
                        + heightUsed, lp.height);

        child.measure(childWidthMeasureSpec, childHeightMeasureSpec);
    }
其内部又调用了 getChildMeasureSpec 函数,源码:
// 代码段3.1.1.1
// ViewGroup 类

    public static int getChildMeasureSpec(int spec, int padding, int childDimension) {
        int specMode = MeasureSpec.getMode(spec);
        int specSize = MeasureSpec.getSize(spec);

        int size = Math.max(0, specSize - padding);

        int resultSize = 0;
        int resultMode = 0;

        switch (specMode) {
        // Parent has imposed an exact size on us
        case MeasureSpec.EXACTLY:
            if (childDimension >= 0) {
                resultSize = childDimension;
                resultMode = MeasureSpec.EXACTLY;
            } else if (childDimension == LayoutParams.MATCH_PARENT) {
                // Child wants to be our size. So be it.
                resultSize = size;
                resultMode = MeasureSpec.EXACTLY;
            } else if (childDimension == LayoutParams.WRAP_CONTENT) {
                // Child wants to determine its own size. It can't be
                // bigger than us.
                resultSize = size;
                resultMode = MeasureSpec.AT_MOST;
            }
            break;

        // Parent has imposed a maximum size on us
        case MeasureSpec.AT_MOST:
            if (childDimension >= 0) {
                // Child wants a specific size... so be it
                resultSize = childDimension;
                resultMode = MeasureSpec.EXACTLY;
            } else if (childDimension == LayoutParams.MATCH_PARENT) {
                // Child wants to be our size, but our size is not fixed.
                // Constrain child to not be bigger than us.
                resultSize = size;
                resultMode = MeasureSpec.AT_MOST;
            } else if (childDimension == LayoutParams.WRAP_CONTENT) {
                // Child wants to determine its own size. It can't be
                // bigger than us.
                resultSize = size;
                resultMode = MeasureSpec.AT_MOST;
            }
            break;

        // Parent asked to see how big we want to be
        case MeasureSpec.UNSPECIFIED:
            if (childDimension >= 0) {
                // Child wants a specific size... let him have it
                resultSize = childDimension;
                resultMode = MeasureSpec.EXACTLY;
            } else if (childDimension == LayoutParams.MATCH_PARENT) {
                // Child wants to be our size... find out how big it should
                // be
                resultSize = View.sUseZeroUnspecifiedMeasureSpec ? 0 : size;
                resultMode = MeasureSpec.UNSPECIFIED;
            } else if (childDimension == LayoutParams.WRAP_CONTENT) {
                // Child wants to determine its own size.... find out how
                // big it should be
                resultSize = View.sUseZeroUnspecifiedMeasureSpec ? 0 : size;
                resultMode = MeasureSpec.UNSPECIFIED;
            }
            break;
        }
        //noinspection ResourceType
        return MeasureSpec.makeMeasureSpec(resultSize, resultMode);
    }
MeasureSpec类帮助我们来测量View,它是一个32位的int值,高两位为specMode (测量的模式),低30位为specSize (测量的大小),测量模式分为三种:
- UNSPECIFIED:未指定模式,View想多大就多大,父容器不做限制,一般用于系统内部的测量。
- AT_MOST:最大模式,对应于wrap_comtent属性,只要尺寸不超过父控件允许的最大尺寸就行。
- EXACTLY:精确模式,对应于match_parent属性和具体的数值,父容器测量出View所需要的大小,也就是specSize的值。
测量逻辑可用表格展示,引用:该链接:

该步骤执行完后,会得到 子view 宽高的规格;
再回到第7步,代码段3.1.1,在 measureChildWithMargins 函数的末尾,调用了子类的 measure 函数,开始子 view 的测量工作,此时来到第八步:
第7步 child.measure
- 7,child.measure(childWidthMeasureSpec, childHeightMeasureSpec)
measure 函数依然是调用 View#measure 函数,跟第4步一样…
接着回到第6步,代码段3.1,看注释 3.1-2 处,调用 View 类的 setMeasuredDimension 函数,来到第9步:
第8步 setMeasuredDimension
- 8,setMeasuredDimension(resolveSizeAndState(…),resolveSizeAndState(…)) 源码
// 代码段3.1.2
// View 类

    protected final void setMeasuredDimension(int measuredWidth, int measuredHeight) {
        boolean optical = isLayoutModeOptical(this);
        if (optical != isLayoutModeOptical(mParent)) {
            Insets insets = getOpticalInsets();
            int opticalWidth  = insets.left + insets.right;
            int opticalHeight = insets.top  + insets.bottom;

            measuredWidth  += optical ? opticalWidth  : -opticalWidth;
            measuredHeight += optical ? opticalHeight : -opticalHeight;
        }
        setMeasuredDimensionRaw(measuredWidth, measuredHeight);
    }


    private void setMeasuredDimensionRaw(int measuredWidth, int measuredHeight) {
        mMeasuredWidth = measuredWidth;
        mMeasuredHeight = measuredHeight;

        mPrivateFlags |= PFLAG_MEASURED_DIMENSION_SET;
    }
最终调用 setMeasuredDimensionRaw 函数,把宽高的测量规格赋值给 mMeasuredWidth、mMeasuredHeight 变量;
后续流程,可以通过下述函数获取:
    public final int getMeasuredWidth() {
        return mMeasuredWidth & MEASURED_SIZE_MASK;
    }

    public final int getMeasuredWidthAndState() {
        return mMeasuredWidth;
    }

    public final int getMeasuredWidthAndState() {
        return mMeasuredWidth;
    }

    public final int getMeasuredHeight() {
        return mMeasuredHeight & MEASURED_SIZE_MASK;
    }
注意 final 修饰的 setMeasuredDimension 函数,所以 View 的子类不能重写,只能调用…
总结
从 measure 这个流程看下来,发现它是一个先测完子view,再测自己的递归的流程;
从第七步开始的 child.measure(width, height),child 也就是 DecorView 的第一个 子View,即系统布局 R.layout.screen_title 或 R.layout.screen_simple 或 其他类似的,统一放在源码工程的 frameworks/base/core/res/res/layout/ 路径下;
R.layout.screen_title 源码 和 R.layout.screen_simple 源码
因为 R.layout.screen_title 这类的布局文件是 ViewGroup 类型的,所以第七步 child 就是它们的 根view:LinearLayout;
其实,这整个流程看下来,只是对 measure 流程有一个大概的了解,具体的View 子类和 ViewGroup 子类的 onMeasure 函数都有自己的实现,需要去具体分析…


 414
414


 被折叠的 条评论
为什么被折叠?
被折叠的 条评论
为什么被折叠?
 到【灌水乐园】发言


