


下面是本文的屏幕录像的在线视频:
03-Vue实例
04-生命周期示意图+钩子函数
温馨提示:
1、视频下载:线上视频被压缩处理,可以下载高清版本:
03-Vue实例:https://pan.baidu.com/s/1O9lUFm2jRIlBeFrBjXPZIA 提取码:nbzt
03-生命周期示意图+钩子函数:https://pan.baidu.com/s/1D4ndTSgPBNGE8D4_Hcx-1A 提取码:jst4
2、示例代码:https://pan.baidu.com/s/1OcZ_ZPwxIlEoYRD7coc4gQ 提取码:y9we
下图是文章大纲:
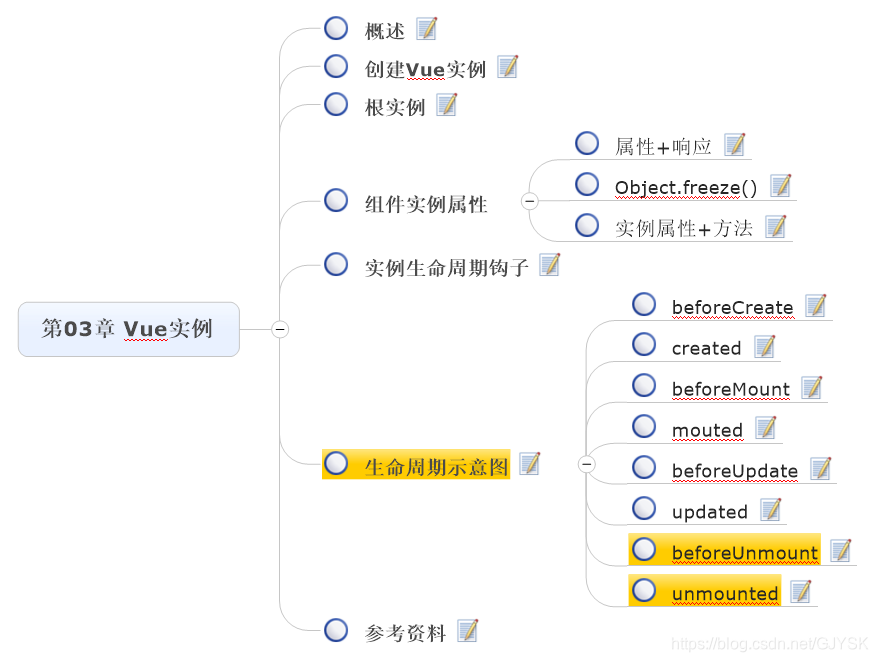
一、概述
本章介绍如何创建Vue实例,以及实例的数据、方法和生命周期钩子函数等内容。
二、创建Vue实例
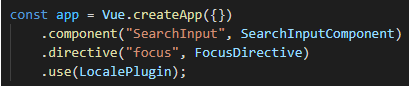
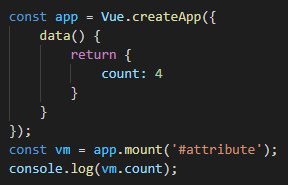
每个Vue应用程序都通过使用以下功能创建一个新的应用程序实例:
![]()
该应用程序实例用于注册“全局变量”,然后可由该应用程序内的组件使用。下面是一个快速实例:
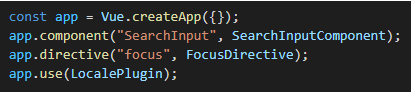
应用程序实例公开的大多数方法都返回相同的实例,从而允许链式调用:
示例代码:01-HelloWorld.html
三、根实例
传递给createApp()的选项用于配置根组件,该组件将用作渲染的起点。需要将应用程序安装到DOM元素中。如下代码所示:
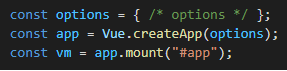
与大多数应用程序方法不同,mount它不返回应用程序,而是返回根组件实例。大多数实际应用程序都被组织为嵌套的可重用组件树。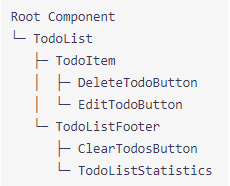
每个组件都有自己的组件实例vm,此应用程序中的所有组件实例将共享同一应用程序实例。根组件与其他组件并没有什么不同,配置选项与相应组件实例的行为相同。
四、组件实例属性
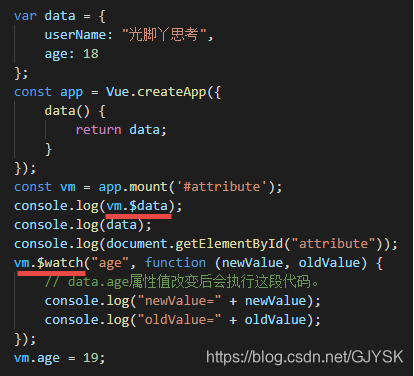
1、属性+响应
示例代码:02-Attribute.html
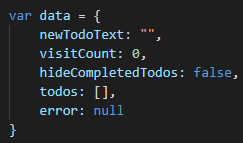
当一个Vue实例被创建时,它将data对象中的所有的属性加入到Vue的响应式系统中。当这些属性值发生改变时,视图将会产生“响应”,即匹配更新为新的值。

示例代码:03-Attribute.html
无论如何定义组件实例的所有属性,都可以在组件的模板中访问它们。值得注意的是只有当实例被创建时就已经存在于data中的属性才是响应式的。如果你知道你会在晚些时候需要一个属性,但是一开始它为空或不存在,那么你仅需要设置一些初始值。
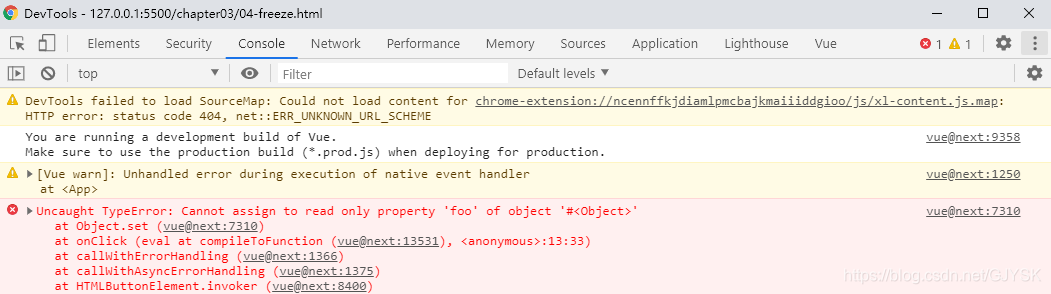
2、Object.freeze()
方法Object.freeze()会阻止修改现有的属性,也意味着响应系统无法再追踪变化。
如下代码所示:
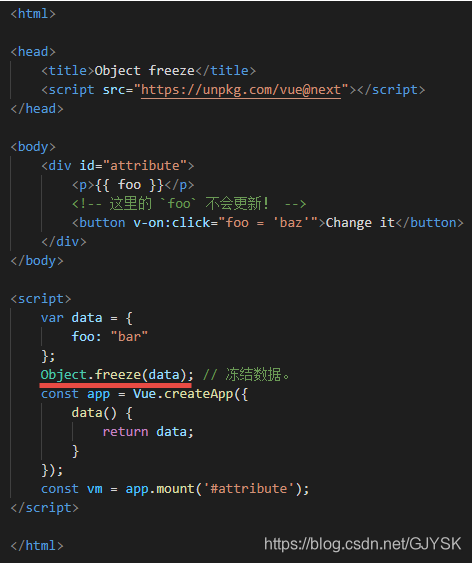
示例代码:04-Freeze.html
控制台同时也会出现如下的错误提示:
3、实例属性+方法
Vue实例还暴露了一些有用的实例属性与方法。它们都有前缀$,以便与用户定义的属性区分开来。
示例代码:05-InstanceAttribute.html
五、实例生命周期钩子
每个Vue实例在被创建时都要经过一系列的初始化过程。例如,需要设置数据监听、编译模板、将实例挂载到DOM并在数据变化时更新DOM等。同时在这个过程中也会运行一些叫做生命周期钩子的函数,这给了用户在不同阶段添加自己的代码的机会。
示例代码:06-LifecycleHooks.html
生命周期钩子的this上下文指向调用它的Vue实例。
在实例生命周期的不同阶段还会调用其他挂钩。
温馨提醒:不要在选项属性或回调上使用箭头函数,比如:
created: () => console.log(this.a)
或
vm.$watch('a', newValue => this.myMethod())
因为箭头函数并没有this,this会作为变量一直向上级词法作用域查找,直至找到为止,经常导致:
Uncaught TypeError: Cannot read property of undefined 或 Uncaught TypeError: this.myMethod is not a function之类的错误。
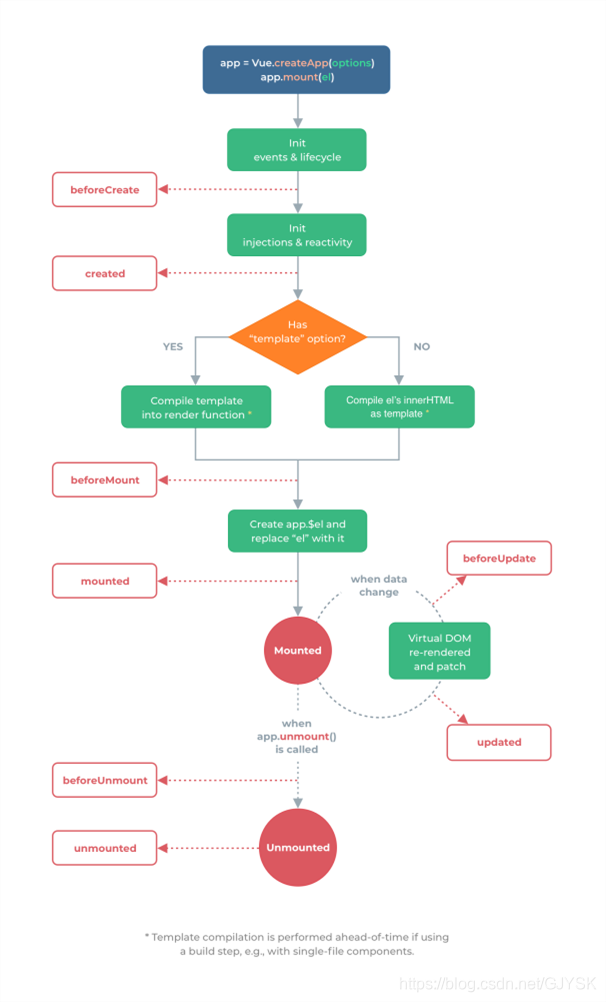
六、生命周期示意图
下面是实例生命周期的示意图。
后续需要专门的文章进行这方面的描述。
1、beforeCreate
在实例初始化之后,数据观察和事件/观察者设置之前立即同步调用,执行beforeCreate()函数时,data和methods中的数据还都没有被初始化。
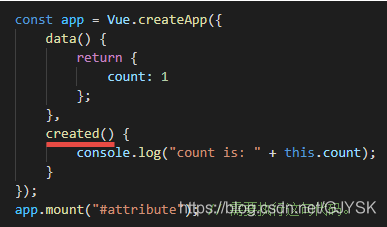
2、created
创建实例后同步调用。在此阶段,实例已完成对选项的处理,这意味着已设置以下内容:数据、计算的属性、方法、监视/事件回调。但是,安装阶段尚未开始,该$el属性尚不可用。如果要调用methods中的方法和data中的数据,最早只能在created()函数中操作。
3、beforeMount
当执行beforeMount()函数时,表示模板已经在内存中渲染好了,但是并没有真正的挂载到页面中去,此时页面还是旧的。
4、mouted
执行到mounted()函数,就表示整个Vue实例初始化完毕了,组件也已经挂载到页面上了。
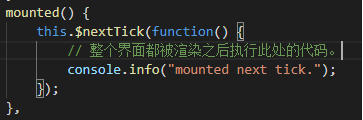
但需要注意的是:mounted()这并不保证所有子组件也都已安装,如果你想等到整个组件都已经挂载到页面上,可以使用$nextTick()机制,如下代码所示:
5、beforeUpdate
当执行beforeUpdate()函数的时候,页面中显示的数据还是旧的。此时data里的数据已经更新完毕,但是页面尚未和最新的数据保持同步。
这是在更新之前访问现有DOM的好地方,例如,删除手动添加的事件侦听器。
6、updated
当updated()事件执行的时候,页面和data数据已经保持同步了,都是最新的。
调用此挂钩时,组件的DOM将已更新,因此您可以在此处执行与DOM相关的操作。
请注意,updated()这并不保证所有子组件也都已被重新渲染。如果你想等到整个视图都已经重新呈现,可以使用$nextTick(),如下代码所示:
7、beforeUnmount
在卸载组件实例之前立即调用。在此阶段,实例仍然可以正常运行。实例身上所有的data和所有的methods以及过滤器、指令等,都处于可用状态,此时还没有真正执行卸载过程。
8、unmounted
在卸载组件实例后调用。调用unmounted()钩子函数后,组件实例的所有指令均已解除绑定,所有事件侦听器均已删除,所有子组件实例也已卸载。
此时,组件中的所有数据、方法、过滤器、指令等,都已经不可用了。
此时Vue实例的生命周期已经全部结束。
9、示例代码
<html>

<head>
    <title>Lifecycle Hooks</title>
    <script src="https://unpkg.com/vue@next"></script>
</head>

<body>
    <div id="attribute">
        this.data = {{ count }}
        <br>
        <input type="button" value="修改数据" v-on:click="change"></input>
        <input type="button" value="销毁" v-on:click="destroy"></input>
    </div>
</body>

<script>
    const app = Vue.createApp({
        data() {
            return {
                count: 1,
                show: true
            };
        },
        methods: {
            change() {
                this.count = this.count + 1; // 修改数据。
            },
            destroy() {
                app.$destroy(); // 销毁组件。
            }
        },
        beforeCreate() {
            console.info("=================================================");
            console.info("beforeCreate");
            console.log("%c%s", "color:red", "el=" + this.$el);
            console.log("%c%s", "color:red", "data=" + this.$data);
            console.info(this.$data);
            console.log("%c%s", "color:red", "count=" + this.count);
        },
        created() {
            console.info("=================================================");
            console.info("created");
            console.log("%c%s", "color:red", "el=" + this.$el);
            console.log("%c%s", "color:green", "data=" + this.$data);
            console.info(this.$data);
            console.log("%c%s", "color:green", "count=" + this.count);
        },
        beforeMount() {
            console.info("=================================================");
            console.info("beforeMount");
            console.log("%c%s", "color:red", "el=" + (this.$el));
            console.log("%c%s", "color:green", "data=" + this.$data);
            console.info(this.$data);
            console.log("%c%s", "color:green", "count=" + this.count);
        },
        mounted() {
            console.info("=================================================");
            console.info("mounted");
            console.log("%c%s", "color:green", "el=" + (this.$el));
            console.info(this.$el);
            console.log("%c%s", "color:green", "data=" + this.$data);
            console.info(this.$data);
            console.log("%c%s", "color:green", "count=" + this.count);
            this.$nextTick(function() {
                // 整个界面都被渲染之后执行此处的代码。
                console.info("mounted next tick.");
            });
        },
        beforeUpdate() {
            debugger;
            console.info("=================================================");
            console.info("beforeUpdate, this.count=" + this.count);
            console.log("%c%s", "color:green", "el=" + (this.$el));
            console.log("%c%s", "color:green", "data=" + this.$data);
            console.log("%c%s", "color:green", "count=" + this.count);
        },
        updated() {
            console.info("=================================================");
            console.info("updated, this.count=" + this.count);
            console.log("%c%s", "color:green", "el=" + (this.$el));
            console.log("%c%s", "color:green", "data=" + this.$data);
            console.log("%c%s", "color:green", "count=" + this.count);
        },
        beforeUnmount() {
            console.info("=================================================");
            console.info("beforeUnmount");
            console.log("%c%s", "color:green", "el=" + (this.$el));
            console.log("%c%s", "color:green", "data=" + this.$data);
            console.log("%c%s", "color:green", "count=" + this.count);
        },
        unmounted() {
            console.info("=================================================");
            console.info("unmounted");
            console.log("%c%s", "color:green", "el=" + (this.$el));
            console.log("%c%s", "color:green", "data=" + this.$data);
            console.log("%c%s", "color:green", "count=" + this.count);
        }
    });
    let vm = app.mount("#attribute"); // 需要执行这句代码。
</script>

</html>


 554
554


 被折叠的 条评论
为什么被折叠?
被折叠的 条评论
为什么被折叠?
 到【灌水乐园】发言


