


In this tutorial, we will take the previous Spring MVC hello world XML-based, and convert it to a annotation-based project.
Technologies used :
- Spring 2.5.6
- JDK 1.6
- Maven 3
- Eclipse 3.6
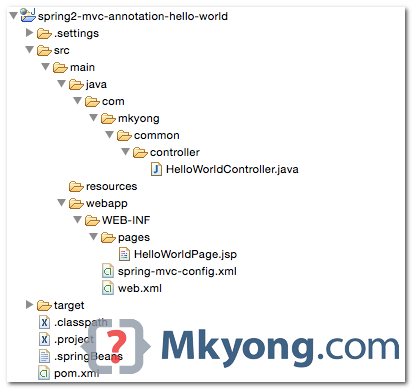
1. Directory Structure
2. Maven
Spring’s annotation is bundled in the same spring-webmvc.jar.
pom.xml
<project xmlns="http://maven.apache.org/POM/4.0.0"
    xmlns:xsi="http://www.w3.org/2001/XMLSchema-instance"
    xsi:schemaLocation="http://maven.apache.org/POM/4.0.0
    http://maven.apache.org/maven-v4_0_0.xsd">
    <modelVersion>4.0.0</modelVersion>
    <groupId>com.mkyong.common</groupId>
    <artifactId>spring2-mvc-annotation-hello-world</artifactId>
    <packaging>war</packaging>
    <version>1.0-SNAPSHOT</version>
    <name>Spring 2 MVC</name>

    <properties>
        <jdk.version>1.6</jdk.version>
        <spring.version>2.5.6</spring.version>
        <jstl.version>1.2</jstl.version>
        <servletapi.version>2.5</servletapi.version>
    </properties>

    <dependencies>

        <!-- Spring MVC framework -->
        <dependency>
            <groupId>org.springframework</groupId>
            <artifactId>spring-webmvc</artifactId>
            <version>${spring.version}</version>
        </dependency>

        <!-- JSTL -->
        <dependency>
            <groupId>javax.servlet</groupId>
            <artifactId>jstl</artifactId>
            <version>${jstl.version}</version>
        </dependency>

        <!-- for compile only, your container should have this -->
        <dependency>
            <groupId>javax.servlet</groupId>
            <artifactId>servlet-api</artifactId>
            <version>${servletapi.version}</version>
            <scope>provided</scope>
        </dependency>

    </dependencies>

    <build>

      <plugins>
        <plugin>
            <groupId>org.apache.maven.plugins</groupId>
            <artifactId>maven-compiler-plugin</artifactId>
            <version>3.3</version>
            <configuration>
                <source>${jdk.version}</source>
                <target>${jdk.version}</target>
            </configuration>
        </plugin>

        <plugin>
            <groupId>org.eclipse.jetty</groupId>
            <artifactId>jetty-maven-plugin</artifactId>
            <version>9.2.11.v20150529</version>
            <configuration>
                <scanIntervalSeconds>10</scanIntervalSeconds>
                <webApp>
                    <contextPath>/spring2</contextPath>
                </webApp>
            </configuration>
        </plugin>

        <plugin>
            <groupId>org.apache.maven.plugins</groupId>
            <artifactId>maven-eclipse-plugin</artifactId>
            <version>2.9</version>
            <configuration>
                <downloadSources>true</downloadSources>
                <downloadJavadocs>true</downloadJavadocs>
                <wtpversion>2.0</wtpversion>
                <wtpContextName>spring2</wtpContextName>
            </configuration>
        </plugin>

      </plugins>

    </build>

</project>
3. Controller & Handler Mapping
Now, you can use @Controller and @RequestMapping to replace the XML configuration.
- Controller – The controller class is no longer need to extend the base controller like
AbstractControllerorSimpleFormController, just simply annotate the class with a@Controllerannotation. - Handler Mapping – No more declaration for the handler mapping like
BeanNameUrlHandlerMapping,ControllerClassNameHandlerMappingor SimpleUrlHandlerMapping, all are replaced with a standard@RequestMappingannotation.
HelloWorldController.java
package com.mkyong.common.controller;

import org.springframework.stereotype.Controller;
import org.springframework.web.bind.annotation.RequestMapping;
import org.springframework.web.bind.annotation.RequestMethod;
import org.springframework.web.servlet.ModelAndView;

@Controller
@RequestMapping("/welcome")
public class HelloWorldController{

    @RequestMapping(method = RequestMethod.GET)
    public ModelAndView helloWorld(){

        ModelAndView model = new ModelAndView("HelloWorldPage");
        model.addObject("msg", "hello world");

        return model;
    }
}
If the @RequestMapping is applied at the class level (can apply at method level with multi-actions controller), it required to put a RequestMethod to indicate which method to handle the mapping request.
In this case, if a URI pattern /welcome is requested, it will map to this HelloWorldController, and handle the request with helloWorld() method.
4. Spring XML Configuration
You still need to configure the view resolver and component scanning in XML file.
/WEB-INF/spring-mvc-config.xml
<beans xmlns="http://www.springframework.org/schema/beans"
    xmlns:xsi="http://www.w3.org/2001/XMLSchema-instance"
    xmlns:context="http://www.springframework.org/schema/context"
    xsi:schemaLocation="http://www.springframework.org/schema/beans
    http://www.springframework.org/schema/beans/spring-beans-2.5.xsd
    http://www.springframework.org/schema/context
    http://www.springframework.org/schema/context/spring-context-2.5.xsd">

    <bean id="viewResolver"
        class="org.springframework.web.servlet.view.InternalResourceViewResolver">
        <property name="prefix">
            <value>/WEB-INF/pages/</value>
        </property>
        <property name="suffix">
            <value>.jsp</value>
        </property>
    </bean>

    <context:component-scan base-package="com.mkyong.common.controller" />

</beans>
5. JSP Page
A simple JSP page for demonstration.
HelloWorldPage.jsp.
<%@ taglib prefix="c" uri="http://java.sun.com/jsp/jstl/core"%>
<html>
<body>
    <h1>Spring MVC Hello World Annotation Example</h1>

    <h2>${msg}</h2>
</body>
</html>
6. web.xml
web.xml
<web-app id="WebApp_ID" version="2.4"
xmlns="http://java.sun.com/xml/ns/j2ee"
xmlns:xsi="http://www.w3.org/2001/XMLSchema-instance"
xsi:schemaLocation="http://java.sun.com/xml/ns/j2ee
http://java.sun.com/xml/ns/j2ee/web-app_2_4.xsd">
<display-name>Spring Web MVC Application</display-name>
<servlet>
<servlet-name>mvc-dispatcher</servlet-name>
<servlet-class>org.springframework.web.servlet.DispatcherServlet</servlet-class>
<init-param>
<param-name>contextConfigLocation</param-name>
<param-value>/WEB-INF/spring-mvc-config.xml</param-value>
</init-param>
<load-on-startup>1</load-on-startup>
</servlet>
<servlet-mapping>
<servlet-name>mvc-dispatcher</servlet-name>
<url-pattern>*.htm</url-pattern>
</servlet-mapping>
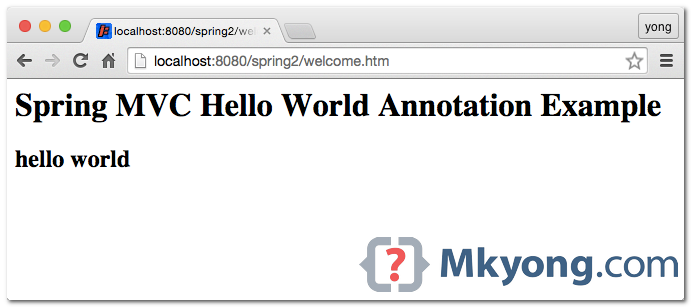
</web-app>7. Demo
6.1 To run with the embedded Jetty, type :
$ mvn jetty:runURL : http://localhost:8080/spring2/welcome.htm
6.2 To import into Eclipse IDE.
$ mvn eclipse:eclipseNote
If you compare this Spring MVC annotation-based hello world example with previously XML-based example, you can see that this annotation approach is easier and flexible in wiring the controller class and URL handler mapping, because you do not need to declare the controller class explicitly or extends any particular class.


 775
775


 被折叠的 条评论
为什么被折叠?
被折叠的 条评论
为什么被折叠?
 到【灌水乐园】发言


