


一、外部化配置
Spring Boot允许外化(externalize)你的配置,这样你能够在不同的环境下使用相同的代码。你可以使用properties文件,YAML文件,环境变量和命令行参数来外化配置。使用@Value注解,可以直接将属性值注入到你的beans中,并通过Spring的Environment抽象或绑定到结构化对象来访问。
Spring Boot使用一个非常特别的PropertySource次序来允许对值进行合理的覆盖,需要以下面的次序考虑属性:
- 在主目录上开发Devtools全局设置属性(
~/.spring-boot-devtools.properties当devtools处于活动状态时)。 @TestPropertySource您的测试中的注释。@SpringBootTest#properties您的测试中的注释属性。- 命令行参数
- 从属性
SPRING_APPLICATION_JSON(嵌入在环境变量或系统属性直列JSON)。 ServletConfig初始化参数。ServletContext初始化参数。- 来自于
java:comp/env的JNDI属性 - Java系统属性(
System.getProperties()) - 操作系统环境变量
- 只有在
random.*里包含的属性会产生一个RandomValuePropertySource - 在打包的jar外的应用程序配置文件(
application-{profile}.properties和YAML变体) - 在打包的jar内的应用程序配置文件(
application-{profile}.properties和YAML变体) - 在打包的jar外的应用程序配置文件(
application.properties,包含YAML和profile变量) - 在打包的jar内的应用程序配置文件(
application.properties,包含YAML和profile变量) - 在
@Configuration类上的@PropertySource注解 - 默认属性(使用
SpringApplication.setDefaultProperties指定)
在Spring Boot中,原来自己整合Spring应用时繁多的XML配置内容,由在pom.xml中引入模块化的Starter POMs替代,其中各个模块都有自己的默认配置,所以如果不是特殊应用场景,就只需要在application.properties中完成一些属性配置就能开启各模块的应用。
二、自定义属性
使用@Value()注解方式
1、在application.properties添加自定义属性。配置文件中也可以通过${}获取文件中的其他配置属性
# 修改服务端口号
server.port=8888

# 自定义属性
pocket.name=蝈蝈
pocket.age=26
pocket.county=长宁区
# 配置文件也可以通过${}引用其他变量
pocket.address=上海市${pocket.county}
2、通过@Value()注解获取自定义属性
package com.songguoliang.properties.controller;
import org.springframework.beans.factory.annotation.Value;
import org.springframework.web.bind.annotation.GetMapping;
import org.springframework.web.bind.annotation.RestController;
/**
* @Description 通过@Value使用自定义属性
* @Author sgl
* @Date 2018-04-27 14:41
*/
@RestController
public class HelloController {
/**
* 通过${}获取application.properties里的自定义属性
*/
@Value("${pocket.name}")
private String name;
@Value("${pocket.age}")
private Integer age;
@Value("${pocket.address}")
private String address;
@GetMapping("/hello")
public String hello() {
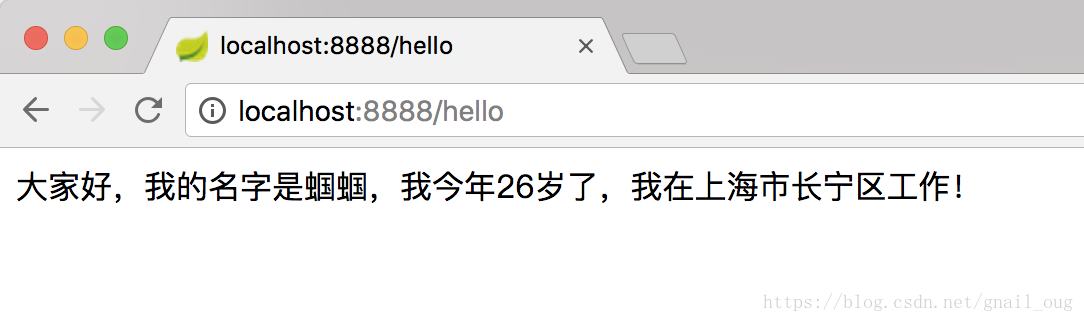
return "大家好,我的名字是" + name + ",我今年" + age + "岁了,我在" + address+"工作!";
}
}
3、重新启动服务,浏览器输入:http://localhost:8888/hello ,可以看到如下内容:
如果出现中文乱码:参考 SpringBoot自定义属性乱码
使用前缀方式
Spring Boot支持通过前缀自动将属性封装的对象中,非常适合属性比较多的情况,其实在各种启动器中也是通过这种方式获取自定义属性的,比如http编码相关的配置用前缀spring.http.encoding(可以参考org.springframework.boot.autoconfigure.http.HttpEncodingProperties)
1、通过注解@ConfigurationProperties指定给实体前缀,如下:
创建实体类User:
package com.songguoliang.properties.model;

import org.springframework.boot.context.properties.ConfigurationProperties;
import org.springframework.stereotype.Component;

/**
 * @Description 由Spring根据ConfigurationProperties自动注入属性的值
 * @Author sgl
 * @Date 2018-04-27 15:29
 */
@Component
@ConfigurationProperties(prefix = "pocket")
public class User {
    private String name;
    private Integer age;
    private String address;

    //省略了get、set方法
}
2、添加Action供页面访问:
package com.songguoliang.properties.controller;
import com.songguoliang.properties.model.User;
import org.springframework.beans.factory.annotation.Autowired;
import org.springframework.web.bind.annotation.GetMapping;
import org.springframework.web.bind.annotation.RestController;
/**
* @Description
* @Author sgl
* @Date 2018-04-27 15:31
*/
@RestController
public class ModelController {
/**
* 注入user
*/
@Autowired
private User user;
@GetMapping("/say")
public String hello() {
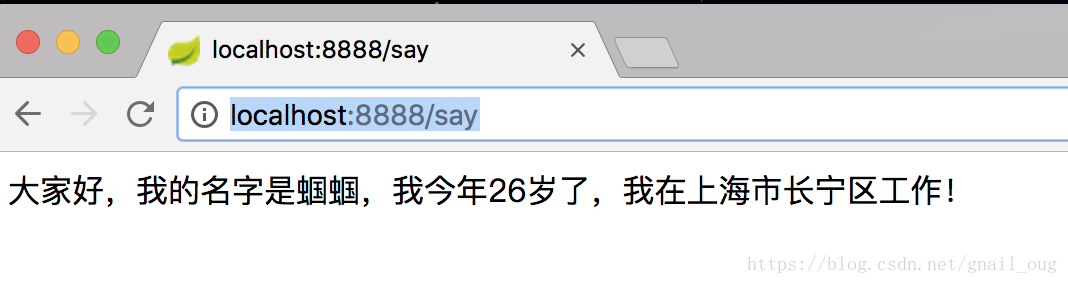
return "大家好,我的名字是" + user.getName() + ",我今年" + user.getAge() + "岁了,我在" + user.getAddress() + "工作!";
}
}
3、重启服务,浏览器输入http://localhost:8888/say ,可以看到:
随机数
在配置文件中也可以通过random.*来调用RandomValuePropertySource#getRandomValue(String type)方法来随机生成一个值,注意:随机的key不能以random开头,如random.a是有问题的
1、配置文件添加以下配置:
# 随机数
# 随机int
test.randomInt=${random.int}
# 随机10以内
test.randomIntMax=${random.int(10)}
# 随机20-50
test.randomIntMiddle=${random.int(20,50)}
# 随机Long
test.randomLong=${random.long}
# 字符串
test.randomValue=${random.value}
# uuid
test.randomUuid=${random.uuid}

# key不能random开头,使用时会有问题
#random.num=${random.int}
2、创建RandomData实体类:
package com.songguoliang.properties.model;

import org.springframework.boot.context.properties.ConfigurationProperties;
import org.springframework.stereotype.Component;

/**
 * @Description
 * @Author sgl
 * @Date 2018-04-27 15:50
 */
@Component
@ConfigurationProperties(prefix = "test")
public class RandomData {
    private Integer randomInt;
    private Integer randomIntMax;
    private Integer randomIntMiddle;
    private Long randomLong;
    private String randomValue;
    private String randomUuid;

    //省略get、set方法
}
3、ModelController类里添加方法:
@Autowired
private RandomData randomData;

@GetMapping("/random")
public RandomData random() {
    return randomData;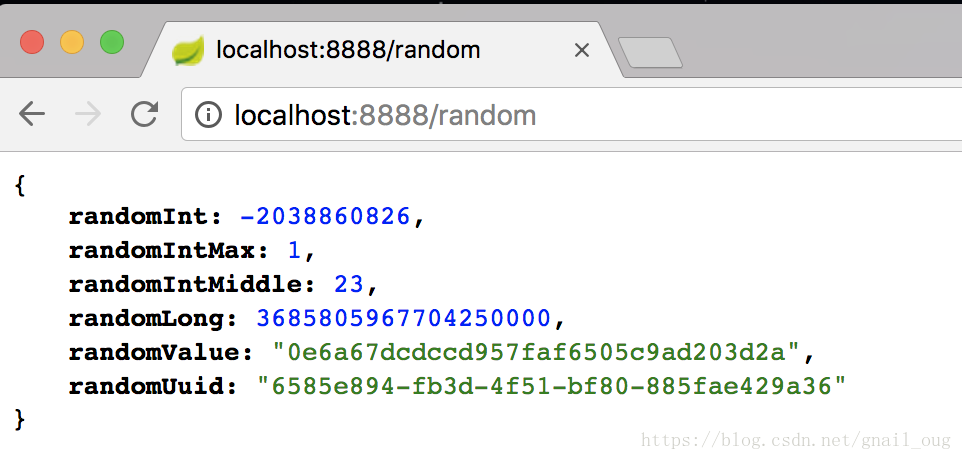
}4、浏览器输入:http://localhost:8888/random ,浏览器看到:
自定义配置文件
application.properties虽然也可以定义非starter中的配置,即定义自己的配置,如果把自己的配置也放到这个文件中可能会使得文件很臃肿,可以将自己的配置放在其他属性文件中,这样配置更加集中
1、在resources中的根目录创建一个test.properties文件
test.name=测试自定义配置文件
test.num=123
2、创建TestEntity实体:
package com.songguoliang.properties.model;

import org.springframework.boot.context.properties.ConfigurationProperties;
import org.springframework.context.annotation.PropertySource;
import org.springframework.stereotype.Component;

/**
 * @Description
 * @Author sgl
 * @Date 2018-04-27 17:01
 */
@ConfigurationProperties("test")
@Component
@PropertySource("classpath:test.properties")
public class TestEntity {
    private String name;
    private Integer num;

    public String getName() {
        return name;
    }

    public void setName(String name) {
        this.name = name;
    }

    public Integer getNum() {
        return num;
    }

    public void setNum(Integer num) {
        this.num = num;
    }
}
3、ModelController中添加url映射:
@Autowired
private TestEntity testEntity;

@GetMapping("/test")
public TestEntity getTestEntity() {
    return testEntity;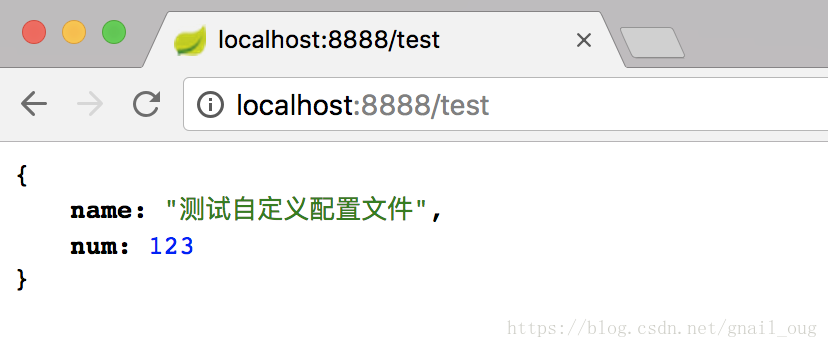
}4、浏览器输入:http://localhost:8888/test ,看到:


 6442
6442


 被折叠的 条评论
为什么被折叠?
被折叠的 条评论
为什么被折叠?
 到【灌水乐园】发言


