


转自于:http://blog.csdn.net/kenshincui/article/details/5846829
<html>
<head>
<link href="ext/resources/css/ext-all.css" mce_href="ext/resources/css/ext-all.css" rel="stylesheet" type="text/css" />
<mce:script src="ext/adapter/ext/ext-base.js" mce_src="ext/adapter/ext/ext-base.js" type="text/javascript"></mce:script>
<mce:script src="ext/ext-all.js" mce_src="ext/ext-all.js" type="text/javascript"></mce:script>
<mce:script type="text/javascript"><!--
Ext.onReady(function(){
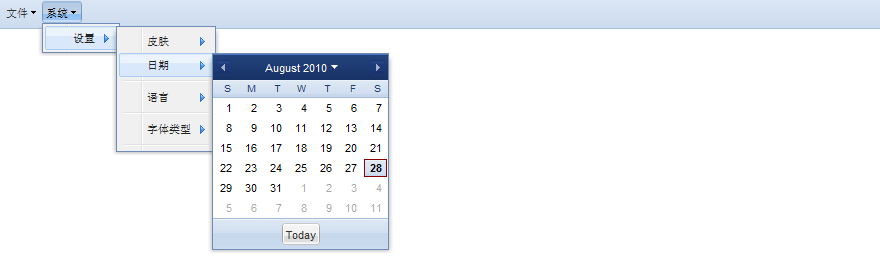
var mnFile=new Ext.menu.Menu({//定义一工具栏一个按钮的下拉列表Menu(注意这个item中有点乱,主要为了让大家多看几种形式)
id:'mnFile',
items:[
{
text:'新建',
icon:'ext/docs/resources/favicon.ico',//设置菜单前面图标
handler:function(){
Ext.Msg.alert("系统提示","您单击了‘新建’");
}
},
new Ext.menu.Item({
text:'打开'
})
]
});
var mnSystem=new Ext.menu.Menu({//第二个Menu列表,这里看一下二级菜单
id:'mnSystem',
items:[
new Ext.menu.Item({
text:'设置',
menu:[
{text:'皮肤', menu:new Ext.menu.ColorMenu({handler:function(cm,color){
Ext.Msg.alert("系统消息","您选择的颜色:"+color);
}})},
{text:'日期',menu:new Ext.menu.DateMenu({handler:function(dp,date){
Ext.Msg.alert("系统消息",date.format("您选择的日期是:Y年m月d日"));
}})},
new Ext.menu.Separator(),//创建分隔符
new Ext.menu.Item({//三级菜单
text:'语言',
menu:[
new Ext.menu.CheckItem({text:"中文",group:"language"}),
new Ext.menu.CheckItem({text:"English",group:"language"})
]
}),
'separator', //这样也可以添加分隔符
new Ext.menu.Item({//注意和上面的区别就是这个没有group,所以就显示为了多选框
text:'字体类型',
menu:[
new Ext.menu.CheckItem({text:"斜体"}),
new Ext.menu.CheckItem({text:"加粗"}),
new Ext.menu.CheckItem({text:"下划线"})
]
}),
'-'//同样可以创建分隔符
]
}),
]
});
var btnFile=new Ext.Button({
text:'文件',
menu:mnFile
});
var btnSystem=new Ext.Button({
text:'系统',
menu:mnSystem
});
var tb=new Ext.Toolbar({
id:'tb',
width:'auto',
height:30,
items:[
btnFile,
btnSystem
]
});
tb.render(Ext.getBody());
});
// --></mce:script>
<mce:style type="text/css"><!--
.item{
padding-left:10px,
color:red
}
--></mce:style><style type="text/css" mce_bogus="1"> .item{
padding-left:10px,
color:red
}
</style>
</head>
<body>
<div id="divMenu"></div>
</body>
</html>
上面我方了完整的代码,有相应的ext库的话可以直接运行,下面我们逐一看一下相关内容。
Ext中的Menu很容易使用,但是对于没有用过的初学者往往有一个误区就是认为声明一个Menu对象(例如上面的mnFile)就可以直接放到工具栏上(例如上面的tb),其实是不对的,通过代码我们看到Menu对象是放在一个button中再将button放到Toolbar上面的;Ext中有几类Menu的Item类型,上面我将常用的都列出来了(还有就是自定义和baseItem这里就不再说了),其他都好说也容易理解,但是注意DateMenu和ColorMenu的使用,并不是直接作为一个menu(注意这里是小写的menu)中使用的而是放到一个Menu的item中使用的(这一点是很合理的,因为总不能直接在menu中出现一个color选框吧,总要点一个类似按钮的东西弹出来才好用啊);然后就是对于CheckItem是单选还是多选我上面已经注释了,想要单选的话就在同一组中标记相同的group就可以了;还有就是初学者会被menu嵌套中item和最后提一下啊就是Ext中经常用到分隔符,我上面已经将三种使用方式都列出来了,不过大家不要错误理解分隔符,不仅仅是纵向分割,想工具条上的多个横排按钮的分割也是如此。
关于Toolbar请看下面的例子:
Ext.onReady(function(){
	var tb=new Ext.Toolbar({
		id:'tb',
		renderTo:'divToolbar',
		autoWidth:true,
		autoHeight:true,
		items:[
			'查询条件:',
			new Ext.form.Field({

			}),
			'',
			{
				xtype:'button',
				text:'搜索',
				iconCls:'btn_search'
			},
			'->',//
			'<b>其他功能:</b>',
			new Ext.Button({
				text:'导出Excel'
			}),
			'-',
			{
				text:'导出word'
			}
		]
	});

});

对于toolbar中的元素并非什么都可以,这个可以查看相关文档,当时相信通过上面和下面的例子已经将常用的元素都列出来了(当然像DateField这些我们没有列举)。对于toolbar有时候我们还这样来添加元素(为了使代码清晰,很多部分都是和上面对应的,例如上面的string文本和addText就是对应的):
var tb=new Ext.Toolbar({
	id:'tb',
	renderTo:'divToolbar',
	autoWidth:true,
	autoHeight:true
});
tb.addText("查询条件:");
tb.addField(new Ext.form.TextField({name:'tf'}));//addField方法可以添加大部分form控件
tb.addSpacer();
tb.addButton({text:'搜索',iconCls:'btn_search'});
tb.addFill();
tb.addElement('divHtml');//参数就是一个html元素的id
tb.add(new Ext.Button({text:'导出Excel'}));
tb.addSeparator();
tb.add(new Ext.Button({text:'导出Word'}));
tb.add(new Ext.SplitButton({
	text:'帮助',
	arrorTooltip:'更多',
	menu:new Ext.menu.Menu({
		items:[
			{
				text:'升级'
			},
			{
				text:'关于'
			}
		]
	})
}))
tb.addDom({tag:'i',html:'版权'});
tb.add('<b>copyright by cmjstudio<b>');
tb.doLayout();//重新布局,否则可以去掉tb中renderTo在这里写tb.render('divToolbar');不然是看不到上面的布局元素的

注意:在Ext中一般给容器添加item时,可以使用其对应的add方法;也可以直接在构造函数中写(这一般有两种,我们在前面也说过,要么是只有主体的类[也就是只有{…}]里面可以指明xtype,要么是匿名的对象也[就是直接new XXX({})])。当然值得说明的是对于直接写在构造函数中只有主体的情况一般不指明xtype对于不同父容器也有默认的类型,除此之外有些特殊的情况(例如分隔符和toolbar的stringitem)也可以值写一个string类型的文本用引号引起来作为item。


 148
148


 被折叠的 条评论
为什么被折叠?
被折叠的 条评论
为什么被折叠?
 到【灌水乐园】发言


