


Custom install or change Microsoft Office with Office Deployment Tool
In earlier versions of Microsoft Office, users could select Install options and customize the installation by installing only selected Office applications, or select an application to be installed on first use, or completely disable an application. Later on, this could be changed, other Office applications installed or disabled.
In Office 2016 and later, including Office 365, this is no longer possible. Full Office suite of applications will be installed, be it an MSI installation from ISO or Click-to-Run installation, and it is no longer possible to remove or add individual Office applications.
The Office Deployment Tool (ODT) is a command-line tool that you can use to deploy (install) Office to your computers. Using ODT, you can select which Office suite applications will be installed or removed. You can also add or remove additional languages and edit various options.
ODT needs a configuration script (XML file), which can be created with Office Customization Tool or manually.
This tutorial will show how to create or modify a configuration script and use it with ODT to custom install Office or modify an existing installation.
Part Two. Configure install options with Office Customization Tool
2.1) Using ODT requires a configuration file in XML format. When setup is run, it reads installation options from this file. Office Customization Tool is a web based application to create ODT configuration files with a few mouse clicks.
2.2) Go to Office Configuration Tool
2.3) Expand Products and releases:
…
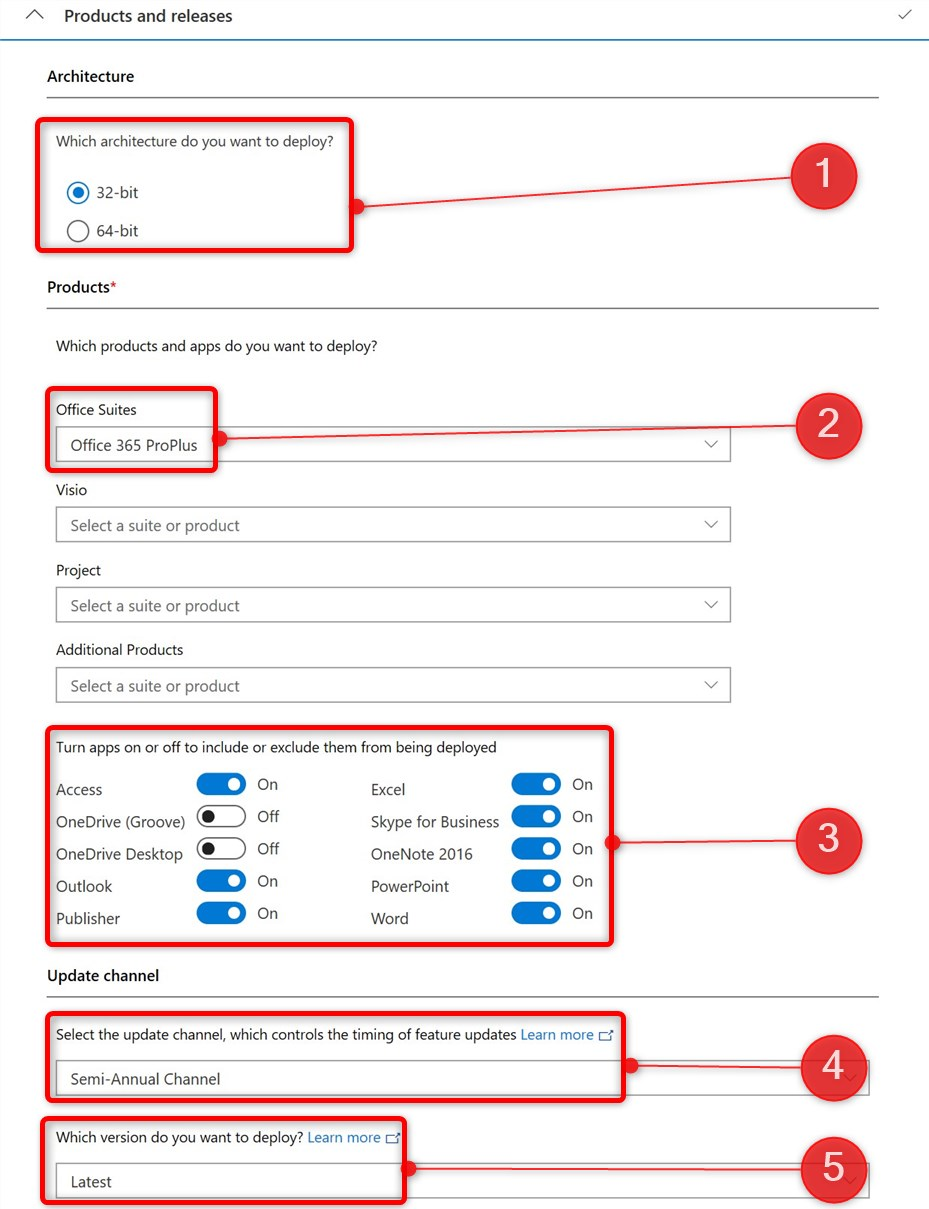
2.4) Select bit architecture (#1), Office edition from Office Suites (#2), which Office applications you want to install and which to exclude (#3), your preferred update channel (#4), and which version you want to install (#5):
…
2.6) In case you select Local source, setup checks what content is already available on given share or folder, and only downloads what is missing. When setup is run first time, content not excluded in configuration script will be downloaded and saved on given Source path. This saves time and bandwidth in case you have multiple computers; use a network share as Source path, download is only done once and Office can be deployed from that share to all computers.
…
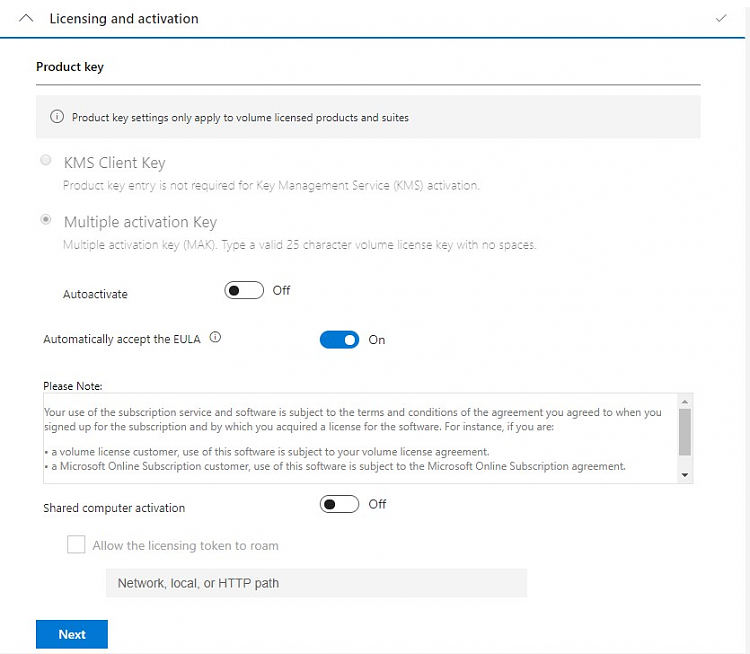
2.8) Click Next or expand Licensing and activation. In case you selected a volume licensed edition of Office in step 2.4, select your volume licencing method. For all editions, select Automatically accept the EULA. Do not turn Autoactivate on:
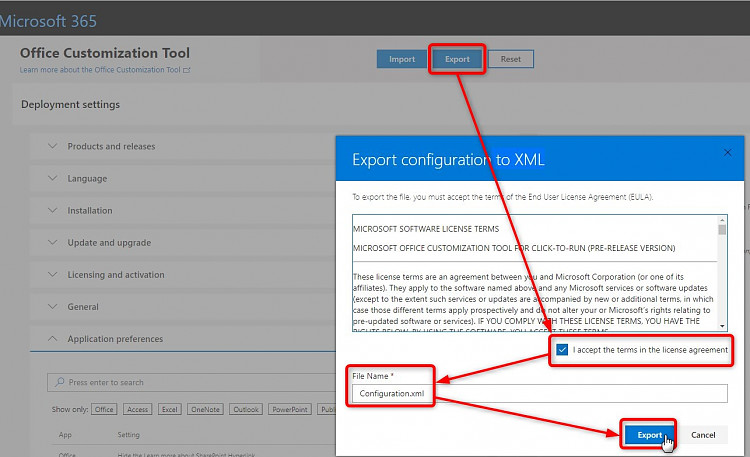
2.11) All done. You can now export (download) the configuration file:
Part Three. Configure and edit install options manually
3.1) The configuration XML files can be created and edited manually. Sample files in step 2.12 are a good base, showing some most common options. See full list of options and commands: Configuration options for the Office Deployment Tool | Microsoft Docs.
Part Four. Run Setup to install Office
4.1) Download ODT:
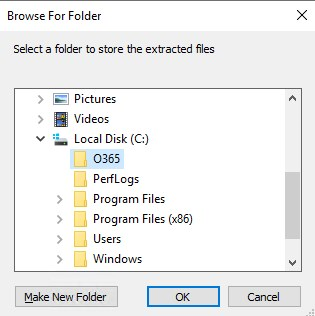
4.2) Create a folder on root of C: drive, name it as O365 (suggestion, you can name the folder as you prefer).
4.5) To extract ODT, select the folder you created in step 4.2 and click OK:
4.6) Copy your XML configuration file to same folder.
4.7) Open an elevated Command Prompt, move to O365 folder with following command:
cd \O365
4.8) If you selected cloud (CDN) as source in step 2.6, enter following command:
setup.exe /configure YourConfigurationFile.xml

4.9) Office will be installed as configured in configuration script.
4.10) If you selected a local folder or network share as Source path in step 2.6, Office setup files need to be downloaded first once with following command:
setup.exe /download YourConfigurationFile.xml
4.11) When downloaded, you can install Office from your local source with command in step 4.8
Notice that when installing from network share, ODT must be run on the computer on which you want to install Office. However, the configuration file and Source path for downloaded Office setup files can be located on a network share.
To download:
setup.exe /download \\ServerName\O365Share\YourConfigurationFile.xml
To install:
setup.exe /configure \\ServerName\O365Share\YourConfigurationFile.xml


 被折叠的 条评论
为什么被折叠?
被折叠的 条评论
为什么被折叠?
 到【灌水乐园】发言


