spring boot 之取消get、set、toString方法

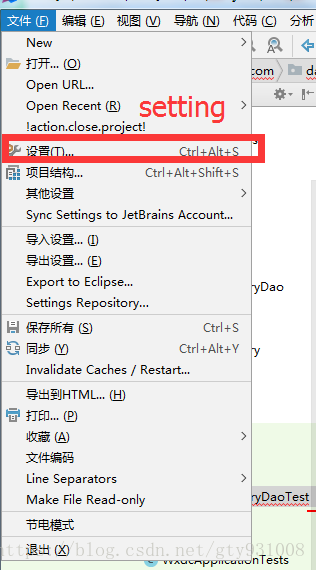
在springboot 开发中中 使用的是idea

在pom.xml加入lombok依赖,记得更新maven

        <dependency>
            <groupId>org.projectlombok</groupId>
            <artifactId>lombok</artifactId>
        </dependency>

接下来将这个lombok插件安装的idea内。


在plugins里面安装lombok插件,我这里已经安装了,
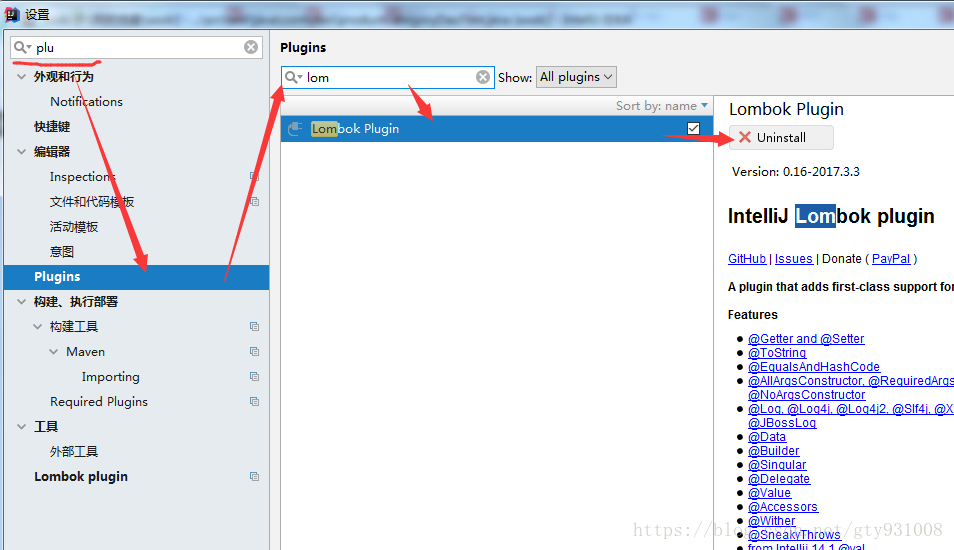

安装完成后重启idea,

这个时候进入到我们的对象类里面,添加 @Data表,这个注解相当于 包含了Get、Set、toString方法。可以ctrl+点击,查看具体实现。

  • 2
    点赞
  • 6
    收藏
    觉得还不错? 一键收藏
  • 1
    评论
YOLO高分设计资源源码,详情请查看资源内容中使用说明 YOLO高分设计资源源码,详情请查看资源内容中使用说明 YOLO高分设计资源源码,详情请查看资源内容中使用说明 YOLO高分设计资源源码,详情请查看资源内容中使用说明YOLO高分设计资源源码,详情请查看资源内容中使用说明YOLO高分设计资源源码,详情请查看资源内容中使用说明YOLO高分设计资源源码,详情请查看资源内容中使用说明YOLO高分设计资源源码,详情请查看资源内容中使用说明YOLO高分设计资源源码,详情请查看资源内容中使用说明YOLO高分设计资源源码,详情请查看资源内容中使用说明YOLO高分设计资源源码,详情请查看资源内容中使用说明YOLO高分设计资源源码,详情请查看资源内容中使用说明YOLO高分设计资源源码,详情请查看资源内容中使用说明YOLO高分设计资源源码,详情请查看资源内容中使用说明YOLO高分设计资源源码,详情请查看资源内容中使用说明YOLO高分设计资源源码,详情请查看资源内容中使用说明YOLO高分设计资源源码,详情请查看资源内容中使用说明YOLO高分设计资源源码,详情请查看资源内容中使用说明YOLO高分设计资源源码,详情请查看资源内容中使用说明YOLO高分设计资源源码,详情请查看资源内容中使用说明YOLO高分设计资源源码,详情请查看资源内容中使用说明YOLO高分设计资源源码,详情请查看资源内容中使用说明YOLO高分设计资源源码,详情请查看资源内容中使用说明YOLO高分设计资源源码,详情请查看资源内容中使用说明YOLO高分设计资源源码,详情请查看资源内容中使用说明YOLO高分设计资源源码,详情请查看资源内容中使用说明
Spring Boot提供了对CoAP(Constrained Application Protocol)的支持。CoAP是一种专门用于物联网设备的轻量级通信协议,它可以在低带宽和网络带宽受限的环境下工作。 要使用Spring Boot与CoAP进行通信,你需要添加Spring Boot的CoAP依赖项。可以通过在Maven或Gradle构建文件中添加以下依赖项来实现: Maven: ```xml <dependency> <groupId>org.springframework.boot</groupId> <artifactId>spring-boot-starter-integration</artifactId> </dependency> <dependency> <groupId>org.eclipse.californium</groupId> <artifactId>californium-core</artifactId> <version>2.0.0-M7</version> </dependency> ``` Gradle: ```gradle dependencies { implementation 'org.springframework.boot:spring-boot-starter-integration' implementation 'org.eclipse.californium:californium-core:2.0.0-M7' } ``` 添加依赖项后,你可以通过创建一个CoapServer实例来启动一个CoAP服务器,并使用CoapClient实例与CoAP服务器进行通信。以下是一个简单的示例: ```java import org.eclipse.californium.core.CoapServer; import org.springframework.boot.SpringApplication; import org.springframework.boot.autoconfigure.SpringBootApplication; import org.springframework.context.annotation.Bean; import org.springframework.integration.annotation.IntegrationComponentScan; import org.springframework.integration.annotation.MessagingGateway; import org.springframework.integration.annotation.ServiceActivator; import org.springframework.integration.channel.DirectChannel; import org.springframework.integration.coap.CoapHeaders; import org.springframework.integration.coap.inbound.CoapInboundGateway; import org.springframework.integration.coap.outbound.CoapOutboundGateway; import org.springframework.integration.dsl.IntegrationFlow; import org.springframework.integration.dsl.IntegrationFlows; import org.springframework.integration.ip.dsl.Tcp; import org.springframework.messaging.Message; import org.springframework.messaging.MessageChannel; @SpringBootApplication @IntegrationComponentScan public class CoapApplication { public static void main(String[] args) { SpringApplication.run(CoapApplication.class, args); } @Bean public CoapServer coapServer() { CoapServer coapServer = new CoapServer(); coapServer.add(new HelloWorldResource()); return coapServer; } @Bean public IntegrationFlow coapInboundFlow() { return IntegrationFlows.from(coapInboundGateway()) .channel(coapRequestChannel()) .handle("myService", "handleCoapMessage") .channel(coapResponseChannel()) .handle(coapOutboundGateway()) .get(); } @Bean public CoapInboundGateway coapInboundGateway() { CoapInboundGateway coapInboundGateway = new CoapInboundGateway(); coapInboundGateway.setRequestChannel(coapRequestChannel()); coapInboundGateway.setPath("/hello"); return coapInboundGateway; } @Bean public MessageChannel coapRequestChannel() { return new DirectChannel(); } @Bean public MessageChannel coapResponseChannel() { return new DirectChannel(); } @Bean public CoapOutboundGateway coapOutboundGateway() { CoapOutboundGateway coapOutboundGateway = new CoapOutboundGateway("coap://localhost/hello"); coapOutboundGateway.setOutputChannel(coapResponseChannel()); return coapOutboundGateway; } @Bean public MyService myService() { return new MyService(); } public static class HelloWorldResource extends CoapResource { public HelloWorldResource() { super("hello"); } @Override public void handleGET(CoapExchange exchange) { exchange.respond("Hello, world!"); } } public static class MyService { @ServiceActivator public Message<String> handleCoapMessage(Message<?> message) { String payload = message.getPayload().toString(); String path = message.getHeaders().get(CoapHeaders.PATH).toString(); System.out.println("Received CoAP message with payload: " + payload + ", path: " + path); return new GenericMessage<>("Hello, world!"); } } @MessagingGateway(defaultRequestChannel = "coapRequestChannel") public interface CoapClient { @Tcp(host = "localhost", port = 5683) String send(String payload); } } ``` 在上面的示例中,我们创建了一个CoapServer实例,并将其添加到一个名为“hello”的CoAP资源中。该资源响应GET请求并返回“Hello, world!”字符串。 我们还创建了一个名为“myService”的Spring Bean,并在其中声明了一个@ServiceActivator方法,该方法接收一个CoAP消息并返回一个响应消息。 我们创建了一个CoapInboundGateway实例来接收来自CoAP客户端的请求,并将其转换为Spring Integration消息。我们还创建了一个CoapOutboundGateway实例,用于向CoAP服务器发送请求并将其转换为Spring Integration消息。 最后,我们创建了一个名为“CoapClient”的Spring集成MessagingGateway,用于向CoAP服务器发送请求。通过调用CoapClient的send方法,我们可以向CoAP服务器发送请求并获取响应。 这是一个简单的示例,演示了如何使用Spring Boot与CoAP进行通信。你可以根据需要进行更改和扩展,以满足你的具体需求。

“相关推荐”对你有帮助么?

  • 非常没帮助
  • 没帮助
  • 一般
  • 有帮助
  • 非常有帮助
提交
评论 1
添加红包

请填写红包祝福语或标题

红包个数最小为10个

红包金额最低5元

当前余额3.43前往充值 >
需支付:10.00
成就一亿技术人!
领取后你会自动成为博主和红包主的粉丝 规则
hope_wisdom
发出的红包
实付
使用余额支付
点击重新获取
扫码支付
钱包余额 0

抵扣说明:

1.余额是钱包充值的虚拟货币,按照1:1的比例进行支付金额的抵扣。
2.余额无法直接购买下载,可以购买VIP、付费专栏及课程。

余额充值