


centos squid 代理服务部署
当前环境
服务器环境
- centos 6.7
- ip:192.168.238.80
- SELINUX=disabled
- iptables on (非必须)
- httpd 2.2.15 (非必须)
客户端环境
- windows 10 专业版
- ie 11
- QQ 8.6
安装squid
//yum安装
yum -y install squid

//设置开机启动
chkconfig --level 35 squid on

//开放squid服务端口
vi /etc/sysconfig/iptables
-A INPUT -m state --state NEW -m tcp -p tcp --dport 3128 -j ACCEPT
service iptables restart
上来就yum 就是这么简单粗暴。有喜欢最新版本的同学可以在官方网站下载。
启动squid服务
service squid start   //启动
service squid stop    //停止
service squid restart //重启
测试连接
yum安装完squid默认情况下只能允本地和许局域网代理,如果只是局域网代理,直接启动即可使用。
启动squid即可使用。
这里介绍一个好用的测试工具:QQ
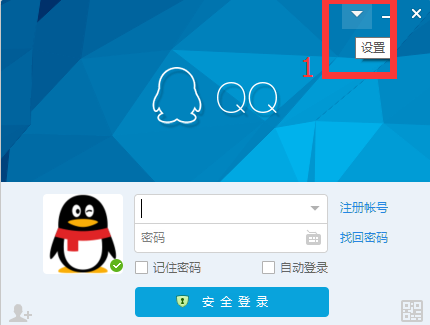
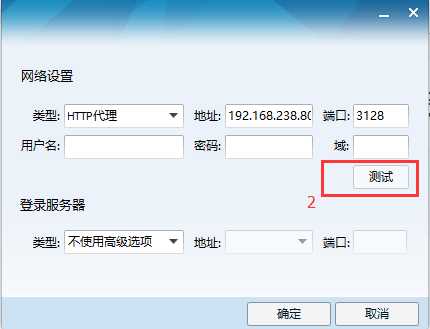
测试连接没有问题,设置internet选项, 使用代理上网

squid配置用户认证
squid的配置文件位于/etc/squid子目录下。
生成用户认证文件
//生成passwd文件,添加用户test,密码abc123
htpasswd -bc /etc/squid/passwd test abc123
扩展阅读
htpasswd 是httpd的一款命令工具,用于生成 http 基本认证的密码文件。
所以必须安装 httpd才能使用这个命令。基本语法
htpasswd [ -c ] [ -m ] passwdfile username
htpasswd -b [ -c ] [ -m | -d | -p | -s ] passwdfile username password
htpasswd -n [ -m | -d | -s | -p ] username
htpasswd -nb [ -m | -d | -s | -p ] username password
其实htpasswd生成的文件格式很简单,
[用户名]:[加密字符串]
如 test:Wa6/n5J4qg7iY
默认是 crypt加密算法
如果不想为生成passwd文件而安装 apache httpd,推荐一款htpasswd在线生成器
http://tool.oschina.net/htpasswd
注意:要选择crypt加密哦。
squid.conf 配置认证
编辑squid.conf
vim /etc/squid/squid.conf添加内容
//认证方式为basic,认证程序路径和密码文件路径
auth_param basic program /usr/lib64/squid/ncsa_auth /etc/squid/passwd
auth_param basic children 5        //认证程序的进程数
auth_param basic credentialsttl 1 hours    //认证有效时间
auth_param basic realm my test prosy       //浏览器显示输入用户/密码对话框时,显示的内容
acl auth_user proxy_auth REQUIRED
http_access allow  auth_user     //普通用户需要通过认证才能访问
公网访问
http_access deny all 改为 http_access allow all
完整 squid.conf 文件
# Auth User
auth_param basic program /usr/lib64/squid/ncsa_auth /etc/squid/passwd
auth_param basic children 10
auth_param basic credentialsttl 1 hours
auth_param basic realm my test prosy

#
# Recommended minimum configuration:
#
acl manager proto cache_object
acl auth_user proxy_auth REQUIRED

acl localhost src 127.0.0.1/32 ::1
acl to_localhost dst 127.0.0.0/8 0.0.0.0/32 ::1

# Example rule allowing access from your local networks.
# Adapt to list your (internal) IP networks from where browsing
# should be allowed
acl localnet src 10.0.0.0/8     # RFC1918 possible internal network
acl localnet src 172.16.0.0/12  # RFC1918 possible internal network
acl localnet src 192.168.0.0/16 # RFC1918 possible internal network
acl localnet src fc00::/7       # RFC 4193 local private network range
acl localnet src fe80::/10      # RFC 4291 link-local (directly plugged) machines

acl SSL_ports port 443
acl Safe_ports port 80          # http
acl Safe_ports port 21          # ftp
acl Safe_ports port 443         # https
acl Safe_ports port 70          # gopher
acl Safe_ports port 210         # wais
acl Safe_ports port 1025-65535  # unregistered ports
acl Safe_ports port 280         # http-mgmt
acl Safe_ports port 488         # gss-http
acl Safe_ports port 591         # filemaker
acl Safe_ports port 777         # multiling http
acl CONNECT method CONNECT

#
# Recommended minimum Access Permission configuration:
#
# Only allow cachemgr access from localhost
http_access allow auth_user
http_access allow manager
http_access deny manager

# Deny requests to certain unsafe ports
http_access deny !Safe_ports

# Deny CONNECT to other than secure SSL ports
http_access deny CONNECT !SSL_ports

# We strongly recommend the following be uncommented to protect innocent
# web applications running on the proxy server who think the only
# one who can access services on "localhost" is a local user
#http_access deny to_localhost

#
# INSERT YOUR OWN RULE(S) HERE TO ALLOW ACCESS FROM YOUR CLIENTS
#

# Example rule allowing access from your local networks.
# Adapt localnet in the ACL section to list your (internal) IP networks
# from where browsing should be allowed
http_access allow localnet
http_access allow localhost

# And finally deny all other access to this proxy
http_access allow all

# Squid normally listens to port 3128
http_port 8888
cache_mem 128 MB

# Uncomment and adjust the following to add a disk cache directory.
#cache_dir ufs /var/spool/squid 100 16 256

# Leave coredumps in the first cache dir
coredump_dir /var/spool/squid

# Add any of your own refresh_pattern entries above these.
refresh_pattern ^ftp:           1440    20%     10080
refresh_pattern ^gopher:        1440    0%      1440
refresh_pattern -i (/cgi-bin/|\?) 0     0%      0
refresh_pattern .               0       20%     4320
重启服务测试
配置完 必须重启服务才能生效
service squid restart //重启用QQ工具测试,必须填用户名和密码才能成功连接。
搞定,收工!
结束语
有关 squid 的acl 和 http_access 这里没有详解,其实很简单。首先定义ACL名称,规则,然后根据规则名称设置是否允许访问。
官方文档参考:http://www.squid-cache.org/Versions/v3/3.1/cfgman/index.html


 499
499


 被折叠的 条评论
为什么被折叠?
被折叠的 条评论
为什么被折叠?
 到【灌水乐园】发言


