


转载请注明出处:http://blog.csdn.net/xiaanming/article/details/13630837
今天主要说的是对Layout_weight属性的完全解析,以及利用Layout_weight这个属性使用ListView来实现表格的效果,我们都知道Android里面专门有一个TableLayout来实现表格的,说实话,我平常开发中用TableLayout还是比较少的,几乎没有用到,我们完全可以用LinearLayout和RelativeLayout来代替TableLayout的使用,自己开发中主要使用LinearLayout,RelativeLayout这两种布局,不过刚开始我还是偏爱于RelativeLayout,因为在RelativeLayout里面我们可以直接拖拽控件来布局,比较方便,现在对这两种布局偏爱各半吧,LinearLayout里面有一个属性android:layout_weight比较重要,我们在开发中常常使用它来调节界面效果,也行很多人还不了解这个属性的使用,不过没关系,我首先先带大家理解android:layout_weight属性然后在利用它来实现一个表格效果
android:layout_weight是指LinearLayout先给里面的控件分配完大小之后剩余空间的权重,也许你暂时还是摸不到头脑,不过没有关系,下面我通过例子来解释layout_weight到底是什么意思,先看下面的布局文件,一个LinearLayout,里面3个文本框
- <LinearLayout xmlns:android="http://schemas.android.com/apk/res/android"
- xmlns:tools="http://schemas.android.com/tools"
- android:layout_width="match_parent"
- android:layout_height="match_parent"
- android:orientation="horizontal" >
- <TextView
- android:layout_width="wrap_content"
- android:layout_height="wrap_content"
- android:background="#0045f5"
- android:gravity="center"
- android:text="1" />
- <TextView
- android:layout_width="wrap_content"
- android:layout_height="wrap_content"
- android:background="#00ff47"
- android:gravity="center"
- android:text="2"
- android:layout_weight="1"/>
- <TextView
- android:layout_width="wrap_content"
- android:layout_height="wrap_content"
- android:background="#ff5600"
- android:gravity="center"
- android:layout_weight="1"
- android:text="3" />
- </LinearLayout>
<LinearLayout xmlns:android="http://schemas.android.com/apk/res/android"
    xmlns:tools="http://schemas.android.com/tools"
    android:layout_width="match_parent"
    android:layout_height="match_parent"
    android:orientation="horizontal" >

    <TextView
        android:layout_width="wrap_content"
        android:layout_height="wrap_content"
        android:background="#0045f5"
        android:gravity="center"
        android:text="1" />

    <TextView
        android:layout_width="wrap_content"
        android:layout_height="wrap_content"
        android:background="#00ff47"
        android:gravity="center"
        android:text="2"
        android:layout_weight="1"/>

    <TextView
        android:layout_width="wrap_content"
        android:layout_height="wrap_content"
        android:background="#ff5600"
        android:gravity="center"
        android:layout_weight="1"
        android:text="3" />

</LinearLayout>
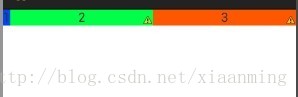
为什么效果是这个样子呢,首先3个文本框的宽度都是“wrap_content”,根据视图内部内容自动扩展,LinearLayout就先给3个TextView分配空间适当的空间大小,假设为每个TextView分配10dip的宽度,屏幕的宽度为480dip, 那么LinearLayout的剩余空间就是 480 - 3*10 = 450dip,由于第一个TextView没有设置layout_weight,所以它的宽度就是10dip,而后面两个TextView设置layout_weight都是1,所以后面两个TextView就平均分配LinearLayout的剩余空间,即为 450 / 2 = 225dip,所以后面两个TextView的宽度为10 + 225 = 235dip
如果我们实际开发中,你设置里面控件的宽度为”wrap_content“,然后想让里面的控件按比例占用大小,那么你就大错特错了,为什么呢?我们看看下面的代码
- <LinearLayout xmlns:android="http://schemas.android.com/apk/res/android"
- xmlns:tools="http://schemas.android.com/tools"
- android:layout_width="match_parent"
- android:layout_height="match_parent"
- android:orientation="horizontal" >
- <TextView
- android:layout_width="wrap_content"
- android:layout_height="wrap_content"
- android:background="#0045f5"
- android:gravity="center"
- android:text="1" />
- <TextView
- android:layout_width="wrap_content"
- android:layout_height="wrap_content"
- android:background="#00ff47"
- android:gravity="center"
- android:text="2222222222222222222"
- android:layout_weight="1"/>
- <TextView
- android:layout_width="wrap_content"
- android:layout_height="wrap_content"
- android:background="#ff5600"
- android:gravity="center"
- android:layout_weight="1"
- android:text="3" />
- </LinearLayout>
<LinearLayout xmlns:android="http://schemas.android.com/apk/res/android"
    xmlns:tools="http://schemas.android.com/tools"
    android:layout_width="match_parent"
    android:layout_height="match_parent"
    android:orientation="horizontal" >

    <TextView
        android:layout_width="wrap_content"
        android:layout_height="wrap_content"
        android:background="#0045f5"
        android:gravity="center"
        android:text="1" />

    <TextView
        android:layout_width="wrap_content"
        android:layout_height="wrap_content"
        android:background="#00ff47"
        android:gravity="center"
        android:text="2222222222222222222"
        android:layout_weight="1"/>

    <TextView
        android:layout_width="wrap_content"
        android:layout_height="wrap_content"
        android:background="#ff5600"
        android:gravity="center"
        android:layout_weight="1"
        android:text="3" />
</LinearLayout>
你本来想让后面两个TextView平均分配剩余控件,可是下面的效果却并不是你想要的,如下图
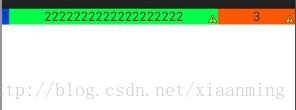
其实因为3个TextView的宽度都是”wrap_content“,LinearLayout会先按照TextView里面的内容分配好大小,由于第2个TextView内容很多,所以LinearLayout为其分配更多的空间,使得剩余空间变小了,原理和上面的一样,那么我们在实际开发中要怎么设置按比例分配呢。知道原理其实就很简单,比如我们想要3个TextView按照1:2:3的效果
- <LinearLayout xmlns:android="http://schemas.android.com/apk/res/android"
- xmlns:tools="http://schemas.android.com/tools"
- android:layout_width="match_parent"
- android:layout_height="match_parent"
- android:orientation="horizontal" >
- <TextView
- android:layout_width="0dip"
- android:layout_height="wrap_content"
- android:background="#0045f5"
- android:gravity="center"
- android:layout_weight="1"
- android:text="1" />
- <TextView
- android:layout_width="0dip"
- android:layout_height="wrap_content"
- android:background="#00ff47"
- android:gravity="center"
- android:text="2222222222222222222"
- android:layout_weight="2"/>
- <TextView
- android:layout_width="0dip"
- android:layout_height="wrap_content"
- android:background="#ff5600"
- android:gravity="center"
- android:layout_weight="3"
- android:text="3" />
- </LinearLayout>
<LinearLayout xmlns:android="http://schemas.android.com/apk/res/android"
    xmlns:tools="http://schemas.android.com/tools"
    android:layout_width="match_parent"
    android:layout_height="match_parent"
    android:orientation="horizontal" >

    <TextView
        android:layout_width="0dip"
        android:layout_height="wrap_content"
        android:background="#0045f5"
        android:gravity="center"
        android:layout_weight="1"
        android:text="1" />

    <TextView
        android:layout_width="0dip"
        android:layout_height="wrap_content"
        android:background="#00ff47"
        android:gravity="center"
        android:text="2222222222222222222"
        android:layout_weight="2"/>

    <TextView
        android:layout_width="0dip"
        android:layout_height="wrap_content"
        android:background="#ff5600"
        android:gravity="center"
        android:layout_weight="3"
        android:text="3" />
</LinearLayout>

我们只需要将3个TextView的宽度设置为0dip,首先LinearLayout为3个TextView分配0dip的宽度,剩余空间就是 480 - 3 * 0 = 480dip,然后剩余空间在按照权重分配,所以我们看到的效果就是1:2:3
通过上面的讲解,也许你会得出一个结论,权重越大,LinearLayout为其分配的空间就越大,我只能说这个结论下有点早了,我们继续看布局
- <LinearLayout xmlns:android="http://schemas.android.com/apk/res/android"
- xmlns:tools="http://schemas.android.com/tools"
- android:layout_width="match_parent"
- android:layout_height="match_parent"
- android:orientation="horizontal" >
- <TextView
- android:layout_width="fill_parent"
- android:layout_height="wrap_content"
- android:background="#0045f5"
- android:gravity="center"
- android:layout_weight="1"
- android:text="1" />
- <TextView
- android:layout_width="fill_parent"
- android:layout_height="wrap_content"
- android:background="#00ff47"
- android:gravity="center"
- android:text="2"
- android:layout_weight="2"/>
- <TextView
- android:layout_width="fill_parent"
- android:layout_height="wrap_content"
- android:background="#ff5600"
- android:gravity="center"
- android:layout_weight="2"
- android:text="3" />
- </LinearLayout>
<LinearLayout xmlns:android="http://schemas.android.com/apk/res/android"
    xmlns:tools="http://schemas.android.com/tools"
    android:layout_width="match_parent"
    android:layout_height="match_parent"
    android:orientation="horizontal" >

    <TextView
        android:layout_width="fill_parent"
        android:layout_height="wrap_content"
        android:background="#0045f5"
        android:gravity="center"
        android:layout_weight="1"
        android:text="1" />

    <TextView
        android:layout_width="fill_parent"
        android:layout_height="wrap_content"
        android:background="#00ff47"
        android:gravity="center"
        android:text="2"
        android:layout_weight="2"/>

    <TextView
        android:layout_width="fill_parent"
        android:layout_height="wrap_content"
        android:background="#ff5600"
        android:gravity="center"
        android:layout_weight="2"
        android:text="3" />
</LinearLayout>
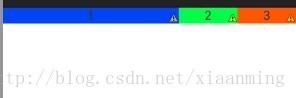
也许你会很纳闷,怎么不是你想要的1:2:2的效果,我来为你解决疑惑吧,原理跟上面的还是一样的,因为我们这里为每个TextView设置的宽度为”fill_parent",即为充满整个LinearLayout,假如屏幕依然为480dip, 首先LinearLayout为3个TextView分配的宽度为480dip,屏幕剩余宽度为 480 - 3* 480 = -960dip,然后3个TextView按照权重分配剩余空间,第一个TextView分配宽度为 480 + (-960) * (1/5) = 288dip,后面两个TextView就为480 + (-960) * (2/5) = 96dip,比例为3:1:1
通过上面的例子和分析,你是不是对Layout_weight属性理解很透彻了呢,如果我们想要按照权重比例来分配LinearLayout,我们需要将其宽度设置为0dip,如果我们将其宽度设置为“fill_parent"的时候,其控件所占的比例不是权重的比例,我们需要自行计算比例
接下来我们就通过Layout_weight用ListView来实现表格,我们先看Activity的布局
- <LinearLayout xmlns:android="http://schemas.android.com/apk/res/android"
- xmlns:tools="http://schemas.android.com/tools"
- android:orientation="vertical"
- android:layout_margin="10dip"
- android:layout_width="match_parent"
- android:layout_height="match_parent" >
- <include
- layout="@layout/list_item"
- android:id="@+id/table_title"/>
- <ListView
- android:id="@+id/list"
- android:divider="#f9b68b"
- android:dividerHeight="1.0dip"
- android:scrollbars="none"
- android:background="@drawable/listview_bg"
- android:cacheColorHint="@android:color/transparent"
- android:fadingEdge="none"
- android:layout_width="fill_parent"
- android:layout_height="wrap_content" >
- </ListView>
- </LinearLayout>
<LinearLayout xmlns:android="http://schemas.android.com/apk/res/android"
    xmlns:tools="http://schemas.android.com/tools"
    android:orientation="vertical"
    android:layout_margin="10dip"
    android:layout_width="match_parent"
    android:layout_height="match_parent" >

    <include
        layout="@layout/list_item"
        android:id="@+id/table_title"/>

    <ListView
        android:id="@+id/list"
        android:divider="#f9b68b"
        android:dividerHeight="1.0dip"
        android:scrollbars="none"
        android:background="@drawable/listview_bg"
        android:cacheColorHint="@android:color/transparent"
        android:fadingEdge="none"
        android:layout_width="fill_parent"
        android:layout_height="wrap_content" >
    </ListView>

</LinearLayout>- <?xml version="1.0" encoding="UTF-8"?>
- <LinearLayout xmlns:android="http://schemas.android.com/apk/res/android"
- android:orientation="horizontal"
- android:layout_width="fill_parent"
- android:layout_height="wrap_content" >
- <TextView
- android:id="@+id/text_name"
- android:layout_width="0dip"
- android:layout_height="wrap_content"
- android:layout_weight="2"
- android:gravity="center"
- android:paddingBottom="10dip"
- android:paddingTop="10dip"
- android:text="姓名" />
- <View
- android:layout_width="1.5dip"
- android:layout_height="fill_parent"
- android:background="#f9b68b"/>
- <TextView
- android:id="@+id/text_sex"
- android:layout_width="0dip"
- android:layout_height="wrap_content"
- android:layout_weight="1"
- android:paddingBottom="10dip"
- android:paddingTop="10dip"
- android:gravity="center"
- android:text="性别" />
- <View
- android:layout_width="1.5dip"
- android:layout_height="fill_parent"
- android:background="#f9b68b"/>
- <TextView
- android:id="@+id/text_age"
- android:layout_width="0dip"
- android:layout_height="wrap_content"
- android:layout_weight="1"
- android:paddingBottom="10dip"
- android:paddingTop="10dip"
- android:gravity="center"
- android:text="年龄" />
- </LinearLayout>
<?xml version="1.0" encoding="UTF-8"?>
<LinearLayout xmlns:android="http://schemas.android.com/apk/res/android"
    android:orientation="horizontal"
    android:layout_width="fill_parent"
    android:layout_height="wrap_content" >

    <TextView
        android:id="@+id/text_name"
        android:layout_width="0dip"
        android:layout_height="wrap_content"
        android:layout_weight="2"
        android:gravity="center"
        android:paddingBottom="10dip"
        android:paddingTop="10dip"
        android:text="姓名" />

    <View
        android:layout_width="1.5dip"
        android:layout_height="fill_parent"
        android:background="#f9b68b"/>

    <TextView
        android:id="@+id/text_sex"
        android:layout_width="0dip"
        android:layout_height="wrap_content"
        android:layout_weight="1"
        android:paddingBottom="10dip"
        android:paddingTop="10dip"
        android:gravity="center"
        android:text="性别" />

     <View
        android:layout_width="1.5dip"
        android:layout_height="fill_parent"
        android:background="#f9b68b"/>

    <TextView
        android:id="@+id/text_age"
        android:layout_width="0dip"
        android:layout_height="wrap_content"
        android:layout_weight="1"
        android:paddingBottom="10dip"
        android:paddingTop="10dip"
        android:gravity="center"
        android:text="年龄" />

</LinearLayout>- package com.example.listviewtable;
- public class Person {
- private String name;
- private String sex;
- private int age;
- public Person() {
- super();
- }
- public Person(String name, String sex, int age) {
- super();
- this.name = name;
- this.sex = sex;
- this.age = age;
- }
- public String getName() {
- return name;
- }
- public void setName(String name) {
- this.name = name;
- }
- public String getSex() {
- return sex;
- }
- public void setSex(String sex) {
- this.sex = sex;
- }
- public int getAge() {
- return age;
- }
- public void setAge(int age) {
- this.age = age;
- }
- }
package com.example.listviewtable;

public class Person {
	private String name;
	private String sex;
	private int age;

	public Person() {
		super();
	}

	public Person(String name, String sex, int age) {
		super();
		this.name = name;
		this.sex = sex;
		this.age = age;
	}
	public String getName() {
		return name;
	}
	public void setName(String name) {
		this.name = name;
	}
	public String getSex() {
		return sex;
	}
	public void setSex(String sex) {
		this.sex = sex;
	}
	public int getAge() {
		return age;
	}
	public void setAge(int age) {
		this.age = age;
	}


}
- package com.example.listviewtable;
- import java.util.List;
- import android.content.Context;
- import android.view.LayoutInflater;
- import android.view.View;
- import android.view.ViewGroup;
- import android.widget.BaseAdapter;
- import android.widget.TextView;
- public class TableAdapter extends BaseAdapter {
- private List<Person> list;
- private LayoutInflater inflater;
- public TableAdapter(Context context, List<Person> list){
- this.list = list;
- inflater = LayoutInflater.from(context);
- }
- @Override
- public int getCount() {
- return list.size();
- }
- @Override
- public Object getItem(int position) {
- return list.get(position);
- }
- @Override
- public long getItemId(int position) {
- return position;
- }
- @Override
- public View getView(int position, View convertView, ViewGroup parent) {
- Person person = (Person) this.getItem(position);
- ViewHolder viewHolder;
- if(convertView == null){
- viewHolder = new ViewHolder();
- convertView = inflater.inflate(R.layout.list_item, null);
- viewHolder.mTextName = (TextView) convertView.findViewById(R.id.text_name);
- viewHolder.mTextSex = (TextView) convertView.findViewById(R.id.text_sex);
- viewHolder.mTextAge = (TextView) convertView.findViewById(R.id.text_age);
- convertView.setTag(viewHolder);
- }else{
- viewHolder = (ViewHolder) convertView.getTag();
- }
- viewHolder.mTextName.setText(person.getName());
- viewHolder.mTextSex.setText(person.getSex());
- viewHolder.mTextAge.setText(person.getAge() + "岁");
- return convertView;
- }
- public static class ViewHolder{
- public TextView mTextName;
- public TextView mTextSex;
- public TextView mTextAge;
- }
- }
package com.example.listviewtable;

import java.util.List;

import android.content.Context;
import android.view.LayoutInflater;
import android.view.View;
import android.view.ViewGroup;
import android.widget.BaseAdapter;
import android.widget.TextView;

public class TableAdapter extends BaseAdapter {
	private List<Person> list;
	private LayoutInflater inflater;

	public TableAdapter(Context context, List<Person> list){
		this.list = list;
		inflater = LayoutInflater.from(context);
	}

	@Override
	public int getCount() {
		return list.size();
	}

	@Override
	public Object getItem(int position) {
		return list.get(position);
	}

	@Override
	public long getItemId(int position) {
		return position;
	}

	@Override
	public View getView(int position, View convertView, ViewGroup parent) {
		Person person = (Person) this.getItem(position);
		ViewHolder viewHolder;
		if(convertView == null){
			viewHolder = new ViewHolder();
			convertView = inflater.inflate(R.layout.list_item, null);
			viewHolder.mTextName = (TextView) convertView.findViewById(R.id.text_name);
			viewHolder.mTextSex = (TextView) convertView.findViewById(R.id.text_sex);
			viewHolder.mTextAge = (TextView) convertView.findViewById(R.id.text_age);
			convertView.setTag(viewHolder);
		}else{
			viewHolder = (ViewHolder) convertView.getTag();
		}

		viewHolder.mTextName.setText(person.getName());
		viewHolder.mTextSex.setText(person.getSex());
		viewHolder.mTextAge.setText(person.getAge() + "岁");


		return convertView;
	}

	public static class ViewHolder{
		public TextView mTextName;
		public TextView mTextSex;
		public TextView mTextAge;

	}

}
- package com.example.listviewtable;
- import java.util.ArrayList;
- import java.util.List;
- import android.app.Activity;
- import android.graphics.Color;
- import android.os.Bundle;
- import android.view.ViewGroup;
- import android.widget.ListView;
- public class ListTableActivity extends Activity {
- @Override
- protected void onCreate(Bundle savedInstanceState) {
- super.onCreate(savedInstanceState);
- setContentView(R.layout.activity_main);
- //设置表格标题的背景颜色
- ViewGroup tableTitle = (ViewGroup) findViewById(R.id.table_title);
- tableTitle.setBackgroundColor(Color.rgb(255, 100, 10));
- List<Person> list = new ArrayList<Person>();
- list.add(new Person("刘德华", "男", 50));
- list.add(new Person("刘德华", "男", 50));
- list.add(new Person("刘德华", "男", 50));
- list.add(new Person("刘德华", "男", 50));
- list.add(new Person("刘德华", "男", 50));
- list.add(new Person("刘德华", "男", 50));
- list.add(new Person("刘德华", "男", 50));
- list.add(new Person("刘德华", "男", 50));
- list.add(new Person("刘德华", "男", 50));
- list.add(new Person("刘德华", "男", 50));
- ListView tableListView = (ListView) findViewById(R.id.list);
- TableAdapter adapter = new TableAdapter(this, list);
- tableListView.setAdapter(adapter);
- }
- }
package com.example.listviewtable;

import java.util.ArrayList;
import java.util.List;

import android.app.Activity;
import android.graphics.Color;
import android.os.Bundle;
import android.view.ViewGroup;
import android.widget.ListView;

public class ListTableActivity extends Activity {

	@Override
	protected void onCreate(Bundle savedInstanceState) {
		super.onCreate(savedInstanceState);
		setContentView(R.layout.activity_main);

		//设置表格标题的背景颜色
		ViewGroup tableTitle = (ViewGroup) findViewById(R.id.table_title);
		tableTitle.setBackgroundColor(Color.rgb(255, 100, 10));

		List<Person> list = new ArrayList<Person>();
		list.add(new Person("刘德华", "男", 50));
		list.add(new Person("刘德华", "男", 50));
		list.add(new Person("刘德华", "男", 50));
		list.add(new Person("刘德华", "男", 50));
		list.add(new Person("刘德华", "男", 50));
		list.add(new Person("刘德华", "男", 50));
		list.add(new Person("刘德华", "男", 50));
		list.add(new Person("刘德华", "男", 50));
		list.add(new Person("刘德华", "男", 50));
		list.add(new Person("刘德华", "男", 50));

		ListView tableListView = (ListView) findViewById(R.id.list);
		TableAdapter adapter = new TableAdapter(this, list);
		tableListView.setAdapter(adapter);
	}


}
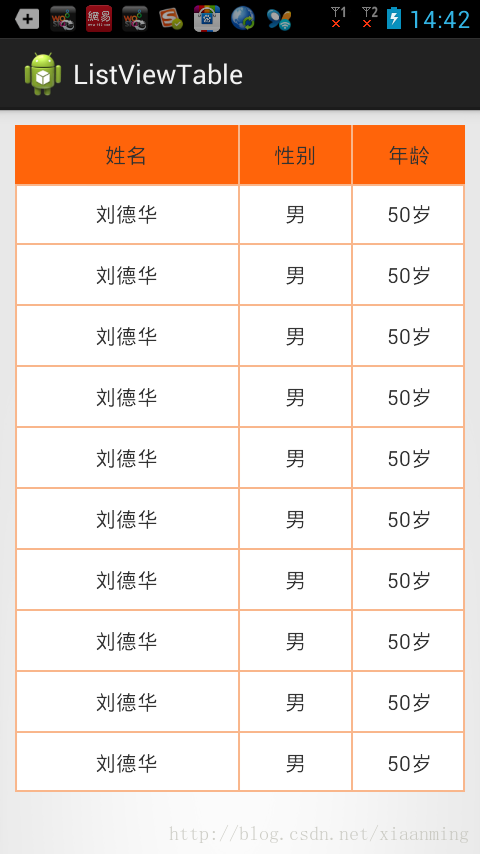
通过layout_weight这个属性,我们就轻松实现了表格的功能,通过本文章相信大家对这个属性有了深刻的理解,大家有什么疑问可以在下面留言,我会为大家解答的
项目源码,点击下载
版权声明:本文为博主原创文章,未经博主允许不得转载。


 4564
4564


 被折叠的 条评论
为什么被折叠?
被折叠的 条评论
为什么被折叠?
 到【灌水乐园】发言


