


本文英文原版及代码下载:http://www.asp.net/learn/security/tutorial-10-cs.aspx
Security Tutorials系列文章第十章:Assigning Roles to Users
导言: 在前面的文章里我们考察了Roles framework以及SqlRoleProvider,我们看到了如何用Roles class类来创建、检索、删除角色.除了创建和删除角色外,我们还需要将用户分配给角色或从角色了删除用户.不幸的是ASP.NET没有提供任何的控件来操作这些事情,因此我们必须自己创建页面来进行管理.还好,向角色添加用户或删除用户是很简单的.Roles类提供了很多的方法以便于我们进行管理.
在本文我们将构建2个页面,第一个页面里我们将看到某个给定的角色包含有哪些用户,某个用户又是属于那个角色的,以及向某个角色添加或删除用户.在第二个页面,我们将对CreateUserWizard控件进行扩展,以多包含一步,在该步里决定新创建的帐户属于哪个角色.当管理员新创建一个帐户的时候是很有用的.
Listing What Users Belong To What Roles
首先,在思考如何将用户分配给角色之前我们先考虑如何判断哪个用户属于哪个角色.我们可以从2方面入手:“by role” 或 “by user”,我们可以允许用户选择一个角色再看哪些用户属于这些角色(也就是从“by role”入手),或者允许用户选择一个用户帐号,再看该帐号所属的角色(也就是从by user”入手).
当需要知道某个角色的所有用户帐户时,从“by role”入手很好;而要知道某个用户帐户的角色信息时,从“by user”入手很好.我在第一个页面里分别从“by role”和“by user”入手.
我们先从创建“by user”界面开始.该界面由一个drop-down list以及一列checkboxes组成.drop-down list里列出的是系统现有的用户帐户;而那些checkbox列出的是系统的所有角色.从drop-down list里选择一个用户帐户以探测该用户帐户所属的所有角色.另外可以check 或 uncheck这些checkbox以将选中的用户帐户添加或移除出对应的角色.
注意: 使用一个drop-down来将所有的用户帐户列出来是很不可取的,比如如果站点有几百甚至更多的帐号的时候. 我们可以用其他手段来罗列用户,比如一个可分页的GridView或让访问者输入一个字母,然后将所有以该字母开头的用户帐户显示出来.
Step 1: Building the “By User” User Interface
打开UsersAndRoles.aspx页面,在顶部添加一个id为ActionStatus的Label控件,清除其Text属性,我们将用该Label来提供视觉反馈信息,显示比如这样的信息:“User Tito has been added to the Administrators role,” 或 “User Jisun has been removed from the Supervisors role.” 为了突出显示,我们将它的CssClass属性设置为“Important”.
<p align="center"> <asp:Label ID="ActionStatus" runat="server" CssClass="Important"> </asp:Label> </p>
接下来在Styles.css里添加如下的CSS class定义: .Important { font-size: large; color: Red; }
该CSS是让浏览器用粗体,红色的文字显示,如图1所示的是在Visual Studio Designer里效果.
图1
接下来,在页面上添加一个DropDownList,设其Id为UserList,将其AutoPostBack属性设置为True.我们用该DropDownList来将系统里所有的用户列出来,它绑定的是一个MembershipUser objects组成的collection.由于我们希望该DropDownLis列出的MembershipUser object的UserName属性(当然也作为其list items的值).因此将DropDownList的DataTextField 和 DataValueField属性都设置为“UserName”.
在该DropDownList控件下面添加一个名为UsersRoleList的一个Repeater控件。它以一系列checkbox的形式将系统里所有的role显示出来.用如下的声明代码来定义该Repeater的ItemTemplate模板:
 <asp:Repeater ID="UsersRoleList" runat="server">

  <ItemTemplate>

  <asp:CheckBox runat="server" ID="RoleCheckBox"

    AutoPostBack="true" Text='<%# Container.DataItem %>'/>

     <br />

 </ItemTemplate>

</asp:Repeater>
该ItemTemplate声明代码仅仅包含一个名为RoleCheckBox的CheckBox控件.其AutoPostBack属性设置为True,而Text属性绑定为Container.DataItem. 之所以绑定语法仅仅绑定Container.DataItem,是因为Roles framework将role names作为一个string array进行返回.而我们的Repeater控件要绑定的就是这个string array.关于这种绑定语法的更深入探讨超出了本文的范畴,你可以参阅文章《 Binding a Scalar Array to a Data Web Control》
此时,你的“by user”界面的声明代码看起来和下面的差不多:
<h3>Manage Roles By User</h3>

 <p>

<b>Select a User:</b>

<asp:DropDownList ID="UserList" runat="server" AutoPostBack="True"           DataTextField="UserName"  DataValueField="UserName">

  </asp:DropDownList>

</p>

<p>

<asp:Repeater ID="UsersRoleList" runat="server">

 <ItemTemplate>

 <asp:CheckBox runat="server" ID="RoleCheckBox" AutoPostBack="true"                     Text='<%# Container.DataItem %>' />

   <br />

  </ItemTemplate>

</asp:Repeater> </p>
我们现在要写代码对DropDownList 和 Repeater控件进行绑定了,在页面的后台代码里,添加BindUsersToUserList方法和BindRolesList方法,如下:
 private void BindUsersToUserList()

{

 // Get all of the user accounts

 MembershipUserCollection users = Membership.GetAllUsers();

 UserList.DataSource = users;

 UserList.DataBind();

}
private void BindRolesToList()
{ // Get all of the roles
string[] roles = Roles.GetAllRoles();
UsersRoleList.DataSource = roles;
UsersRoleList.DataBind();
}
BindUsersToUserList方法通过Membership.GetAllUsers method返回系统所有的user accounts.该Membership.GetAllUsers method返回的是MembershipUserCollection object,实际上也就是一个MembershipUser instances的collection.再用该collection绑定到UserList DropDownList.而MembershipUser instances有诸如UserName, Email, CreationDate, 以及IsOnline等属性,因此务必要将UserList DropDownList的DataTextField 和DataValueField属性设置为“UserName”. 注意: Membership.GetAllUsers方法有二个重载:一个没有输入参数,返回的是所有的users;而另一个要接受2个integer类型的输入参数,分别代表page index 和 page size,且返回的是指定的那部分users.当系统用户很多,且显示在一个可分页的界面里时,那么第二种重载就很适用,因为分页效率高,仅仅是返回某页所需的用户,而不是盲目的将所有用户返回.
BindRolesToList方法一开始调用Roles类的GetAllRoles method,它将系统里的roles以一个string array的形式进行返回,再绑定到Repeater. 然后,在页面初次加载时我们需要调用这2个方法。因此在Page_Load事件处理器里添加如下的代码:
 protected void Page_Load(object sender, EventArgs e)

{

 if (!Page.IsPostBack)

 {           // Bind the users and roles

  BindUsersToUserList();

 BindRolesToList();

  }

}
添加这些代码后,花点时间来测试,你的屏幕应该和图2差不多.所有的用户帐户都绑定到下拉列表里,再下面是每个role.由于我们将DropDownList 和CheckBoxes的AutoPostBack属性都设置为True,选择一个用户或选中或弃选一个role都会导致一个回传.不过实际上什么都没发生,因为我们还没有写相应的事件处理器,我们将在后面的章节完善.
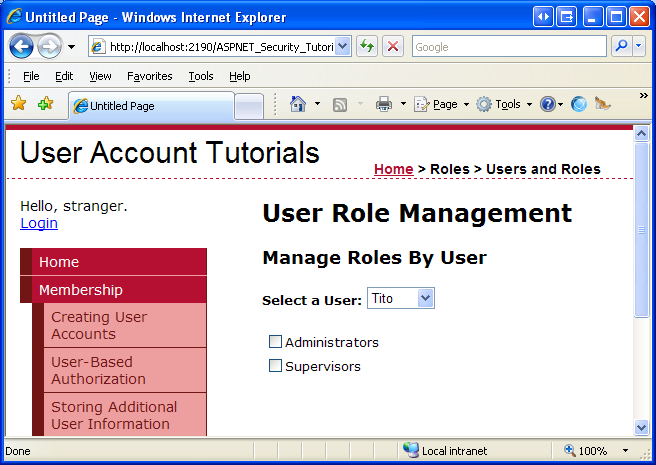 图2
图2
Checking the Roles the Selected User Belongs To
当页面初次加载,或任何时候登录者选择一个新的用户,我们都需要对 UsersRoleList里的这些checkbox进行更新,如果该用户输入某个role,就使该role处于选中状态.为此,创建一个名为CheckRolesForSelectedUser的方法,代码如下:
private void CheckRolesForSelectedUser()

{

  // Determine what roles the selected user belongs to

  string selectedUserName = UserList.SelectedValue;

  string[] selectedUsersRoles = Roles.GetRolesForUser(selectedUserName);


  // Loop through the Repeater's Items and check or uncheck the checkbox as needed

 foreach (RepeaterItem ri in UsersRoleList.Items)

  {

     // Programmatically referencethe CheckBox

      CheckBox RoleCheckBox = ri.FindControl("RoleCheckBox") as CheckBox;

     // See if RoleCheckBox.Text is in selectedUsersRoles

    if (selectedUsersRoles.Contains<string>(RoleCheckBox.Text))

    RoleCheckBox.Checked = true;

    else RoleCheckBox.Checked = false;

  }

}
上述代码一开始探测选中的用户是哪个,再用Roles类的GetRolesForUser(userName) method来检索出该用户所属的roles信息,以一个string array的形式返回.接下来,遍历Repeater的items,并引用每个item的idRoleCheckBox的CheckBox.如果该用户属于该role,那么对应的CheckBox的才会处于选中状态.
注意: 如果你使用的是ASP.NET 2.0的话,那么代码里的selectedUserRoles.Contains<string>(...)语法就不会编译通过.因为Contains<string> method是LINQ library的一部分,而LINQ library是ASP.NET 3.5里新添加的.如果你使用的是ASP.NET 2.0的话,你可以使用Array.IndexOf<string> method方法来替换.
我们需要在2种情况下调用CheckRolesForSelectedUser方法:当页面初次加载时和当id为UserList的DropDownList控件的selected index发生改变时.因此,在Page_Load事件处理器里调用该方法(要放在BindUsersToUserList 和BindRolesToList这2个方法之后).同样,为DropDownList的SelectedIndexChanged事件创造事件处理器,并调用该方法:
protected void Page_Load(object sender, EventArgs e)

{

 if (!Page.IsPostBack)

 {           // Bind the users and roles

             BindUsersToUserList();

             BindRolesToList();

            // Check the selected user's roles

           CheckRolesForSelectedUser();      }

}

...


protected void UserList_SelectedIndexChanged(object sender, EventArgs e)

{      CheckRolesForSelectedUser();

}
添加完代码后,你可以在浏览器里测试.然而由于UsersAndRoles.aspx页面目前还不能将用户分配给角色,因此用户并没有角色,我们将在后面完善.因此你要么等好后面看效果,要么手动向aspnet_UsersInRoles表里添加记录,以测试功能.
Assigning and Removing Users from Roles
当访问者在UsersRoleList Repeater里选中或弃选一个CheckBox时,我们对需要从对应的role里添加或移除该用户.而CheckBox的AutoPostBack属性目前是设为True, 这就意味着任何时候选中或弃选都会引发一个页面回传.简单的说,我们需要为CheckBox的CheckChanged event创建事件处理器.由于CheckBox是位于Repeater里的,因此我们需要手动添加事件处理器.在页面的后台代码里添加一个protected method,如下:
protected void RoleCheckBox_CheckChanged(object sender, EventArgs e) { }
我们在后面再来写具体的代码。在Repeater的ItemTemplate里,为CheckBox添加OnCheckedChanged="RoleCheckBox_CheckChanged".这样的话就将RoleCheckBox_CheckChanged事件处理器与RoleCheckBox的CheckedChanged事件联系起来了,如下:
<asp:CheckBox runat="server" ID="RoleCheckBox"  AutoPostBack="true"  Text='<%# Container.DataItem %>'

     OnCheckedChanged="RoleCheckBox_CheckChanged"

/>
我们再来完成RoleCheckBox_CheckChanged event handler.我们要引用触发该事件的那个CheckBox,通过其Text 和 Checked属性来确定选中或弃选了哪个role,同时根据所选用户的UserName,我们就可以通过Roles类的AddUserToRole 或 RemoveUserFromRole method来将用户从role里添加或移除.
protected void RoleCheckBox_CheckChanged(object sender, EventArgs e)

{

     // Reference the CheckBox that raised this event

     CheckBox RoleCheckBox = sender as CheckBox;

     // Get the currently selected user and role

     string selectedUserName = UserList.SelectedValue;

     string roleName = RoleCheckBox.Text;

     // Determine if we need to add or remove the user from this role

 if (RoleCheckBox.Checked)

     {

          // Add the user to the role

          Roles.AddUserToRole(selectedUserName, roleName);

         // Display a status message

        ActionStatus.Text = string.Format("User {0} was added to role {1}.", selectedUserName, roleName);

     }

else

     {

          // Remove the user from the role

          Roles.RemoveUserFromRole(selectedUserName, roleName);

          // Display a status message

          ActionStatus.Text = string.Format("User {0} was removed from role {1}.", selectedUserName, roleName);

     }

}
代码通过输入参数sender来引用触发事件的那个CheckBox.如果该CheckBox处于选中状态就将选中的用户添加到对应的角色,反之就从该角色里删除.不管怎样,id为ActionStatus的Label将显示一条消息指出进行了什么操作.我们来测试,选择用户Tito并将其添加到Administrators 和 Supervisors角色里.
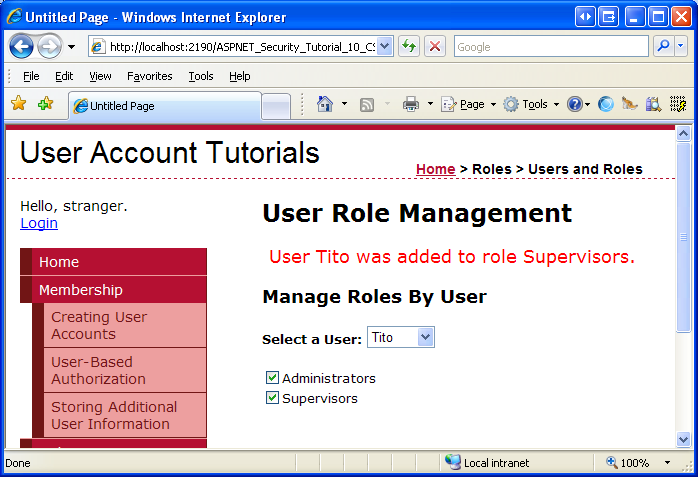
图3
接下来从下拉列表里选中Bruce,这将发生一个页面回传,同时通过CheckRolesForSelectedUser对Repeater的CheckBoxes进行更新.由于Bruce并不属于任何角色,因此这2个checkbox都是处于未选中状态,接下来,将Bruce添加进Supervisors角色.
图4
Step 2: Building the “By Roles” User Interface
到此,我们完成了“从user的角度”的界面,我们再来看“从role的角度”的界面.在后者的界面里我们可以从一来下拉列表里选中一个角色,然后属于该角色的所有用户都会展示在一个GridView里.
在UsersAndRoles.aspx页面里添加另一个DropDownList控件.将其放置在Repeater控件的下面,设其id为RoleList,设其AutoPostBack属性为True,在其下面再添加一个id为RolesUserList的GridView,设其AutoGenerateColumns属性为False,并在Columns collection里添加一个TemplateField,设其HeaderText属性为“Users”.定义该TemplateField的ItemTemplate,在ItemTemplate里放置一个id为UserNameLabel的Label,用数据绑定表达式Container.DataItem来对其Text属性赋值.完成后,你的“从role的角度”界面的声明代码看起来和下面的差不多:
<h3>Manage Users By Role</h3>

<p>

     <b>Select a Role:</b>

     <asp:DropDownList ID="RoleList" runat="server"  AutoPostBack="true"></asp:DropDownList> </p> <p>

     <asp:GridView ID="RolesUserList" runat="server" AutoGenerateColumns="false" EmptyDataText="No users belong to this role.">

          <Columns>

               <asp:TemplateField HeaderText="Users">

                    <ItemTemplate>

                         <asp:Label runat="server" id="UserNameLabel"  Text='<%# Container.DataItem %>'>

                         </asp:Label>

                    </ItemTemplate>

               </asp:TemplateField>

          </Columns>

     </asp:GridView>

</p>
我们需要用系统的所有roles对id为RoleList的DropDownList进行填充.为此,对BindRolesToList方法进行更新,以便用Roles.GetAllRoles方法返回的string array对id为RolesList的DropDownList进行添加(就像我们对id为UsersRoleList的Repeater那样)
private void BindRolesToList()

{

     // Get all of the roles

     string[] roles = Roles.GetAllRoles();

     UsersRoleList.DataSource = roles;

     UsersRoleList.DataBind();

     RoleList.DataSource = roles;

     RoleList.DataBind();

}
在BindRolesToList方法的最后2行,我们用系统的用户对id为RoleList的 DropDownList进行绑定.图5显示的是从浏览器里访问的界面.
Displaying the Users That Belong To the Selected Role
当页面初次加载或从RoleList DropDownList里新选中一个角色时,我们需要在GridView里显示属于该角色的所有用户.为此,创建一个名为DisplayUsersBelongingToRole的新方法,代码如下:
private void DisplayUsersBelongingToRole()

{

    // Get the selected role

   string selectedRoleName = RoleList.SelectedValue;

    // Get the list of usernames that belong to the role

   string[] usersBelongingToRole = Roles.GetUsersInRole(selectedRoleName);

   // Bind the list of users to the GridView

   RolesUserList.DataSource = usersBelongingToRole;

   RolesUserList.DataBind();

}
该方法首先获取RoleList DropDownList里选中的角色,然后通过Roles.GetUsersInRole(roleName)方法返回属于该角色的用户的UserNames,并以一个string array的形式返回,然后再用该array绑定到id为RolesUserList的那个GridView.
同样,在如下2种情况下我们需要调用该方法:当页面初次加载或从RoleList DropDownList里选中的role发生改变时.因此,对Page_Load事件处理器进行改动.将上面创建的那个方法放在CheckRolesForSelectedUser方法后面;另外还要对RoleList的SelectedIndexChanged事件创建一个事件处理器,也要调用该方法,如下:
protected void Page_Load(object sender, EventArgs e)

{

 if (!Page.IsPostBack)

 {

          // Bind the users and roles

          BindUsersToUserList();

          BindRolesToList();

          // Check the selected user's roles

          CheckRolesForSelectedUser();

          // Display those users belonging to the currently selected role

          DisplayUsersBelongingToRole();

     }

}

...


protected void RoleList_SelectedIndexChanged(object sender, EventArgs e)

{

     DisplayUsersBelongingToRole();

}
完成后,RolesUserList GridView就可以将选中的角色所属的用户显示出来.如图6所示,角色Supervisors只包含了2个用户:Bruce 和 Tito.
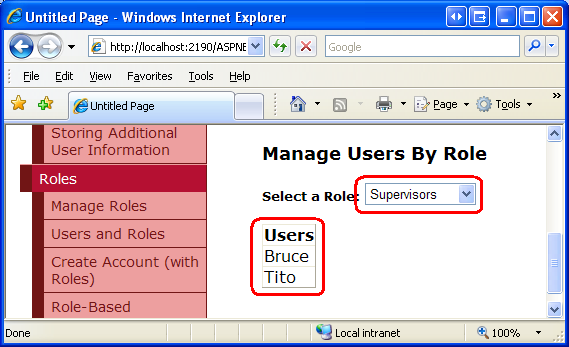 图6
图6
Removing Users from the Selected Role
我们再对RolesUserList GridView进行扩展,使其包含一个“Remove”按钮.当点击该按钮时,对应的用户就会从该角色你删除.
首先向GridView添加一个Delete button field,并放在最左边,将其DeleteText属性从默认的“Delete”改为“Remove”.
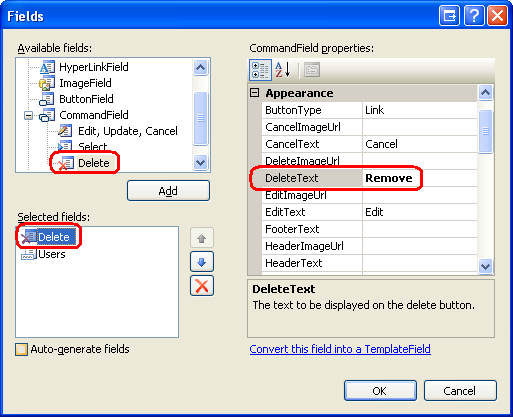 图7
图7
当点击“Remove”按钮时将会产生一个页面回传,并触GridView的RowDeleting event.我们需要为它创建一个事件处理器,写代码将用户从角色里删除,代码如下:
protected void RolesUserList_RowDeleting(object sender, GridViewDeleteEventArgs e)

{

 // Get the selected role

 string selectedRoleName = RoleList.SelectedValue;

  // Reference the UserNameLabel

 Label UserNameLabel = RolesUserList.Rows[e.RowIndex].FindControl("UserNameLabel") as Label;

     // Remove the user from the role

     Roles.RemoveUserFromRole(UserNameLabel.Text, selectedRoleName);


     // Refresh the GridView

     DisplayUsersBelongingToRole();

     // Display a status message

     ActionStatus.Text = string.Format("User {0} was removed from role {1}.", UserNameLabel.Text, selectedRoleName);

}
代码最开始判断所选角色的名字,再引用相应的id为UserNameLabel的Label控件,以获取要进行移除的用户的UserName.然后通过Roles.RemoveUserFromRole方法来将用户从角色里删除.然后对RolesUserList GridView进行刷新,并在ActionStatus Label里展示一条信息. 注意: 在进行删除时,该“Remove” button没有任何的确认信息.我建议你添加一些确认信息.其中最简单的通过客户端的确认对话框.关于该技术的更多信息请参阅文章《Adding Client-Side Confirmation When Deleting》
图8显示的是当将用户Tito从Supervisors角色里删除后的界面
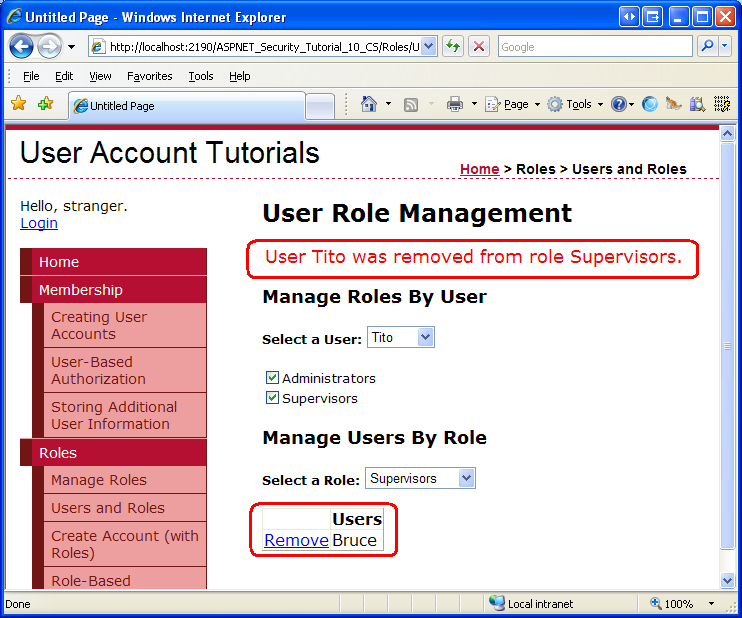
图8
Adding New Users to the Selected Role
除了允许将用户从角色里删除外,我们还应允许将用户添加到角色.如果你的站点只有很少的用户账号,那么你就可以用一个DropDownList控件将用户列出来.如果你的站点的账号很多,你最好允许在界面里查询某个账号,或按某种条件过滤账号.
就本文而言,我们创建一个很简单的界面,不管系列里有多少账号,我们仅仅用一个TextBox控件供键入用户账号,以添加该账号到选定的角色.如果键入的用户账号不存在,或已经属于该角色了,我们就在ActionStatus Label里显示一个信息。如果用户账号存在,但不属于该角色,我们就进行添加并刷新.
在GridView下添加一个TextBox 和 Button.设TextBox的ID为UserNameToAddToRole;再分别设Button的ID 和 Text属性为AddUserToRoleButton 和 “Add User to Role”.
<p>

     <b>UserName:</b>

     <asp:TextBox ID="UserNameToAddToRole" runat="server"></asp:TextBox>

     <br />

     <asp:Button ID="AddUserToRoleButton" runat="server" Text="Add User to Role" />

</p>
接下来为AddUserToRoleButton按钮创建一个Click事件处理器:
protected void AddUserToRoleButton_Click(object sender, EventArgs e)

{

     // Get the selected role and username

     string selectedRoleName = RoleList.SelectedValue;

     string userNameToAddToRole = UserNameToAddToRole.Text;


     // Make sure that a value was entered

     if (userNameToAddToRole.Trim().Length == 0)

     {

          ActionStatus.Text = "You must enter a username in the textbox.";

          return;

     }


     // Make sure that the user exists in the system

     MembershipUser userInfo = Membership.GetUser(userNameToAddToRole);

     if (userInfo == null)

     {

          ActionStatus.Text = string.Format("The user {0} does not exist in the system.", userNameToAddToRole);

          return;

     }


     // Make sure that the user doesn't already belong to this role

     if (Roles.IsUserInRole(userNameToAddToRole, selectedRoleName))

     {

          ActionStatus.Text = string.Format("User {0} already is a member of role {1}.", userNameToAddToRole, selectedRoleName);

          return;

     }

     // If we reach here, we need to add the user to the role

     Roles.AddUserToRole(userNameToAddToRole, selectedRoleName);

     // Clear out the TextBox

     UserNameToAddToRole.Text = string.Empty;

     // Refresh the GridView

     DisplayUsersBelongingToRole();

     // Display a status message

     ActionStatus.Text = string.Format("User {0} was added to role {1}.", userNameToAddToRole, selectedRoleName);

}
上述代码主要完成各种确认检查.它确保在UserNameToAddToRole TextBox里键入的用户账号存在于系统里;确保该账号还未添加到所选的角色里;任何一项检查未通过就显示一个对应的消息,并退出处理.所有检查通过就用Roles.AddUserToRole method将用户添加到所选的角色里.接下来清空TextBox的Text属性,并刷新GridView.并且ActionStatus Label显示一条信息指出该用户已经添加到所选的角色里. 注意:为了探测用户是否属于某个角色,我们用到了Roles.IsUserInRole(userName, roleName) method, 它返回一个布尔值。我们将在下一篇文章里还会使用到该方法.
在浏览器里登陆,从下拉列表里选Supervisors角色。再键入一个非法的账号——你将看到一条信息指出系统不存在该用户

图9
然后再输入一个有效的账号,并添加到角色Supervisors里
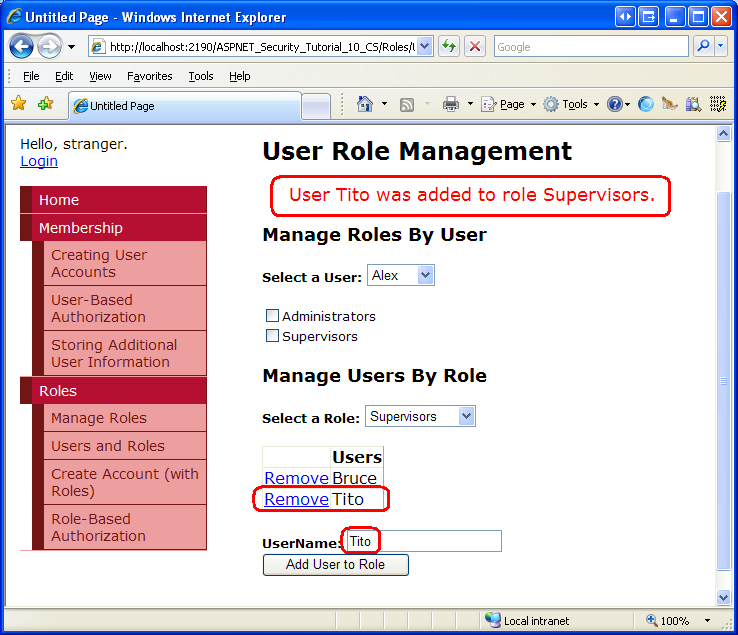
图10
Step 3: Cross-Updating the “By User” and “By Role” Interfaces
当前UsersAndRoles.aspx页面里有2个截然不同的界面来管理users 和 roles.目前这2个界面彼此独立,互不影响。比如,假如我们从RoleList DropDownList里选择Supervisors role,该角色包含的用户包括Bruce 和 Tito;接下来,再从UserList DropDownList里选择Tito,这将使UsersRoleList Repeater里的Administrators 和Supervisors checkboxes处于选中状态.如果我们弃选Supervisor role对应的checkboxes, 那么Tito就会从Supervisor role里剔除,但这并没有影响到“by role”界面.在GridView里,用户Tito依然属于Supervisors role.
为了进行弥补,当选中或弃选UsersRoleList Repeater里的role时,我们要对GridView进行刷新.同理,当在“by role”界面里把一个账号从角色里添加或删除时也要对Repeater进行更新.
对“by user”界面里的Repeater进行刷新是通过调用CheckRolesForSelectedUser方法来实现的.而对“by role”的修改是在RolesUserList GridView的RowDeleting事件处理器以及 AddUserToRoleButton Button的Click事件处理器里进行的.因此,不管怎样,我们都要调用CheckRolesForSelectedUser方法.
protected void RolesUserList_RowDeleting(object sender, GridViewDeleteEventArgs e)

{

     ... Code removed for brevity ...

     // Refresh the "by user" interface

     CheckRolesForSelectedUser();

}


 protected void AddUserToRoleButton_Click(object sender, EventArgs e)

{

     ... Code removed for brevity ...

     // Refresh the "by user" interface

     CheckRolesForSelectedUser();

}
同样的,“by role”界面里的GridView的刷新是通过调用DisplayUsersBelongingToRole method方法来实现的.而对“by user”界面的修改是通过RoleCheckBox_CheckChanged事件处理器来实现的,因此在该事件处理器里调用DisplayUsersBelongingToRole method方法.
protected void RoleCheckBox_CheckChanged(object sender, EventArgs e)

{

     ... Code removed for brevity...

     // Refresh the "by role" interface

     DisplayUsersBelongingToRole();

}
做了上述修改后,“by user” 和 “by role” 界面就可以正确的相互影响了.我们来验证,在浏览器里打开页面,分别从UserList 和 RoleList DropDownLists里选择Tito 和 Supervisors.注意,对用户Tito来说,当在“by user” 界面里弃选 Repeater里的Supervisors角色时,那么,在“by role”界面里Tito就自动的从GridView里移除了. 当我们在“by role”界面里再次将Tito添加到Supervisors role里时,那么在“by user”界面里,Supervisors对应的checkbox就再次处于选中状态.
Step 4: Customizing the CreateUserWizard to Include a “Specify Roles” Step
在《Creating User Accounts》文章里,我们看到了如何使用CreateUserWizard控件来提供一个界面来创建新的用户帐户,比如:
.供访问者创建他们自己的用户帐户 .供管理员创建新的用户帐户
对第一种情况,访问者在CreateUserWizard控件里输入信息以注册帐户;对第二种情况而言,管理员为另一个用户创建帐户.
当管理员创建一个新的帐户后,如果允许管理员为帐户分配角色的话是很有用的.在前面《Storing Additional User Information》里我们看见了如何对CreateUserWizard进行定制以添加一个WizardSteps.在本文,我们看如何为CreateUserWizard添加额外的步骤,以对帐户指定角色.
打开CreateUserWizardWithRoles.aspx页面,并添加一个id为RegisterUserWithRoles的CreateUserWizard控件.设其ContinueDestinationPageUrl属性为“~/Default.aspx”. 由于我们是想让administrator这个角色来使用该CreateUserWizard控件来创建新帐户,因此设其LoginCreatedUser属性为False.该属性默认值为True,作用是以刚创建的那个帐号登录系统.我们将其设为False是因为,当管理员创建新帐户后,我们仍然让管理员以administrator这个角色登录系统.
接下来,在CreateUserWizard的智能标签里选“Add/Remove WizardSteps…”,以添加一个新的WizardStep, 设其ID为SpecifyRolesStep.将该WizardStep放在“Sign Up for Your New Account”这一步之前,“Complete”这一步之后.将该WizardStep的Title属性设为“Specify Roles”, StepType属性设置为Step,AllowReturn属性设为False.
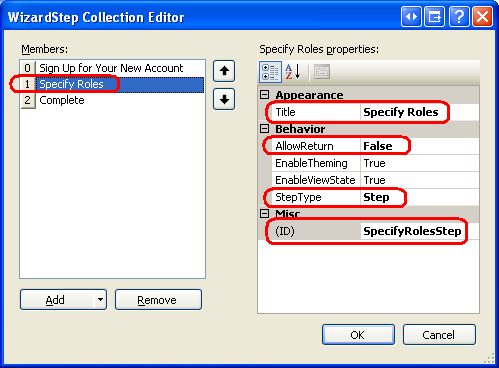 图11
图11
改动后,你的CreateUserWizard的声明代码如下:
<asp:CreateUserWizard ID="RegisterUserWithRoles" runat="server"   ContinueDestinationPageUrl="~/Default.aspx"

LoginCreatedUser="False">

<WizardSteps>

          <asp:CreateUserWizardStep ID="CreateUserWizardStep1" runat="server">

          </asp:CreateUserWizardStep>

          <asp:WizardStep ID="SpecifyRolesStep" runat="server" StepType="Step" Title="Specify Roles" AllowReturn="False">

          </asp:WizardStep>

          <asp:CompleteWizardStep ID="CompleteWizardStep1" runat="server">

          </asp:CompleteWizardStep>

     </WizardSteps>

</asp:CreateUserWizard>
在“Specify Roles” WizardStep里,添加一个id为RoleList的CheckBoxList,列出所有可用的角色,作用是当新添加帐户时,将用户分配给某个角色.
不过我们还有2项工作还没有做.第一,我们要使用RoleList CheckBoxList列出所有的系统角色;第二,当从“Specify Roles” 这一步到“Complete”这一步时,我们要将新帐户分配给某个角色.对一个个问题,我们要可以在Page_Load事件处理器里完成.下面的代码当初次登录页面时,编程引用RoleList CheckBox,并绑定为系统所有的角色.
protected void Page_Load(object sender, EventArgs e)

{

    if (!Page.IsPostBack)

      {

          // Reference the SpecifyRolesStep WizardStep

          WizardStep SpecifyRolesStep = RegisterUserWithRoles.FindControl("SpecifyRolesStep") as WizardStep;

        // Reference the RoleList CheckBoxList

          CheckBoxList RoleList = SpecifyRolesStep.FindControl("RoleList") as CheckBoxList;

          // Bind the set of roles to RoleList

          RoleList.DataSource = Roles.GetAllRoles();

          RoleList.DataBind();

     }

}
起来很眼熟吧?在前面的文章《Storing Additional User Information》里我们在一个自定义的WizardStep里用FindControl语句来引用一个Web控件.上面将roles绑定到CheckBoxList的代码就来自于前面的文章.
为了完成第二个任务,我们必须知道“Specify Roles”这一步在什么时候结束了.记得CreateUserWizard有一个ActiveStepChanged事件,当登录者从一个步骤导航到另一个步骤时就会触发该事件.在此事件里我们可以判断登录者是否达到“Complete”这一步了,如果是的话,我们就需要将用户添加到所选的角色里.为ActiveStepChanged事件创建一个事件处理器,如下:
protected void RegisterUserWithRoles_ActiveStepChanged(object sender, EventArgs e)

{

     // Have we JUST reached the Complete step?

     if (RegisterUserWithRoles.ActiveStep.Title == "Complete")

     {

          // Reference the SpecifyRolesStep WizardStep

          WizardStep SpecifyRolesStep = RegisterUserWithRoles.FindControl("SpecifyRolesStep") as WizardStep;

        // Reference the RoleList CheckBoxList

          CheckBoxList RoleList = SpecifyRolesStep.FindControl("RoleList") as CheckBoxList;

          // Add the checked roles to the just-added user

          foreach (ListItem li in RoleList.Items)

         {

               if (li.Selected)

               Roles.AddUserToRole(RegisterUserWithRoles.UserName, li.Text);

         }

     }

}
如果用户刚好达到“Completed”这一步,那么就遍历RoleList CheckBoxList的items,将用户添加到所选定的角色.
在浏览器里查看,CreateUserWizard的第一步是标准的“Sign Up for Your New Account”步骤,提示用户输入username, password, email等信息,我们来创建一个名为Wanda的用户.
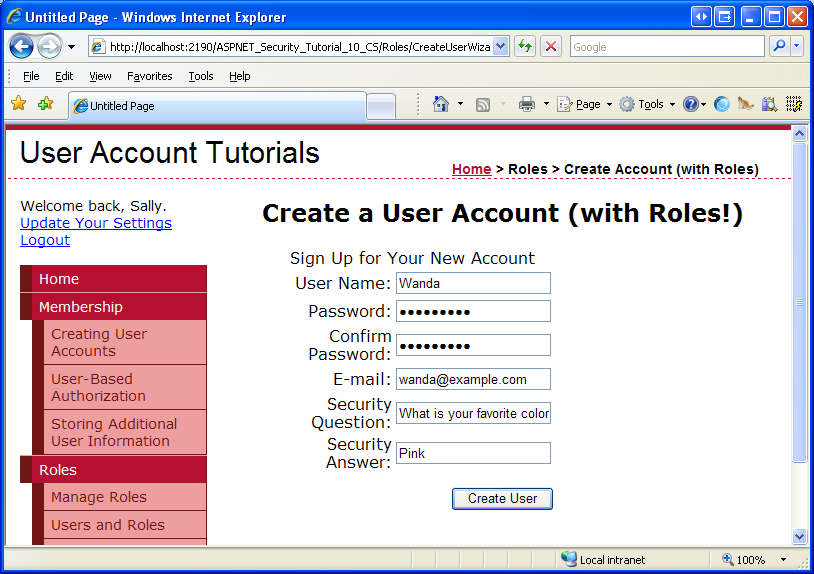 图12
图12
点击“Create User”按钮,CreateUserWizard控件在内部调用 Membership.CreateUser方法以创建新用户帐户,然后跳转到“Specify Roles.”这一步.在这一步里,列出了系统所有的角色信息,选择Supervisors,再点Next.
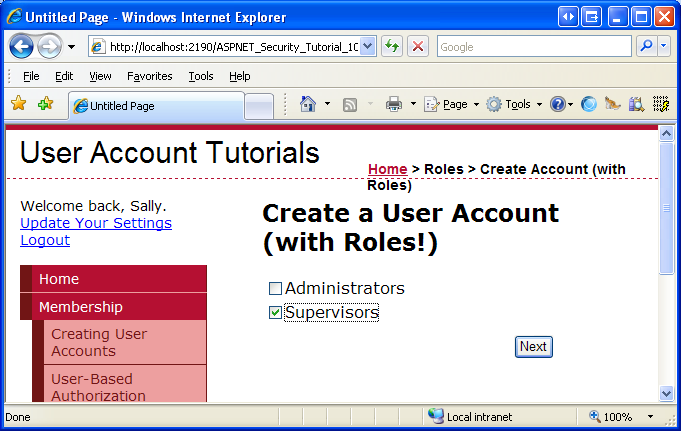 图13
图13
点击Next将触发一个页面回传,导航到“Complete”这一步.在ActiveStepChanged事件处理器里,新创建的用户将分配到Supervisors角色里.我们来验证一下,转到UsersAndRoles.aspx页面,在RoleList下拉列表里选Supervisors.如图14所示,该Supervisors角色包含3个用户:uce, Tito, and Wanda.
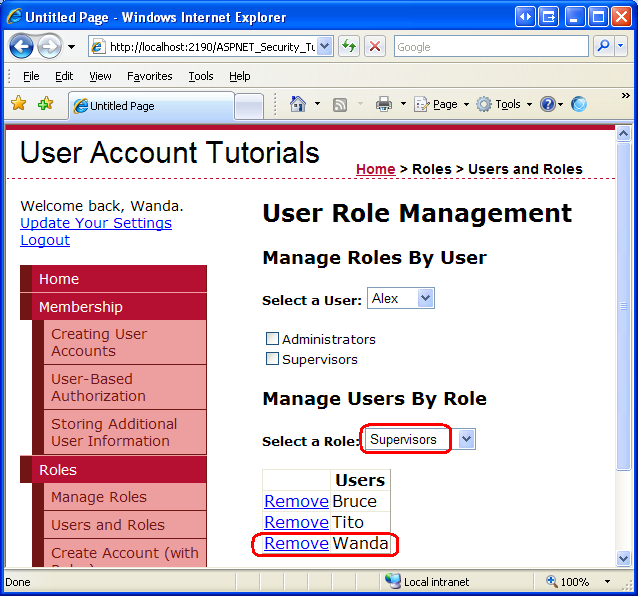 图14
图14
结语: Roles framework提供了多个方法来返回某个用户的具体角色信息,以及某个角色包含了哪些用户帐户.另外,还有其他的方法来将一个或多个用户从一个或多个角色里进行添加或删除操作.就本文而言,我们主要关注2个方法:AddUserToRole 以及 RemoveUserFromRole. 另外,还有其他的方法来添加多个用户到一个角色,以及对一个用户分配多个角色.本文还考察了如何对CreateUserWizard进行扩充,以包含一个WizardStep,以方便对新添加的用户帐户分配角色信息.
此外,我们演示了如何创建和删除角色,以及如何将用户从角色里删除.不过我们开没考察如何引用基于角色的授权。在接下来的文章里我们将看如何基于role-by-role的原则定义URL authorization rules,以及如何根据当前登录用户的角色来限制页面级别的功能.
祝编程快乐!


 822
822

 被折叠的 条评论
为什么被折叠?
被折叠的 条评论
为什么被折叠?
 到【灌水乐园】发言


